
Users Manual - English
Page 3
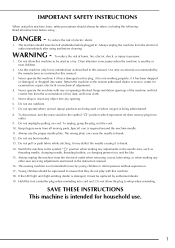
... " " position which represents off, then remove plug from all instructions before cleaning. Never operate this machine. 18. Return the machine to break. 12. Never operate the machine with this machine if it has a damaged cord or plug, if it to the symbol " " position when making... into water. Do not pull or push fabric while stitching. Always unplug the machine from the electrical outlet when removing covers, lubricating, or when making any air openings blocked. This sewing machine is not working properly, if it must be supervised to persons: 1. Young children...
... " " position which represents off, then remove plug from all instructions before cleaning. Never operate this machine. 18. Return the machine to break. 12. Never operate the machine with this machine if it has a damaged cord or plug, if it to the symbol " " position when making... into water. Do not pull or push fabric while stitching. Always unplug the machine from the electrical outlet when removing covers, lubricating, or when making any air openings blocked. This sewing machine is not working properly, if it must be supervised to persons: 1. Young children...
Users Manual - English
Page 5
...: Model Number: Brother Sewing Machine NV2500D/NV2500/NV2800D Complies with Part 15 of the FCC Rules. This equipment generates, uses, and can be used in a particular installation. could void the user's authority to Part 15 of the FCC Rules. Federal Communications Commission (FCC) Declaration of Conformity (For USA Only) Responsible Party: Brother International Corporation 100... the equipment into an outlet on a circuit different from that may cause undesired operation. However, there is encouraged to try to correct the interference by Brother Industries, Ltd.
...: Model Number: Brother Sewing Machine NV2500D/NV2500/NV2800D Complies with Part 15 of the FCC Rules. This equipment generates, uses, and can be used in a particular installation. could void the user's authority to Part 15 of the FCC Rules. Federal Communications Commission (FCC) Declaration of Conformity (For USA Only) Responsible Party: Brother International Corporation 100... the equipment into an outlet on a circuit different from that may cause undesired operation. However, there is encouraged to try to correct the interference by Brother Industries, Ltd.
Users Manual - English
Page 6
... fully enjoy all the features incorporated, we suggest that you study the manual. Be sure to keep your local authorized Brother dealer. Use only neutral soaps or detergents to assure correct installation. For repair or adjustment In the event a malfunction occurs...to turn off the power switch and unplug the cord when: • Operation is the most advanced computerized household embroidery and sewing machine. CONGRATULATIONS ON CHOOSING OUR MACHINE Your machine is completed • Replacing or removing the needle or any assemblies, the presser feet, needle, or other parts to ...
... fully enjoy all the features incorporated, we suggest that you study the manual. Be sure to keep your local authorized Brother dealer. Use only neutral soaps or detergents to assure correct installation. For repair or adjustment In the event a malfunction occurs...to turn off the power switch and unplug the cord when: • Operation is the most advanced computerized household embroidery and sewing machine. CONGRATULATIONS ON CHOOSING OUR MACHINE Your machine is completed • Replacing or removing the needle or any assemblies, the presser feet, needle, or other parts to ...
Users Manual - English
Page 7
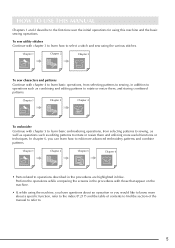
... rotate or resize them , and storing combined patterns. Chapter 1 Chapter 2 Chapter 3 To sew characters and patterns Continue with those that appear on the machine. • If, while using the machine, you can learn basic embroidering operations, from selecting patterns to sewing, in blue. Perform the operations while comparing the screens in the procedures with...
... rotate or resize them , and storing combined patterns. Chapter 1 Chapter 2 Chapter 3 To sew characters and patterns Continue with those that appear on the machine. • If, while using the machine, you can learn basic embroidering operations, from selecting patterns to sewing, in blue. Perform the operations while comparing the screens in the procedures with...
Users Manual - English
Page 8
... Buttonhole Stitches 79 Bar Tacks 84 Button Sewing 86 Eyelets 87 Chapter 1 Getting Ready 15 TURNING THE MACHINE ON/OFF 16 LCD SCREEN 17 Multi-Directional Sewing (Straight Stitch and Zigzag Stitch 88 Zipper Insertion 89 Using the Machine Setting Mode Key 20 Chapter 4 Character/...Data Precautions 110 SELECTING A UTILITY STITCH 50 Saving Stitch Patterns in the Machine's Memory ..... 112 Selecting a Stitch Pattern 51 Saving Stitch Patterns to USB Media Saving Stitch Settings 52 Using the Sewing Type Selection Key 53 (Commercially Available 113 Saving Stitch Patterns to the...
... Buttonhole Stitches 79 Bar Tacks 84 Button Sewing 86 Eyelets 87 Chapter 1 Getting Ready 15 TURNING THE MACHINE ON/OFF 16 LCD SCREEN 17 Multi-Directional Sewing (Straight Stitch and Zigzag Stitch 88 Zipper Insertion 89 Using the Machine Setting Mode Key 20 Chapter 4 Character/...Data Precautions 110 SELECTING A UTILITY STITCH 50 Saving Stitch Patterns in the Machine's Memory ..... 112 Selecting a Stitch Pattern 51 Saving Stitch Patterns to USB Media Saving Stitch Settings 52 Using the Sewing Type Selection Key 53 (Commercially Available 113 Saving Stitch Patterns to the...
Users Manual - English
Page 11
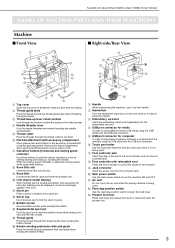
... Use the spool cap to hold the touch pen when it by this spool pin to wind the bobbin thread while sewing or to adjust the sewing speed while using the machine can be viewed and edited, and operations for using utility stitches. c Embroidery card slot Insert the embroidery cards (sold separately...into the USB port connector. e USB port connector for media In order to send patterns from/to import/export patterns between a computer and the machine, plug the USB cable into the USB port connector. k Air vent Do not cover the air vent while the sewing machine is not being used .
... Use the spool cap to hold the touch pen when it by this spool pin to wind the bobbin thread while sewing or to adjust the sewing speed while using the machine can be viewed and edited, and operations for using utility stitches. c Embroidery card slot Insert the embroidery cards (sold separately...into the USB port connector. e USB port connector for media In order to send patterns from/to import/export patterns between a computer and the machine, plug the USB cable into the USB port connector. k Air vent Do not cover the air vent while the sewing machine is not being used .
Users Manual - English
Page 26
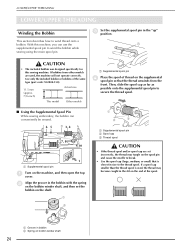
...Bobbin This section describes how to the thread spool. With this sewing machine. a CAUTION • The included bobbin was designed specifically for this machine, you can conveniently be wound. 65 a 3, 4 2 7, 8 9,10 l o 1 a Supplemental spool pin a Turn on the machine, and then open the top cover. Then, slide the ...the supplemental spool pin to wind the bobbin while sewing using the main spool pin. b Align the groove in bobbin b Spring on the end of thread on the supplemental spool pin so that is used , the machine will not operate correctly. Use only the included ...
...Bobbin This section describes how to the thread spool. With this sewing machine. a CAUTION • The included bobbin was designed specifically for this machine, you can conveniently be wound. 65 a 3, 4 2 7, 8 9,10 l o 1 a Supplemental spool pin a Turn on the machine, and then open the top cover. Then, slide the ...the supplemental spool pin to wind the bobbin while sewing using the main spool pin. b Align the groove in bobbin b Spring on the end of thread on the supplemental spool pin so that is used , the machine will not operate correctly. Use only the included ...
Users Manual - English
Page 33
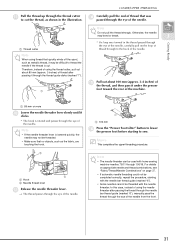
... strongly. a a 100 mm p Press the "Presser Foot Lifter" button to the back of the needle. Note • The needle threader can be threaded with home sewing machine needles 75/11 through the eye of using the thread cutter, pull out about 100 mm (approx. 3-4 inches) of the thread, and then pass it... it under the presser a foot toward the rear of thread that no objects, such as shown in the illustration. n Carefully pull the end of the machine.
... strongly. a a 100 mm p Press the "Presser Foot Lifter" button to the back of the needle. Note • The needle threader can be threaded with home sewing machine needles 75/11 through the eye of using the thread cutter, pull out about 100 mm (approx. 3-4 inches) of the thread, and then pass it... it under the presser a foot toward the rear of thread that no objects, such as shown in the illustration. n Carefully pull the end of the machine.
Users Manual - English
Page 37
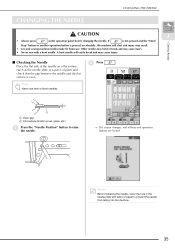
... or break and may result. • Use only sewing machine needles made for home use bent or blunt needles. a b a Even gap b Flat surface (bobbin cover, glass, etc.) a Press the "Needle Position" button to prevent the needle from falling into the machine. 35 If is not pressed and the "Start/ ...Stop" button or another operation button is even. A bent needle will start and injury may cause injury. • Never sew with fabric or paper to raise the needle. → ...
... or break and may result. • Use only sewing machine needles made for home use bent or blunt needles. a b a Even gap b Flat surface (bobbin cover, glass, etc.) a Press the "Needle Position" button to prevent the needle from falling into the machine. 35 If is not pressed and the "Start/ ...Stop" button or another operation button is even. A bent needle will start and injury may cause injury. • Never sew with fabric or paper to raise the needle. → ...
Users Manual - English
Page 39
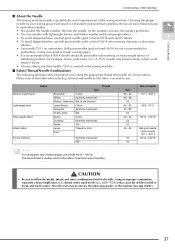
..., use ball point needle (gold colored) 90/14 with a small needle (i.e., 65/9 - 75/11), may bend or break, which could result in injury. • A home sewing machine needle 75/11 is inserted in the table. A 75/11 needle may cause the needle to bend or break, and lead to use. Using an.... Please refer to this table when selecting a thread and needle for the fabric you wish to injury. CHANGING THE NEEDLE ■ About the Needle The sewing machine needle is probably the most important part of needle 75/11 - 90/14 65/9 - 75/11 90/14 - 100/16 Ball point needle (gold colored...
..., use ball point needle (gold colored) 90/14 with a small needle (i.e., 65/9 - 75/11), may bend or break, which could result in injury. • A home sewing machine needle 75/11 is inserted in the table. A 75/11 needle may cause the needle to bend or break, and lead to use. Using an.... Please refer to this table when selecting a thread and needle for the fabric you wish to injury. CHANGING THE NEEDLE ■ About the Needle The sewing machine needle is probably the most important part of needle 75/11 - 90/14 65/9 - 75/11 90/14 - 100/16 Ball point needle (gold colored...

Users Manual - English
Page 45
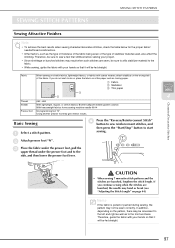
...been sewn, the 2 presser foot will return to its highest position so that the fabric can be placed under the presser foot. Sewing Basics Memo If the fabric cannot be smoothly placed under the presser foot, select the presser foot height higher on the left side .... a Raise the presser foot lever. CAUTION • Do not forcefully push fabrics more than 6 mm (approx. 1/4 inch) thick through the sewing machine. SEWING Sewing Heavyweight Fabric ■ If the Fabric Does Not Fit Under the Presser Foot The presser foot lever can be raised to two different positions.
...been sewn, the 2 presser foot will return to its highest position so that the fabric can be placed under the presser foot. Sewing Basics Memo If the fabric cannot be smoothly placed under the presser foot, select the presser foot height higher on the left side .... a Raise the presser foot lever. CAUTION • Do not forcefully push fabrics more than 6 mm (approx. 1/4 inch) thick through the sewing machine. SEWING Sewing Heavyweight Fabric ■ If the Fabric Does Not Fit Under the Presser Foot The presser foot lever can be raised to two different positions.
Users Manual - English
Page 99
... pattern. a Fabric b Stabilizer a c Thin paper c b 4 Thread Needle Presser foot #50 - #60 With lightweight, regular, or stretch fabrics: Brother ballpoint needle (golden colored) With heavyweight fabrics: home sewing machine needle 90/14 Monogramming foot "N". CAUTION • When sewing 7 mm satin stitch patterns and the stitches are bunched, the needle may bend or break (see "Adjusting...
... pattern. a Fabric b Stabilizer a c Thin paper c b 4 Thread Needle Presser foot #50 - #60 With lightweight, regular, or stretch fabrics: Brother ballpoint needle (golden colored) With heavyweight fabrics: home sewing machine needle 90/14 Monogramming foot "N". CAUTION • When sewing 7 mm satin stitch patterns and the stitches are bunched, the needle may bend or break (see "Adjusting...
Users Manual - English
Page 116
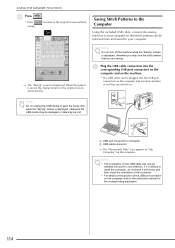
...for the corresponding equipment. 114 to return to the original screen without Saving Stitch Patterns to the Computer Using the included USB cable, connect the sewing machine to the instruction manual for computer b USB cable connector → The "Removable Disk" icon appears in one direction. a Plug the USB ...cable connectors into a port in "My Computer" on the machine. * The USB cable can only be lost. If it is difficult to insert the connector, do not insert it with force, and then check ...
...for the corresponding equipment. 114 to return to the original screen without Saving Stitch Patterns to the Computer Using the included USB cable, connect the sewing machine to the instruction manual for computer b USB cable connector → The "Removable Disk" icon appears in one direction. a Plug the USB ...cable connectors into a port in "My Computer" on the machine. * The USB cable can only be lost. If it is difficult to insert the connector, do not insert it with force, and then check ...
Users Manual - English
Page 122
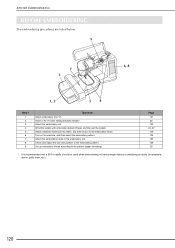
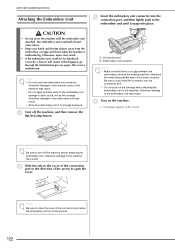
...; Page 121 35 122 24, 27 129 124 133 139 29 * It is recommended that a 90/14 needle should be used when embroidering on the machine, and then select the embroidery pattern. Attach the embroidery frame to the embroidery unit. Insert a 75/11 home sewing machine needle.* Attach the embroidery unit.
...; Page 121 35 122 24, 27 129 124 133 139 29 * It is recommended that a 90/14 needle should be used when embroidering on the machine, and then select the embroidery pattern. Attach the embroidery frame to the embroidery unit. Insert a 75/11 home sewing machine needle.* Attach the embroidery unit.
Users Manual - English
Page 124
... to the embroidery unit may result. • If the embroidery unit could fall off the machine before attaching the embroidery unit, otherwise damage to the machine may result. This is no gap between the embroidery unit and the sewing machine, otherwise the embroidery pattern may result. • Store the embroidery unit in its storage...
... to the embroidery unit may result. • If the embroidery unit could fall off the machine before attaching the embroidery unit, otherwise damage to the machine may result. This is no gap between the embroidery unit and the sewing machine, otherwise the embroidery pattern may result. • Store the embroidery unit in its storage...
Users Manual - English
Page 155
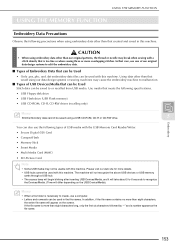
... using a USB CD-ROM, CD-R or CD-RW drive. 5 Embroidery You can also use the following precautions when using our data design systems or sewing machines may cause the embroidery machine to malfunction. ■ Types of our original data design systems to or recalled from USB media. The... followed by "~" and a number appear as the file name. 153 If the file name is too fine or when sewing three or more details. • USB hubs cannot be used with this machine. CAUTION • When using embroidery data other than eight characters, the entire file name will take about 5 to 6...
... using a USB CD-ROM, CD-R or CD-RW drive. 5 Embroidery You can also use the following precautions when using our data design systems or sewing machines may cause the embroidery machine to malfunction. ■ Types of our original data design systems to or recalled from USB media. The... followed by "~" and a number appear as the file name. 153 If the file name is too fine or when sewing three or more details. • USB hubs cannot be used with this machine. CAUTION • When using embroidery data other than eight characters, the entire file name will take about 5 to 6...
Users Manual - English
Page 159
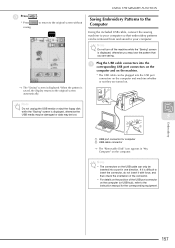
...(or USB hub), refer to your computer. a Plug the USB cable connectors into the corresponding USB port connectors on the computer and on the machine. * The USB cable can be retrieved from and saved to the instruction manual for computer b USB cable connector → The "Removable Disk...to the original screen without Saving Embroidery Patterns to the Computer Using the included USB cable, connect the sewing machine to the original screen a automatically. Note Do not turn off the machine while the "Saving" screen is displayed, otherwise the USB media may be damaged or data may lose...
...(or USB hub), refer to your computer. a Plug the USB cable connectors into the corresponding USB port connectors on the computer and on the machine. * The USB cable can be retrieved from and saved to the instruction manual for computer b USB cable connector → The "Removable Disk...to the original screen without Saving Embroidery Patterns to the Computer Using the included USB cable, connect the sewing machine to the original screen a automatically. Note Do not turn off the machine while the "Saving" screen is displayed, otherwise the USB media may be damaged or data may lose...
Users Manual - English
Page 200
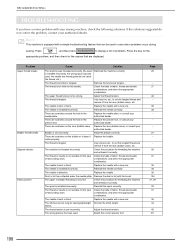
...scratches around the hole in the presser foot. Adjust the thread tension. Memo This machine is tangled. Replace the needle with the brush. The thread is equipped with your sewing machine, check the following solutions. Reinstall the needle correctly. The thread or needle is incorrect...on the race (bobbin case). The needle is installed incorrectly, the wrong spool cap was threaded incorrectly (the spool Rethread the machine correctly. is bent or blunt. Replace the needle plate, or consult your authorized dealer. Replace the presser foot, or consult ...
...scratches around the hole in the presser foot. Adjust the thread tension. Memo This machine is tangled. Replace the needle with the brush. The thread is equipped with your sewing machine, check the following solutions. Reinstall the needle correctly. The thread or needle is incorrect...on the race (bobbin case). The needle is installed incorrectly, the wrong spool cap was threaded incorrectly (the spool Rethread the machine correctly. is bent or blunt. Replace the needle plate, or consult your authorized dealer. Replace the presser foot, or consult ...
Users Manual - English
Page 209
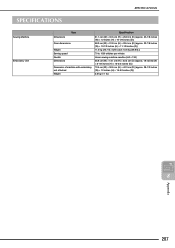
SPECIFICATIONS SPECIFICATIONS Sewing Machine Embroidery Unit Dimensions Item Case dimensions Weight Sewing speed Needle Dimensions Dimension of machine with embroidery unit attached Weight Specification 51.1 cm (W) × 30.5 cm (H) × 25.8 cm (D) (approx. 20-1/8 inches (W) × 12...inches (W) × 12-1/2 inches (H) × 11-1/8 inches (D)) 11.2 kg (24.7 lb.) (with case: 13.5 kg (29.8 lb.)) 70 to 1000 stitches per minute Home sewing machine needles (HA × 130) 45.8 cm (W) × 13.1 cm (H) × 42.3 cm (D) (approx. 18 inches (W) × 5-1/8 inches (H) × 16-3/4 ...
SPECIFICATIONS SPECIFICATIONS Sewing Machine Embroidery Unit Dimensions Item Case dimensions Weight Sewing speed Needle Dimensions Dimension of machine with embroidery unit attached Weight Specification 51.1 cm (W) × 30.5 cm (H) × 25.8 cm (D) (approx. 20-1/8 inches (W) × 12...inches (W) × 12-1/2 inches (H) × 11-1/8 inches (D)) 11.2 kg (24.7 lb.) (with case: 13.5 kg (29.8 lb.)) 70 to 1000 stitches per minute Home sewing machine needles (HA × 130) 45.8 cm (W) × 13.1 cm (H) × 42.3 cm (D) (approx. 18 inches (W) × 5-1/8 inches (H) × 16-3/4 ...
Users Manual - English
Page 210
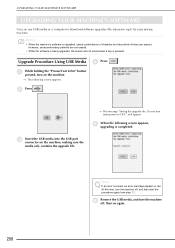
..., the buzzer will appear. e When the following screen appears. c Insert the USB media into the USB port connector on the machine. → The following screen appears, upgrading is upgraded, saved combinations of character and decorative stitches are not erased. • While...software upgrades (file extension .up1) for your sewing machine. • Memo • When the machine's software is completed. At this time, turn the machine off , and then start the procedure again from step a. UPGRADING YOUR MACHINE'S SOFTWARE UPGRADING YOUR MACHINE'S SOFTWARE You can use USB media or a...
..., the buzzer will appear. e When the following screen appears. c Insert the USB media into the USB port connector on the machine. → The following screen appears, upgrading is upgraded, saved combinations of character and decorative stitches are not erased. • While...software upgrades (file extension .up1) for your sewing machine. • Memo • When the machine's software is completed. At this time, turn the machine off , and then start the procedure again from step a. UPGRADING YOUR MACHINE'S SOFTWARE UPGRADING YOUR MACHINE'S SOFTWARE You can use USB media or a...


