
Users Manual - English
Page 3
...presser foot, and the like. 15. To unplug, grasp the plug, not the cord. 10. Do not pull or push fabric while stitching. This sewing machine is not working properly, if it is not intended for examination, repair, electrical or mechanical adjustment. 4. Do not allow this manual. 3. To reduce ...or plug, if it has been dropped or damaged, or dropped into any object into water. Do not use as contained in this machine only for household use by young children or infirm persons without supervision. 17. Do not allow the plug to break. 14. Always unplug the...
...presser foot, and the like. 15. To unplug, grasp the plug, not the cord. 10. Do not pull or push fabric while stitching. This sewing machine is not working properly, if it is not intended for examination, repair, electrical or mechanical adjustment. 4. Do not allow this manual. 3. To reduce ...or plug, if it has been dropped or damaged, or dropped into any object into water. Do not use as contained in this machine only for household use by young children or infirm persons without supervision. 17. Do not allow the plug to break. 14. Always unplug the...
Users Manual - English
Page 5
... is con- Federal Communications Commission (FCC) Declaration of Conformity (For USA Only) Responsible Party: Brother International Corporation 100 Somerset Corporate Boulevard Bridgewater, NJ 08807-0911 USA TEL : (908) 704-1700 declares that the product Product Name: Model Number: Brother Sewing Machine NV2500D/NV2500/NV2800D Complies with the limits for help. • The included interface cable...
... is con- Federal Communications Commission (FCC) Declaration of Conformity (For USA Only) Responsible Party: Brother International Corporation 100 Somerset Corporate Boulevard Bridgewater, NJ 08807-0911 USA TEL : (908) 704-1700 declares that the product Product Name: Model Number: Brother Sewing Machine NV2500D/NV2500/NV2800D Complies with the limits for help. • The included interface cable...
Users Manual - English
Page 6
... web site at www.brother.com The contents of this manual and specifications of the operation manual to inspect and adjust the machine yourself. For repair or adjustment In the event a malfunction occurs or adjustment is the most advanced computerized household embroidery and sewing machine. PLEASE READ BEFORE USING THIS MACHINE For safe operation 1. Do...
... web site at www.brother.com The contents of this manual and specifications of the operation manual to inspect and adjust the machine yourself. For repair or adjustment In the event a malfunction occurs or adjustment is the most advanced computerized household embroidery and sewing machine. PLEASE READ BEFORE USING THIS MACHINE For safe operation 1. Do...
Users Manual - English
Page 7
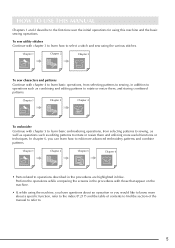
... Continue with chapter 3 to learn basic operations, from selecting patterns to sewing, as well as operations such as combining and editing patterns to select a stitch and sew using this machine and the basic sewing operations. Chapter 1 Chapter 2 Chapter 5 Chapter 6 • Parts related...blue. Chapter 1 Chapter 2 Chapter 3 To sew characters and patterns Continue with those that appear on the machine. • If, while using the machine, you can learn basic embroidering operations, from selecting patterns to sewing, in addition to operations such as editing patterns...
... Continue with chapter 3 to learn basic operations, from selecting patterns to sewing, as well as operations such as combining and editing patterns to select a stitch and sew using this machine and the basic sewing operations. Chapter 1 Chapter 2 Chapter 5 Chapter 6 • Parts related...blue. Chapter 1 Chapter 2 Chapter 3 To sew characters and patterns Continue with those that appear on the machine. • If, while using the machine, you can learn basic embroidering operations, from selecting patterns to sewing, in addition to operations such as editing patterns...
Users Manual - English
Page 8
... Buttonhole Stitches 79 Bar Tacks 84 Button Sewing 86 Eyelets 87 Chapter 1 Getting Ready 15 TURNING THE MACHINE ON/OFF 16 LCD SCREEN 17 Multi-Directional Sewing (Straight Stitch and Zigzag Stitch 88 Zipper Insertion 89 Using the Machine Setting Mode Key 20 Chapter 4 Character/...Data Precautions 110 SELECTING A UTILITY STITCH 50 Saving Stitch Patterns in the Machine's Memory ..... 112 Selecting a Stitch Pattern 51 Saving Stitch Patterns to USB Media Saving Stitch Settings 52 Using the Sewing Type Selection Key 53 (Commercially Available 113 Saving Stitch Patterns to the...
... Buttonhole Stitches 79 Bar Tacks 84 Button Sewing 86 Eyelets 87 Chapter 1 Getting Ready 15 TURNING THE MACHINE ON/OFF 16 LCD SCREEN 17 Multi-Directional Sewing (Straight Stitch and Zigzag Stitch 88 Zipper Insertion 89 Using the Machine Setting Mode Key 20 Chapter 4 Character/...Data Precautions 110 SELECTING A UTILITY STITCH 50 Saving Stitch Patterns in the Machine's Memory ..... 112 Selecting a Stitch Pattern 51 Saving Stitch Patterns to USB Media Saving Stitch Settings 52 Using the Sewing Type Selection Key 53 (Commercially Available 113 Saving Stitch Patterns to the...
Users Manual - English
Page 11
...cord Press the foot controller to check the position of the machine. g Operation buttons (5 buttons) and sewing speed controller Use these buttons to raise or lower the needle. k Air vent Do not cover the air vent while the sewing machine is not being used . b Handwheel Turn the handwheel toward... you to sew one stitch or to perform various operations, such as sleeve cuffs. e USB port connector for using utility ...
...cord Press the foot controller to check the position of the machine. g Operation buttons (5 buttons) and sewing speed controller Use these buttons to raise or lower the needle. k Air vent Do not cover the air vent while the sewing machine is not being used . b Handwheel Turn the handwheel toward... you to sew one stitch or to perform various operations, such as sleeve cuffs. e USB port connector for using utility ...
Users Manual - English
Page 26
...than the thread spool is closest in bobbin b Spring on the supplemental spool pin so that is used , the machine will not operate correctly. a Groove in size to the thread spool. With this sewing machine. b Align the groove in the bobbin with the spring on the bobbin winder shaft, and then set incorrectly... pin to break. • Use the spool cap (large, medium, or small) that the thread unwinds from other models are set the bobbin on the machine, and then open the top cover. Use only the included bobbin or bobbins of the same type (part code: X52800-150). 11.5 mm (approx. ...
...than the thread spool is closest in bobbin b Spring on the supplemental spool pin so that is used , the machine will not operate correctly. a Groove in size to the thread spool. With this sewing machine. b Align the groove in the bobbin with the spring on the bobbin winder shaft, and then set incorrectly... pin to break. • Use the spool cap (large, medium, or small) that the thread unwinds from other models are set the bobbin on the machine, and then open the top cover. Use only the included bobbin or bobbins of the same type (part code: X52800-150). 11.5 mm (approx. ...
Users Manual - English
Page 33
... the thread through the eye of the needle. a 80 mm or more l Lower the needle threader lever slowly until it may be used with home sewing machine needles 75/11 through 100/16. a a 100 mm p Press the "Presser Foot Lifter" button to lower the presser foot before starting with the .... n Carefully pull the end of thread that quickly winds off the spool, such as shown in the thread passed through the eye of the machine. Note • If the needle threader lever is rotated and passes through the eye of using thread that was formed in the illustration. In ...
... the thread through the eye of the needle. a 80 mm or more l Lower the needle threader lever slowly until it may be used with home sewing machine needles 75/11 through 100/16. a a 100 mm p Press the "Presser Foot Lifter" button to lower the presser foot before starting with the .... n Carefully pull the end of thread that quickly winds off the spool, such as shown in the thread passed through the eye of the machine. Note • If the needle threader lever is rotated and passes through the eye of using thread that was formed in the illustration. In ...
Users Manual - English
Page 37
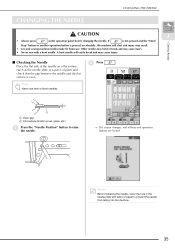
...of glass) and check that the gap between the needle and the flat surface is pressed accidentally, the machine will easily break and may cause injury. • Never sew with fabric or paper to raise the needle. → The screen changes, and all keys and operation...cover, glass, etc.) a Press the "Needle Position" button to prevent the needle from falling into the machine. 35 A bent needle will start and injury may result. • Use only sewing machine needles made for home use bent or blunt needles. CHANGING THE NEEDLE CHANGING THE NEEDLE Getting Ready CAUTION ...
...of glass) and check that the gap between the needle and the flat surface is pressed accidentally, the machine will easily break and may cause injury. • Never sew with fabric or paper to raise the needle. → The screen changes, and all keys and operation...cover, glass, etc.) a Press the "Needle Position" button to prevent the needle from falling into the machine. 35 A bent needle will start and injury may result. • Use only sewing machine needles made for home use bent or blunt needles. CHANGING THE NEEDLE CHANGING THE NEEDLE Getting Ready CAUTION ...
Users Manual - English
Page 39
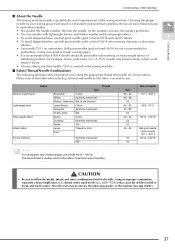
... 60 - 80 60 - 80 50 30 - 50 50 50 50 - 60 30 30 Size of the sewing machine. CHANGING THE NEEDLE ■ About the Needle The sewing machine needle is inserted in the sewing machine. ■ Fabric/Thread/Needle Combinations The following table provides information concerning the appropriate thread and needle for your...finish and fewer problems. Below are not recommended for embroidery, as they may bend or break, which could result in injury. • A home sewing machine needle 75/11 is probably the most important part of needle 75/11 - 90/14 65/9 - 75/11 90/14 - 100/16 Ball point...
... 60 - 80 60 - 80 50 30 - 50 50 50 50 - 60 30 30 Size of the sewing machine. CHANGING THE NEEDLE ■ About the Needle The sewing machine needle is inserted in the sewing machine. ■ Fabric/Thread/Needle Combinations The following table provides information concerning the appropriate thread and needle for your...finish and fewer problems. Below are not recommended for embroidery, as they may bend or break, which could result in injury. • A home sewing machine needle 75/11 is probably the most important part of needle 75/11 - 90/14 65/9 - 75/11 90/14 - 100/16 Ball point...

Users Manual - English
Page 45
...spot has been sewn, the 2 presser foot will return to make sewing easier. Gently tear off the paper or the stabilizer after sewing. CAUTION • Do not forcefully push fabrics more than 6 mm (approx. 1/4 inch) thick through the sewing machine. If the fabric is raised. ■ If the Fabric Does ...Not Feed If the fabric does not feed when starting to two different positions. Sewing Basics Memo If the fabric cannot be smoothly placed under the presser foot...
...spot has been sewn, the 2 presser foot will return to make sewing easier. Gently tear off the paper or the stabilizer after sewing. CAUTION • Do not forcefully push fabrics more than 6 mm (approx. 1/4 inch) thick through the sewing machine. If the fabric is raised. ■ If the Fabric Does ...Not Feed If the fabric does not feed when starting to two different positions. Sewing Basics Memo If the fabric cannot be smoothly placed under the presser foot...
Users Manual - English
Page 99
...b Stabilizer a c Thin paper c b 4 Thread Needle Presser foot #50 - #60 With lightweight, regular, or stretch fabrics: Brother ballpoint needle (golden colored) With heavyweight fabrics: home sewing machine needle 90/14 Monogramming foot "N". Using another presser foot may bend or break (see "Adjusting the Stitch Length" on the wrong...Other factors, such as the type or thickness of the fabric being sewn or the type of the fabric. If you continue sewing when the stitches are bunched, lengthen the stitch length. In addition, depending on the pattern, there may not be movement to ...
...b Stabilizer a c Thin paper c b 4 Thread Needle Presser foot #50 - #60 With lightweight, regular, or stretch fabrics: Brother ballpoint needle (golden colored) With heavyweight fabrics: home sewing machine needle 90/14 Monogramming foot "N". Using another presser foot may bend or break (see "Adjusting the Stitch Length" on the wrong...Other factors, such as the type or thickness of the fabric being sewn or the type of the fabric. If you continue sewing when the stitches are bunched, lengthen the stitch length. In addition, depending on the pattern, there may not be movement to ...
Users Manual - English
Page 116
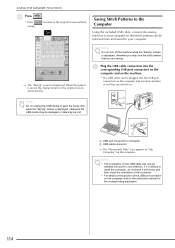
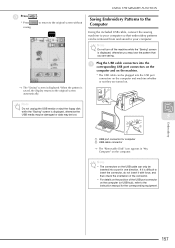
... the pattern is displayed. to return to the original screen without Saving Stitch Patterns to the Computer Using the included USB cable, connect the sewing machine to your computer. → The "Saving" screen is saved, the display returns to the instruction manual for computer b USB cable connector... → The "Removable Disk" icon appears in "My Computer" on the machine. * The USB cable can be inserted into a port in one direction. Note • The connectors on the USB cable can be lost....
... the pattern is displayed. to return to the original screen without Saving Stitch Patterns to the Computer Using the included USB cable, connect the sewing machine to your computer. → The "Saving" screen is saved, the display returns to the instruction manual for computer b USB cable connector... → The "Removable Disk" icon appears in "My Computer" on the machine. * The USB cable can be inserted into a port in one direction. Note • The connectors on the USB cable can be lost....
Users Manual - English
Page 122
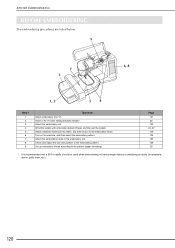
.... Page 121 35 122 24, 27 129 124 133 139 29 * It is recommended that a 90/14 needle should be used when embroidering on the machine, and then select the embroidery pattern. BEFORE EMBROIDERING BEFORE EMBROIDERING The embroidering procedures are listed below. 9 6, 8 7 3 1, 2 54 Step # 1 2 3 4 5 6 7 8 9 Operation... (for example; Wind the bobbin with embroidery bobbin thread, and then set the bobbin. Insert a 75/11 home sewing machine needle.* Attach the embroidery unit. Set up embroidery thread according to the pattern (upper threading). denim, puffy foam, etc.). 120
.... Page 121 35 122 24, 27 129 124 133 139 29 * It is recommended that a 90/14 needle should be used when embroidering on the machine, and then select the embroidery pattern. BEFORE EMBROIDERING BEFORE EMBROIDERING The embroidering procedures are listed below. 9 6, 8 7 3 1, 2 54 Step # 1 2 3 4 5 6 7 8 9 Operation... (for example; Wind the bobbin with embroidery bobbin thread, and then set the bobbin. Insert a 75/11 home sewing machine needle.* Attach the embroidery unit. Set up embroidery thread according to the pattern (upper threading). denim, puffy foam, etc.). 120
Users Manual - English
Page 124
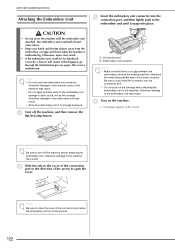
... screen. Be sure to fully insert the connector into place. Note Be sure to turn off the machine, and then remove the flat-bed attachment. This is no gap between the embroidery unit and the sewing machine, otherwise the embroidery pattern may not be initialized correctly, a buzzer will sound. a b a Connection port b Embroidery unit...
... screen. Be sure to fully insert the connector into place. Note Be sure to turn off the machine, and then remove the flat-bed attachment. This is no gap between the embroidery unit and the sewing machine, otherwise the embroidery pattern may not be initialized correctly, a buzzer will sound. a b a Connection port b Embroidery unit...
Users Manual - English
Page 155
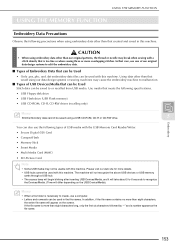
... be Used • Only .pes,.phc, and .dst embroidery data files can be used with this machine. In that case, use the following precautions when using our data design systems or sewing machines may cause the embroidery machine to or recalled from USB media. Using data other than eight characters, the entire file name...
... be Used • Only .pes,.phc, and .dst embroidery data files can be used with this machine. In that case, use the following precautions when using our data design systems or sewing machines may cause the embroidery machine to or recalled from USB media. Using data other than eight characters, the entire file name...
Users Manual - English
Page 159
to return to the original screen without Saving Embroidery Patterns to the Computer Using the included USB cable, connect the sewing machine to your computer. When the pattern is displayed. b Note Do not unplug the USB media or eject the floppy disk while the "Saving" ... screen is saved, the display returns to the original screen a automatically. USING THE MEMORY FUNCTION c Press * Press saving. . Note Do not turn off the machine while the "Saving" screen is difficult to insert the connector, do not insert it with force, and then check the orientation of the connector. •...
to return to the original screen without Saving Embroidery Patterns to the Computer Using the included USB cable, connect the sewing machine to your computer. When the pattern is displayed. b Note Do not unplug the USB media or eject the floppy disk while the "Saving" ... screen is saved, the display returns to the original screen a automatically. USING THE MEMORY FUNCTION c Press * Press saving. . Note Do not turn off the machine while the "Saving" screen is difficult to insert the connector, do not insert it with force, and then check the orientation of the connector. •...
Users Manual - English
Page 200
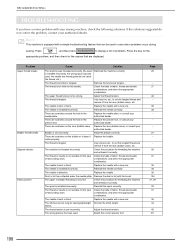
... with the brush. TROUBLESHOOTING TROUBLESHOOTING If you have a minor problem with a new one. The needle is tangled. Replace the needle with your sewing machine, check the following solutions. Page 29 − 37 45 − 35 35 27 − − 29 37 35 35 35 194... your authorized dealer. The thread is bent or blunt. Check the procedure for the needle. The needle is installed incorrectly. Memo This machine is incorrect. Adjust the thread tension. Use scissors, etc., to display a list of fabric, thread and needle combinations, and select ...
... with the brush. TROUBLESHOOTING TROUBLESHOOTING If you have a minor problem with a new one. The needle is tangled. Replace the needle with your sewing machine, check the following solutions. Page 29 − 37 45 − 35 35 27 − − 29 37 35 35 35 194... your authorized dealer. The thread is bent or blunt. Check the procedure for the needle. The needle is installed incorrectly. Memo This machine is incorrect. Adjust the thread tension. Use scissors, etc., to display a list of fabric, thread and needle combinations, and select ...
Users Manual - English
Page 209
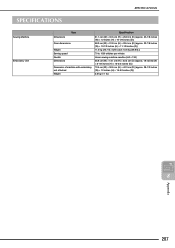
SPECIFICATIONS SPECIFICATIONS Sewing Machine Embroidery Unit Dimensions Item Case dimensions Weight Sewing speed Needle Dimensions Dimension of machine with embroidery unit attached Weight Specification 51.1 cm (W) × 30.5 cm (H) × 25.8 cm (D) (approx. 20-1/8 inches (W) × 12...inches (W) × 12-1/2 inches (H) × 11-1/8 inches (D)) 11.2 kg (24.7 lb.) (with case: 13.5 kg (29.8 lb.)) 70 to 1000 stitches per minute Home sewing machine needles (HA × 130) 45.8 cm (W) × 13.1 cm (H) × 42.3 cm (D) (approx. 18 inches (W) × 5-1/8 inches (H) × 16-3/4 ...
SPECIFICATIONS SPECIFICATIONS Sewing Machine Embroidery Unit Dimensions Item Case dimensions Weight Sewing speed Needle Dimensions Dimension of machine with embroidery unit attached Weight Specification 51.1 cm (W) × 30.5 cm (H) × 25.8 cm (D) (approx. 20-1/8 inches (W) × 12...inches (W) × 12-1/2 inches (H) × 11-1/8 inches (D)) 11.2 kg (24.7 lb.) (with case: 13.5 kg (29.8 lb.)) 70 to 1000 stitches per minute Home sewing machine needles (HA × 130) 45.8 cm (W) × 13.1 cm (H) × 42.3 cm (D) (approx. 18 inches (W) × 5-1/8 inches (H) × 16-3/4 ...
Users Manual - English
Page 210
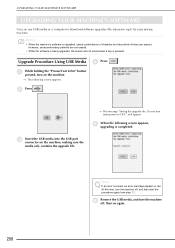
... error occurred, an error message appears in red. At this time, turn main power to download software upgrades (file extension .up1) for your sewing machine. • Memo • When the machine's software is upgraded, saved combinations of character and decorative stitches are not erased. • While the software is completed. b Press . → The...
... error occurred, an error message appears in red. At this time, turn main power to download software upgrades (file extension .up1) for your sewing machine. • Memo • When the machine's software is upgraded, saved combinations of character and decorative stitches are not erased. • While the software is completed. b Press . → The...


