
Users Manual - English
Page 6
...of this product are subject to turn off the power switch and unplug the cord when: • Operation is the most advanced computerized household embroidery and sewing machine. If the problem persists, please consult your eye on the foot controller. 4. Be sure to assure correct installation. Do not... touch the handwheel, thread take-up lever, needle, or other parts to keep your local authorized Brother dealer. Do not drop or hit the machine. 4. Do not store anything on the needle while sewing. Plug the machine directly into the wall....
...of this product are subject to turn off the power switch and unplug the cord when: • Operation is the most advanced computerized household embroidery and sewing machine. If the problem persists, please consult your eye on the foot controller. 4. Be sure to assure correct installation. Do not... touch the handwheel, thread take-up lever, needle, or other parts to keep your local authorized Brother dealer. Do not drop or hit the machine. 4. Do not store anything on the needle while sewing. Plug the machine directly into the wall....
Users Manual - English
Page 7
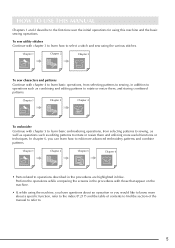
... sew utility stitches Continue with chapter 4 to learn how to sewing, in blue. HOW TO USE THIS MANUAL Chapters 1 and 2 describe to edit more advanced embroidery patterns and combine patterns. Chapter 1 Chapter 2 Chapter 3 To sew characters and patterns Continue with chapter 3 to learn basic operations, from selecting patterns to sewing, as...
... sew utility stitches Continue with chapter 4 to learn how to sewing, in blue. HOW TO USE THIS MANUAL Chapters 1 and 2 describe to edit more advanced embroidery patterns and combine patterns. Chapter 1 Chapter 2 Chapter 3 To sew characters and patterns Continue with chapter 3 to learn basic operations, from selecting patterns to sewing, as...
Users Manual - English
Page 8
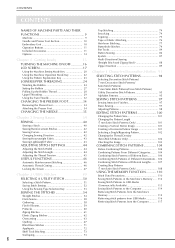
CONTENTS CONTENTS NAMES OF MACHINE PARTS AND THEIR FUNCTIONS 9 Machine 9 Needle and Presser Foot Section 10 Embroidery Unit 10 Operation Buttons 11 Included Accessories 11 Options 14 Top Stitching 74 Smocking 74 Fagoting 75 Tape or Elastic Attaching 76 Heirloom Stitching 77 ...
CONTENTS CONTENTS NAMES OF MACHINE PARTS AND THEIR FUNCTIONS 9 Machine 9 Needle and Presser Foot Section 10 Embroidery Unit 10 Operation Buttons 11 Included Accessories 11 Options 14 Top Stitching 74 Smocking 74 Fagoting 75 Tape or Elastic Attaching 76 Heirloom Stitching 77 ...
Users Manual - English
Page 9
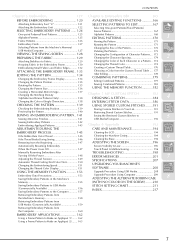
...One-point Patterns/Floral Patterns 125 Alphabet Patterns 125 Alphabet Patterns 168 EDITING PATTERNS 170 1 Frame Patterns 126 Moving the Pattern 171 Embroidery Cards 127 Selecting Patterns from the Machine's Memory/ Rotating the Pattern 171 Changing the Size of the Pattern 172 USB Media/...Out of Thread 145 If the Thread Breaks During Sewing 146 Restarting from the Beginning 147 Automatically Resuming Embroidery When the Power Goes Off 147 Manually Resuming Embroidery After Turning Off the Power 148 Adjusting the Thread Tension 149 Automatic Thread Cutting (End Color Trim ...
...One-point Patterns/Floral Patterns 125 Alphabet Patterns 125 Alphabet Patterns 168 EDITING PATTERNS 170 1 Frame Patterns 126 Moving the Pattern 171 Embroidery Cards 127 Selecting Patterns from the Machine's Memory/ Rotating the Pattern 171 Changing the Size of the Pattern 172 USB Media/...Out of Thread 145 If the Thread Breaks During Sewing 146 Restarting from the Beginning 147 Automatically Resuming Embroidery When the Power Goes Off 147 Manually Resuming Embroidery After Turning Off the Power 148 Adjusting the Thread Tension 149 Automatic Thread Cutting (End Color Trim ...
Users Manual - English
Page 11
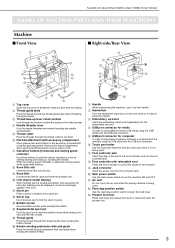
... needle. c Thread take -up lever check window Look through the thread cutter to perform various operations, such as sleeve cuffs. c Embroidery card slot Insert the embroidery cards (sold separately) into the USB port connector. e USB port connector for computer In order to hold the spool in place....f Touch pen holder Use the touch pen holder to import/export patterns between a computer and the machine, plug the USB cable into the embroidery card slot. b Thread guide plate Pass the thread around the thread guide plate when threading the upper thread. d Needle threader lever Use...
... needle. c Thread take -up lever check window Look through the thread cutter to perform various operations, such as sleeve cuffs. c Embroidery card slot Insert the embroidery cards (sold separately) into the USB port connector. e USB port connector for computer In order to hold the spool in place....f Touch pen holder Use the touch pen holder to import/export patterns between a computer and the machine, plug the USB cable into the embroidery card slot. b Thread guide plate Pass the thread around the thread guide plate when threading the upper thread. d Needle threader lever Use...

Users Manual - English
Page 12
... the needle in place. j Needle clamp screw Use the needle clamp screw to the presser foot holder. b Release button (located under the embroidery unit) Press the release button to clean the bobbin case and race. e Feed dogs The feed dogs feed the fabric in place. g ...Needle plate cover Remove the needle plate cover to remove the embroidery unit. d Embroidery frame holder Attach the embroidery frame to the embroidery frame holder to secure the embroidery frame. e Frame-securing lever Press down the frame-securing lever to hold the frame in place....
... the needle in place. j Needle clamp screw Use the needle clamp screw to the presser foot holder. b Release button (located under the embroidery unit) Press the release button to clean the bobbin case and race. e Feed dogs The feed dogs feed the fabric in place. g ...Needle plate cover Remove the needle plate cover to remove the embroidery unit. d Embroidery frame holder Attach the embroidery frame to the embroidery frame holder to secure the embroidery frame. e Frame-securing lever Press down the frame-securing lever to hold the frame in place....
Users Manual - English
Page 13
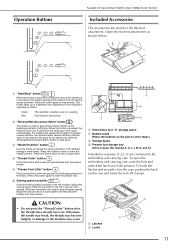
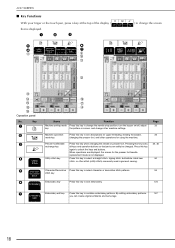
... cut. b b a a a Latches b Locks 11 This button lights up in the same spot, then stops automatically. To open the embroidery unit carrying case, raise the lock and unlock the latch out of stitching. Press this button to automatically trim the excess thread. CAUTION •...on the machine's operating condition. Operation Buttons NAMES OF MACHINE PARTS AND THEIR FUNCTIONS Included Accessories The accessories are contained in the embroidery unit carrying case. Press this button is held down. The machine cannot sew. f Sewing speed controller Slide the sewing speed ...
... cut. b b a a a Latches b Locks 11 This button lights up in the same spot, then stops automatically. To open the embroidery unit carrying case, raise the lock and unlock the latch out of stitching. Press this button to automatically trim the excess thread. CAUTION •...on the machine's operating condition. Operation Buttons NAMES OF MACHINE PARTS AND THEIR FUNCTIONS Included Accessories The accessories are contained in the embroidery unit carrying case. Press this button is held down. The machine cannot sew. f Sewing speed controller Slide the sewing speed ...
Users Manual - English
Page 15
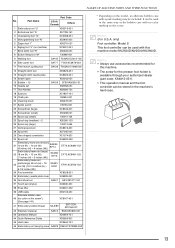
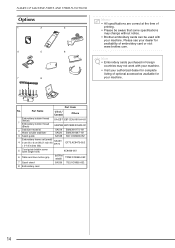
...X81164-001 BM3:XE0806-001 43 Operation Manual XD0954-151 44 Quick Reference Guide XD0956-051 45 Hard case XC9640-151 46 Embroidery unit carrying case SA529 D6EUC:XC9862-052 * Depending on the screw. Memo • Always use accessories recommended for the ... included. It can be used with a pink marking may be used in the machine's hard case. 13 Memo (For U.S.A. Part Name U.S.A./ Canada Others 1 Embroidery foot "U" XD0313-051 2 Buttonhole foot "A" X57789-151 3 Overcasting foot "G" XC3098-051 4 Monogramming foot "N" X53840-351 5 Zipper foot "I" X59370-051 6 ...
...X81164-001 BM3:XE0806-001 43 Operation Manual XD0954-151 44 Quick Reference Guide XD0956-051 45 Hard case XC9640-151 46 Embroidery unit carrying case SA529 D6EUC:XC9862-052 * Depending on the screw. Memo • Always use accessories recommended for the ... included. It can be used with a pink marking may be used in the machine's hard case. 13 Memo (For U.S.A. Part Name U.S.A./ Canada Others 1 Embroidery foot "U" XD0313-051 2 Buttonhole foot "A" X57789-151 3 Overcasting foot "G" XC3098-051 4 Monogramming foot "N" X53840-351 5 Zipper foot "I" X59370-051 6 ...
Users Manual - English
Page 16
... motion grip SATFM 4000D TFM2:XC8645-052 7 Spool stand SA539 TS2:XC9655-052 8 Embroidery card 14 Part Name U.S.A./ Canada Others Embroidery bobbin thread 1 (White) Embroidery bobbin thread (Black) SA-EBT EBT-CEN:X81164-001 SAEBT999 EBT-CEBN:XC5520-001 ...EF73 × 2-1/2 inches (W)) EF73:XC8479-052 5 Cord guide bobbin cover (with your machine. Note • Embroidery cards purchased in foreign countries may change without notice. • Brother embroidery cards can be aware that some specifications may not work with your machine. • Visit your authorized dealer for...
... motion grip SATFM 4000D TFM2:XC8645-052 7 Spool stand SA539 TS2:XC9655-052 8 Embroidery card 14 Part Name U.S.A./ Canada Others Embroidery bobbin thread 1 (White) Embroidery bobbin thread (Black) SA-EBT EBT-CEN:X81164-001 SAEBT999 EBT-CEBN:XC5520-001 ...EF73 × 2-1/2 inches (W)) EF73:XC8479-052 5 Cord guide bobbin cover (with your machine. Note • Embroidery cards purchased in foreign countries may change without notice. • Brother embroidery cards can be aware that some specifications may not work with your machine. • Visit your authorized dealer for...
Users Manual - English
Page 20
... screen l m n o p s Operation panel No. Key a b c d e f r q t Name Machine setting mode key Function Press this key to combine embroidery patterns. Press this key to see descriptions for upper threading, winding the bobbin, 22 mode key changing the presser foot, and other operations for the... 34, 35 50 Character/Decorative Press this key to select character or decorative stitch patterns. 94 stitch key Embroidery key Press this key to sew embroidery. 124 Embroidery edit key Press this key again to select a straight stitch, zigzag stitch, buttonhole, blind hem stitch,...
... screen l m n o p s Operation panel No. Key a b c d e f r q t Name Machine setting mode key Function Press this key to combine embroidery patterns. Press this key to see descriptions for upper threading, winding the bobbin, 22 mode key changing the presser foot, and other operations for the... 34, 35 50 Character/Decorative Press this key to select character or decorative stitch patterns. 94 stitch key Embroidery key Press this key to sew embroidery. 124 Embroidery edit key Press this key again to select a straight stitch, zigzag stitch, buttonhole, blind hem stitch,...

Users Manual - English
Page 22
...Using the Machine Setting Mode Key Press to display the next page. b Adjust the thread tension for normal sewing. c Adjust the height of embroidery patterns. c Select the thread brand available when selecting a thread color number in the raised or lowered position when the machine is installed. * ... speed controller or to display the next page. d Select the units (mm/inch) for the thread color display in the embroidery screen (see page 43). b Select whether the thread color name, thread color number or sewing time appears for displaying distances and the sizes ...
...Using the Machine Setting Mode Key Press to display the next page. b Adjust the thread tension for normal sewing. c Adjust the height of embroidery patterns. c Select the thread brand available when selecting a thread color number in the raised or lowered position when the machine is installed. * ... speed controller or to display the next page. d Select the units (mm/inch) for the thread color display in the embroidery screen (see page 43). b Select whether the thread color name, thread color number or sewing time appears for displaying distances and the sizes ...
Users Manual - English
Page 23
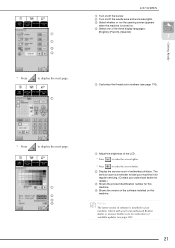
a b c d a Adjust the brightness of embroidery stitches. Memo The latest version of software is installed in for regular servicing. (Contact your authorized dealer for details.) c Shows the product identification number for ... work area lights. b Display the service count of the LCD. * Press to make the screen lighter. * Press to take your machine in your local authorized Brother dealer or at www.brother.com for this machine. d Select one of the software installed on . Check with your machine.
a b c d a Adjust the brightness of embroidery stitches. Memo The latest version of software is installed in for regular servicing. (Contact your authorized dealer for details.) c Shows the product identification number for ... work area lights. b Display the service count of the LCD. * Press to make the screen lighter. * Press to take your machine in your local authorized Brother dealer or at www.brother.com for this machine. d Select one of the software installed on . Check with your machine.
Users Manual - English
Page 24
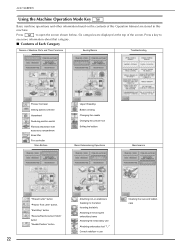
... Using the Machine Operation Mode Key Basic machine operations and other information based on stabilizers (backing) to the fabric Inserting the fabric Attaching & removing the embroidery frame Attaching the embroidery unit Attaching embroidery foot "U" Correct stabilizer to use Cleaning the race and bobbin case Press to open the screen shown below.
... Using the Machine Operation Mode Key Basic machine operations and other information based on stabilizers (backing) to the fabric Inserting the fabric Attaching & removing the embroidery frame Attaching the embroidery unit Attaching embroidery foot "U" Correct stabilizer to use Cleaning the race and bobbin case Press to open the screen shown below.
Users Manual - English
Page 26
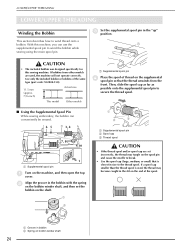
.../UPPER THREADING LOWER/UPPER THREADING Winding the Bobbin This section describes how to secure the thread spool. ■ Using the Supplemental Spool Pin While sewing embroidery, the bobbin can use the supplemental spool pin to the thread spool. a CAUTION • The included bobbin was designed specifically for this machine, you can...
.../UPPER THREADING LOWER/UPPER THREADING Winding the Bobbin This section describes how to secure the thread spool. ■ Using the Supplemental Spool Pin While sewing embroidery, the bobbin can use the supplemental spool pin to the thread spool. a CAUTION • The included bobbin was designed specifically for this machine, you can...
Users Manual - English
Page 39
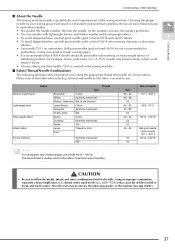
...Also, the seam may be used for your sewing project will result in a beautiful finish and fewer problems. Below are not recommended for embroidery, as they may bend or break, which could result in injury. • A home sewing machine needle 75/11 is usually used ... combinations listed in the sewing machine. ■ Fabric/Thread/Needle Combinations The following table provides information concerning the appropriate thread and needle for embroidery. Choosing the proper needle for the bobbin thread and upper threading. A 75/11 needle may bend or break, causing injury. •...
...Also, the seam may be used for your sewing project will result in a beautiful finish and fewer problems. Below are not recommended for embroidery, as they may bend or break, which could result in injury. • A home sewing machine needle 75/11 is usually used ... combinations listed in the sewing machine. ■ Fabric/Thread/Needle Combinations The following table provides information concerning the appropriate thread and needle for embroidery. Choosing the proper needle for the bobbin thread and upper threading. A 75/11 needle may bend or break, causing injury. •...

Users Manual - English
Page 45
... the black button on the left side of presser foot "J". Sewing Lightweight Fabric Iron the fabric with starch or place thin paper or tear away embroidery stabilizer under the presser foot, select the presser foot height higher on the setting screen (see page 20).
... the black button on the left side of presser foot "J". Sewing Lightweight Fabric Iron the fabric with starch or place thin paper or tear away embroidery stabilizer under the presser foot, select the presser foot height higher on the setting screen (see page 20).
Users Manual - English
Page 48
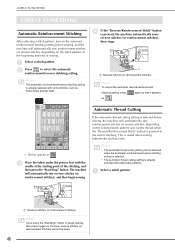
... setting is selected. • The automatic thread cutting setting is already selected with some stitches, such as . c Place the fabric under the presser foot with embroidery patterns. This is pressed, the machine automatically sews reverse stitches (or reinforcement stitches), then stops. USEFUL FUNCTIONS USEFUL FUNCTIONS Automatic Reinforcement Stitching After selecting a stitch...
... setting is selected. • The automatic thread cutting setting is already selected with some stitches, such as . c Place the fabric under the presser foot with embroidery patterns. This is pressed, the machine automatically sews reverse stitches (or reinforcement stitches), then stops. USEFUL FUNCTIONS USEFUL FUNCTIONS Automatic Reinforcement Stitching After selecting a stitch...
Users Manual - English
Page 58
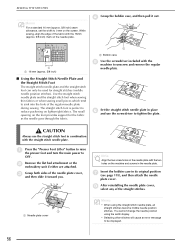
... CAUTION Always use the screwdriver to be used for the fabric as the needle goes through the fabric. b Remove the flat bed attachment or the embroidery unit if either are attached. f Set the straight stitch needle plate in place and use the straight stitch foot in its original position (see page...
... CAUTION Always use the screwdriver to be used for the fabric as the needle goes through the fabric. b Remove the flat bed attachment or the embroidery unit if either are attached. f Set the straight stitch needle plate in place and use the straight stitch foot in its original position (see page...

Users Manual - English
Page 84
...). Add together the diameter and thickness of the button, and then set at the front of the presser foot, and then temporarily tie them. * Use #5 embroidery thread or lace yarn for the gimp thread. ■ Buttons That Do Not Fit into the Button Holder Plate Use the markings on the presser...
...). Add together the diameter and thickness of the button, and then set at the front of the presser foot, and then temporarily tie them. * Use #5 embroidery thread or lace yarn for the gimp thread. ■ Buttons That Do Not Fit into the Button Holder Plate Use the markings on the presser...
Users Manual - English
Page 112
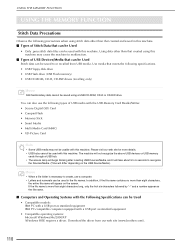
...specifications. • USB Floppy disk drive • USB Flash drive (USB Flash memory) • USB CD-ROM, CD-R, CD-RW drives (recalling only) Memo Stitch/embroidery data cannot be saved using this machine may not be usable with this machine. In addition, if the file name contains no more than eight... lamp will begin blinking after inserting USB Devices/Media, and it will take about 5 to 6 seconds to or recalled from our web site (www.brother.com)). 110 If the file name is necessary to create, use the following types of USB media with the USB Memory Card Reader/Writer. •...
...specifications. • USB Floppy disk drive • USB Flash drive (USB Flash memory) • USB CD-ROM, CD-R, CD-RW drives (recalling only) Memo Stitch/embroidery data cannot be saved using this machine may not be usable with this machine. In addition, if the file name contains no more than eight... lamp will begin blinking after inserting USB Devices/Media, and it will take about 5 to 6 seconds to or recalled from our web site (www.brother.com)). 110 If the file name is necessary to create, use the following types of USB media with the USB Memory Card Reader/Writer. •...


