
Users Manual - English
Page 1
.... Keep the CD-ROM in the box. Please visit our web site at http://solutions.brother.com where you need to. Brother Laser Printer HL-5130 HL-5140 HL-5150D HL-5170DN User's Guide For visually-impaired users You can read this manual with Screen Reader 'text-to-speech' software. You can get answers to set up...
.... Keep the CD-ROM in the box. Please visit our web site at http://solutions.brother.com where you need to. Brother Laser Printer HL-5130 HL-5140 HL-5150D HL-5170DN User's Guide For visually-impaired users You can read this manual with Screen Reader 'text-to-speech' software. You can get answers to set up...
Users Manual - English
Page 4
... in the United States and other countries. III Apple, the Apple Logo and Macintosh® are subject to the publication. ©2004 Brother Industries Ltd. The contents of this manual and the specifications of International Business Machines Corporation. Epson is a registered trademark and FX-80 and FX-850 are registered trademarks of this...
... in the United States and other countries. III Apple, the Apple Logo and Macintosh® are subject to the publication. ©2004 Brother Industries Ltd. The contents of this manual and the specifications of International Business Machines Corporation. Epson is a registered trademark and FX-80 and FX-850 are registered trademarks of this...

Users Manual - English
Page 5
...33 Printing on transparencies from the paper tray 1-33 Printing on transparencies from the manual feed tray (For HL-5130 and HL-5140) ........ 1-36 Printing on transparencies from the MP tray (For HL-5150D and HL-5170DN 1-39 Duplex Printing ...1-43 Guidelines for printing on both sides of the...Printing on both sides of the paper (manual duplex printing 1-43 Manual duplex printing from the paper tray 1-43 Manual duplex printing from the manual feed tray (For HL-5130 and HL-5140 1-44 Manual duplex printing from the multi-purpose tray (For HL-5150D and HL-5170DN) .... 1-45 Printing on both ...
...33 Printing on transparencies from the paper tray 1-33 Printing on transparencies from the manual feed tray (For HL-5130 and HL-5140) ........ 1-36 Printing on transparencies from the MP tray (For HL-5150D and HL-5170DN 1-39 Duplex Printing ...1-43 Guidelines for printing on both sides of the...Printing on both sides of the paper (manual duplex printing 1-43 Manual duplex printing from the paper tray 1-43 Manual duplex printing from the manual feed tray (For HL-5130 and HL-5140 1-44 Manual duplex printing from the multi-purpose tray (For HL-5150D and HL-5170DN) .... 1-45 Printing on both ...
Users Manual - English
Page 9
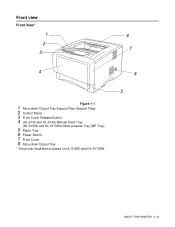
Front view Front View* 1 8 2 7 3 4 Figure 1-1 1 Face-down Output Tray Support Flap (Support Flap) 2 Control Panel 3 Front Cover Release Button 4 (HL-5130 and HL-5140) Manual Feed Tray (HL-5150D and HL-5170DN) Multi-purpose Tray (MP Tray) 5 Paper Tray 6 Power Switch 7 Front Cover 8 Face-down Output Tray * The printer illustration is based on HL-5150D and HL-5170DN. 6 5 ABOUT THIS PRINTER 1 - 2
Front view Front View* 1 8 2 7 3 4 Figure 1-1 1 Face-down Output Tray Support Flap (Support Flap) 2 Control Panel 3 Front Cover Release Button 4 (HL-5130 and HL-5140) Manual Feed Tray (HL-5150D and HL-5170DN) Multi-purpose Tray (MP Tray) 5 Paper Tray 6 Power Switch 7 Front Cover 8 Face-down Output Tray * The printer illustration is based on HL-5150D and HL-5170DN. 6 5 ABOUT THIS PRINTER 1 - 2
Users Manual - English
Page 12
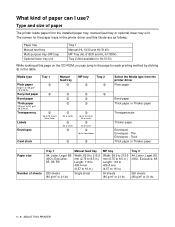
... 2 L L L L L L Up to 10 sheets A4 or Letter L A4 or Letter L Up to 3 envelopes Card stock L L Select the Media type from the installed paper tray, manual feed tray or optional lower tray unit. The names for the paper trays in the printer driver and this Guide are as follows: Paper tray... Manual feed tray Multi-purpose tray (MP tray) Optional lower tray unit Tray 1 Manual (HL-5130 and HL-5140) MP Tray (HL-5150D and HL-5170DN) Tray 2 (Not available for HL-5130) While looking at this page on the CD-ROM, you can I...
... 2 L L L L L L Up to 10 sheets A4 or Letter L A4 or Letter L Up to 3 envelopes Card stock L L Select the Media type from the installed paper tray, manual feed tray or optional lower tray unit. The names for the paper trays in the printer driver and this Guide are as follows: Paper tray... Manual feed tray Multi-purpose tray (MP tray) Optional lower tray unit Tray 1 Manual (HL-5130 and HL-5140) MP Tray (HL-5150D and HL-5170DN) Tray 2 (Not available for HL-5130) While looking at this page on the CD-ROM, you can I...
Users Manual - English
Page 15
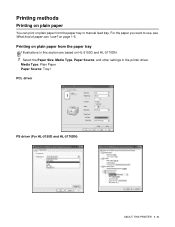
Printing on plain paper from the paper tray or manual feed tray. For the paper you want to use ? Media Type: Plain Paper Paper Source: Tray1 PCL driver PS driver (For HL-5150D and HL-5170DN) ABOUT THIS PRINTER 1 - 8 on page 1-5. Printing methods Printing on plain paper You can I use , see What kind of paper can print on plain paper from the paper tray Illustrations in this section are based on HL-5150D and HL-5170DN. 1 Select the Paper Size, Media Type, Paper Source, and other settings in the printer driver.
Printing on plain paper from the paper tray or manual feed tray. For the paper you want to use ? Media Type: Plain Paper Paper Source: Tray1 PCL driver PS driver (For HL-5150D and HL-5170DN) ABOUT THIS PRINTER 1 - 8 on page 1-5. Printing methods Printing on plain paper You can I use , see What kind of paper can print on plain paper from the paper tray Illustrations in this section are based on HL-5150D and HL-5170DN. 1 Select the Paper Size, Media Type, Paper Source, and other settings in the printer driver.
Users Manual - English
Page 19
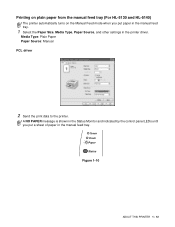
Toner Drum Paper Status Figure 1-10 ABOUT THIS PRINTER 1 - 12 A NO PAPER message is shown in the Status Monitor and indicated by the control panel LEDs until you put a sheet of paper in the printer driver. Printing on plain paper from the manual feed tray (For HL-5130 and HL-5140) The printer automatically turns on the Manual Feed mode when you put paper in the manual feed tray. 1 Select the Paper Size, Media Type, Paper Source, and other settings in the manual feed tray. Media Type: Plain Paper Paper Source: Manual PCL driver 2 Send the print data to the printer.
Toner Drum Paper Status Figure 1-10 ABOUT THIS PRINTER 1 - 12 A NO PAPER message is shown in the Status Monitor and indicated by the control panel LEDs until you put a sheet of paper in the printer driver. Printing on plain paper from the manual feed tray (For HL-5130 and HL-5140) The printer automatically turns on the Manual Feed mode when you put paper in the manual feed tray. 1 Select the Paper Size, Media Type, Paper Source, and other settings in the manual feed tray. Media Type: Plain Paper Paper Source: Manual PCL driver 2 Send the print data to the printer.
Users Manual - English
Page 20
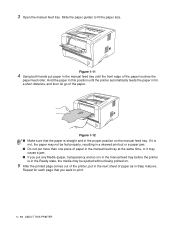
Hold the paper in this position until the printer automatically feeds the paper in for each page that the paper is in the manual feed tray until the front edge of the paper. Repeat for a short distance, and then let go of the paper touches the paper feed roller. ...Figure 1-12 ■ Make sure that you put any Media (paper, transparency and so on) in the manual feed tray before the printer is straight and in the proper position on . 5 After the printed page comes out of the printer, put paper in...
Hold the paper in this position until the printer automatically feeds the paper in for each page that the paper is in the manual feed tray until the front edge of the paper. Repeat for a short distance, and then let go of the paper touches the paper feed roller. ...Figure 1-12 ■ Make sure that you put any Media (paper, transparency and so on) in the manual feed tray before the printer is straight and in the proper position on . 5 After the printed page comes out of the printer, put paper in...

Users Manual - English
Page 24
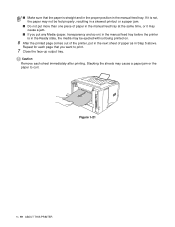
...of paper can I use? Media Type: Thick paper or Thicker paper Paper Source: Manual PCL driver 2 Open the face-up output tray is pulled down, the printer has a straight paper path from the manual feed tray (For HL-5130 and HL-5140) 1 Select the Paper Size, Media Type, Paper Source, and other settings ...in the printer driver. Printing on thicker paper and card stock from the manual feed tray or the MP tray through to print on...
...of paper can I use? Media Type: Thick paper or Thicker paper Paper Source: Manual PCL driver 2 Open the face-up output tray is pulled down, the printer has a straight paper path from the manual feed tray (For HL-5130 and HL-5140) 1 Select the Paper Size, Media Type, Paper Source, and other settings ...in the printer driver. Printing on thicker paper and card stock from the manual feed tray or the MP tray through to print on...

Users Manual - English
Page 25
Slide the paper guides to the printer. Figure 1-19 5 Using both hands put a sheet of paper in the manual feed tray. A NO PAPER status is shown by the control panel LEDs until the front edge of the paper. Figure 1-20 ABOUT THIS PRINTER 1 - 18 Toner Drum Paper Status Figure 1-18 4 Open the manual feed tray. 3 Send the print data to fit the paper size. Hold the paper in this position until the printer automatically feeds the paper in the manual feed tray until you put the paper in for a short distance, and then let go of the paper touches the paper feed roller.
Slide the paper guides to the printer. Figure 1-19 5 Using both hands put a sheet of paper in the manual feed tray. A NO PAPER status is shown by the control panel LEDs until the front edge of the paper. Figure 1-20 ABOUT THIS PRINTER 1 - 18 Toner Drum Paper Status Figure 1-18 4 Open the manual feed tray. 3 Send the print data to fit the paper size. Hold the paper in this position until the printer automatically feeds the paper in the manual feed tray until you put the paper in for a short distance, and then let go of the paper touches the paper feed roller.
Users Manual - English
Page 26
.... 6 After the printed page comes out of the printer, put more than one piece of paper in the manual feed tray at the same time, or it is not, the paper may cause a paper jam or the paper...paper jam. ■ Do not put in the next sheet of paper as in the manual feed tray. Repeat for each sheet immediately after printing. Stacking the sheets may not be ejected without being printed ...on ) in the manual feed tray before the printer is straight and in the proper position in Step 5 above. Figure 1-21...
.... 6 After the printed page comes out of the printer, put more than one piece of paper in the manual feed tray at the same time, or it is not, the paper may cause a paper jam or the paper...paper jam. ■ Do not put in the next sheet of paper as in the manual feed tray. Repeat for each sheet immediately after printing. Stacking the sheets may not be ejected without being printed ...on ) in the manual feed tray before the printer is straight and in the proper position in Step 5 above. Figure 1-21...

Users Manual - English
Page 32
The printer automatically turns on envelopes from the manual feed tray (For HL-5130 and HL-5140) The printer has a straight paper path from the manual feed tray to print envelopes. Figure 1-29 1 - 25 ABOUT THIS PRINTER Use this paper feed and output method when you put paper in the manual feed tray. 1 Select the Paper Size, Media Type, Paper Source, and other settings in the printer driver. Media Type: Envelopes Paper Source: Manual PCL driver 2 Open the face-up output tray. Printing on the Manual Feed mode when you want to the back of the printer.
The printer automatically turns on envelopes from the manual feed tray (For HL-5130 and HL-5140) The printer has a straight paper path from the manual feed tray to print envelopes. Figure 1-29 1 - 25 ABOUT THIS PRINTER Use this paper feed and output method when you put paper in the manual feed tray. 1 Select the Paper Size, Media Type, Paper Source, and other settings in the printer driver. Media Type: Envelopes Paper Source: Manual PCL driver 2 Open the face-up output tray. Printing on the Manual Feed mode when you want to the back of the printer.

Users Manual - English
Page 33
Toner Drum Paper Status Figure 1-30 4 Open the manual feed tray. A NO PAPER status is shown by the control panel LEDs until you put a sheet of paper in the manual feed tray. Slide the paper guides to the printer. 3 Send the print data to fit the envelope size. Figure 1-31 ABOUT THIS PRINTER 1 - 26
Toner Drum Paper Status Figure 1-30 4 Open the manual feed tray. A NO PAPER status is shown by the control panel LEDs until you put a sheet of paper in the manual feed tray. Slide the paper guides to the printer. 3 Send the print data to fit the envelope size. Figure 1-31 ABOUT THIS PRINTER 1 - 26

Users Manual - English
Page 34
... face-up output tray to reset the two blue tabs back to their original position. Figure 1-32 5 Using both hands put the envelope in the manual feed tray until the printer automatically feeds it in the figure below). Envelopes that have been creased after they have finished printing your envelopes, close...
... face-up output tray to reset the two blue tabs back to their original position. Figure 1-32 5 Using both hands put the envelope in the manual feed tray until the printer automatically feeds it in the figure below). Envelopes that have been creased after they have finished printing your envelopes, close...
Users Manual - English
Page 35
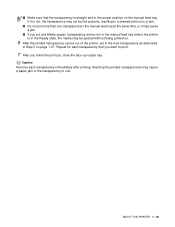
Repeat Step 5 for each envelope you want to be printed face up. ■ If you put any Media (paper, transparency and so on) in the manual feed tray before the printer is not, the envelope may be ejected without being printed on. 6 After the printed envelope comes out of the printer, ... folded without wrinkles or creases. ■ Make sure the envelope is straight as you insert it may cause a jam. ■ Put the envelope in the manual feed tray with the side to print. 7 After you put more than one envelope in the...
Repeat Step 5 for each envelope you want to be printed face up. ■ If you put any Media (paper, transparency and so on) in the manual feed tray before the printer is not, the envelope may be ejected without being printed on. 6 After the printed envelope comes out of the printer, ... folded without wrinkles or creases. ■ Make sure the envelope is straight as you insert it may cause a jam. ■ Put the envelope in the manual feed tray with the side to print. 7 After you put more than one envelope in the...
Users Manual - English
Page 40
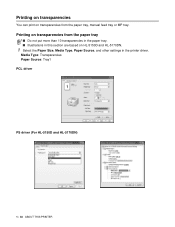
Printing on HL-5150D and HL-5170DN. 1 Select the Paper Size, Media Type, Paper Source, and other settings in the printer driver. Media Type: Transparencies Paper Source: Tray1 PCL driver PS driver (For HL-5150D and HL-5170DN) 1 - 33 ABOUT THIS PRINTER Printing on transparencies You can print on transparencies from the paper tray ■ Do not put more than 10 transparencies in the paper tray. ■ Illustrations in this section are based on transparencies from the paper tray, manual feed tray or MP tray.
Printing on HL-5150D and HL-5170DN. 1 Select the Paper Size, Media Type, Paper Source, and other settings in the printer driver. Media Type: Transparencies Paper Source: Tray1 PCL driver PS driver (For HL-5150D and HL-5170DN) 1 - 33 ABOUT THIS PRINTER Printing on transparencies You can print on transparencies from the paper tray ■ Do not put more than 10 transparencies in the paper tray. ■ Illustrations in this section are based on transparencies from the paper tray, manual feed tray or MP tray.

Users Manual - English
Page 43
Figure 1-45 ABOUT THIS PRINTER 1 - 36 Media Type: Transparencies Paper Source: Manual PCL driver 2 Open the face-up output tray. 1 Select the Paper Size, Media Type, Paper Source, and other settings in the printer driver. Printing on transparencies from the manual feed tray (For HL-5130 and HL-5140) When the face-up output tray is open, the printer has a straight paper path from the manual feed tray to the face-up output tray.
Figure 1-45 ABOUT THIS PRINTER 1 - 36 Media Type: Transparencies Paper Source: Manual PCL driver 2 Open the face-up output tray. 1 Select the Paper Size, Media Type, Paper Source, and other settings in the printer driver. Printing on transparencies from the manual feed tray (For HL-5130 and HL-5140) When the face-up output tray is open, the printer has a straight paper path from the manual feed tray to the face-up output tray.

Users Manual - English
Page 44
Figure 1-47 5 Using both hands put a transparency in this position until its front edge touches the paper feed roller. Slide the paper guides to the printer A NO PAPER status is shown by the control panel LEDs until you put the transparency in the manual feed tray until the printer automatically feeds it in for a short distance, and then let go of the transparency. 1 - 37 ABOUT THIS PRINTER Figure 1-48 Toner Drum Paper Status Figure 1-46 4 Open the manual feed tray. Hold the transparency in the manual feed tray. 3 Send the print data to the transparency size.
Figure 1-47 5 Using both hands put a transparency in this position until its front edge touches the paper feed roller. Slide the paper guides to the printer A NO PAPER status is shown by the control panel LEDs until you put the transparency in the manual feed tray until the printer automatically feeds it in for a short distance, and then let go of the transparency. 1 - 37 ABOUT THIS PRINTER Figure 1-48 Toner Drum Paper Status Figure 1-46 4 Open the manual feed tray. Hold the transparency in the manual feed tray. 3 Send the print data to the transparency size.
Users Manual - English
Page 45
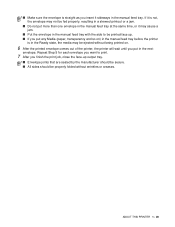
... the Ready state, the media may be fed properly, resulting in a skewed printout or a jam. ■ Do not put more than one transparency in the manual feed tray at the same time, or it may not be ejected without being printed on. 6 After the printed transparency comes out of the printer..., put any Media (paper, transparency and so on) in the manual feed tray before the printer is straight and in Step 5 on the manual feed tray. ■ Make sure that you want to curl.
... the Ready state, the media may be fed properly, resulting in a skewed printout or a jam. ■ Do not put more than one transparency in the manual feed tray at the same time, or it may not be ejected without being printed on. 6 After the printed transparency comes out of the printer..., put any Media (paper, transparency and so on) in the manual feed tray before the printer is straight and in Step 5 on the manual feed tray. ■ Make sure that you want to curl.
Users Manual - English
Page 50
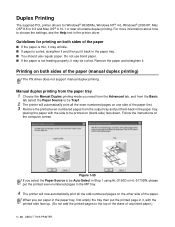
... the stack of unprinted paper.) 1 - 43 ABOUT THIS PRINTER Figure 1-55 If you select the Paper Source to be Auto Select in Step 1 using HL-5150D or HL-5170DN, please put the printed even-numbered pages in the MP tray. 4 The printer will automatically print all the odd-numbered pages on both... use bond paper. ■ If the paper is not feeding properly, it may be printed on both sides of the paper (manual duplex printing) The PS driver does not support manual duplex printing. Printing on (blank side) face down. When you need from the Advanced tab, and from the output tray and...
... the stack of unprinted paper.) 1 - 43 ABOUT THIS PRINTER Figure 1-55 If you select the Paper Source to be Auto Select in Step 1 using HL-5150D or HL-5170DN, please put the printed even-numbered pages in the MP tray. 4 The printer will automatically print all the odd-numbered pages on both... use bond paper. ■ If the paper is not feeding properly, it may be printed on both sides of the paper (manual duplex printing) The PS driver does not support manual duplex printing. Printing on (blank side) face down. When you need from the Advanced tab, and from the output tray and...

