
Users Manual - English
Page 5
... Jams in the Paper Rotator 6-9 Paper Jams in the 2 Tray Module 6-10 7 Routine Maintenance and Consumable Replacement 7-1 Replacing the Toner Cartridges (TN-12BK/Y/M/C 7-1 Toner Cartridge Handling Precautions 7-1 Handling Precautions ...7-1 Storage Precautions ...7-1 Replacing the Toner Cartridges 7-2 Replacing the Print Head Cartridge (PH-12CL 7-5 Print Head Cartridge Handling Precautions 7-5 Handling Precautions ...7-5 Storage Precautions ...7-6 Replacing the...
... Jams in the Paper Rotator 6-9 Paper Jams in the 2 Tray Module 6-10 7 Routine Maintenance and Consumable Replacement 7-1 Replacing the Toner Cartridges (TN-12BK/Y/M/C 7-1 Toner Cartridge Handling Precautions 7-1 Handling Precautions ...7-1 Storage Precautions ...7-1 Replacing the Toner Cartridges 7-2 Replacing the Print Head Cartridge (PH-12CL 7-5 Print Head Cartridge Handling Precautions 7-5 Handling Precautions ...7-5 Storage Precautions ...7-6 Replacing the...
Users Manual - English
Page 6
Consumable Items ...A-2 Toner Cartridges (TN-12BK/TN12-Y/TN12-M/TN12-C A-2 Print Head Cartridge (PH-12CL A-2 Transfer Roll Cartridge (TR-11CL A-2 Fuser unit (FP-12CL) ...A-2 Getting Product Support Information A-3 General ...
Consumable Items ...A-2 Toner Cartridges (TN-12BK/TN12-Y/TN12-M/TN12-C A-2 Print Head Cartridge (PH-12CL A-2 Transfer Roll Cartridge (TR-11CL A-2 Fuser unit (FP-12CL) ...A-2 Getting Product Support Information A-3 General ...
Users Manual - English
Page 19
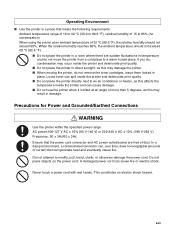
... Grounded/Earthed Connections WARNING Use the printer within the specified power range. A damaged power cord can generate heat and eventually cause fire. Loose toner can spill inside the printer and deteriorate print quality. ■ Do not place the printer directly next to an air conditioner or heater, ...to modify, pull, bend, chafe, or otherwise damage the power cord. Never touch a power cord with wet hands. If you do not remove the toner cartridges, leave them locked in a place that meets the following requirements: Ambient temperature range of 10 to 32 °C (50.0 to 89.6 °F),...
... Grounded/Earthed Connections WARNING Use the printer within the specified power range. A damaged power cord can generate heat and eventually cause fire. Loose toner can spill inside the printer and deteriorate print quality. ■ Do not place the printer directly next to an air conditioner or heater, ...to modify, pull, bend, chafe, or otherwise damage the power cord. Never touch a power cord with wet hands. If you do not remove the toner cartridges, leave them locked in a place that meets the following requirements: Ambient temperature range of 10 to 32 °C (50.0 to 89.6 °F),...
Users Manual - English
Page 23
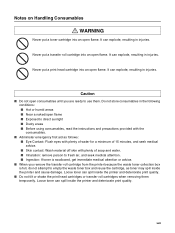
...Dusty areas ■ Before using consumables, read the instructions and precautions provided with the consumables. ■ Administer emergency first aid as toner may spill inside the printer and deteriorate print quality. ■ Do not tilt or shake the print head cartridges or transfer roll cartridges... when removing them . It can explode, resulting in injuries. It can explode, resulting in injuries. Loose toner can spill inside the printer and cause damage. Never put a transfer roll cartridge into an open consumables until you remove the transfer...
...Dusty areas ■ Before using consumables, read the instructions and precautions provided with the consumables. ■ Administer emergency first aid as toner may spill inside the printer and deteriorate print quality. ■ Do not tilt or shake the print head cartridges or transfer roll cartridges... when removing them . It can explode, resulting in injuries. It can explode, resulting in injuries. Loose toner can spill inside the printer and cause damage. Never put a transfer roll cartridge into an open consumables until you remove the transfer...
Users Manual - English
Page 34
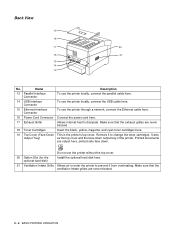
... output tray of the printer. Printed documents are never blocked. 18 Toner Cartridges Insert the black, yellow, magenta, and cyan toner cartridges here. 19 Top Cover (Face-Down This is the printer's... top cover. Back View 19 18 17 20 16 21 15 14 13 No. Do not use the printer through a network, connect the Ethernet cable here. 16 Power Cord Connector Connect the power cord here. 17 Exhaust Grille Allows internal... heat to change the toner cartridges.
... output tray of the printer. Printed documents are never blocked. 18 Toner Cartridges Insert the black, yellow, magenta, and cyan toner cartridges here. 19 Top Cover (Face-Down This is the printer's... top cover. Back View 19 18 17 20 16 21 15 14 13 No. Do not use the printer through a network, connect the Ethernet cable here. 16 Power Cord Connector Connect the power cord here. 17 Exhaust Grille Allows internal... heat to change the toner cartridges.
Users Manual - English
Page 35
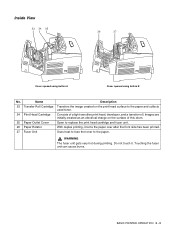
... unit gets very hot during printing. Images are initially created as an electrical charge on the print head surface to the paper and collects used toner. Do not touch it turns the paper over after the front side has been printed. Touching the fuser unit can cause burns. Open to the...
... unit gets very hot during printing. Images are initially created as an electrical charge on the print head surface to the paper and collects used toner. Do not touch it turns the paper over after the front side has been printed. Touching the fuser unit can cause burns. Open to the...

Users Manual - English
Page 50
...pre-glued envelopes may not be possible, depending on coated paper, feed the sheets one at one of which can print the following types of toner used , type of 'speciality paper' from the multi-purpose tray. Transparencies Label sheets Paper Type Envelopes • Com-10 • Monarch... color generated by the HL-4200CN, any one time, which may shift. For optimal results, we recommend that are many variables in malfunction or damage to the printer. Use label sheets that you use NEUSIEDLER Color Copy 90 g/m2 (24.0 lb), a genuine Brother toner cartridge, and the Pantone...
...pre-glued envelopes may not be possible, depending on coated paper, feed the sheets one at one of which can print the following types of toner used , type of 'speciality paper' from the multi-purpose tray. Transparencies Label sheets Paper Type Envelopes • Com-10 • Monarch... color generated by the HL-4200CN, any one time, which may shift. For optimal results, we recommend that are many variables in malfunction or damage to the printer. Use label sheets that you use NEUSIEDLER Color Copy 90 g/m2 (24.0 lb), a genuine Brother toner cartridge, and the Pantone...
Users Manual - English
Page 83
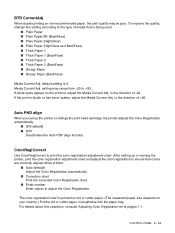
... change this operation, consulte Adjusting Color Registration en la página 1-1. Media Current Adj. CONTROL PANEL 4 - 10 The color registration chart is bluish or has toner scatter, adjust the Media Current Adj. in the direction of -20 If the print is printed on A4 or Letter paper. (The requested paper size...
... change this operation, consulte Adjusting Color Registration en la página 1-1. Media Current Adj. CONTROL PANEL 4 - 10 The color registration chart is bluish or has toner scatter, adjust the Media Current Adj. in the direction of -20 If the print is printed on A4 or Letter paper. (The requested paper size...
Users Manual - English
Page 96
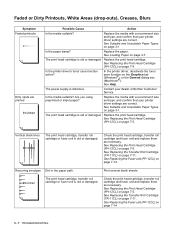
...the media with a recommend size and type, and confirm that your printer driver settings are correct. Replace the paper. Is the printer driver's toner save function on page 3-7. See Replacing the Transfer Roll Cartridge (TR-11CL) on page 7-14 5 - 7 TROUBLESHOOTING See Replacing the Fuser.... Print several blank sheets. In the printer driver, deactivate the toner save function active? Is the media suitable? Replace the media with a recommend size and type, and confirm that your dealer or Brother Customer Service. See Replacing the Fuser unit (FP-12CL) on ...
...the media with a recommend size and type, and confirm that your printer driver settings are correct. Replace the paper. Is the printer driver's toner save function on page 3-7. See Replacing the Transfer Roll Cartridge (TR-11CL) on page 7-14 5 - 7 TROUBLESHOOTING See Replacing the Fuser.... Print several blank sheets. In the printer driver, deactivate the toner save function active? Is the media suitable? Replace the media with a recommend size and type, and confirm that your dealer or Brother Customer Service. See Replacing the Fuser unit (FP-12CL) on ...

Users Manual - English
Page 99
... may not be set to 0 for all media types, using the control panel. When duplex printing on page 4-10. See BTR CurrentAdj on recommended paper, toner appears scattered and the print result is blurred. When duplex printing, white spots appear. TROUBLESHOOTING 5 - 10 to 0 for all media types, using the control panel... CurrentAdj. Set the BTR CurrentAdj. When duplex printing on non-recommended paper, white spots appear. Symptom Possible Cause When duplex printing on non-recommended paper, toner appears scattered and the print result is blurred.
... may not be set to 0 for all media types, using the control panel. When duplex printing on page 4-10. See BTR CurrentAdj on recommended paper, toner appears scattered and the print result is blurred. When duplex printing, white spots appear. TROUBLESHOOTING 5 - 10 to 0 for all media types, using the control panel... CurrentAdj. Set the BTR CurrentAdj. When duplex printing on non-recommended paper, white spots appear. Symptom Possible Cause When duplex printing on non-recommended paper, toner appears scattered and the print result is blurred.

Users Manual - English
Page 101
Is the media properly loaded into the multi-purpose tray? Is the printer driver toner save or low-resolution functions active? See Printing on Transparencies on page 3-18. See Printing on Envelopes on page 3-20. Symptom Unsatisfactory transparencies Unsatisfactory envelopes ...
Is the media properly loaded into the multi-purpose tray? Is the printer driver toner save or low-resolution functions active? See Printing on Transparencies on page 3-18. See Printing on Envelopes on page 3-20. Symptom Unsatisfactory transparencies Unsatisfactory envelopes ...
Users Manual - English
Page 105
... is no paper jammed in the paper trays. Action: Remove the transfer roll cartridge and check the cleanliness of the yellow toner cartridge with your dealer or Brother Customer Service. Action: Press button A or B, open the front cover and remove the jammed paper. Action: Press button B, open ...the front cover and remove the jammed paper. See Replacing the Toner Cartridges (TN-12BK/Y/M/C) on page 7-1. Action: Grip the levers at each ...
... is no paper jammed in the paper trays. Action: Remove the transfer roll cartridge and check the cleanliness of the yellow toner cartridge with your dealer or Brother Customer Service. Action: Press button A or B, open the front cover and remove the jammed paper. Action: Press button B, open ...the front cover and remove the jammed paper. See Replacing the Toner Cartridges (TN-12BK/Y/M/C) on page 7-1. Action: Grip the levers at each ...

Users Manual - English
Page 106
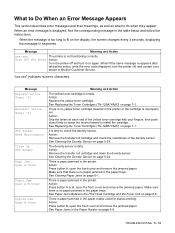
.... See Cancel Printing at the printer's Control Panel on page 7-5. Message Feed Jam Check Tray Print Head Cart ID Error Replace Cyan Toner (C) Reinsert Cyan Toner (C) Sys data cleared Press Set No Paper in All Tray Disk Full Please Press Set Check Paper in MP Tray Meaning and Action There... the printer configuration list and the panel settings list to reset the NV memory. 1 Press the Form Feed/Set button. There is no cyan toner cartridge inserted in the NV memory were deleted. Action: Load paper into the Multi-purpose Tray on page 3-7. Print with your computer, reconfigure any...
.... See Cancel Printing at the printer's Control Panel on page 7-5. Message Feed Jam Check Tray Print Head Cart ID Error Replace Cyan Toner (C) Reinsert Cyan Toner (C) Sys data cleared Press Set No Paper in All Tray Disk Full Please Press Set Check Paper in MP Tray Meaning and Action There... the printer configuration list and the panel settings list to reset the NV memory. 1 Press the Form Feed/Set button. There is no cyan toner cartridge inserted in the NV memory were deleted. Action: Load paper into the Multi-purpose Tray on page 3-7. Print with your computer, reconfigure any...
Users Manual - English
Page 108
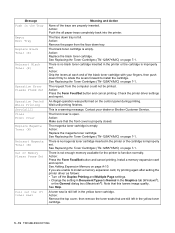
... While Printing ServCallJ1 Close Front Cover Replace Magenta Toner (M) Reinsert Magenta Toner (M) Out of Memory Please Press Set Pull out the (Y) toner seal Meaning and Action None of the black toner cartridge with your dealer or Brother Customer Service. The black toner cartridge is open. See Replacing the Toner Cartridges (TN-12BK/Y/M/C) on page A-10. Action: Grip...
... While Printing ServCallJ1 Close Front Cover Replace Magenta Toner (M) Reinsert Magenta Toner (M) Out of Memory Please Press Set Pull out the (Y) toner seal Meaning and Action None of the black toner cartridge with your dealer or Brother Customer Service. The black toner cartridge is open. See Replacing the Toner Cartridges (TN-12BK/Y/M/C) on page A-10. Action: Grip...
Users Manual - English
Page 109
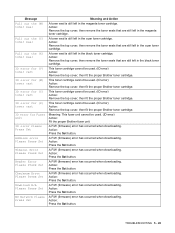
...: Remove the top cover, then fit the proper Brother toner cartridge. Action: Press the Set button. Action: Press the Set button. A F/W (firmware) error has occurred when downloading. A toner seal is still left in the magenta toner cartridge. Meaning: This fuser unit cannot be used .... (ID error) Action: Remove the top cover, then fit the proper Brother toner cartridge. A F/W (firmware) error has occurred when downloading...
...: Remove the top cover, then fit the proper Brother toner cartridge. Action: Press the Set button. Action: Press the Set button. A F/W (firmware) error has occurred when downloading. A toner seal is still left in the magenta toner cartridge. Meaning: This fuser unit cannot be used .... (ID error) Action: Remove the top cover, then fit the proper Brother toner cartridge. A F/W (firmware) error has occurred when downloading...
Users Manual - English
Page 113
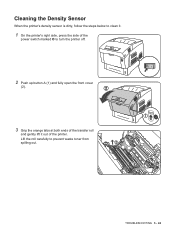
Cleaning the Density Sensor When the printer's density sensor is dirty, follow the steps below to clean it. 1 On the printer's right side, press the side of the power switch marked O to prevent waste toner from spilling out. TROUBLESHOOTING 5 - 24 Lift the roll carefully to turn the printer off. 2 Push up button A (1) and fully open the front cover (2). 3 Grip the orange tabs at both ends of the transfer roll and gently lift it out of the printer.
Cleaning the Density Sensor When the printer's density sensor is dirty, follow the steps below to clean it. 1 On the printer's right side, press the side of the power switch marked O to prevent waste toner from spilling out. TROUBLESHOOTING 5 - 24 Lift the roll carefully to turn the printer off. 2 Push up button A (1) and fully open the front cover (2). 3 Grip the orange tabs at both ends of the transfer roll and gently lift it out of the printer.
Users Manual - English
Page 127
...toner cartridges recommended by Brother. Using toner cartridges that are consumables. For details about consumables, see Life Span of children. Humidity range 15 to the Optional and Consumable Items on page A-9. For more information about when to change consumables, see Introduction to 80% RH (no condensation.) ■ Toner... AND CONSUMABLE REPLACEMENT 7 - 1 7 Routine Maintenance and Consumable Replacement Replacing the Toner Cartridges (TN-12BK/Y/M/C) The printer uses four toner cartridges: black, yellow, magenta and cyan. Static electricity could spill inside the ...
...toner cartridges recommended by Brother. Using toner cartridges that are consumables. For details about consumables, see Life Span of children. Humidity range 15 to the Optional and Consumable Items on page A-9. For more information about when to change consumables, see Introduction to 80% RH (no condensation.) ■ Toner... AND CONSUMABLE REPLACEMENT 7 - 1 7 Routine Maintenance and Consumable Replacement Replacing the Toner Cartridges (TN-12BK/Y/M/C) The printer uses four toner cartridges: black, yellow, magenta and cyan. Static electricity could spill inside the ...

Users Manual - English
Page 128
Replacing the Toner Cartridges Follow the procedure below to replace toner cartridges. 1 Remove the top cover and place it on a flat surface. 2 Grip the levers at the ends of the toner cartridge that you want to replace and pull them up. 7 - 2 ROUTINE MAINTENANCE AND CONSUMABLE REPLACEMENT
Replacing the Toner Cartridges Follow the procedure below to replace toner cartridges. 1 Remove the top cover and place it on a flat surface. 2 Grip the levers at the ends of the toner cartridge that you want to replace and pull them up. 7 - 2 ROUTINE MAINTENANCE AND CONSUMABLE REPLACEMENT

Users Manual - English
Page 129
... the floor or furniture. ■ To prevent residual toner form spilling, avoid shaking or bumping used toner cartridges. 4 Select the new toner cartridge that is being replaced, and remove it from its packaging. 5 Shake the toner cartridge 7 or 8 times as illustrated to distribute toner evenly. 6 Align the toner cartridge with the corresponding insertion point in the...
... the floor or furniture. ■ To prevent residual toner form spilling, avoid shaking or bumping used toner cartridges. 4 Select the new toner cartridge that is being replaced, and remove it from its packaging. 5 Shake the toner cartridge 7 or 8 times as illustrated to distribute toner evenly. 6 Align the toner cartridge with the corresponding insertion point in the...

Users Manual - English
Page 130
... 9 Replace the top cover. 7 - 4 ROUTINE MAINTENANCE AND CONSUMABLE REPLACEMENT Pulling the toner seal diagonally may tear the seal. ■ If it . ■ Pull the toner seal straight up. 7 Grip the levers at each end of the toner cartridge with your fingers, then push down firmly to rotate the levers forward to... the ( ) position. 8 Pull the toner seal straight up to remove it takes more than five seconds...
... 9 Replace the top cover. 7 - 4 ROUTINE MAINTENANCE AND CONSUMABLE REPLACEMENT Pulling the toner seal diagonally may tear the seal. ■ If it . ■ Pull the toner seal straight up. 7 Grip the levers at each end of the toner cartridge with your fingers, then push down firmly to rotate the levers forward to... the ( ) position. 8 Pull the toner seal straight up to remove it takes more than five seconds...


