
Users Manual - English
Page 2
...method to Panel 1-4 Setting the IP Address ...1-5 Setting the Subnet Mask ...1-6 Setting the Gateway Address 1-7 Setting Protocols ...1-8 Changing Protocol Settings 1-8 Confirming Settings ...1-9 2 Basic Printer Operation ...2-1 Printer Part Names and Functions 2-1 Front View ...2-1 Back View ...2-2 Inside View ...2-3 Turning the Printer On and Off ...2-4 Turn the Printer On ...2-4 Turn the Printer Off ...2-5 Installing the Printer Driver for Windows 2-6 Installing the Printer Driver ...2-6 Upgrading the Printer Driver 2-6 Changing default printing functions 2-8 Using Windows® Help...
...method to Panel 1-4 Setting the IP Address ...1-5 Setting the Subnet Mask ...1-6 Setting the Gateway Address 1-7 Setting Protocols ...1-8 Changing Protocol Settings 1-8 Confirming Settings ...1-9 2 Basic Printer Operation ...2-1 Printer Part Names and Functions 2-1 Front View ...2-1 Back View ...2-2 Inside View ...2-3 Turning the Printer On and Off ...2-4 Turn the Printer On ...2-4 Turn the Printer Off ...2-5 Installing the Printer Driver for Windows 2-6 Installing the Printer Driver ...2-6 Upgrading the Printer Driver 2-6 Changing default printing functions 2-8 Using Windows® Help...

Users Manual - English
Page 9
... recommended that you must ship your Printer, carefully package the Printer to the publication. ©2003 Brother Industries Ltd. viii Centronics is a trademark of Brother Industries Ltd., this user's guide are subject to change without notice in this manual has been compiled and published, covering the latest product descriptions and specifications. Use current PANTONE Color Reference Manuals for any reason you save and...
... recommended that you must ship your Printer, carefully package the Printer to the publication. ©2003 Brother Industries Ltd. viii Centronics is a trademark of Brother Industries Ltd., this user's guide are subject to change without notice in this manual has been compiled and published, covering the latest product descriptions and specifications. Use current PANTONE Color Reference Manuals for any reason you save and...
Users Manual - English
Page 88
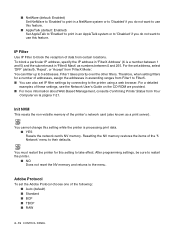
...; For more information about Web Based Management, consulte Confirming Printer Status from Filter1 to Filter5. ■ You can filter up to the menu. Adobe Protocol To set IP filter settings by connecting to their defaults. For a detailed examples of the '5 Network' menu to the printer using a web browser. To block a particular IP address, specify the IP address in 'FilterX Address' (X is processing print data. ■ YES Resets the network card's NV memory.
...; For more information about Web Based Management, consulte Confirming Printer Status from Filter1 to Filter5. ■ You can filter up to the menu. Adobe Protocol To set IP filter settings by connecting to their defaults. For a detailed examples of the '5 Network' menu to the printer using a web browser. To block a particular IP address, specify the IP address in 'FilterX Address' (X is processing print data. ■ YES Resets the network card's NV memory.
Users Manual - English
Page 93
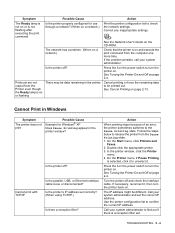
... set correctly? (When using TCP/IP.) Is there a reception filter? See Cancel Printing on the CD-ROM. Follow the steps below to be printed out. Call your system administrator to turn the printer on page 2-4. In the printer window, click the Printer menu. 4. See the Network User's Guide on page 2-13. Press the I on the power switch to turn the printer back on a network.) Action Print the printer configuration list to the Pause Printing state. See Turning...
... set correctly? (When using TCP/IP.) Is there a reception filter? See Cancel Printing on the CD-ROM. Follow the steps below to be printed out. Call your system administrator to turn the printer on page 2-4. In the printer window, click the Printer menu. 4. See the Network User's Guide on page 2-13. Press the I on the power switch to turn the printer back on a network.) Action Print the printer configuration list to the Pause Printing state. See Turning...
Users Manual - English
Page 98
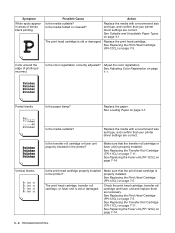
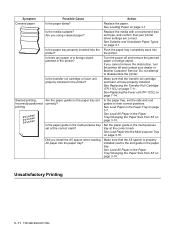
... print head cartridge properly installed in the printer? Replace the media with a recommend size and type, and confirm that your printer driver settings are correct. Is the color registration correctly adjusted? The print head cartridge, transfer roll cartridge, or fuser unit is properly installed. See Replacing the Print Head Cartridge (PH-12CL) on page 7-11. See Replacing the Fuser unit (FP-12CL) on page 3-7. Symptom White spots appear in areas of printing is incorrect. Color around the edge of dense black printing. See Loading Paper on page 7-14. 5 - 9 TROUBLESHOOTING...
... print head cartridge properly installed in the printer? Replace the media with a recommend size and type, and confirm that your printer driver settings are correct. Is the color registration correctly adjusted? The print head cartridge, transfer roll cartridge, or fuser unit is properly installed. See Replacing the Print Head Cartridge (PH-12CL) on page 7-11. See Replacing the Fuser unit (FP-12CL) on page 3-7. Symptom White spots appear in areas of printing is incorrect. Color around the edge of dense black printing. See Loading Paper on page 7-14. 5 - 9 TROUBLESHOOTING...
Users Manual - English
Page 100
... Tray on page 3-10. If you using creased paper? See Replacing the Transfer Roll Cartridge (TR-11CL) on page 3-7. Unsatisfactory Printing 5 - 11 TROUBLESHOOTING Symptom Possible Cause Action Creased paper Is the paper damp? Is the transfer roll cartridge or fuser unit properly installed in the printer? Replace the media with a recommend size and type, and confirm that your dealer or Brother Customer Service. Is there any paper or a foreign object jammed in the printer? Replace the paper. See Loading Paper on page...
... Tray on page 3-10. If you using creased paper? See Replacing the Transfer Roll Cartridge (TR-11CL) on page 3-7. Unsatisfactory Printing 5 - 11 TROUBLESHOOTING Symptom Possible Cause Action Creased paper Is the paper damp? Is the transfer roll cartridge or fuser unit properly installed in the printer? Replace the media with a recommend size and type, and confirm that your dealer or Brother Customer Service. Is there any paper or a foreign object jammed in the printer? Replace the paper. See Loading Paper on page...

Users Manual - English
Page 102
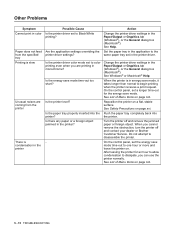
... Paper Types on page 3-16. See Load Paper into the Multi-purpose Tray on page 3-1 Push the paper tray completely back into the paper tray? Is the printer level? Replace the paper. See Load A5 Paper in the multi-purpose tray set at once, Paper does not feed straight Possible Cause Is the media properly loaded? Is the paper damp? Is the paper guide in the Paper Tray/Changing the Paper Size from A5 on page 3-10. 5 - 13 TROUBLESHOOTING See Clearing Paper Jams on page xvi. If using media...
... Paper Types on page 3-16. See Load Paper into the Multi-purpose Tray on page 3-1 Push the paper tray completely back into the paper tray? Is the printer level? Replace the paper. See Load A5 Paper in the multi-purpose tray set at once, Paper does not feed straight Possible Cause Is the media properly loaded? Is the paper damp? Is the paper guide in the Paper Tray/Changing the Paper Size from A5 on page 3-10. 5 - 13 TROUBLESHOOTING See Clearing Paper Jams on page xvi. If using media...
Users Manual - English
Page 104
... paper tray in the application to the same paper tray set a longer time-out for an hour to allow condensation to dissipate, you cannot remove the obstruction, turn the printer off and remove the jammed paper or foreign object. On the control panel, set in the printer driver. After leaving the printer for the energy save mode. See Help. See Windows® or Macintosh® Help. See Safety Precautions on page 4-6. See List of Menu...
... paper tray in the application to the same paper tray set a longer time-out for an hour to allow condensation to dissipate, you cannot remove the obstruction, turn the printer off and remove the jammed paper or foreign object. On the control panel, set in the printer driver. After leaving the printer for the energy save mode. See Help. See Windows® or Macintosh® Help. See Safety Precautions on page 4-6. See List of Menu...
Users Manual - English
Page 105
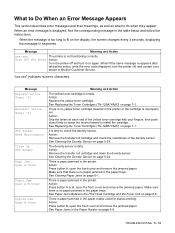
... page 6-1. There is no yellow toner cartridge inserted in the printer or the cartridge is paper jammed in the printer. There is improperly set. Make sure that there is time to install the cartridge. It is no paper jammed in the paper trays. Message Meaning and Action xxx-xxx Turn OFF the Power The printer is no paper jammed in the paper trays. Action: Replace the yellow toner cartridge. See Clearing Paper Jams on page 7-1. Action: Press button A or B, open the front cover and remove the jammed paper. Make...
... page 6-1. There is no yellow toner cartridge inserted in the printer or the cartridge is paper jammed in the printer. There is improperly set. Make sure that there is time to install the cartridge. It is no paper jammed in the paper trays. Message Meaning and Action xxx-xxx Turn OFF the Power The printer is no paper jammed in the paper trays. Action: Replace the yellow toner cartridge. See Clearing Paper Jams on page 7-1. Action: Press button A or B, open the front cover and remove the jammed paper. Make...

Users Manual - English
Page 106
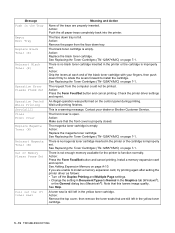
... page 6-4. Action: Make sure the paper is improperly set. Action: Pull out the tray and remove the jammed media. All system settings stored in the Multi-purpose Tray on your fingers, then push down firmly to rotate the levers forward to reset the NV memory. 1 Press the Form Feed/Set button. The print head cartridge is no cyan toner cartridge inserted in the Paper Tray on page 7-5. See Loading Paper on page 2-15. See Changing the Configuration for...
... page 6-4. Action: Make sure the paper is improperly set. Action: Pull out the tray and remove the jammed media. All system settings stored in the Multi-purpose Tray on your fingers, then push down firmly to rotate the levers forward to reset the NV memory. 1 Press the Form Feed/Set button. The print head cartridge is no cyan toner cartridge inserted in the Paper Tray on page 7-5. See Loading Paper on page 2-15. See Changing the Configuration for...
Users Manual - English
Page 108
... Form Feed/Set button and cancel printing. The front cover is full. See Replacing the Toner Cartridges (TN-12BK/Y/M/C) on page A-10. See Adding Expansion Memory on page 7-1. Action: Grip the levers at each end of the trays are unable to install a memory expansion card, try printing again after setting the printer driver as follows: • Turn off the Duplex Printing and Multiple Page settings. • Change the setting in Document Types to Normal in the Graphics tab (Windows®...
... Form Feed/Set button and cancel printing. The front cover is full. See Replacing the Toner Cartridges (TN-12BK/Y/M/C) on page A-10. See Adding Expansion Memory on page 7-1. Action: Grip the levers at each end of the trays are unable to install a memory expansion card, try printing again after setting the printer driver as follows: • Turn off the Duplex Printing and Multiple Page settings. • Change the setting in Document Types to Normal in the Graphics tab (Windows®...

Quick Setup Guide - English
Page 14
Protective Packing Windows® USB Windows® Parallel Installing the Driver Windows® Network Macintosh ® USB 2 Push the button to open the front cover. Check for assistance. 8 Close the paper outlet cover. Note: Do not touch the transfer roller. Close the front cover. 13 Macintosh ® Network Fo r Administrators Front Cover 5 Remove the protective packing. Tear off Protective Packing Print Head Cartridge 4 Pull the 4 seals firmly to remove them completely. Protective Sheet Transfer Roller Seals If there is...
Protective Packing Windows® USB Windows® Parallel Installing the Driver Windows® Network Macintosh ® USB 2 Push the button to open the front cover. Check for assistance. 8 Close the paper outlet cover. Note: Do not touch the transfer roller. Close the front cover. 13 Macintosh ® Network Fo r Administrators Front Cover 5 Remove the protective packing. Tear off Protective Packing Print Head Cartridge 4 Pull the 4 seals firmly to remove them completely. Protective Sheet Transfer Roller Seals If there is...
Quick Setup Guide - English
Page 17
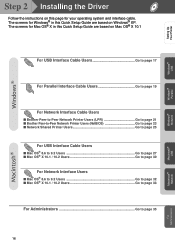
Setting Up Your Printer Windows® USB Windows® Parallel Windows® Network Step 2 Installing the Driver Follow the instructions on this Quick Setup Guide are based on Mac OS® X 10.1 For USB Interface Cable Users Go to page 17 For Parallel Interface Cable Users Go to page 19 For Network Interface Cable Users ■ Brother Peer-to-Peer Network Printer Users (LPR Go to page 21 ■ Brother Peer-to-Peer Network Printer Users (NetBIOS Go to page 23 ■ Network Shared Printer Users Go to...
Setting Up Your Printer Windows® USB Windows® Parallel Windows® Network Step 2 Installing the Driver Follow the instructions on this Quick Setup Guide are based on Mac OS® X 10.1 For USB Interface Cable Users Go to page 17 For Parallel Interface Cable Users Go to page 19 For Network Interface Cable Users ■ Brother Peer-to-Peer Network Printer Users (LPR Go to page 21 ■ Brother Peer-to-Peer Network Printer Users (NetBIOS Go to page 23 ■ Network Shared Printer Users Go to...

Quick Setup Guide - English
Page 18
...-ROM drive. Step 2 Installing the Driver For USB Interface Cable Users 1. If you have already connected the cable, remove it. 4 Depending on the paper size you plan on the Menu screen. 7 Select Local Printer with USB cable, and then click the Next button. 17 Follow the instructions on the screen. 6 Select Standard Installation, and then click the Next button. 3 Click Install Software on using, select Standard Driver - Installing the Driver and Connecting the Printer to Your PC 1 Make...
...-ROM drive. Step 2 Installing the Driver For USB Interface Cable Users 1. If you have already connected the cable, remove it. 4 Depending on the paper size you plan on the Menu screen. 7 Select Local Printer with USB cable, and then click the Next button. 17 Follow the instructions on the screen. 6 Select Standard Installation, and then click the Next button. 3 Click Install Software on using, select Standard Driver - Installing the Driver and Connecting the Printer to Your PC 1 Make...
Quick Setup Guide - English
Page 30
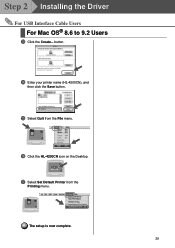
F Click the HL-4200CN icon on the Desktop. E Select Quit from the Printing menu. D Enter your printer name (HL-4200CN), and then click the Save button. Step 2 Installing the Driver For USB Interface Cable Users For Mac OS® 8.6 to 9.2 Users C Click the Create... The setup is now complete. 29 button. G Select Set Default Printer from the File menu.
F Click the HL-4200CN icon on the Desktop. E Select Quit from the Printing menu. D Enter your printer name (HL-4200CN), and then click the Save button. Step 2 Installing the Driver For USB Interface Cable Users For Mac OS® 8.6 to 9.2 Users C Click the Create... The setup is now complete. 29 button. G Select Set Default Printer from the File menu.
Quick Setup Guide - English
Page 33
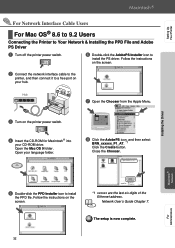
... a free port on the printer power switch. 4 Insert the CD-ROM for Macintosh into your language folder. 8 Click the AdobePS icon, and then select BRN_xxxxxx_P1_AT. *1 Click the Create button. Installing the Driver Macintosh® Network Fo r Administrators 5 Double-click the PPD Installer icon to install the PS driver. Setting Up Your Printer For Network Interface Cable Users For Mac OS® 8.6 to 9.2 Users Connecting the Printer to Your Network & Installing the PPD File and Adobe PS Driver 1 Turn...
... a free port on the printer power switch. 4 Insert the CD-ROM for Macintosh into your language folder. 8 Click the AdobePS icon, and then select BRN_xxxxxx_P1_AT. *1 Click the Create button. Installing the Driver Macintosh® Network Fo r Administrators 5 Double-click the PPD Installer icon to install the PS driver. Setting Up Your Printer For Network Interface Cable Users For Mac OS® 8.6 to 9.2 Users Connecting the Printer to Your Network & Installing the PPD File and Adobe PS Driver 1 Turn...
Network Users Manual - English
Page 21
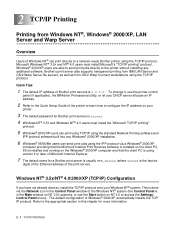
... your DHCP server allocate an IP address. 2 Refer to a network-ready Brother printer using the TCP/IP protocol. The default configuration of Windows NT® can print directly to the Quick Setup Guide of the Windows NT® system (the Control Panel is in this chapter for Brother print servers is access. 4 Windows NT® 3.51 and Windows NT® 4.0 users must install Microsoft's "TCP/IP printing" protocol. To change it, use the Start button on the Windows® 2000...
... your DHCP server allocate an IP address. 2 Refer to a network-ready Brother printer using the TCP/IP protocol. The default configuration of Windows NT® can print directly to the Quick Setup Guide of the Windows NT® system (the Control Panel is in this chapter for Brother print servers is access. 4 Windows NT® 3.51 and Windows NT® 4.0 users must install Microsoft's "TCP/IP printing" protocol. To change it, use the Start button on the Windows® 2000...
Network Users Manual - English
Page 26
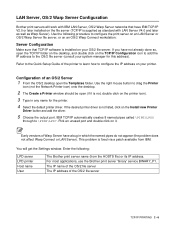
... fixed via a patch available from the HOSTS file) or its IP address. You will work with LAN Server V4.0 and later as well as standard with IBM LAN Server, OS/2 Warp Server networks that TCP/IP software is installed on the Install new Printer Driver button and add the driver. 5 Choose the output port. This problem is supplied as Warp Server). LAN Server, OS/2 Warp Server Configuration Brother print servers will get the Settings window. Use the following : LPD server LPD printer...
... fixed via a patch available from the HOSTS file) or its IP address. You will work with LAN Server V4.0 and later as well as standard with IBM LAN Server, OS/2 Warp Server networks that TCP/IP software is installed on the Install new Printer Driver button and add the driver. 5 Choose the output port. This problem is supplied as Warp Server). LAN Server, OS/2 Warp Server Configuration Brother print servers will get the Settings window. Use the following : LPD server LPD printer...
Network Users Manual - English
Page 30
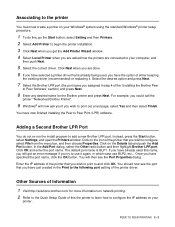
... already used , you have selected a printer driver that you have just created in the Print to the following port setting of the "Installing the Brother Peer to Peer Software" section) and press Next. 8 Enter any desired name for more information on network printing. 2 Refer to the Quick Setup Guide of either keeping the existing driver (recommended) or replacing it again, in step 4 of the printer driver. Enter the IP address...
... already used , you have selected a printer driver that you have just created in the Print to the following port setting of the "Installing the Brother Peer to Peer Software" section) and press Next. 8 Enter any desired name for more information on network printing. 2 Refer to the Quick Setup Guide of either keeping the existing driver (recommended) or replacing it again, in step 4 of the printer driver. Enter the IP address...
Network Users Manual - English
Page 39
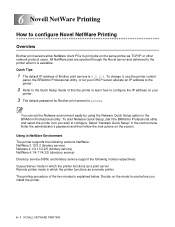
.../IP or other network protocol users. Quick Tips: 1 The default IP address of Brother print servers is explained below. You can set the Netware environment easily by using the Netware Quick Setup option in the control menu. To change it is access. Decide on the mode to use the printer control panel, the BRAdmin Professional utility, or let your DHCP server allocate an IP address to the printer. 2 Refer to the Quick Setup Guide of this the...
.../IP or other network protocol users. Quick Tips: 1 The default IP address of Brother print servers is explained below. You can set the Netware environment easily by using the Netware Quick Setup option in the control menu. To change it is access. Decide on the mode to use the printer control panel, the BRAdmin Professional utility, or let your DHCP server allocate an IP address to the printer. 2 Refer to the Quick Setup Guide of this the...


