
Network Users Manual - English
Page 7
... Method of Wi-Fi Protected Setup to configure your machine for a wireless network ...27 4 Wireless configuration for Windows® using the Brother automatic installer application (For HL-3075CW) 28 Configuration in Infrastructure mode ...28 Before configuring the wireless settings 28 Configure the wireless settings...29 5 Wireless Configuration for Macintosh using the Brother installer application (For HL-3075CW) 30 Configuration in...
... Method of Wi-Fi Protected Setup to configure your machine for a wireless network ...27 4 Wireless configuration for Windows® using the Brother automatic installer application (For HL-3075CW) 28 Configuration in Infrastructure mode ...28 Before configuring the wireless settings 28 Configure the wireless settings...29 5 Wireless Configuration for Macintosh using the Brother installer application (For HL-3075CW) 30 Configuration in...
Network Users Manual - English
Page 8
... the PIN Method of Wi-Fi Protected Setup (For HL-3075CW) 36 Overview...36 How to configure your wireless machine, using the PIN Method of Wi-Fi Protected Setup 36 For Windows® users...38 For Macintosh users ...42 8 Control panel features 44 Overview...44 Network menu...45 TCP/IP ...45 Ethernet (wired network...
... the PIN Method of Wi-Fi Protected Setup (For HL-3075CW) 36 Overview...36 How to configure your wireless machine, using the PIN Method of Wi-Fi Protected Setup 36 For Windows® users...38 For Macintosh users ...42 8 Control panel features 44 Overview...44 Network menu...45 TCP/IP ...45 Ethernet (wired network...

Network Users Manual - English
Page 23
... wireless network. ("xxxxxxxxxxxx" is your machine using the BRAdmin Light utility 2 Note • You can print, configure the software settings following the instructions. • Node name: Node name appears in the current BRAdmin Light window. Double-click Macintosh HD (Startup Disk) / Library / Printers / Brother ...://solutions.brother.com/. Configuring your machine for a network Setting the IP address and subnet mask 2 Using the BRAdmin Light utility to configure your machine as a network printer 2 2 BRAdmin Light 2 The BRAdmin Light utility is designed for initial setup of anti...
... wireless network. ("xxxxxxxxxxxx" is your machine using the BRAdmin Light utility 2 Note • You can print, configure the software settings following the instructions. • Node name: Node name appears in the current BRAdmin Light window. Double-click Macintosh HD (Startup Disk) / Library / Printers / Brother ...://solutions.brother.com/. Configuring your machine for a network Setting the IP address and subnet mask 2 Using the BRAdmin Light utility to configure your machine as a network printer 2 2 BRAdmin Light 2 The BRAdmin Light utility is designed for initial setup of anti...
Network Users Manual - English
Page 28
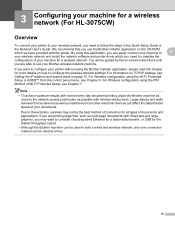
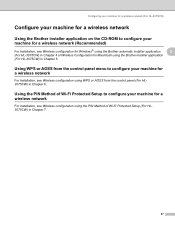
... or the Network User's Guide. Configuring your machine for a wireless network (For HL-3075CW)3 3 Configuring your machine for a wireless network (For HL-3075CW) 3 Overview 3 To connect your printer to your wireless network, you use your Brother wireless network machine. By using the Wi-Fi Protected Setup or AOSS™ from other electronic devices can easily connect your machine...
... or the Network User's Guide. Configuring your machine for a wireless network (For HL-3075CW)3 3 Configuring your machine for a wireless network (For HL-3075CW) 3 Overview 3 To connect your printer to your wireless network, you use your Brother wireless network machine. By using the Wi-Fi Protected Setup or AOSS™ from other electronic devices can easily connect your machine...
Network Users Manual - English
Page 32
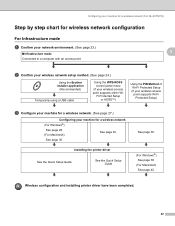
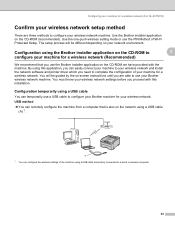
... page 42. Configuring your machine for a wireless network (For HL-3075CW) Step by step chart for wireless network configuration For Infrastructure mode a Confirm your network environment. (See page 23.) o Infrastructure mode Connected to a computer with an access point 3 3 3 b Confirm your wireless network setup method. (See page 24.) Using the Brother installer application (Recommended) Temporarily using a USB...
... page 42. Configuring your machine for a wireless network (For HL-3075CW) Step by step chart for wireless network configuration For Infrastructure mode a Confirm your network environment. (See page 23.) o Infrastructure mode Connected to a computer with an access point 3 3 3 b Confirm your wireless network setup method. (See page 24.) Using the Brother installer application (Recommended) Temporarily using a USB...
Network Users Manual - English
Page 34
... and install the network software and printer driver which you are three methods to configure your Brother machine for a wireless network. Configuration using the Brother installer application on the CD-ROM to configure your machine for a wireless network (For HL-3075CW) Confirm your wireless network setup method 3 There are able to use a USB cable to configure your...
... and install the network software and printer driver which you are three methods to configure your Brother machine for a wireless network. Configuration using the Brother installer application on the CD-ROM to configure your machine for a wireless network (For HL-3075CW) Confirm your wireless network setup method 3 There are able to use a USB cable to configure your...
Network Users Manual - English
Page 35
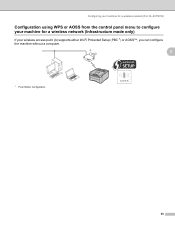
Configuring your machine for a wireless network (For HL-3075CW) Configuration using WPS or AOSS from the control panel menu to configure your machine for a wireless network (Infrastructure mode only) 3 If your wireless access point (A) supports either Wi-Fi Protected Setup (PBC 1) or AOSS™, you can configure the machine without a computer. A 3 1 Push Button Configuration 25
Configuring your machine for a wireless network (For HL-3075CW) Configuration using WPS or AOSS from the control panel menu to configure your machine for a wireless network (Infrastructure mode only) 3 If your wireless access point (A) supports either Wi-Fi Protected Setup (PBC 1) or AOSS™, you can configure the machine without a computer. A 3 1 Push Button Configuration 25
Network Users Manual - English
Page 36
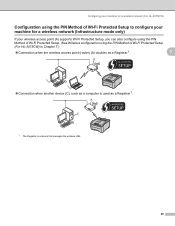
... can also configure using the PIN Method of Wi-Fi Protected Setup. (See Wireless configuration using the PIN Method of Wi-Fi Protected Setup (For HL-3075CW) in Chapter 7.) „ Connection when the wireless access point (router) (A) doubles as a Registrar 1. 3 A „ Connection when another device (C), such as a Registrar 1. A C 1 The Registrar is used as a computer is...
... can also configure using the PIN Method of Wi-Fi Protected Setup. (See Wireless configuration using the PIN Method of Wi-Fi Protected Setup (For HL-3075CW) in Chapter 7.) „ Connection when the wireless access point (router) (A) doubles as a Registrar 1. 3 A „ Connection when another device (C), such as a Registrar 1. A C 1 The Registrar is used as a computer is...
Network Users Manual - English
Page 37
... from the control panel menu to configure your machine for a wireless network 3 For installation, see Wireless configuration using the Brother installer application (For HL-3075CW) in Chapter 7. 27 Using the PIN Method of Wi-Fi Protected Setup to configure your machine for a wireless network 3 For installation, see Wireless configuration using the PIN Method of Wi-Fi Protected...
... from the control panel menu to configure your machine for a wireless network 3 For installation, see Wireless configuration using the Brother installer application (For HL-3075CW) in Chapter 7. 27 Using the PIN Method of Wi-Fi Protected Setup to configure your machine for a wireless network 3 For installation, see Wireless configuration using the PIN Method of Wi-Fi Protected...
Network Users Manual - English
Page 39
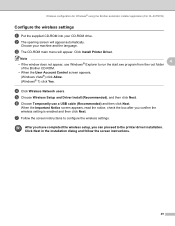
.... Click Install Printer Driver. e Choose Wireless Setup and Driver Install (Recommended), and then click Next. When the Important Notice screen appears, read the notice, check the box after you can proceed to configure the wireless settings. Wireless configuration for Windows® using the Brother automatic installer application (For HL-3075CW) Configure the wireless settings 4 a Put the supplied...
.... Click Install Printer Driver. e Choose Wireless Setup and Driver Install (Recommended), and then click Next. When the Important Notice screen appears, read the notice, check the box after you can proceed to configure the wireless settings. Wireless configuration for Windows® using the Brother automatic installer application (For HL-3075CW) Configure the wireless settings 4 a Put the supplied...
Network Users Manual - English
Page 41
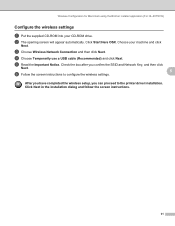
.... Click Start Here OSX. f Follow the screen instructions to configure the wireless settings. 5 After you have completed the wireless setup, you confirm the SSID and Network Key, and then click Next. Wireless Configuration for Macintosh using the Brother installer application (For HL-3075CW) Configure the wireless settings 5 a Put the supplied CD-ROM into your machine and click...
.... Click Start Here OSX. f Follow the screen instructions to configure the wireless settings. 5 After you have completed the wireless setup, you confirm the SSID and Network Key, and then click Next. Wireless Configuration for Macintosh using the Brother installer application (For HL-3075CW) Configure the wireless settings 5 a Put the supplied CD-ROM into your machine and click...

Network Users Manual - English
Page 42
...This feature automatically detects which mode your access point uses Wi-Fi Protected Setup or AOSS™. By pushing a button on the wireless access point/router, you can setup the wireless network and security settings. Your Brother machine has the WPS/AOSS menu on how to access one-push mode... on the control panel. Wireless configuration using SES/WPS or AOSS from(FothreHcLo-3n0tr7o5l CpaWn)e6l 6 Wireless configuration using WPS or AOSS from the control panel (For HL-3075CW) 6 Overview 6 If your wireless access point/router supports either Wi-Fi Protected Setup (PBC 1) or AOSS™...
...This feature automatically detects which mode your access point uses Wi-Fi Protected Setup or AOSS™. By pushing a button on the wireless access point/router, you can setup the wireless network and security settings. Your Brother machine has the WPS/AOSS menu on how to access one-push mode... on the control panel. Wireless configuration using SES/WPS or AOSS from(FothreHcLo-3n0tr7o5l CpaWn)e6l 6 Wireless configuration using WPS or AOSS from the control panel (For HL-3075CW) 6 Overview 6 If your wireless access point/router supports either Wi-Fi Protected Setup (PBC 1) or AOSS™...
Network Users Manual - English
Page 43
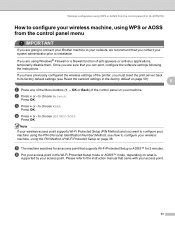
... Firewall or a firewall function of anti-spyware or antivirus applications, temporarily disable them. Note If your wireless access point supports Wi-Fi Protected Setup (PIN Method) and you want to configure your machine using the PIN (Personal Identification Number) Method,...Setup mode or AOSS™ mode, depending on page 36. d Press + or - Please refer to installation. Wireless configuration using WPS or AOSS from the control panel (For HL-3075CW) How to configure your wireless machine, using WPS or AOSS from the control panel menu 6 IMPORTANT If you are going to connect your Brother...
... Firewall or a firewall function of anti-spyware or antivirus applications, temporarily disable them. Note If your wireless access point supports Wi-Fi Protected Setup (PIN Method) and you want to configure your machine using the PIN (Personal Identification Number) Method,...Setup mode or AOSS™ mode, depending on page 36. d Press + or - Please refer to installation. Wireless configuration using WPS or AOSS from the control panel (For HL-3075CW) How to configure your wireless machine, using WPS or AOSS from the control panel menu 6 IMPORTANT If you are going to connect your Brother...
Network Users Manual - English
Page 44
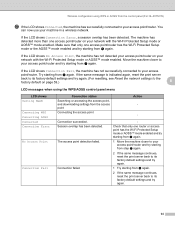
..., the machine has not detected your access point/router on page 59.) 6 LCD messages when using WPS or AOSS from the control panel (For HL-3075CW) g If the LCD shows Connected, the machine has successfully connected to your access point/router. Try starting from a again. Connection failed. ... one router or access point has the Wi-Fi Protected Setup mode or AOSS™ mode enabled and try starting from a again. 1 Move the machine closer to your machine in a wireless network. The access point detection failed. Wireless configuration using the WPS/AOSS control panel menu LCD shows ...
..., the machine has not detected your access point/router on page 59.) 6 LCD messages when using WPS or AOSS from the control panel (For HL-3075CW) g If the LCD shows Connected, the machine has successfully connected to your access point/router. Try starting from a again. Connection failed. ... one router or access point has the Wi-Fi Protected Setup mode or AOSS™ mode enabled and try starting from a again. 1 Move the machine closer to your machine in a wireless network. The access point detection failed. Wireless configuration using the WPS/AOSS control panel menu LCD shows ...
Network Users Manual - English
Page 45
Wireless configuration using WPS or AOSS from the CD-ROM menu. (Macintosh) You have completed the wireless network setup. If you would like to continue installing the printer driver necessary for operating your device, please choose Install Printer Driver from the control panel (For HL-3075CW) (Windows®) You have completed the wireless network setup. If you would like to continue installing the printer driver necessary for operating your device, please choose Start Here OSX from the CDROM menu. 6 35
Wireless configuration using WPS or AOSS from the CD-ROM menu. (Macintosh) You have completed the wireless network setup. If you would like to continue installing the printer driver necessary for operating your device, please choose Install Printer Driver from the control panel (For HL-3075CW) (Windows®) You have completed the wireless network setup. If you would like to continue installing the printer driver necessary for operating your device, please choose Start Here OSX from the CDROM menu. 6 35
Network Users Manual - English
Page 46
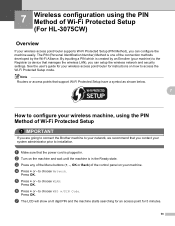
...Press + or - Press OK. Note Routers or access points that support Wi-Fi Protected Setup have a symbol as shown below. 7 How to configure your wireless machine, using the PIN Method of Wi-Fi Protected Setup (For HL-3075CW) 7 Overview 7 If your machine. Press OK. b Turn on the machine and ... of Wi-(FioPr rHoLte-3ct0e7d5SCeWtu)7p 7 Wireless configuration using the PIN Method of Wi-Fi Protected Setup 7 IMPORTANT If you are going to connect the Brother machine to your network, we recommend that manages the wireless LAN), you can setup the wireless network and security settings. See the user...
...Press + or - Press OK. Note Routers or access points that support Wi-Fi Protected Setup have a symbol as shown below. 7 How to configure your wireless machine, using the PIN Method of Wi-Fi Protected Setup (For HL-3075CW) 7 Overview 7 If your machine. Press OK. b Turn on the machine and ... of Wi-(FioPr rHoLte-3ct0e7d5SCeWtu)7p 7 Wireless configuration using the PIN Method of Wi-Fi Protected Setup 7 IMPORTANT If you are going to connect the Brother machine to your network, we recommend that manages the wireless LAN), you can setup the wireless network and security settings. See the user...
Network Users Manual - English
Page 47
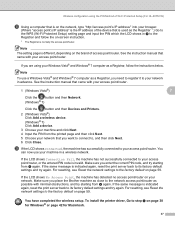
... below. Make sure you place the Brother machine as close to the network access point/router as the Registrar 1.) Go to the WPS (Wi-Fi Protected Setup) setting page and input the PIN ...59. Make sure you enter the correct PIN code, and try again. You have completed the wireless setup. See the instruction manual that is indicated again, reset the print server back to its factory...to , and then click Next. 6 Click Close. If you are using the PIN Method of Wi-Fi Protected Setup (For HL-3075CW) h Using a computer that is on the network, type "http://access point's IP address/" into your ...
... below. Make sure you place the Brother machine as close to the network access point/router as the Registrar 1.) Go to the WPS (Wi-Fi Protected Setup) setting page and input the PIN ...59. Make sure you enter the correct PIN code, and try again. You have completed the wireless setup. See the instruction manual that is indicated again, reset the print server back to its factory...to , and then click Next. 6 Click Close. If you are using the PIN Method of Wi-Fi Protected Setup (For HL-3075CW) h Using a computer that is on the network, type "http://access point's IP address/" into your ...
Network Users Manual - English
Page 48
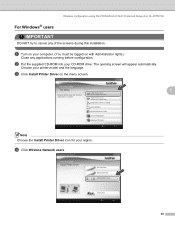
... users. 38 The opening screen will appear automatically. Wireless configuration using the PIN Method of the screens during this installation. a Turn on your CD-ROM drive. c Click Install Printer Driver on with Administrator rights.) Close any of Wi-Fi Protected Setup (For HL-3075CW) For Windows® users 7 IMPORTANT DO NOT try to...
... users. 38 The opening screen will appear automatically. Wireless configuration using the PIN Method of the screens during this installation. a Turn on your CD-ROM drive. c Click Install Printer Driver on with Administrator rights.) Close any of Wi-Fi Protected Setup (For HL-3075CW) For Windows® users 7 IMPORTANT DO NOT try to...
Network Users Manual - English
Page 49
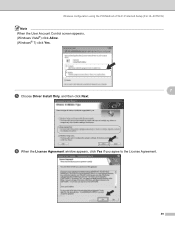
f When the License Agreement window appears, click Yes if you agree to the License Agreement. 39 Wireless configuration using the PIN Method of Wi-Fi Protected Setup (For HL-3075CW) Note When the User Account Control screen appears, (Windows Vista®) click Allow. (Windows® 7) click Yes. 7 e Choose Driver Install Only, and then click Next.
f When the License Agreement window appears, click Yes if you agree to the License Agreement. 39 Wireless configuration using the PIN Method of Wi-Fi Protected Setup (For HL-3075CW) Note When the User Account Control screen appears, (Windows Vista®) click Allow. (Windows® 7) click Yes. 7 e Choose Driver Install Only, and then click Next.
Network Users Manual - English
Page 50
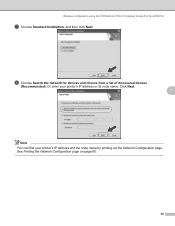
Wireless configuration using the PIN Method of discovered devices (Recommended). Click Next. 7 Note You can find your printer's IP address or its node name. Or enter your printer's IP address and the node name by printing out the Network Configuration page. See Printing the Network Configuration page on page 60. 40 h Choose Search the network for devices and choose from a list of Wi-Fi Protected Setup (For HL-3075CW) g Choose Standard Installation, and then click Next.
Wireless configuration using the PIN Method of discovered devices (Recommended). Click Next. 7 Note You can find your printer's IP address or its node name. Or enter your printer's IP address and the node name by printing out the Network Configuration page. See Printing the Network Configuration page on page 60. 40 h Choose Search the network for devices and choose from a list of Wi-Fi Protected Setup (For HL-3075CW) g Choose Standard Installation, and then click Next.


