Users Manual - English
Page 6
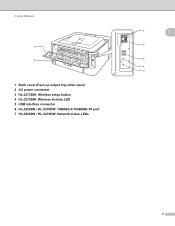
Printing Methods 1 2 1 Back cover (Face-up output tray when open) 2 AC power connector 3 HL-2270DW: Wireless setup button 4 HL-2270DW: Wireless Activity LED 5 USB interface connector 6 HL-2250DN / HL-2270DW: 10BASE-T/100BASE-TX port 7 HL-2250DN / HL-2270DW: Network status LEDs 7 1 6 5 4 3 2
Printing Methods 1 2 1 Back cover (Face-up output tray when open) 2 AC power connector 3 HL-2270DW: Wireless setup button 4 HL-2270DW: Wireless Activity LED 5 USB interface connector 6 HL-2250DN / HL-2270DW: 10BASE-T/100BASE-TX port 7 HL-2250DN / HL-2270DW: Network status LEDs 7 1 6 5 4 3 2
Users Manual - English
Page 17
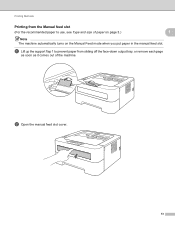
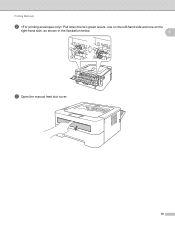
b Open the manual feed slot cover. 13 a Lift up the support flap 1 to use, see Type and size of the machine. Printing Methods Printing from the Manual feed slot (For the recommended paper to prevent paper from sliding off the face-down output tray, or remove each page as soon as it comes out of paper on page 3.) 1 1 Note The machine automatically turns on the Manual Feed mode when you put paper in the manual feed slot.
b Open the manual feed slot cover. 13 a Lift up the support flap 1 to use, see Type and size of the machine. Printing Methods Printing from the Manual feed slot (For the recommended paper to prevent paper from sliding off the face-down output tray, or remove each page as soon as it comes out of paper on page 3.) 1 1 Note The machine automatically turns on the Manual Feed mode when you put paper in the manual feed slot.
Users Manual - English
Page 19
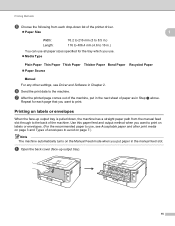
... slot. Use this paper feed and output method when you want to print on labels or envelopes 1 When the face-up output tray). 15 a Open the back cover (face-up output tray is pulled down, the machine has a straight paper path from each drop-down list of the printer driver. Paper...
... slot. Use this paper feed and output method when you want to print on labels or envelopes 1 When the face-up output tray). 15 a Open the back cover (face-up output tray is pulled down, the machine has a straight paper path from each drop-down list of the printer driver. Paper...
Users Manual - English
Page 20
Printing Methods b Pull down the two green levers, one on the left-hand side and one on the right-hand side, as shown in the illustration below. 1 c Open the manual feed slot cover. 16
Printing Methods b Pull down the two green levers, one on the left-hand side and one on the right-hand side, as shown in the illustration below. 1 c Open the manual feed slot cover. 16

Users Manual - English
Page 57
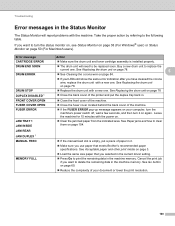
... shown in the table below are used in the illustrations in this chapter. LED is in one of the following states: 4 No paper / Paper jam / Cover open 4 Ready LED The Ready LED will flash depending on . or or or or LED is dimmed. The LED is off. LED is flashing. 53
... shown in the table below are used in the illustrations in this chapter. LED is in one of the following states: 4 No paper / Paper jam / Cover open 4 Ready LED The Ready LED will flash depending on . or or or or LED is dimmed. The LED is off. LED is flashing. 53

Users Manual - English
Page 59
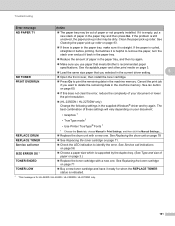
... cartridge with a new one . TONER ENDED Replace the toner cartridge with a new one . Buy a new toner cartridge and have it back in. NO TONER Open the front cover, install the toner cartridge. The Toner LED will need to be replaced soon. See Toner cartridge on page 71. See Replacing the toner cartridge...
... cartridge with a new one . TONER ENDED Replace the toner cartridge with a new one . Buy a new toner cartridge and have it back in. NO TONER Open the front cover, install the toner cartridge. The Toner LED will need to be replaced soon. See Toner cartridge on page 71. See Replacing the toner cartridge...

Users Manual - English
Page 61
...page 118. See Solving print problems on page 84. SIZE ERROR DX (HL-2240D / HL-2242D / HL-2250DN / HL-2270DW only) Set the correct paper that you selected in the machine and close the back cover. See Paper jams and how to be cleaned. See Solving print problems ... JAM REAR / JAM DUPLEX 3 Clear the paper jam. Press Go. Control Panel LEDs Machine Status FRONT COVER OPEN Close the front cover of a document. FUSER COVER OPEN Close the fuser cover located behind the back cover of a document. DRUM STOP Replace the drum unit with a new one. See Replacing the drum unit ...
...page 118. See Solving print problems on page 84. SIZE ERROR DX (HL-2240D / HL-2242D / HL-2250DN / HL-2270DW only) Set the correct paper that you selected in the machine and close the back cover. See Paper jams and how to be cleaned. See Solving print problems ... JAM REAR / JAM DUPLEX 3 Clear the paper jam. Press Go. Control Panel LEDs Machine Status FRONT COVER OPEN Close the front cover of a document. FUSER COVER OPEN Close the fuser cover located behind the back cover of a document. DRUM STOP Replace the drum unit with a new one. See Replacing the drum unit ...
Users Manual - English
Page 75
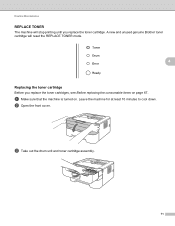
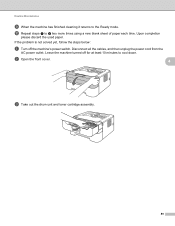
c Take out the drum unit and toner cartridge assembly. 71 Leave the machine for at least 10 minutes to cool down. A new and unused genuine Brother toner cartridge will stop printing until you replace the toner cartridges, see Before replacing the consumable items on . a Make sure that the machine is turned on page 67. b Open the front cover. Routine Maintenance REPLACE TONER 4 The machine will reset the REPLACE TONER mode. 4 Replacing the toner cartridge 4 Before you replace the toner cartridge.
c Take out the drum unit and toner cartridge assembly. 71 Leave the machine for at least 10 minutes to cool down. A new and unused genuine Brother toner cartridge will stop printing until you replace the toner cartridges, see Before replacing the consumable items on . a Make sure that the machine is turned on page 67. b Open the front cover. Routine Maintenance REPLACE TONER 4 The machine will reset the REPLACE TONER mode. 4 Replacing the toner cartridge 4 Before you replace the toner cartridge.

Users Manual - English
Page 78
i Put the drum unit and toner cartridge assembly back into the machine. Close the front cover. Note DO NOT turn off the machine's power switch or open the front cover until the Ready LED lights up. 74 Routine Maintenance h Clean the primary corona wire inside the drum unit by gently sliding the green tab from right to left and left to right several times. 4 1 Note Be sure to return the tab to the home position (a) (1). If you do not, printed pages may have a vertical stripe.
i Put the drum unit and toner cartridge assembly back into the machine. Close the front cover. Note DO NOT turn off the machine's power switch or open the front cover until the Ready LED lights up. 74 Routine Maintenance h Clean the primary corona wire inside the drum unit by gently sliding the green tab from right to left and left to right several times. 4 1 Note Be sure to return the tab to the home position (a) (1). If you do not, printed pages may have a vertical stripe.

Users Manual - English
Page 82
b Open the front cover. 4 c Take out the drum unit and toner cartridge assembly. 78 Leave the machine for at least 10 minutes to reset the drum counter by completing the following steps: a Make sure that the machine is turned on page 67. When you replace the drum unit with a new one, you replace the drum unit, see Before replacing the consumable items on and the Drum LED is flashing. Routine Maintenance Replacing the drum unit 4 Before you need to cool down.
b Open the front cover. 4 c Take out the drum unit and toner cartridge assembly. 78 Leave the machine for at least 10 minutes to reset the drum counter by completing the following steps: a Make sure that the machine is turned on page 67. When you replace the drum unit with a new one, you replace the drum unit, see Before replacing the consumable items on and the Drum LED is flashing. Routine Maintenance Replacing the drum unit 4 Before you need to cool down.

Users Manual - English
Page 88
Routine Maintenance Cleaning the corona wire If you accidentally spill or scatter toner. • To prevent damage to cool down. b Take out the drum unit and toner cartridge assembly. 4 4 IMPORTANT • We recommend that you put the drum unit and toner cartridge assembly on a piece of disposable paper or cloth in case you have print quality problems, clean the corona wire as follows: a Open the front cover and leave the machine for at least 10 minutes to the machine from static electricity, DO NOT touch the electrodes shown in the illustration. 84
Routine Maintenance Cleaning the corona wire If you accidentally spill or scatter toner. • To prevent damage to cool down. b Take out the drum unit and toner cartridge assembly. 4 4 IMPORTANT • We recommend that you put the drum unit and toner cartridge assembly on a piece of disposable paper or cloth in case you have print quality problems, clean the corona wire as follows: a Open the front cover and leave the machine for at least 10 minutes to the machine from static electricity, DO NOT touch the electrodes shown in the illustration. 84
Users Manual - English
Page 90
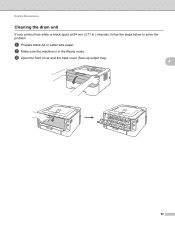
Routine Maintenance Cleaning the drum unit 4 If your printout has white or black spots at 94 mm (3.71 in the Ready mode. b Make sure the machine is in .) intervals, follow the steps below to solve the problem. a Prepare blank A4 or Letter size paper. c Open the front cover and the back cover (face-up output tray). 4 86
Routine Maintenance Cleaning the drum unit 4 If your printout has white or black spots at 94 mm (3.71 in the Ready mode. b Make sure the machine is in .) intervals, follow the steps below to solve the problem. a Prepare blank A4 or Letter size paper. c Open the front cover and the back cover (face-up output tray). 4 86
Users Manual - English
Page 91
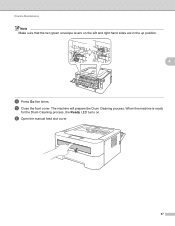
When the machine is ready for the Drum Cleaning process, the Ready LED turns on the left and right hand sides are in the up position. 4 d Press Go five times. The machine will prepare the Drum Cleaning process. f Open the manual feed slot cover. 87 Routine Maintenance Note Make sure that the two green envelope levers on . e Close the front cover.
When the machine is ready for the Drum Cleaning process, the Ready LED turns on the left and right hand sides are in the up position. 4 d Press Go five times. The machine will prepare the Drum Cleaning process. f Open the manual feed slot cover. 87 Routine Maintenance Note Make sure that the two green envelope levers on . e Close the front cover.
Users Manual - English
Page 93
Upon completion please discard the used paper. Leave the machine turned off the machine's power switch. b Open the front cover. 4 c Take out the drum unit and toner cartridge assembly. 89 j Repeat steps c to cool down. Disconnect all the cables, and then unplug the power cord from the AC power outlet. If the problem is not solved yet, follow the steps below: a Turn off for at least 10 minutes to i two more times using a new blank sheet of paper each time. Routine Maintenance i When the machine has finished cleaning it returns to the Ready mode.
Upon completion please discard the used paper. Leave the machine turned off the machine's power switch. b Open the front cover. 4 c Take out the drum unit and toner cartridge assembly. 89 j Repeat steps c to cool down. Disconnect all the cables, and then unplug the power cord from the AC power outlet. If the problem is not solved yet, follow the steps below: a Turn off for at least 10 minutes to i two more times using a new blank sheet of paper each time. Routine Maintenance i When the machine has finished cleaning it returns to the Ready mode.

Users Manual - English
Page 96
Put the drum unit and toner cartridge assembly back into place. j Put the paper tray firmly back in properly, the green lock lever will lift automatically. 4 i Open the front cover. h Put the toner cartridge back into the drum unit until you put the cartridge in the machine. k Close the front cover. 92 Routine Maintenance IMPORTANT DO NOT clean the surface of the photosensitive drum with a sharp object. If you hear it lock into the machine.
Put the drum unit and toner cartridge assembly back into place. j Put the paper tray firmly back in properly, the green lock lever will lift automatically. 4 i Open the front cover. h Put the toner cartridge back into the drum unit until you put the cartridge in the machine. k Close the front cover. 92 Routine Maintenance IMPORTANT DO NOT clean the surface of the photosensitive drum with a sharp object. If you hear it lock into the machine.

Users Manual - English
Page 99
The machine should be adequately insured with the carrier. Leave the machine turned off the machine's power switch. b Open the front cover. 4 c Take out the drum unit and toner cartridge assembly. Disconnect all the cables, and then unplug the power cord from static electricity, DO NOT touch ...
The machine should be adequately insured with the carrier. Leave the machine turned off the machine's power switch. b Open the front cover. 4 c Take out the drum unit and toner cartridge assembly. Disconnect all the cables, and then unplug the power cord from static electricity, DO NOT touch ...
Users Manual - English
Page 104
...setting. Press Go to replace the current one . Error message CARTRIDGE ERROR DRUM END SOON DRUM ERROR DRUM STOP DUPLEX DISABLED 1 FRONT COVER OPEN FUSER COVER OPEN FUSER ERROR JAM TRAY 1 JAM INSIDE JAM REAR JAM DUPLEX 1 MANUAL FEED MEMORY FULL Action Make sure the drum unit and toner... Go button on page 3. Load the same size paper that you use paper that meets Brother's recommended paper specifications. See Replacing the drum unit on page 78 Close the back cover of your computer, turn the machine's power switch off, wait a few seconds, and then turn ...
...setting. Press Go to replace the current one . Error message CARTRIDGE ERROR DRUM END SOON DRUM ERROR DRUM STOP DUPLEX DISABLED 1 FRONT COVER OPEN FUSER COVER OPEN FUSER ERROR JAM TRAY 1 JAM INSIDE JAM REAR JAM DUPLEX 1 MANUAL FEED MEMORY FULL Action Make sure the drum unit and toner... Go button on page 3. Load the same size paper that you use paper that meets Brother's recommended paper specifications. See Replacing the drum unit on page 78 Close the back cover of your computer, turn the machine's power switch off, wait a few seconds, and then turn ...
Users Manual - English
Page 105
... Printer TrueType® Fonts 1 REPLACE DRUM 1 Choose the Basic tab, choose Manual in the paper tray, make sure it ready for HL-2240D / HL-2242D / HL-2250DN / HL-2270DW only. 101 If it before printing. The best combination of paper in the paper tray and then press Go. See Go button...; Open the front cover, then install the toner cartridge. Service call indications on page 60. If this does not clear the error, reduce the complexity of paper or not properly installed. See Replacing the toner cartridge on page 3. Load the same size paper that meets Brother's ...
... Printer TrueType® Fonts 1 REPLACE DRUM 1 Choose the Basic tab, choose Manual in the paper tray, make sure it ready for HL-2240D / HL-2242D / HL-2250DN / HL-2270DW only. 101 If it before printing. The best combination of paper in the paper tray and then press Go. See Go button...; Open the front cover, then install the toner cartridge. Service call indications on page 60. If this does not clear the error, reduce the complexity of paper or not properly installed. See Replacing the toner cartridge on page 3. Load the same size paper that meets Brother's ...
Users Manual - English
Page 147
... (USA/Canada 142 Apple Macintosh 39, 119 B Bar code control commands 132 Brother Numbers (USA/Canada 140, 141 C CARTRIDGE ERROR 55 Cleaning 82 Computer requirements 125 Consumable items 66 Control panel 53, 122 Corona wire 74, 84, 85 Cover Open 57 D Deep Sleep mode 54 Default settings 64 Dimensions 123 Domain 129 DRUM...
... (USA/Canada 142 Apple Macintosh 39, 119 B Bar code control commands 132 Brother Numbers (USA/Canada 140, 141 C CARTRIDGE ERROR 55 Cleaning 82 Computer requirements 125 Consumable items 66 Control panel 53, 122 Corona wire 74, 84, 85 Cover Open 57 D Deep Sleep mode 54 Default settings 64 Dimensions 123 Domain 129 DRUM...
Quick Setup Guide - English
Page 1
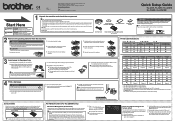
Quick Setup Guide HL-2230, HL-2240, HL-2240D HL-2242D, HL-2250DN Start Here WARNING indicates a potentially hazardous situation which ...panel. Printer LED Toner Drum Error Ready User's Guide Printer LED Toner Drum Error Ready TONER LOW3 Chapter 4 COVER OPEN PAPER JAM2 REPLACE TONER4 TONER ENDED DRUM END SOON3 Chapter 4 Chapter 4 Chapter 4 NO PAPER DRUM ERROR2 ... DATA DATA REMAINING2 3 Load paper in the machine. d. For Network Users (For HL-2250DN only) Web Based Management (web browser) The Brother print server is equipped with the carrier. (EU Only) ENG Version 0 Before using...
Quick Setup Guide HL-2230, HL-2240, HL-2240D HL-2242D, HL-2250DN Start Here WARNING indicates a potentially hazardous situation which ...panel. Printer LED Toner Drum Error Ready User's Guide Printer LED Toner Drum Error Ready TONER LOW3 Chapter 4 COVER OPEN PAPER JAM2 REPLACE TONER4 TONER ENDED DRUM END SOON3 Chapter 4 Chapter 4 Chapter 4 NO PAPER DRUM ERROR2 ... DATA DATA REMAINING2 3 Load paper in the machine. d. For Network Users (For HL-2250DN only) Web Based Management (web browser) The Brother print server is equipped with the carrier. (EU Only) ENG Version 0 Before using...


