Users Manual - English
Page 5
TABLE OF CONTENTS CHAPTER 1 ABOUT THIS PRINTER What is included in the carton 1-1 Components 1-1 General View 1-8 Positioning the printer 1-10 Power supply 1-10 Environment 1-11 What kind of paper can I use 1-12 Print media and size 1-12 Printing from the Paper cassette 1-17 Printing from the Multi-purpose tray 1-21 Printing envelopes 1-25 Printing on Labels, Transparencies etc 1-31 Printing to the Face up output tray (Face up printing 1-37 Printing on both sides of the paper (Duplex printing 1-39 Manual Feed 1-42
TABLE OF CONTENTS CHAPTER 1 ABOUT THIS PRINTER What is included in the carton 1-1 Components 1-1 General View 1-8 Positioning the printer 1-10 Power supply 1-10 Environment 1-11 What kind of paper can I use 1-12 Print media and size 1-12 Printing from the Paper cassette 1-17 Printing from the Multi-purpose tray 1-21 Printing envelopes 1-25 Printing on Labels, Transparencies etc 1-31 Printing to the Face up output tray (Face up printing 1-37 Printing on both sides of the paper (Duplex printing 1-39 Manual Feed 1-42
Users Manual - English
Page 11
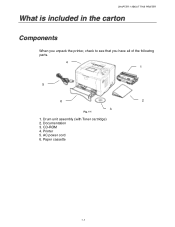
Drum unit assembly (with Toner cartridge) 2. Paper cassette 1-1 Printer 5. Documentation 3. CHAPTER 1 ABOUT THIS PRINTER What is included in the carton Components When you unpack the printer, check to see that you have all of the following parts. 4 1 5 6 2 3 Fig. 1-1 1. AC power cord 6. CD-ROM 4.
Drum unit assembly (with Toner cartridge) 2. Paper cassette 1-1 Printer 5. Documentation 3. CHAPTER 1 ABOUT THIS PRINTER What is included in the carton Components When you unpack the printer, check to see that you have all of the following parts. 4 1 5 6 2 3 Fig. 1-1 1. AC power cord 6. CD-ROM 4.

Users Manual - English
Page 27
While pressing the paper guide release lever, slide the adjusters to fit the paper size. Check that they fit correctly into the slots. Fig. 1-7 1-17 CHAPTER 1 ABOUT THIS PRINTER Printing from the Paper cassette ☛ 1. Fig. 1-6 ☛ 2. Pull the paper cassette out of the printer.
While pressing the paper guide release lever, slide the adjusters to fit the paper size. Check that they fit correctly into the slots. Fig. 1-7 1-17 CHAPTER 1 ABOUT THIS PRINTER Printing from the Paper cassette ☛ 1. Fig. 1-6 ☛ 2. Pull the paper cassette out of the printer.

Users Manual - English
Page 28
Load paper in . Fig. 1-9 1-18 paper While pressing the Universal guide release lever, extend the rear of the Paper cassette. Check that the paper is flat and below the limit mark. For Legal or 8.5 x 13 in the paper cassette. Fig. 1-8 ☛ 3.
Load paper in . Fig. 1-9 1-18 paper While pressing the Universal guide release lever, extend the rear of the Paper cassette. Check that the paper is flat and below the limit mark. For Legal or 8.5 x 13 in the paper cassette. Fig. 1-8 ☛ 3.

Users Manual - English
Page 29
Fig. 1-10 1-19 Install the paper cassette into the printer. ✒ Note • Extend the Extension flap to prevent the paper from sliding off the face down output tray. • If you choose not to the lines on transparencies, use the Face down output tray. When ... immediately after they exit the printer. ✒ Note CHAPTER 1 ABOUT THIS PRINTER Do not load more than 250 sheets of paper (80 g/m2 or 21 lb.) in the cassette or paper jams may occur. Paper can be loaded up to extend the Extension flap, we recommend that you print on the sliding guide. ☛ 4.
Fig. 1-10 1-19 Install the paper cassette into the printer. ✒ Note • Extend the Extension flap to prevent the paper from sliding off the face down output tray. • If you choose not to the lines on transparencies, use the Face down output tray. When ... immediately after they exit the printer. ✒ Note CHAPTER 1 ABOUT THIS PRINTER Do not load more than 250 sheets of paper (80 g/m2 or 21 lb.) in the cassette or paper jams may occur. Paper can be loaded up to extend the Extension flap, we recommend that you print on the sliding guide. ☛ 4.

Users Manual - English
Page 36
...Note • Before printing envelopes, you must fan the stack of envelopes well to avoid paper jams and misfeeds. • Do not load different types of paper at the same time in the paper cassette because paper jams and misfeeds may occur. • Do not print envelopes using Duplex printing. &#...8226; For correct printing, you must select the same paper size from within your software application as the paper in the tray. &#...
...Note • Before printing envelopes, you must fan the stack of envelopes well to avoid paper jams and misfeeds. • Do not load different types of paper at the same time in the paper cassette because paper jams and misfeeds may occur. • Do not print envelopes using Duplex printing. &#...8226; For correct printing, you must select the same paper size from within your software application as the paper in the tray. &#...

Users Manual - English
Page 42
...; Do not load different types of paper at the edge. • Do not place the punched holes of organizer sheets near the actuator (paper sensor). • Do not use paper with perforations at the same time in the paper cassette because it may cause paper jams or misfeeds. • For correct... printing, you must select the same paper size from within your software application as the paper in the tray. •...
...; Do not load different types of paper at the edge. • Do not place the punched holes of organizer sheets near the actuator (paper sensor). • Do not use paper with perforations at the same time in the paper cassette because it may cause paper jams or misfeeds. • For correct... printing, you must select the same paper size from within your software application as the paper in the tray. •...

Users Manual - English
Page 47
Open the Face up output tray extension. Fig. 1-28 Unfold the Face up output tray. ☛ 2. Fig. 1-29 1-37 CHAPTER 1 ABOUT THIS PRINTER Printing to the rear of the printer. Use this output method when you want to print on special media that is open, the printer has a straight paper path from the Paper cassette or Multi-purpose tray to the Face up output tray (Face up printing) When the Face up output tray is thick or should not be bent, such as heavy paper, labels, transparencies, card stock or envelopes. ☛ 1.
Open the Face up output tray extension. Fig. 1-28 Unfold the Face up output tray. ☛ 2. Fig. 1-29 1-37 CHAPTER 1 ABOUT THIS PRINTER Printing to the rear of the printer. Use this output method when you want to print on special media that is open, the printer has a straight paper path from the Paper cassette or Multi-purpose tray to the Face up output tray (Face up printing) When the Face up output tray is thick or should not be bent, such as heavy paper, labels, transparencies, card stock or envelopes. ☛ 1.

Users Manual - English
Page 48
Fig. 1-30 After the printer ejects all the printed pages, remove them and close the Face up output tray. 1-38 Place the paper into the Paper cassette or Multi-purpose tray. ☛ 4. ☛ 3.
Fig. 1-30 After the printer ejects all the printed pages, remove them and close the Face up output tray. 1-38 Place the paper into the Paper cassette or Multi-purpose tray. ☛ 4. ☛ 3.
Users Manual - English
Page 49
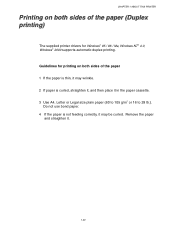
...paper and straighten it in the paper cassette. 3 Use A4, Letter or Legal size plain paper (60 to 105 g/m2 or 16 to 28 lb.). Guidelines for Windows® 95 / 98 / Me, Windows NT® 4.0, Windows® 2000 supports automatic duplex printing. CHAPTER 1 ABOUT THIS PRINTER Printing on both sides of the paper... (Duplex printing) The supplied printer drivers for printing on both sides of the paper 1 If the paper is curled, straighten it, and then place it . 1-39 Do not use bond...
...paper and straighten it in the paper cassette. 3 Use A4, Letter or Legal size plain paper (60 to 105 g/m2 or 16 to 28 lb.). Guidelines for Windows® 95 / 98 / Me, Windows NT® 4.0, Windows® 2000 supports automatic duplex printing. CHAPTER 1 ABOUT THIS PRINTER Printing on both sides of the paper... (Duplex printing) The supplied printer drivers for printing on both sides of the paper 1 If the paper is curled, straighten it, and then place it . 1-39 Do not use bond...

Users Manual - English
Page 50
Fig. 1-32 ✒ Note If the Paper adjustment lever for duplex printing is not correctly set the Paper adjustment lever for the paper size, paper jams may occur and the printing will be out of position on the paper. 1-40 Load paper into the Paper cassette or Multi-purpose tray. When you use A4 or Letter size paper, set for duplex printing to match your paper size. ☛ 1. Fig. 1-31 ☛ 2.
Fig. 1-32 ✒ Note If the Paper adjustment lever for duplex printing is not correctly set the Paper adjustment lever for the paper size, paper jams may occur and the printing will be out of position on the paper. 1-40 Load paper into the Paper cassette or Multi-purpose tray. When you use A4 or Letter size paper, set for duplex printing to match your paper size. ☛ 1. Fig. 1-31 ☛ 2.

Users Manual - English
Page 123
Paper cassette (Tray 1) 250 sheets Multi-purpose tray (MP tray) 100 sheets Lower tray unit (Tray 2) 250 sheets Expands up to 600 sheets total Fig. 4-1 To purchase the optional Lower tray unit (tray 2), consult the dealer where you purchased the printer. 4-2 Lower tray unit (LT-500) The Lower tray unit (tray 2) is a device that functions as an additional paper source. It can hold a maximum of 250 sheets of paper (80 g/m2 or 21 lb.).
Paper cassette (Tray 1) 250 sheets Multi-purpose tray (MP tray) 100 sheets Lower tray unit (Tray 2) 250 sheets Expands up to 600 sheets total Fig. 4-1 To purchase the optional Lower tray unit (tray 2), consult the dealer where you purchased the printer. 4-2 Lower tray unit (LT-500) The Lower tray unit (tray 2) is a device that functions as an additional paper source. It can hold a maximum of 250 sheets of paper (80 g/m2 or 21 lb.).
Users Manual - English
Page 168
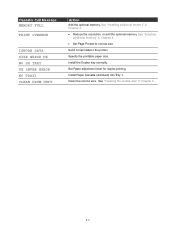
Install the Duplex tray correctly. Install Paper cassette (standard) into Tray 1. Send correct data to correct size. Set Paper adjustment lever for duplex printing. Specify the printable paper size. OOppeerraattoorr CCaallll MMeessssaaggee MEMORY FULL PRINT OVERRUN IGNORE DATA SIZE ERROR DX NO DX TRAY DX LEVER ERROR NO TRAY1 CLEAN DRUM UNIT AAccttiioonn ...
Install the Duplex tray correctly. Install Paper cassette (standard) into Tray 1. Send correct data to correct size. Set Paper adjustment lever for duplex printing. Specify the printable paper size. OOppeerraattoorr CCaallll MMeessssaaggee MEMORY FULL PRINT OVERRUN IGNORE DATA SIZE ERROR DX NO DX TRAY DX LEVER ERROR NO TRAY1 CLEAN DRUM UNIT AAccttiioonn ...

Users Manual - English
Page 171
.... • Make sure that MANUAL FEED = ON (STOP) is selected. 6-5 The printer does not print into the paper cassette. • Reduce the amount of paper in the paper cassette, make sure it is usually done in the page setup or document setup menu of pages. Your application software must be set ...up output tray. • Turn the paper in the Paper cassette over and place it back into the Face down output tray can I use?" in Media Type to a thicker level setting than current ...
.... • Make sure that MANUAL FEED = ON (STOP) is selected. 6-5 The printer does not print into the paper cassette. • Reduce the amount of paper in the paper cassette, make sure it is usually done in the page setup or document setup menu of pages. Your application software must be set ...up output tray. • Turn the paper in the Paper cassette over and place it back into the Face down output tray can I use?" in Media Type to a thicker level setting than current ...

Users Manual - English
Page 174
Fig. 6-2 6-8 JAM TRAY1 JAM TRAY1 Follow the instructions below to clear a paper jam: ☛ 1. Pull the Paper cassette completely out of the printer. Fig. 6-1 Pull the jammed paper out of the printer. ☛ 2.
Fig. 6-2 6-8 JAM TRAY1 JAM TRAY1 Follow the instructions below to clear a paper jam: ☛ 1. Pull the Paper cassette completely out of the printer. Fig. 6-1 Pull the jammed paper out of the printer. ☛ 2.

Users Manual - English
Page 175
Install the paper cassette into the printer. CHAPTER 6 TROUBLESHOOTING ! Caution Do not pull out the standard Paper cassette while paper is being fed from the optional Lower paper cassette because it will cause a paper jam. 6-9 ☛ 3.
Install the paper cassette into the printer. CHAPTER 6 TROUBLESHOOTING ! Caution Do not pull out the standard Paper cassette while paper is being fed from the optional Lower paper cassette because it will cause a paper jam. 6-9 ☛ 3.

Users Manual - English
Page 176
Fig. 6-3 Using both hands, pull the jammed paper out of the printer. ☛ 2. Fig. 6-4 Install the Lower paper cassette into the printer. 6-10 Pull the Lower paper cassette completely out of the printer. ☛ 3. JAM TRAY2 JAM TRAY2 Follow the instructions below to clear the paper jam: ☛ 1.
Fig. 6-3 Using both hands, pull the jammed paper out of the printer. ☛ 2. Fig. 6-4 Install the Lower paper cassette into the printer. 6-10 Pull the Lower paper cassette completely out of the printer. ☛ 3. JAM TRAY2 JAM TRAY2 Follow the instructions below to clear the paper jam: ☛ 1.

Users Manual - English
Page 178
Fig. 6-8 6-12 Pull the jammed paper up and out of the printer. Pull the Paper cassette completely out of the printer. Press the Cover release button, and then open the Front cover. ☛ 2. ☛ 3. Fig. 6-7 Pull the Drum unit assembly out of the printer. JAM INSIDE JAM INSIDE Follow the instructions below to clear the paper jam: ☛ 1.
Fig. 6-8 6-12 Pull the jammed paper up and out of the printer. Pull the Paper cassette completely out of the printer. Press the Cover release button, and then open the Front cover. ☛ 2. ☛ 3. Fig. 6-7 Pull the Drum unit assembly out of the printer. JAM INSIDE JAM INSIDE Follow the instructions below to clear the paper jam: ☛ 1.

Users Manual - English
Page 179
...; Take care not to stain your hands and clothes with cold water. • Never touch the transfer roller. ☛ 4. Install the Drum unit assembly and Paper cassette into the printer. Remove the paper carefully. ! Fig. 6-9 6-13 CHAPTER 6 TROUBLESHOOTING Warning The fixing roller is extremely hot during operation.
...; Take care not to stain your hands and clothes with cold water. • Never touch the transfer roller. ☛ 4. Install the Drum unit assembly and Paper cassette into the printer. Remove the paper carefully. ! Fig. 6-9 6-13 CHAPTER 6 TROUBLESHOOTING Warning The fixing roller is extremely hot during operation.

Users Manual - English
Page 185
Close the Face up output tray. Fig. 6-21 6-19 Fig. 6-20 Pull the jammed paper out of the printer. ☛ 5. If the paper jam cannot be cleared, go to the next step. Pull the Duplex tray and Paper cassette out of the printer. CHAPTER 6 TROUBLESHOOTING Fig. 6-19 ☛ 4. ☛ 3.
Close the Face up output tray. Fig. 6-21 6-19 Fig. 6-20 Pull the jammed paper out of the printer. ☛ 5. If the paper jam cannot be cleared, go to the next step. Pull the Duplex tray and Paper cassette out of the printer. CHAPTER 6 TROUBLESHOOTING Fig. 6-19 ☛ 4. ☛ 3.


