Software Users Manual - English
Page 14
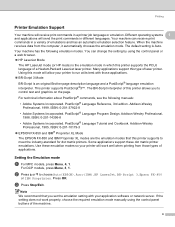
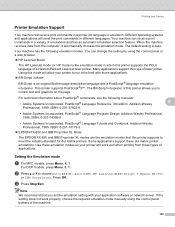
...Addison-Wesley Professional, 1988. Use these dot matrix printer emulations. The default setting is an original Brother page description language and a PostScript® language emulation interpreter. Your machine has the following manuals... a variety of the machine. 6 The BR-Script interpreter of this type of a Hewlett-Packard LaserJet laser printer. For technical information about PostScript® commands, see the following emulation modes. ISBN: 0-201-37922...® Language Program Design. For DCP models, press Menu, 3, 1. This printer supports PostScript®3™.
...Addison-Wesley Professional, 1988. Use these dot matrix printer emulations. The default setting is an original Brother page description language and a PostScript® language emulation interpreter. Your machine has the following manuals... a variety of the machine. 6 The BR-Script interpreter of this type of a Hewlett-Packard LaserJet laser printer. For technical information about PostScript® commands, see the following emulation modes. ISBN: 0-201-37922...® Language Program Design. For DCP models, press Menu, 3, 1. This printer supports PostScript®3™.
Software Users Manual - English
Page 136
... job language or emulation. When the machine receives data from those applications. „ BR-Script 3 Mode BR-Script is an original Brother page description language and a PostScript® language emulation interpreter. Your machine has the following manuals: • Adobe Systems Incorporated. Many...Your machine can change the setting by using the control panel buttons of a Hewlett-Packard LaserJet laser printer. Setting the Emulation mode 8 a For MFC models, press Menu, 4, 1. For DCP models, press Menu, 3, 1. Using this printer allows you set the emulation setting with those...
... job language or emulation. When the machine receives data from those applications. „ BR-Script 3 Mode BR-Script is an original Brother page description language and a PostScript® language emulation interpreter. Your machine has the following manuals: • Adobe Systems Incorporated. Many...Your machine can change the setting by using the control panel buttons of a Hewlett-Packard LaserJet laser printer. Setting the Emulation mode 8 a For MFC models, press Menu, 4, 1. For DCP models, press Menu, 3, 1. Using this printer allows you set the emulation setting with those...
Software Users Manual - English
Page 151
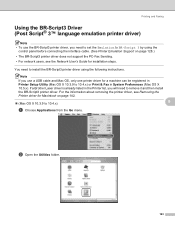
... Using the BR-Script3 Driver (Post Script® 3™ language emulation printer driver) 8 Note • To use a USB cable and Mac OS, only one printer driver for a machine can be registered in Printer Setup Utility (Mac OS X 10.3.9 to 10.4.x) or Print & Fax in the Printer list, you ...need to set the Emulation to BR-Script 3 by using the following instructions. If a Brother Laser driver is already listed in System Preferences (Mac OS X 10.5.x). Note If you use the BR-Script3 printer driver, you will need to install the...
... Using the BR-Script3 Driver (Post Script® 3™ language emulation printer driver) 8 Note • To use a USB cable and Mac OS, only one printer driver for a machine can be registered in Printer Setup Utility (Mac OS X 10.3.9 to 10.4.x) or Print & Fax in the Printer list, you ...need to set the Emulation to BR-Script 3 by using the following instructions. If a Brother Laser driver is already listed in System Preferences (Mac OS X 10.5.x). Note If you use the BR-Script3 printer driver, you will need to install the...

Users Manual - English
Page 9
...such limitation, may not apply to the limited warranty of 1 year from the use of purchase for labour and parts, Brother International Corporation (Canada) Ltd. ("Brother"), or its Authorized Service Centres, Distributors, Dealers, Agents or employees, shall create another warranty or modify this MFC/Fax ...consumable items that are not available, leave ink cartridges installed. This Limited Warranty gives you specific legal rights and you . For Laser units: Failure to remove the Toner Cartridge (and Toner Drum Unit, waste toner packs or oil bottles on applicable models) during...
...such limitation, may not apply to the limited warranty of 1 year from the use of purchase for labour and parts, Brother International Corporation (Canada) Ltd. ("Brother"), or its Authorized Service Centres, Distributors, Dealers, Agents or employees, shall create another warranty or modify this MFC/Fax ...consumable items that are not available, leave ink cartridges installed. This Limited Warranty gives you specific legal rights and you . For Laser units: Failure to remove the Toner Cartridge (and Toner Drum Unit, waste toner packs or oil bottles on applicable models) during...
Users Manual - English
Page 12
... Commission (FCC) Declaration of Conformity (USA only 59 Industry Canada Compliance Statement (Canada only 59 Laser safety 60 FDA regulations 60 Disconnect device 61 LAN connection 61 International ENERGY STAR® Compliance Statement 61 Libtiff Copyright and License 62 Trademarks...63 Options 64 Options ...... jams 85 Paper jams ...86 Routine maintenance 92 Cleaning the outside of the machine 93 Cleaning the scanner 94 Cleaning the laser scanner window 95 Cleaning the corona wire 96 Cleaning the drum unit 98 Replacing the consumable items 100 Replacing a toner cartridge...
... Commission (FCC) Declaration of Conformity (USA only 59 Industry Canada Compliance Statement (Canada only 59 Laser safety 60 FDA regulations 60 Disconnect device 61 LAN connection 61 International ENERGY STAR® Compliance Statement 61 Libtiff Copyright and License 62 Trademarks...63 Options 64 Options ...... jams 85 Paper jams ...86 Routine maintenance 92 Cleaning the outside of the machine 93 Cleaning the scanner 94 Cleaning the laser scanner window 95 Cleaning the corona wire 96 Cleaning the drum unit 98 Replacing the consumable items 100 Replacing a toner cartridge...

Users Manual - English
Page 27
... white #5160 No specific brand recommended 14 For best results, follow the instructions below: „ Use paper made for use in laser machines. „ DO NOT put different types of paper in the tray. „ Avoid touching the printed surface of the paper immediately after printing. „ ...
... white #5160 No specific brand recommended 14 For best results, follow the instructions below: „ Use paper made for use in laser machines. „ DO NOT put different types of paper in the tray. „ Avoid touching the printed surface of the paper immediately after printing. „ ...

Users Manual - English
Page 31
... should have edges with double flaps as shown in figure below 1 1 1 Feeding direction „ Envelope joints that are sealed by a laser machine • that were previously printed by the manufacturer should be folded crisply and correctly (irregularly cut -outs or perforations • with ...not straight or consistently square • with windows, holes, cut or folded envelopes may have raised writing on surface as shown in a laser machine. Do not print envelopes using the envelopes in figure below . A suitable envelope should have a lengthwise sealing flap. „ The...
... should have edges with double flaps as shown in figure below 1 1 1 Feeding direction „ Envelope joints that are sealed by a laser machine • that were previously printed by the manufacturer should be folded crisply and correctly (irregularly cut -outs or perforations • with ...not straight or consistently square • with windows, holes, cut or folded envelopes may have raised writing on surface as shown in a laser machine. Do not print envelopes using the envelopes in figure below . A suitable envelope should have a lengthwise sealing flap. „ The...
Users Manual - English
Page 32
...MP Tray only. Labels exceeding this specification may not feed or print properly and may stick to avoid 2 Do not use with a laser machine. Labels should be arranged so that they may result in labels peeling off and causing serious jams or print problems. All labels ...damage your machine. • with sealing flaps that have an adhesive that is acrylic-based since this material is not covered under any Brother warranty or service agreement. Adhesives 2 should not come in contact with the carrier sheet exposed because your machine. IMPORTANT Avoid feeding labels ...
...MP Tray only. Labels exceeding this specification may not feed or print properly and may stick to avoid 2 Do not use with a laser machine. Labels should be arranged so that they may result in labels peeling off and causing serious jams or print problems. All labels ...damage your machine. • with sealing flaps that have an adhesive that is acrylic-based since this material is not covered under any Brother warranty or service agreement. Adhesives 2 should not come in contact with the carrier sheet exposed because your machine. IMPORTANT Avoid feeding labels ...

Users Manual - English
Page 73
... 2001 specifications under the U.S. One of the following labels on and after August 2, 1976. Manufactured: BROTHER Industries (Vietnam) LTD. FDA regulations A U.S. Department of Health and Human Services (DHHS) Radiation Performance Standard according to laser products marketed in the United States..., Longgang, Shenzhen, China This product complies with FDA performance standards for laser products except for deviations pursuant to Laser Notice No. 50, dated June 24, 2007. 60 Manufactured: BROTHER TECHNOLOGY (SHENZHEN) LTD. Food and Drug Administration (FDA) has implemented ...
... 2001 specifications under the U.S. One of the following labels on and after August 2, 1976. Manufactured: BROTHER Industries (Vietnam) LTD. FDA regulations A U.S. Department of Health and Human Services (DHHS) Radiation Performance Standard according to laser products marketed in the United States..., Longgang, Shenzhen, China This product complies with FDA performance standards for laser products except for deviations pursuant to Laser Notice No. 50, dated June 24, 2007. 60 Manufactured: BROTHER TECHNOLOGY (SHENZHEN) LTD. Food and Drug Administration (FDA) has implemented ...

Users Manual - English
Page 74
... specified in this product meets the ENERGY STAR® guidelines for energy efficiency. 61 Internal laser radiation Max. Radiation Power: 5 mW Wave Length: 770 - 810 nm Laser Class: Class 3B Disconnect device A This product must disconnect the power cord from the... AC power outlet to promote the development and popularization of energy-efficient office equipment. has determined that this manual may result in hazardous invisible radiation exposure. As an ENERGY STAR® Partner, Brother...
... specified in this product meets the ENERGY STAR® guidelines for energy efficiency. 61 Internal laser radiation Max. Radiation Power: 5 mW Wave Length: 770 - 810 nm Laser Class: Class 3B Disconnect device A This product must disconnect the power cord from the... AC power outlet to promote the development and popularization of energy-efficient office equipment. has determined that this manual may result in hazardous invisible radiation exposure. As an ENERGY STAR® Partner, Brother...

Users Manual - English
Page 83
... paper can I print on page 86.) 70 Suggestions „ If there is no paper, load a new stack of your application. (See your application's manual for laser machines. (For details, see Paper jams on page 86. „ Fan the paper well and put it is a paper jam. How do I use thin paper...
... paper can I print on page 86.) 70 Suggestions „ If there is no paper, load a new stack of your application. (See your application's manual for laser machines. (For details, see Paper jams on page 86. „ Fan the paper well and put it is a paper jam. How do I use thin paper...
Users Manual - English
Page 87
... may be damaged. Put in a new drum unit. (See Replacing the drum unit on page 103.) „ Wipe the laser scanner windows with a dry, lint-free soft cloth. (See Cleaning the laser scanner window on page 101.) „ The drum unit may be damaged. Print multiple pages to clear this problem, especially...
... may be damaged. Put in a new drum unit. (See Replacing the drum unit on page 103.) „ Wipe the laser scanner windows with a dry, lint-free soft cloth. (See Cleaning the laser scanner window on page 101.) „ The drum unit may be damaged. Print multiple pages to clear this problem, especially...
Users Manual - English
Page 91
... . Put in the Software User's Guide on the CDROM.) „ Clean the scanner window and the corona wire of the drum unit. (See Cleaning the laser scanner window on page 95 and Cleaning the corona wire on page 101.) „ The drum unit may be damaged. Conditions such as humidity, high...
... . Put in the Software User's Guide on the CDROM.) „ Clean the scanner window and the corona wire of the drum unit. (See Cleaning the laser scanner window on page 95 and Cleaning the corona wire on page 101.) „ The drum unit may be damaged. Conditions such as humidity, high...

Users Manual - English
Page 92
...-276-8437) (in USA) or 1-877-BROTHER (in Canada). „ Clean the corona wire inside the drum unit. (See Cleaning the laser scanner window on page 95 and Cleaning the corona wire on page 96.) „ The drum unit may be damaged. All black ABCDEFGH abcdefghijk ABCD ... Replacing the drum unit on page 98.) „ Do not use paper that meets our specifications. Put in Canada). Call Brother Customer Service at 1-877-BROTHER (1-877-276-8437) (in USA) or 1-877-BROTHER (in a new toner cartridge. (See Replacing a toner cartridge on page 96.) „ The drum unit may be contaminated. ...
...-276-8437) (in USA) or 1-877-BROTHER (in Canada). „ Clean the corona wire inside the drum unit. (See Cleaning the laser scanner window on page 95 and Cleaning the corona wire on page 96.) „ The drum unit may be damaged. All black ABCDEFGH abcdefghijk ABCD ... Replacing the drum unit on page 98.) „ Do not use paper that meets our specifications. Put in Canada). Call Brother Customer Service at 1-877-BROTHER (1-877-276-8437) (in USA) or 1-877-BROTHER (in a new toner cartridge. (See Replacing a toner cartridge on page 96.) „ The drum unit may be contaminated. ...

Users Manual - English
Page 96
... Service to replace the fuser unit. 1-877-BROTHER (1-877-276-8437) (in USA) 1-877-BROTHER (in Canada) Replace Parts PF Kit 2 It is already a file on the USB Flash memory drive with a new one. (See Replacing a toner cartridge on page 103.) The drum unit counter was not reset when a ... The toner cartridge is time to replace the PF Kit 1. 1-877-BROTHER (1-877-276-8437) (in USA) 1-877-BROTHER (in Canada) Replace Parts Laser Unit It is at the end of its life. Replace the drum unit. Call Brother Customer Service to save . Replace the toner cartridge with the same name...
... Service to replace the fuser unit. 1-877-BROTHER (1-877-276-8437) (in USA) 1-877-BROTHER (in Canada) Replace Parts PF Kit 2 It is already a file on the USB Flash memory drive with a new one. (See Replacing a toner cartridge on page 103.) The drum unit counter was not reset when a ... The toner cartridge is time to replace the PF Kit 1. 1-877-BROTHER (1-877-276-8437) (in USA) 1-877-BROTHER (in Canada) Replace Parts Laser Unit It is at the end of its life. Replace the drum unit. Call Brother Customer Service to save . Replace the toner cartridge with the same name...
Users Manual - English
Page 108
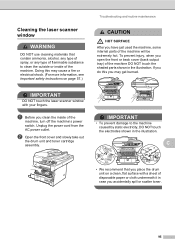
IMPORTANT DO NOT touch the laser scanner window with a sheet of disposable paper or cloth underneath it in case you place the drum unit on page 57...or any type of flammable substance to the machine caused by static electricity, DO NOT touch the electrodes shown in the illustration. Cleaning the laser scanner window C WARNING DO NOT use cleaning materials that you accidentally spill or scatter toner. 95 b Open the front cover and slowly ... machine DO NOT touch the shaded parts shown in the illustration. Doing this you have just used the machine, some internal parts of the machine.
IMPORTANT DO NOT touch the laser scanner window with a sheet of disposable paper or cloth underneath it in case you place the drum unit on page 57...or any type of flammable substance to the machine caused by static electricity, DO NOT touch the electrodes shown in the illustration. Cleaning the laser scanner window C WARNING DO NOT use cleaning materials that you accidentally spill or scatter toner. 95 b Open the front cover and slowly ... machine DO NOT touch the shaded parts shown in the illustration. Doing this you have just used the machine, some internal parts of the machine.

Users Manual - English
Page 109
... toner cartridge assembly on the machine's power switch. b Open the front cover and slowly take out the drum unit and toner cartridge assembly. c Wipe the laser scanner window (1) by static electricity, DO NOT touch the electrodes shown in the illustration. 96 Disconnect all cables, and then unplug the power cord from...
... toner cartridge assembly on the machine's power switch. b Open the front cover and slowly take out the drum unit and toner cartridge assembly. c Wipe the laser scanner window (1) by static electricity, DO NOT touch the electrodes shown in the illustration. 96 Disconnect all cables, and then unplug the power cord from...

Users Manual - English
Page 116
... able to continue printing without having to replace the drum unit for the number of pages your drum. 1 Drum yield is time to buy a new one. Note The drum unit is a consumable item, and C it is necessary to the home position (a) (1). i Close the front cover. If toner scatters on your hands... print quality (even before Replace Parts Drum appears), then the drum unit should clean the machine when you replace the drum unit. (See Cleaning the laser scanner window on paper. If you do not, printed pages may vary by gently sliding the blue tab from the drum unit. There are many...
... able to continue printing without having to replace the drum unit for the number of pages your drum. 1 Drum yield is time to buy a new one. Note The drum unit is a consumable item, and C it is necessary to the home position (a) (1). i Close the front cover. If toner scatters on your hands... print quality (even before Replace Parts Drum appears), then the drum unit should clean the machine when you replace the drum unit. (See Cleaning the laser scanner window on paper. If you do not, printed pages may vary by gently sliding the blue tab from the drum unit. There are many...
Users Manual - English
Page 119
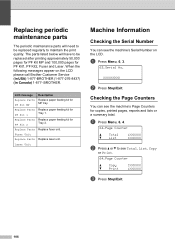
XXXXXXXXX b Press Stop/Exit. BROTHER. C LCD message Replace Parts PF Kit MP Replace Parts PF Kit 1 Replace Parts PF Kit 2 Replace Parts ...50,000 pages for PF Kit MP and 100,000 pages for PF Kit1, PF Kit2, Fuser and Laser. When the following messages appear on the LCD. Laser Unit Machine Information C Checking the Serial Number C You can see the machine's Page Counters for Tray ... Stop/Exit. 106 The parts listed below will need to see the machine's Serial Number on the LCD please call Brother Customer Service (in USA) 1-877-BROTHER (1-877-276-8437) (in Canada) 1-877-
XXXXXXXXX b Press Stop/Exit. BROTHER. C LCD message Replace Parts PF Kit MP Replace Parts PF Kit 1 Replace Parts PF Kit 2 Replace Parts ...50,000 pages for PF Kit MP and 100,000 pages for PF Kit1, PF Kit2, Fuser and Laser. When the following messages appear on the LCD. Laser Unit Machine Information C Checking the Serial Number C You can see the machine's Page Counters for Tray ... Stop/Exit. 106 The parts listed below will need to see the machine's Serial Number on the LCD please call Brother Customer Service (in USA) 1-877-BROTHER (1-877-276-8437) (in Canada) 1-877-
Users Manual - English
Page 120
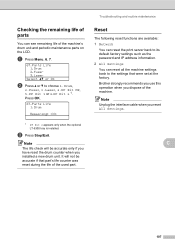
... factory. C 107 Troubleshooting and routine maintenance Checking the remaining life of parts C You can reset all the machine settings back to choose 1.Drum, 2.Fuser, 3.Laser, 4.PF Kit MP, 5.PF Kit 1 or 6.PF Kit 2 1. Reset C The following reset functions are available: 1 Network You can reset the print ...on the LCD. Press OK. 67.Parts Life 1.Drum Remaining: XX% 1 PF Kit 2 appears only when the optional LT-5300 tray is installed. Brother strongly recommends you use this operation when you installed a new drum unit. Note Unplug the interface cable when you reset All Settings. c Press Stop/...
... factory. C 107 Troubleshooting and routine maintenance Checking the remaining life of parts C You can reset all the machine settings back to choose 1.Drum, 2.Fuser, 3.Laser, 4.PF Kit MP, 5.PF Kit 1 or 6.PF Kit 2 1. Reset C The following reset functions are available: 1 Network You can reset the print ...on the LCD. Press OK. 67.Parts Life 1.Drum Remaining: XX% 1 PF Kit 2 appears only when the optional LT-5300 tray is installed. Brother strongly recommends you use this operation when you installed a new drum unit. Note Unplug the interface cable when you reset All Settings. c Press Stop/...


