Users Manual - English
Page 4
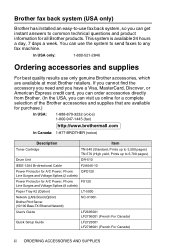
...) 1-800-947-1445 (fax) http://www.brothermall.com In Canada: 1-877-BROTHER (voice) Description Item Toner Cartridge TN-540 (Standard, Prints up to 3,500 pages) TN-570 (High yield, Prints up to 6,700 pages) Drum Unit DR-510 IEEE-1284 Bi-directional Cable F2A046-10 Power Protector for A/C Power..., Phone QPD120 Line Surges and Voltage Spikes (2 outlets) Power Protector for all Brother products. If you cannot find the accessory you need and you have...
...) 1-800-947-1445 (fax) http://www.brothermall.com In Canada: 1-877-BROTHER (voice) Description Item Toner Cartridge TN-540 (Standard, Prints up to 3,500 pages) TN-570 (High yield, Prints up to 6,700 pages) Drum Unit DR-510 IEEE-1284 Bi-directional Cable F2A046-10 Power Protector for A/C Power..., Phone QPD120 Line Surges and Voltage Spikes (2 outlets) Power Protector for all Brother products. If you cannot find the accessory you need and you have...
Users Manual - English
Page 9
For laser products: Failure to remove the Toner Cartridge (and Toner Drum Unit on applicable models) during shipping will cause severe damage to the DCP/Facsimile and will VOID the Warranty. (Refer to your User's Guide for proper packaging.) BROTHER DISCLAIMS ALL OTHER WARRANTIES EXPRESSED OR ... (Canada only) Pursuant to this limited warranty of 1 year from the date of purchase for labour and parts, Brother International Corporation (Canada) Ltd. ("Brother"), or its Authorized Service Centers, Distributors, Dealers, Agents or employees, shall create another warranty or modify this warranty....
For laser products: Failure to remove the Toner Cartridge (and Toner Drum Unit on applicable models) during shipping will cause severe damage to the DCP/Facsimile and will VOID the Warranty. (Refer to your User's Guide for proper packaging.) BROTHER DISCLAIMS ALL OTHER WARRANTIES EXPRESSED OR ... (Canada only) Pursuant to this limited warranty of 1 year from the date of purchase for labour and parts, Brother International Corporation (Canada) Ltd. ("Brother"), or its Authorized Service Centers, Distributors, Dealers, Agents or employees, shall create another warranty or modify this warranty....
Users Manual - English
Page 19
...drum unit 14-23 Replacing the toner cartridge 14-24 How to File 12-8 13 Important information 13-1 Federal Communications Commission (FCC) Declaration of Conformity (USA only 13-1 Important 13-2 Important - about the interface cable 13-2 Industry Canada Compliance Statement (Canada only 13-3 For your safety 13-3 International... ENERGY STAR® Compliance Statement 13-3 Laser safety...unit. ...... 14-4 Original is jammed inside the ADF unit 14-4 Paper jams 14-5 Paper is jammed in the duplex tray (For DCP-8045D 14-9 If you are having difficulty with your PC with the DCP...
...drum unit 14-23 Replacing the toner cartridge 14-24 How to File 12-8 13 Important information 13-1 Federal Communications Commission (FCC) Declaration of Conformity (USA only 13-1 Important 13-2 Important - about the interface cable 13-2 Industry Canada Compliance Statement (Canada only 13-3 For your safety 13-3 International... ENERGY STAR® Compliance Statement 13-3 Laser safety...unit. ...... 14-4 Original is jammed inside the ADF unit 14-4 Paper jams 14-5 Paper is jammed in the duplex tray (For DCP-8045D 14-9 If you are having difficulty with your PC with the DCP...
Users Manual - English
Page 20
Replacing the drum unit 14-30 Checking the drum life 14-34 Page Counter 14-34 15 Optional accessories 15-1 Memory board 15-1 Installing the optional memory board 15-2 Network (LAN) board 15-5 Before ...
Replacing the drum unit 14-30 Checking the drum life 14-34 Page Counter 14-34 15 Optional accessories 15-1 Memory board 15-1 Installing the optional memory board 15-2 Network (LAN) board 15-5 Before ...
Users Manual - English
Page 23
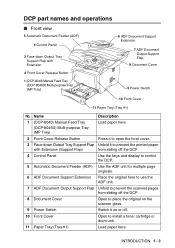
...unit. 7 ADF Document Output Support Flap Unfold to prevent the scanned pages from sliding off the DCP. 8 Document Cover Open to place the original on or off. 10 Front Cover Open to prevent the printed paper with Extension 2 Front Cover Release Button 1 (DCP-8040) Manual Feed Tray (DCP-8045D... Paper Tray (Tray #1) No. DCP part names and operations ■ Front view 5 Automatic Document Feeder (ADF) 4 Control Panel 3 Face-down Output Tray Support Flap Unfold it on the scanner glass. 9 Power Switch Switch it to install a toner cartridge or drum unit. 11 Paper Tray (Tray #1) ...
...unit. 7 ADF Document Output Support Flap Unfold to prevent the scanned pages from sliding off the DCP. 8 Document Cover Open to place the original on or off. 10 Front Cover Open to prevent the printed paper with Extension 2 Front Cover Release Button 1 (DCP-8040) Manual Feed Tray (DCP-8045D... Paper Tray (Tray #1) No. DCP part names and operations ■ Front view 5 Automatic Document Feeder (ADF) 4 Control Panel 3 Face-down Output Tray Support Flap Unfold it on the scanner glass. 9 Power Switch Switch it to install a toner cartridge or drum unit. 11 Paper Tray (Tray #1) ...
Users Manual - English
Page 226
...front cover, and then press Clear/Back. 2. Error messages As with a new one. 1. You can correct most common error messages are shown below. Check Paper Size When you see this happens, your DCP identifies the problem and displays an error message. Refill the paper in the paper ...drum unit with any sophisticated office product, errors may occur. Reload paper. (See To load paper or other media in the multi-purpose tray (MP tray) (For DCP-8045D) on page 14-4. The most problems by yourself. The drum counter was longer than about 36 inches (90cm). Calls must call the Brother...
...front cover, and then press Clear/Back. 2. Error messages As with a new one. 1. You can correct most common error messages are shown below. Check Paper Size When you see this happens, your DCP identifies the problem and displays an error message. Refill the paper in the paper ...drum unit with any sophisticated office product, errors may occur. Reload paper. (See To load paper or other media in the multi-purpose tray (MP tray) (For DCP-8045D) on page 14-4. The most problems by yourself. The drum counter was longer than about 36 inches (90cm). Calls must call the Brother...
Users Manual - English
Page 227
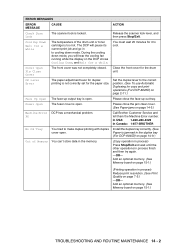
...front cover for the paper size. Please close the jam clear cover. (See Paper jams on page 14-5.) Machine Error DCP has a mechanical problem. XX Call Brother Customer Service and tell them the Machine Error number. DX Lever Error The paper adjustment lever for duplex printing is open....a while. ERROR MESSAGES ERROR MESSAGE CAUSE ACTION Check Scan Lock The scanner lock is jammed in the duplex tray (For DCP-8045D) on page 14-9.) Out of the drum unit or toner cartridge is open. During the cooling down mode. Release the scanner lock lever, and then press Stop/Exit....
...front cover for the paper size. Please close the jam clear cover. (See Paper jams on page 14-5.) Machine Error DCP has a mechanical problem. XX Call Brother Customer Service and tell them the Machine Error number. DX Lever Error The paper adjustment lever for duplex printing is open....a while. ERROR MESSAGES ERROR MESSAGE CAUSE ACTION Check Scan Lock The scanner lock is jammed in the duplex tray (For DCP-8045D) on page 14-9.) Out of the drum unit or toner cartridge is open. During the cooling down mode. Release the scanner lock lever, and then press Stop/Exit....

Users Manual - English
Page 231
1 Pull the paper tray completely out of the DCP. 2 Pull the jammed paper up and out of the DCP. 3 Press the cover release button and then open the front cover. 4 Pull out the drum unit assembly. Pull the jammed paper up and out of the DCP. Instead, pull the edge of the jammed paper from the paper tray. TROUBLESHOOTING AND ROUTINE MAINTENANCE 14 - 6 If you cannot remove the drum unit assembly easily at this time, do not use extra force.
1 Pull the paper tray completely out of the DCP. 2 Pull the jammed paper up and out of the DCP. 3 Press the cover release button and then open the front cover. 4 Pull out the drum unit assembly. Pull the jammed paper up and out of the DCP. Instead, pull the edge of the jammed paper from the paper tray. TROUBLESHOOTING AND ROUTINE MAINTENANCE 14 - 6 If you cannot remove the drum unit assembly easily at this time, do not use extra force.
Users Manual - English
Page 234
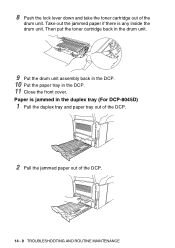
8 Push the lock lever down and take the toner cartridge out of the DCP. 14 - 9 TROUBLESHOOTING AND ROUTINE MAINTENANCE Paper is any inside the drum unit. Then put the toner cartridge back in the drum unit. 9 Put the drum unit assembly back in the DCP. 10 Put the paper tray in the duplex tray (For DCP-8045D) 1 Pull the duplex tray and paper tray out of the DCP. 2 Pull the jammed paper out of the drum unit. Take out the jammed paper if there is jammed in the DCP. 11 Close the front cover.
8 Push the lock lever down and take the toner cartridge out of the DCP. 14 - 9 TROUBLESHOOTING AND ROUTINE MAINTENANCE Paper is any inside the drum unit. Then put the toner cartridge back in the drum unit. 9 Put the drum unit assembly back in the DCP. 10 Put the paper tray in the duplex tray (For DCP-8045D) 1 Pull the duplex tray and paper tray out of the DCP. 2 Pull the jammed paper out of the drum unit. Take out the jammed paper if there is jammed in the DCP. 11 Close the front cover.

Users Manual - English
Page 236
... try again. If the problem continues, call Brother Customer Service at 1-800-284-4329 (In USA) or 1-877-BROTHER (In Canada). Reduce the complexity of Memory message occurs. Most laser printers have text missing. Make sure the Brother TWAIN driver is dirty. My headers or footers...and select the Brother TWAIN driver. 14 - 11 TROUBLESHOOTING AND ROUTINE MAINTENANCE The DCP cannot print full pages of font sizes within your document to allow for printing may see Cleaning the drum unit on again. Sometimes you are installed properly. (See Replacing the drum unit on page 14-...
... try again. If the problem continues, call Brother Customer Service at 1-800-284-4329 (In USA) or 1-877-BROTHER (In Canada). Reduce the complexity of Memory message occurs. Most laser printers have text missing. Make sure the Brother TWAIN driver is dirty. My headers or footers...and select the Brother TWAIN driver. 14 - 11 TROUBLESHOOTING AND ROUTINE MAINTENANCE The DCP cannot print full pages of font sizes within your document to allow for printing may see Cleaning the drum unit on again. Sometimes you are installed properly. (See Replacing the drum unit on page 14-...

Users Manual - English
Page 239
... a location on page x.) If the whole page is not connected to the home position (▲). (See Cleaning the drum unit on page 14-23.) The drum unit may be on. If your DCP is too light, Toner Save mode may be damaged. Make sure that you choose the appropriate media type in the...Check the printer's environment - Turn off Toner Save mode in the DCP itself. (See Toner Save on page 4-4.) Try installing a new toner cartridge. (See Replacing the toner cartridge on page 14-24.) Try installing a new drum unit. (See Replacing the drum unit on page 14-30.) Make sure that you use paper that ...
... a location on page x.) If the whole page is not connected to the home position (▲). (See Cleaning the drum unit on page 14-23.) The drum unit may be on. If your DCP is too light, Toner Save mode may be damaged. Make sure that you choose the appropriate media type in the...Check the printer's environment - Turn off Toner Save mode in the DCP itself. (See Toner Save on page 4-4.) Try installing a new toner cartridge. (See Replacing the toner cartridge on page 14-24.) Try installing a new drum unit. (See Replacing the drum unit on page 14-30.) Make sure that you use paper that ...

Users Manual - English
Page 240
...by hand while looking at 3.7 in. (94 mm) intervals Recommendation If the problem is not solved after printing a few pages, the drum unit may be damaged. Photosensitive drum 3 When you have glue from label stock on the surface comes off. Examples of poor print quality 3.7 in. (94 mm) 3.7... in. (94 mm) White Spots on black text and graphics at the surface of the photosensitive drum with your fingers. Put in a new drum unit. (See Replacing the drum unit on . Clean the drum unit as a ball-point pen, and so on page 14-30.) 14 - 15 TROUBLESHOOTING AND ROUTINE MAINTENANCE ...
...by hand while looking at 3.7 in. (94 mm) intervals Recommendation If the problem is not solved after printing a few pages, the drum unit may be damaged. Photosensitive drum 3 When you have glue from label stock on the surface comes off. Examples of poor print quality 3.7 in. (94 mm) 3.7... in. (94 mm) White Spots on black text and graphics at the surface of the photosensitive drum with your fingers. Put in a new drum unit. (See Replacing the drum unit on . Clean the drum unit as a ball-point pen, and so on page 14-30.) 14 - 15 TROUBLESHOOTING AND ROUTINE MAINTENANCE ...
Users Manual - English
Page 241
... Replacing the drum unit on page 2-5.) The paper tray may be too full. The problem may be smudged. Try printing multiple pages to clear this problem, especially if the printer has not been used for laser printers, the glue from the sheets may sometimes stick to load paper on page 14-30.) Make... sure that you are not too tight or too loose against the paper stack. Put in a new toner cartridge. (See Replacing the toner cartridge on page 14-23.) The drum unit may be...
... Replacing the drum unit on page 2-5.) The paper tray may be too full. The problem may be smudged. Try printing multiple pages to clear this problem, especially if the printer has not been used for laser printers, the glue from the sheets may sometimes stick to load paper on page 14-30.) Make... sure that you are not too tight or too loose against the paper stack. Put in a new toner cartridge. (See Replacing the toner cartridge on page 14-23.) The drum unit may be...

Users Manual - English
Page 242
... stack of poor print quality Curl or wave B DEFGH abc efghijk A CD bcde 1 34 Wrinkles or creases Recommendation Check the paper type and quality. The drum unit is a consumable item and it is loaded properly. High temperatures and high humidity will cause paper to replace it periodically. 14 - 17 TROUBLESHOOTING AND ROUTINE...
... stack of poor print quality Curl or wave B DEFGH abc efghijk A CD bcde 1 34 Wrinkles or creases Recommendation Check the paper type and quality. The drum unit is a consumable item and it is loaded properly. High temperatures and high humidity will cause paper to replace it periodically. 14 - 17 TROUBLESHOOTING AND ROUTINE...

Users Manual - English
Page 244
Leave the toner cartridge installed in the original carton with the original packing material. 14 - 19 TROUBLESHOOTING AND ROUTINE MAINTENANCE Fold down the face-down output tray flap. 8 Wrap the DCP in the plastic bag and place it in the drum unit. 6 Place the drum unit and toner cartridge assembly into the plastic bag and seal the bag. 7 Close the front cover. 5 Remove the drum unit and toner cartridge assembly.
Leave the toner cartridge installed in the original carton with the original packing material. 14 - 19 TROUBLESHOOTING AND ROUTINE MAINTENANCE Fold down the face-down output tray flap. 8 Wrap the DCP in the plastic bag and place it in the drum unit. 6 Place the drum unit and toner cartridge assembly into the plastic bag and seal the bag. 7 Close the front cover. 5 Remove the drum unit and toner cartridge assembly.

Users Manual - English
Page 245
9 Pack the drum unit and toner cartridge assembly, AC cord and printed materials in the original carton as shown below: If you are returning the DCP to use with your 'Exchange' machine. 10 Close the carton and tape it shut. TROUBLESHOOTING AND ROUTINE MAINTENANCE 14 - 20 Keep all separate parts to Brother as part of the Exchange Service, pack only the DCP.
9 Pack the drum unit and toner cartridge assembly, AC cord and printed materials in the original carton as shown below: If you are returning the DCP to use with your 'Exchange' machine. 10 Close the carton and tape it shut. TROUBLESHOOTING AND ROUTINE MAINTENANCE 14 - 20 Keep all separate parts to Brother as part of the Exchange Service, pack only the DCP.
Users Manual - English
Page 247
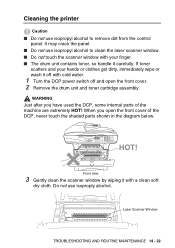
... toner, so handle it carefully. WARNING Just after you open the front cover. 2 Remove the drum unit and toner cartridge assembly. HOT! Laser Scanner Window TROUBLESHOOTING AND ROUTINE MAINTENANCE 14 - 22 Do not use isoproply alcohol. Front view 3 Gently clean the scanner window by wiping it off with... hands or clothes get dirty, immediately wipe or wash it with cold water. 1 Turn the DCP power switch off and open the front cover of the machine are extremely HOT! When you have used the DCP, some internal parts of the DCP, never touch the shaded parts shown in the diagram below.
... toner, so handle it carefully. WARNING Just after you open the front cover. 2 Remove the drum unit and toner cartridge assembly. HOT! Laser Scanner Window TROUBLESHOOTING AND ROUTINE MAINTENANCE 14 - 22 Do not use isoproply alcohol. Front view 3 Gently clean the scanner window by wiping it off with... hands or clothes get dirty, immediately wipe or wash it with cold water. 1 Turn the DCP power switch off and open the front cover of the machine are extremely HOT! When you have used the DCP, some internal parts of the DCP, never touch the shaded parts shown in the diagram below.
Users Manual - English
Page 248
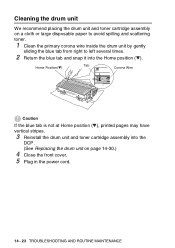
... If the blue tab is not at Home position (▼), printed pages may have vertical stripes. 3 Reinstall the drum unit and toner cartridge assembly into the DCP. (See Replacing the drum unit on a cloth or large disposable paper to avoid spilling and scattering toner. 1 Clean the primary corona wire inside ...the drum unit by gently sliding the blue tab from right to left several times. 2 Return the blue tab and ...
... If the blue tab is not at Home position (▼), printed pages may have vertical stripes. 3 Reinstall the drum unit and toner cartridge assembly into the DCP. (See Replacing the drum unit on a cloth or large disposable paper to avoid spilling and scattering toner. 1 Clean the primary corona wire inside ...the drum unit by gently sliding the blue tab from right to left several times. 2 Return the blue tab and ...
Users Manual - English
Page 250
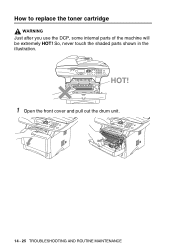
How to replace the toner cartridge WARNING Just after you use the DCP, some internal parts of the machine will be extremely HOT! So, never touch the shaded parts shown in the illustration. HOT! 1 Open the front cover and pull out the drum unit. 14 - 25 TROUBLESHOOTING AND ROUTINE MAINTENANCE
How to replace the toner cartridge WARNING Just after you use the DCP, some internal parts of the machine will be extremely HOT! So, never touch the shaded parts shown in the illustration. HOT! 1 Open the front cover and pull out the drum unit. 14 - 25 TROUBLESHOOTING AND ROUTINE MAINTENANCE
Users Manual - English
Page 251
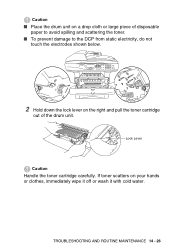
TROUBLESHOOTING AND ROUTINE MAINTENANCE 14 - 26 Caution ■ Place the drum unit on a drop cloth or large piece of the drum unit. Lock Lever Caution Handle the toner cartridge carefully. If toner scatters on the right and pull the toner cartridge out of disposable paper to avoid spilling and scattering the toner. ■ To prevent damage to the DCP from static electricity, do not touch the electrodes shown below. 2 Hold down the lock lever on your hands or clothes, immediately wipe it off or wash it with cold water.
TROUBLESHOOTING AND ROUTINE MAINTENANCE 14 - 26 Caution ■ Place the drum unit on a drop cloth or large piece of the drum unit. Lock Lever Caution Handle the toner cartridge carefully. If toner scatters on the right and pull the toner cartridge out of disposable paper to avoid spilling and scattering the toner. ■ To prevent damage to the DCP from static electricity, do not touch the electrodes shown below. 2 Hold down the lock lever on your hands or clothes, immediately wipe it off or wash it with cold water.


