Users Manual - English
Page 4
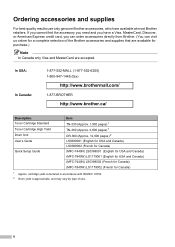
...is declared in accordance with ISO/IEC 19752. 2 Drum yield is approximate, and may vary by type of the Brother accessories and supplies that are available for purchase.) Note In Canada only Visa and MasterCard are available at most Brother retailers. In USA: In Canada: 1-877-552-MALL... (1-877-552-6255) 1-800-947-1445 (fax) http://www.brothermall.com/ 1-877-BROTHER http://www.brother.ca/ Description Toner Cartridge Standard Toner Cartridge High Yield Drum Unit User's Guide Quick Setup Guide Item TN-330 (Approx. 1,500 pages) 1 TN-360 (Approx. 2,600 pages) 1...
...is declared in accordance with ISO/IEC 19752. 2 Drum yield is approximate, and may vary by type of the Brother accessories and supplies that are available for purchase.) Note In Canada only Visa and MasterCard are available at most Brother retailers. In USA: In Canada: 1-877-552-MALL... (1-877-552-6255) 1-800-947-1445 (fax) http://www.brothermall.com/ 1-877-BROTHER http://www.brother.ca/ Description Toner Cartridge Standard Toner Cartridge High Yield Drum Unit User's Guide Quick Setup Guide Item TN-330 (Approx. 1,500 pages) 1 TN-360 (Approx. 2,600 pages) 1...
Users Manual - English
Page 8
...refer to your Canadian Proof of Purchase in the development, production, or delivery of this warranty. For Laser units: Failure to remove the Toner Cartridge (and Toner Drum Unit, waste toner packs or oil bottles on applicable models) during shipping and will void the Warranty. ...WARRANTY (Canada only) Pursuant to the limited warranty of 1 year from the date of purchase for labour and parts, Brother International Corporation (Canada) Ltd. ("Brother"), or its Authorized Service Centres, Distributors, Dealers, Agents or employees, shall create another warranty or modify this MFC/Fax...
...refer to your Canadian Proof of Purchase in the development, production, or delivery of this warranty. For Laser units: Failure to remove the Toner Cartridge (and Toner Drum Unit, waste toner packs or oil bottles on applicable models) during shipping and will void the Warranty. ...WARRANTY (Canada only) Pursuant to the limited warranty of 1 year from the date of purchase for labour and parts, Brother International Corporation (Canada) Ltd. ("Brother"), or its Authorized Service Centres, Distributors, Dealers, Agents or employees, shall create another warranty or modify this MFC/Fax...
Users Manual - English
Page 11
...International ENERGY STAR® Compliance Statement 41 Laser safety 41 FDA regulations 42 Important safety instructions 42 Trademarks...45 B Troubleshooting and routine maintenance 46 Troubleshooting 46 If you are having difficulty with your machine 46 Improving the print quality 49 Error and maintenance messages 55 Document jams (DCP-7040... only 57 Paper jams ...58 Routine maintenance 62 Cleaning the outside of the machine 62 Cleaning the scanner glass 63 Cleaning the laser scanner window 64 Cleaning the corona wire 66 Cleaning the drum unit 68 ix
...International ENERGY STAR® Compliance Statement 41 Laser safety 41 FDA regulations 42 Important safety instructions 42 Trademarks...45 B Troubleshooting and routine maintenance 46 Troubleshooting 46 If you are having difficulty with your machine 46 Improving the print quality 49 Error and maintenance messages 55 Document jams (DCP-7040... only 57 Paper jams ...58 Routine maintenance 62 Cleaning the outside of the machine 62 Cleaning the scanner glass 63 Cleaning the laser scanner window 64 Cleaning the corona wire 66 Cleaning the drum unit 68 ix

Users Manual - English
Page 12
Replacing the consumable items 70 Replacing a toner cartridge 70 Replacing the drum unit 74 Machine information 77 Checking the serial number 77 Checking the page counters 77 Checking the Drum life 77 Packing and shipping the machine 78 C Menu and features 79 On-screen programming 79 Menu table ...79 Memory storage 79 Menu keys ...79 How to access the menu mode 80 Menu table ...81 D Specifications 83 General ...83 Print media...85 Copy ...86 Scan...87 Print ...88 Interfaces ...88 Computer requirements 89 Consumable items 90 E Glossary 91 F Index 92 x
Replacing the consumable items 70 Replacing a toner cartridge 70 Replacing the drum unit 74 Machine information 77 Checking the serial number 77 Checking the page counters 77 Checking the Drum life 77 Packing and shipping the machine 78 C Menu and features 79 On-screen programming 79 Menu table ...79 Memory storage 79 Menu keys ...79 How to access the menu mode 80 Menu table ...81 D Specifications 83 General ...83 Print media...85 Copy ...86 Scan...87 Print ...88 Interfaces ...88 Computer requirements 89 Consumable items 90 E Glossary 91 F Index 92 x
Users Manual - English
Page 28
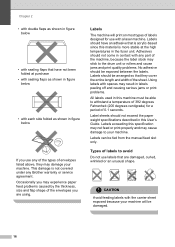
... feed slot only. Chapter 2 • with double flaps as shown in figure below • with a laser machine. This damage is more stable at purchase • with sealing flaps as shown in figure below •...; with each side folded as shown in the fuser unit. Labels should have not been folded at the high temperatures in figure below If you use any... avoid 2 Do not use with sealing flaps that they may cause damage to the drum unit or rollers and cause jams and print quality problems. No adhesive should be exposed between the labels...
... feed slot only. Chapter 2 • with double flaps as shown in figure below • with a laser machine. This damage is more stable at purchase • with sealing flaps as shown in figure below •...; with each side folded as shown in the fuser unit. Labels should have not been folded at the high temperatures in figure below If you use any... avoid 2 Do not use with sealing flaps that they may cause damage to the drum unit or rollers and cause jams and print quality problems. No adhesive should be exposed between the labels...

Users Manual - English
Page 50
... AC power outlet to shut off the power completely. Plastic bags are under the document cover or scanner cover. (DCP-7040 only) To prevent injuries, be careful not to put your machine and drum unit. In case of an emergency, you move the machine, grasp the side hand holds that is easily accessible. To...
... AC power outlet to shut off the power completely. Plastic bags are under the document cover or scanner cover. (DCP-7040 only) To prevent injuries, be careful not to put your machine and drum unit. In case of an emergency, you move the machine, grasp the side hand holds that is easily accessible. To...
Users Manual - English
Page 59
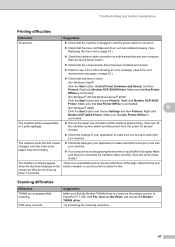
... that the machine is plugged in and the power switch is turned on. „ Check that the toner cartridge and drum unit are installed properly. (See Replacing the drum unit on page 74.) „ Check the interface cable connection on both the machine and your computer. (See the Quick Setup...with your machine. „ Your computer is not recognizing the machine's input buffer's full signal. Right-click Brother DCP-XXXX Printer. Right-click Brother DCP-XXXX Printer. Right-click Brother DCP-XXXX Printer. The machine prints the first couple of the page. Adjust the top and bottom margins in your...
... that the machine is plugged in and the power switch is turned on. „ Check that the toner cartridge and drum unit are installed properly. (See Replacing the drum unit on page 74.) „ Check the interface cable connection on both the machine and your computer. (See the Quick Setup...with your machine. „ Your computer is not recognizing the machine's input buffer's full signal. Right-click Brother DCP-XXXX Printer. Right-click Brother DCP-XXXX Printer. Right-click Brother DCP-XXXX Printer. The machine prints the first couple of the page. Adjust the top and bottom margins in your...
Users Manual - English
Page 61
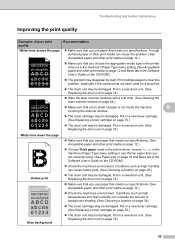
... than you are currently using. (See Paper type on page 19 and Basic tab in a new drum unit. (See Replacing the drum unit on page 74.) „ Wipe the laser scanner windows with a soft cloth. (See Cleaning the laser scanner window on page 64.) ABCDEFGH abcdefghijk ABCD abcde 01234 „ Make sure that meets our specifications...
... than you are currently using. (See Paper type on page 19 and Basic tab in a new drum unit. (See Replacing the drum unit on page 74.) „ Wipe the laser scanner windows with a soft cloth. (See Cleaning the laser scanner window on page 64.) ABCDEFGH abcdefghijk ABCD abcde 01234 „ Make sure that meets our specifications...
Users Manual - English
Page 62
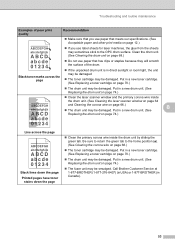
...'s Guide on the CD-ROM.) If you print only a few pages, change the printer driver setting in Media Type to a thin setting. 50 Call Brother Customer Service. „ Check the paper type and quality. (See Acceptable paper and other print media on page 12.) „ Make sure that paper ...For Windows®) or Print Settings (For Macintosh®) in the software User's Guide on the CD-ROM.) „ The drum unit may be contaminated. Rough- Put in a new drum unit. (See Replacing the drum unit on page 12.) „ Make sure that you are using the manual feed slot, see Loading paper in the manual...
...'s Guide on the CD-ROM.) If you print only a few pages, change the printer driver setting in Media Type to a thin setting. 50 Call Brother Customer Service. „ Check the paper type and quality. (See Acceptable paper and other print media on page 12.) „ Make sure that paper ...For Windows®) or Print Settings (For Macintosh®) in the software User's Guide on the CD-ROM.) „ The drum unit may be contaminated. Rough- Put in a new drum unit. (See Replacing the drum unit on page 12.) „ Make sure that you are using the manual feed slot, see Loading paper in the manual...
Users Manual - English
Page 63
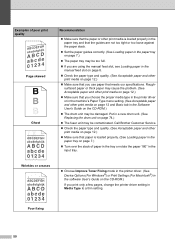
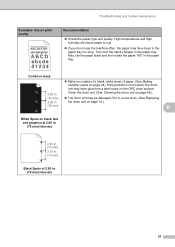
... poor print quality Recommendation „ Check the paper type and quality. Put in a new drum. (See Replacing 2.95 in the paper tray. Also, fan the paper stack and then rotate... the OPC drum surface. 2.95 in. the drum unit on page 74.) (75 mm) B White Spots on page 68.) (75 mm) „ The drum unit may have been in the paper tray too long. Clean the drum unit. (See Cleaning the drum unit on black ... multiple copies on page 24.) If the problem is not solved, the drum unit may be damaged. Troubleshooting and routine maintenance Examples of paper in the paper tray.
... poor print quality Recommendation „ Check the paper type and quality. Put in a new drum. (See Replacing 2.95 in the paper tray. Also, fan the paper stack and then rotate... the OPC drum surface. 2.95 in. the drum unit on page 74.) (75 mm) B White Spots on page 68.) (75 mm) „ The drum unit may have been in the paper tray too long. Clean the drum unit. (See Cleaning the drum unit on black ... multiple copies on page 24.) If the problem is not solved, the drum unit may be damaged. Troubleshooting and routine maintenance Examples of paper in the paper tray.
Users Manual - English
Page 64
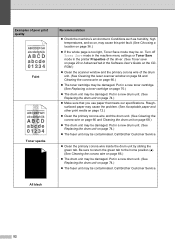
...drum unit. (See Cleaning the laser scanner window on page 64 and Cleaning the corona wire on page 66.) „ The toner cartridge may be damaged. Put in a new toner cartridge. (See Replacing a toner cartridge on page 74.) „ The fuser unit may be contaminated. Put in a new drum unit. (See Replacing the drum unit... ABCDEFGH abcdefghijk ABCD abcde 01234 Toner specks Recommendation „ Check the machine's environment. Call Brother Customer Service. „ Clean the primary corona wire inside the drum unit by sliding the green tab. All black 52 Be sure to return the green tab to...
...drum unit. (See Cleaning the laser scanner window on page 64 and Cleaning the corona wire on page 66.) „ The toner cartridge may be damaged. Put in a new toner cartridge. (See Replacing a toner cartridge on page 74.) „ The fuser unit may be contaminated. Put in a new drum unit. (See Replacing the drum unit... ABCDEFGH abcdefghijk ABCD abcde 01234 Toner specks Recommendation „ Check the machine's environment. Call Brother Customer Service. „ Clean the primary corona wire inside the drum unit by sliding the green tab. All black 52 Be sure to return the green tab to...
Users Manual - English
Page 65
... 74.) ABCDEFGH abcdefghijk ABCD abcde 01234 „ Clean the laser scanner window and the primary corona wire inside the drum unit by sliding the green tab. Call Brother Customer Service at 1-877-BROTHER (1-877-276-8437) (in USA) or 1-877-BROTHER (in direct sunlight or room light, the unit may be damaged. „ The toner cartridge may...
... 74.) ABCDEFGH abcdefghijk ABCD abcde 01234 „ Clean the laser scanner window and the primary corona wire inside the drum unit by sliding the green tab. Call Brother Customer Service at 1-877-BROTHER (1-877-276-8437) (in USA) or 1-877-BROTHER (in direct sunlight or room light, the unit may be damaged. „ The toner cartridge may...
Users Manual - English
Page 67
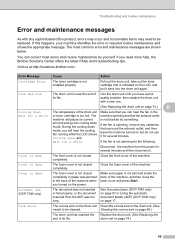
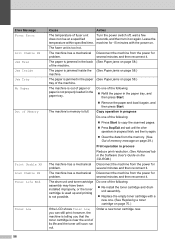
...help, the Brother Solutions Center offers the latest FAQs and troubleshooting tips. See Document jams (DCP-7040 only) on page 57 or Using the automatic document feeder (ADF) (DCP-7040 only) on page 74.) 55 Cleaning the corona wire on page 66.) The drum unit has reached...replace the drum unit with any obstacles that is not installed properly. Drum Error The corona wire on the drum unit Clean the corona wire on the drum unit. (See needs to be cleaned. Troubleshooting and routine maintenance Error and maintenance messages B As with a new one. (See Replacing the drum unit on ...
...help, the Brother Solutions Center offers the latest FAQs and troubleshooting tips. See Document jams (DCP-7040 only) on page 57 or Using the automatic document feeder (ADF) (DCP-7040 only) on page 74.) 55 Cleaning the corona wire on page 66.) The drum unit has reached...replace the drum unit with any obstacles that is not installed properly. Drum Error The corona wire on the drum unit Clean the corona wire on the drum unit. (See needs to be cleaned. Troubleshooting and routine maintenance Error and maintenance messages B As with a new one. (See Replacing the drum unit on ...
Users Manual - English
Page 68
... hot. The machine has a mechanical Disconnect the machine from the power for problem. several minutes and then reconnect it . Do one of the following : „ Re-install the toner cartridge and drum unit assembly. „ Replace the empty toner cartridge with the power on page 58.) tray of paper or paper is full.
... hot. The machine has a mechanical Disconnect the machine from the power for problem. several minutes and then reconnect it . Do one of the following : „ Re-install the toner cartridge and drum unit assembly. „ Replace the empty toner cartridge with the power on page 58.) tray of paper or paper is full.
Users Manual - English
Page 70
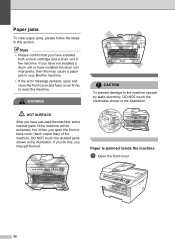
If you do this may get burned. When you may cause a paper jam in your Brother machine. • If the error message remains, open the front or back cover (back output tray) of the machine will be extremely hot. WARNING CAUTION ... firmly to the machine caused by static electricity, DO NOT touch the electrodes shown in the machine. If you have not installed a drum unit or have just used the machine, some internal parts of the machine, DO NOT touch the shaded parts shown in this section. Paper jams B To clear paper jams, please...
If you do this may get burned. When you may cause a paper jam in your Brother machine. • If the error message remains, open the front or back cover (back output tray) of the machine will be extremely hot. WARNING CAUTION ... firmly to the machine caused by static electricity, DO NOT touch the electrodes shown in the machine. If you have not installed a drum unit or have just used the machine, some internal parts of the machine, DO NOT touch the shaded parts shown in this section. Paper jams B To clear paper jams, please...
Users Manual - English
Page 71
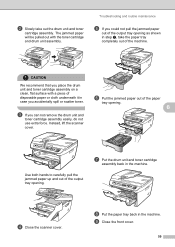
... the jammed paper out of the output tray opening as shown in case you place the drum unit and toner cartridge assembly on a clean, flat surface with the toner cartridge and drum unit assembly. g Put the drum unit and toner cartridge assembly back in the machine. d Close the scanner cover. CAUTION We..., lift the scanner cover. f Pull the jammed paper out of disposable paper or cloth underneath it in step c, take out the drum unit and toner cartridge assembly. h Put the paper tray back in the machine. Troubleshooting and routine maintenance e If you can not remove the...
... the jammed paper out of the output tray opening as shown in case you place the drum unit and toner cartridge assembly on a clean, flat surface with the toner cartridge and drum unit assembly. g Put the drum unit and toner cartridge assembly back in the machine. d Close the scanner cover. CAUTION We..., lift the scanner cover. f Pull the jammed paper out of disposable paper or cloth underneath it in step c, take out the drum unit and toner cartridge assembly. h Put the paper tray back in the machine. Troubleshooting and routine maintenance e If you can not remove the...

Users Manual - English
Page 72
...Close the front cover. 60 CAUTION We recommend that you place the drum unit and toner cartridge assembly on a clean, flat surface with a piece of disposable paper or cloth underneath it in the machine. g Put the drum unit and toner cartridge assembly back in case you to open the fuser ...cover (2). b Slowly take out the drum unit and toner cartridge assembly. 2 1 e Pull the jammed paper out of the machine B a ...
...Close the front cover. 60 CAUTION We recommend that you place the drum unit and toner cartridge assembly on a clean, flat surface with a piece of disposable paper or cloth underneath it in the machine. g Put the drum unit and toner cartridge assembly back in case you to open the fuser ...cover (2). b Slowly take out the drum unit and toner cartridge assembly. 2 1 e Pull the jammed paper out of the machine B a ...

Users Manual - English
Page 73
... We recommend that you accidentally spill or scatter toner. Troubleshooting and routine maintenance c Push down the green lock lever and take out the drum unit and toner cartridge assembly. b Slowly take the toner cartridge out of disposable paper or cloth underneath it off with a piece of the... drum unit. To avoid print quality problems, DO NOT touch the shaded parts shown in case you place the drum unit and toner cartridge assembly on your hands or clothes, wipe or wash it in the ...
... We recommend that you accidentally spill or scatter toner. Troubleshooting and routine maintenance c Push down the green lock lever and take out the drum unit and toner cartridge assembly. b Slowly take the toner cartridge out of disposable paper or cloth underneath it off with a piece of the... drum unit. To avoid print quality problems, DO NOT touch the shaded parts shown in case you place the drum unit and toner cartridge assembly on your hands or clothes, wipe or wash it in the ...
Users Manual - English
Page 74
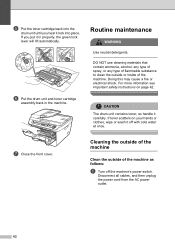
..., wipe or wash it off the machine's power switch. If you hear it lock into the drum unit until you put it carefully. Routine maintenance B WARNING Use neutral detergents. If toner scatters on page 42. CAUTION The drum unit contains toner, so handle it in the machine. g Close the front cover. Cleaning the outside... power cord from the AC power outlet. 62 Doing this may cause a fire or electrical shock. e Put the toner cartridge back into place. f Put the drum unit and toner cartridge assembly back in properly, the green lock lever will lift automatically.
..., wipe or wash it off the machine's power switch. If you hear it lock into the drum unit until you put it carefully. Routine maintenance B WARNING Use neutral detergents. If toner scatters on page 42. CAUTION The drum unit contains toner, so handle it in the machine. g Close the front cover. Cleaning the outside... power cord from the AC power outlet. 62 Doing this may cause a fire or electrical shock. e Put the toner cartridge back into place. f Put the drum unit and toner cartridge assembly back in properly, the green lock lever will lift automatically.
Users Manual - English
Page 76
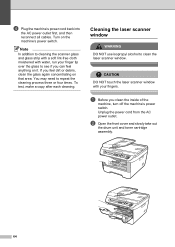
...again concentrating on the machine's power switch. a Before you feel anything on it. To test, make a copy after each cleaning. CAUTION DO NOT touch the laser scanner window with water, run your fingers. Unplug the power cord from the AC power outlet. You may need to repeat the cleaning process three...that area. If you clean the inside of the machine, turn off the machine's power switch. b Open the front cover and slowly take out the drum unit and toner cartridge assembly. 64 d Plug the machine's power cord back into the AC power outlet first, and then reconnect all cables.
...again concentrating on the machine's power switch. a Before you feel anything on it. To test, make a copy after each cleaning. CAUTION DO NOT touch the laser scanner window with water, run your fingers. Unplug the power cord from the AC power outlet. You may need to repeat the cleaning process three...that area. If you clean the inside of the machine, turn off the machine's power switch. b Open the front cover and slowly take out the drum unit and toner cartridge assembly. 64 d Plug the machine's power cord back into the AC power outlet first, and then reconnect all cables.


