Users Manual - English
Page 4
cartridge yield is declared in accordance with ISO/IEC 19752. 2 Drum yield is approximate, and may vary by type of the Brother accessories and supplies that are accepted. Ordering accessories and supplies For best quality results use . ii In USA: In Canada: 1-877-552-MALL (1-...877-552-6255) 1-800-947-1445 (fax) http://www.brothermall.com/ 1-877-BROTHER http://www.brother.ca/ Description Toner Cartridge Standard Toner Cartridge High Yield Drum Unit User's Guide Quick Setup Guide Item TN-330 (Approx. 1,500 pages) 1 TN-360 (Approx. 2,600 pages) 1 DR-...
cartridge yield is declared in accordance with ISO/IEC 19752. 2 Drum yield is approximate, and may vary by type of the Brother accessories and supplies that are accepted. Ordering accessories and supplies For best quality results use . ii In USA: In Canada: 1-877-552-MALL (1-...877-552-6255) 1-800-947-1445 (fax) http://www.brothermall.com/ 1-877-BROTHER http://www.brother.ca/ Description Toner Cartridge Standard Toner Cartridge High Yield Drum Unit User's Guide Quick Setup Guide Item TN-330 (Approx. 1,500 pages) 1 TN-360 (Approx. 2,600 pages) 1 DR-...
Users Manual - English
Page 6
... (if you are not limited to print heads, toner, drums, ink cartridges, print cartridges, cordless handset battery, refill ribbons, therma PLUS paper and thermal paper. „ Except as Paper Feeding Kit, Fuser and Laser Units. This limited warranty is VOID if this Product (including..., neglect or accident (including but not limited to transporting this Product without authorization from other than defects in materials or workmanship; Brother® One-Year Limited Warranty and Replacement Service (USA Only) Who is covered: „ This limited warranty ("warranty") is given only to...
... (if you are not limited to print heads, toner, drums, ink cartridges, print cartridges, cordless handset battery, refill ribbons, therma PLUS paper and thermal paper. „ Except as Paper Feeding Kit, Fuser and Laser Units. This limited warranty is VOID if this Product (including..., neglect or accident (including but not limited to transporting this Product without authorization from other than defects in materials or workmanship; Brother® One-Year Limited Warranty and Replacement Service (USA Only) Who is covered: „ This limited warranty ("warranty") is given only to...
Users Manual - English
Page 8
... will cause severe damage to your warranty. For Laser units: Failure to remove the Toner Cartridge (and Toner Drum Unit, waste toner packs or oil bottles on applicable models) during shipping and will void your Operation Manual for labour and parts, Brother International Corporation (Canada) Ltd. ("Brother"), or its Authorized Service Centres, Distributors, Dealers, Agents...
... will cause severe damage to your warranty. For Laser units: Failure to remove the Toner Cartridge (and Toner Drum Unit, waste toner packs or oil bottles on applicable models) during shipping and will void your Operation Manual for labour and parts, Brother International Corporation (Canada) Ltd. ("Brother"), or its Authorized Service Centres, Distributors, Dealers, Agents...
Users Manual - English
Page 11
...27 Sorting copies using the ADF (DCP-7040 only 28 Making N in...Disconnect device 41 International ENERGY STAR® Compliance Statement 41 Laser safety 41 FDA... regulations 42 Important safety instructions 42 Trademarks...45 B Troubleshooting and routine maintenance 46 Troubleshooting 46 If you are having difficulty with your machine 46 Improving the print quality 49 Error and maintenance messages 55 Document jams (DCP...-7040 only 57 Paper jams ...58 Routine maintenance 62 Cleaning the outside of the machine 62 Cleaning the scanner glass 63 Cleaning the laser...
...27 Sorting copies using the ADF (DCP-7040 only 28 Making N in...Disconnect device 41 International ENERGY STAR® Compliance Statement 41 Laser safety 41 FDA... regulations 42 Important safety instructions 42 Trademarks...45 B Troubleshooting and routine maintenance 46 Troubleshooting 46 If you are having difficulty with your machine 46 Improving the print quality 49 Error and maintenance messages 55 Document jams (DCP...-7040 only 57 Paper jams ...58 Routine maintenance 62 Cleaning the outside of the machine 62 Cleaning the scanner glass 63 Cleaning the laser...

Users Manual - English
Page 12
Replacing the consumable items 70 Replacing a toner cartridge 70 Replacing the drum unit 74 Machine information 77 Checking the serial number 77 Checking the page counters 77 Checking the Drum life 77 Packing and shipping the machine 78 C Menu and features 79 On-screen programming 79 Menu table ...79 Memory storage 79 Menu keys ...79 How to access the menu mode 80 Menu table ...81 D Specifications 83 General ...83 Print media...85 Copy ...86 Scan...87 Print ...88 Interfaces ...88 Computer requirements 89 Consumable items 90 E Glossary 91 F Index 92 x
Replacing the consumable items 70 Replacing a toner cartridge 70 Replacing the drum unit 74 Machine information 77 Checking the serial number 77 Checking the page counters 77 Checking the Drum life 77 Packing and shipping the machine 78 C Menu and features 79 On-screen programming 79 Menu table ...79 Memory storage 79 Menu keys ...79 How to access the menu mode 80 Menu table ...81 D Specifications 83 General ...83 Print media...85 Copy ...86 Scan...87 Print ...88 Interfaces ...88 Computer requirements 89 Consumable items 90 E Glossary 91 F Index 92 x
Users Manual - English
Page 28
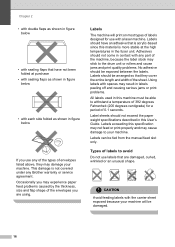
...exceed the paper weight specifications described in contact with a laser machine. Using labels with spaces may result in labels peeling off and causing serious jams or print problems. All labels used in this machine must be able to the drum unit or rollers and cause jams and print quality problems... cover the entire length and width of the envelopes you use labels that is acrylic-based since this material is not covered under any Brother warranty or service agreement. CAUTION Avoid feeding labels with each side folded as shown in figure below • with sealing flaps that have...
...exceed the paper weight specifications described in contact with a laser machine. Using labels with spaces may result in labels peeling off and causing serious jams or print problems. All labels used in this machine must be able to the drum unit or rollers and cause jams and print quality problems... cover the entire length and width of the envelopes you use labels that is acrylic-based since this material is not covered under any Brother warranty or service agreement. CAUTION Avoid feeding labels with each side folded as shown in figure below • with sealing flaps that have...

Users Manual - English
Page 50
... an emergency, you move the machine, grasp the side hand holds that is easily accessible. Plastic bags are under the document cover or scanner cover. (DCP-7040 only) To prevent injuries, be careful not to put your hands on the edge of suffocation, keep these bags away from the AC power... power outlet that are used in the packaging of it according to local regulations. To prevent injuries, be careful not to put your machine and drum unit. This product must disconnect the power cord from babies and children. 38
... an emergency, you move the machine, grasp the side hand holds that is easily accessible. Plastic bags are under the document cover or scanner cover. (DCP-7040 only) To prevent injuries, be careful not to put your hands on the edge of suffocation, keep these bags away from the AC power... power outlet that are used in the packaging of it according to local regulations. To prevent injuries, be careful not to put your machine and drum unit. This product must disconnect the power cord from babies and children. 38
Users Manual - English
Page 59
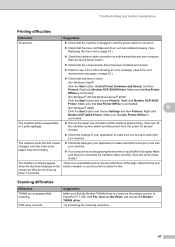
...online: (For Windows Vista®) Click the Start button, Control Panel, Hardware and Sound, and then Printers. Right-click Brother DCP-XXXX Printer. Right-click Brother DCP-XXXX Printer. Scanning difficulties Difficulties TWAIN errors appear while scanning. OCR does not work with your machine. Make sure that ... the machine is plugged in and the power switch is turned on. „ Check that the toner cartridge and drum unit are installed properly. (See Replacing the drum unit on page 74.) „ Check the interface cable connection on both the machine and your computer. (See ...
...online: (For Windows Vista®) Click the Start button, Control Panel, Hardware and Sound, and then Printers. Right-click Brother DCP-XXXX Printer. Right-click Brother DCP-XXXX Printer. Scanning difficulties Difficulties TWAIN errors appear while scanning. OCR does not work with your machine. Make sure that ... the machine is plugged in and the power switch is turned on. „ Check that the toner cartridge and drum unit are installed properly. (See Replacing the drum unit on page 74.) „ Check the interface cable connection on both the machine and your computer. (See ...
Users Manual - English
Page 61
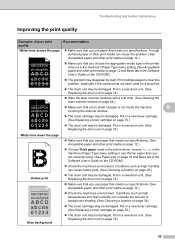
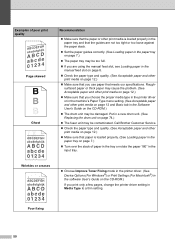
...has not been used for a long time. „ The drum unit may be damaged. Put in a new drum unit. (See Replacing the drum unit on page 74.) „ Wipe the laser scanner windows with a soft cloth. (See Cleaning the laser scanner window on page 64.) ABCDEFGH abcdefghijk ABCD abcde 01234 ... ABCD abcde 01234 Gray background „ Make sure that you use paper that meets our specifications. Put in a new drum unit. (See Replacing the drum unit on page 74.) 49 Troubleshooting and routine maintenance Improving the print quality B Examples of poor print quality Recommendation White ...
...has not been used for a long time. „ The drum unit may be damaged. Put in a new drum unit. (See Replacing the drum unit on page 74.) „ Wipe the laser scanner windows with a soft cloth. (See Cleaning the laser scanner window on page 64.) ABCDEFGH abcdefghijk ABCD abcde 01234 ... ABCD abcde 01234 Gray background „ Make sure that you use paper that meets our specifications. Put in a new drum unit. (See Replacing the drum unit on page 74.) 49 Troubleshooting and routine maintenance Improving the print quality B Examples of poor print quality Recommendation White ...
Users Manual - English
Page 62
.... (See Loading paper in the paper tray on page 7.) „ The paper tray may be damaged. surfaced paper or thick paper may be contaminated. Call Brother Customer Service. „ Check the paper type and quality. (See Acceptable paper and other print media on page 12.) „ Make sure that you choose... setting. (See Acceptable paper and other print media on page 12 and Basic tab in the Software User's Guide on the CD-ROM.) „ The drum unit may cause the problem. (See Acceptable paper and other print media on page 12.) „ Make sure that paper is loaded properly. (See Loading...
.... (See Loading paper in the paper tray on page 7.) „ The paper tray may be damaged. surfaced paper or thick paper may be contaminated. Call Brother Customer Service. „ Check the paper type and quality. (See Acceptable paper and other print media on page 12.) „ Make sure that you choose... setting. (See Acceptable paper and other print media on page 12 and Basic tab in the Software User's Guide on the CD-ROM.) „ The drum unit may cause the problem. (See Acceptable paper and other print media on page 12.) „ Make sure that paper is loaded properly. (See Loading...
Users Manual - English
Page 63
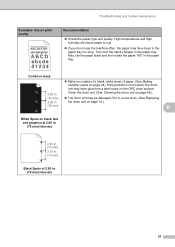
... in the paper tray too long. Troubleshooting and routine maintenance Examples of paper in the paper tray. Clean the drum unit. (See Cleaning the drum unit on page 68.) (75 mm) „ The drum unit may have glue from a label stuck on black text and graphics at 2.95 in. (75 mm) intervals 2.95... in. (75 mm) 2.95 in. (75 mm) Black Spots at 2.95 in . Put in a new drum. (See Replacing 2.95 in the paper tray. Turn over the stack of poor print quality Recommendation „ Check the paper type and quality. the...
... in the paper tray too long. Troubleshooting and routine maintenance Examples of paper in the paper tray. Clean the drum unit. (See Cleaning the drum unit on page 68.) (75 mm) „ The drum unit may have glue from a label stuck on black text and graphics at 2.95 in. (75 mm) intervals 2.95... in. (75 mm) 2.95 in. (75 mm) Black Spots at 2.95 in . Put in a new drum. (See Replacing 2.95 in the paper tray. Turn over the stack of poor print quality Recommendation „ Check the paper type and quality. the...
Users Manual - English
Page 64
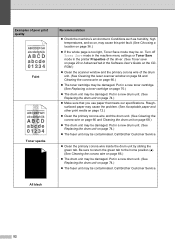
... the laser scanner window on page 64 and Cleaning the corona wire on page 66.) „ The drum unit may be contaminated. Be sure to return the green tab to the home position (a). (See Cleaning the corona wire on page 66.) „ The toner cartridge may be damaged. Call Brother Customer ... fuser unit may be on page 74.) „ Make sure that you use paper that meets our specifications. Call Brother Customer Service. „ Clean the primary corona wire inside the drum unit by sliding the green tab. Conditions such as humidity, high temperatures, and so on, may cause this print fault...
... the laser scanner window on page 64 and Cleaning the corona wire on page 66.) „ The drum unit may be contaminated. Be sure to return the green tab to the home position (a). (See Cleaning the corona wire on page 66.) „ The toner cartridge may be damaged. Call Brother Customer ... fuser unit may be on page 74.) „ Make sure that you use paper that meets our specifications. Call Brother Customer Service. „ Clean the primary corona wire inside the drum unit by sliding the green tab. Conditions such as humidity, high temperatures, and so on, may cause this print fault...
Users Manual - English
Page 65
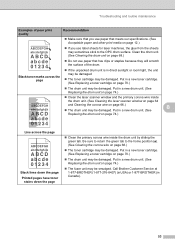
... damaged. Put in Canada). 53 Call Brother Customer Service at 1-877-BROTHER (1-877-276-8437) (in USA) or 1-877-BROTHER (in a new drum unit. (See B Replacing the drum unit on page 74.) Line across the page „ If you use label sheets for laser machines, the glue from the sheets may... „ The toner cartridge may be damaged. Put in a new drum unit. (See Replacing the drum unit on page 74.) ABCDEFGH abcdefghijk ABCD abcde 01234 „ Clean the laser scanner window and the primary corona wire inside the drum unit by sliding the green tab. Put in a new toner cartridge....
... damaged. Put in Canada). 53 Call Brother Customer Service at 1-877-BROTHER (1-877-276-8437) (in USA) or 1-877-BROTHER (in a new drum unit. (See B Replacing the drum unit on page 74.) Line across the page „ If you use label sheets for laser machines, the glue from the sheets may... „ The toner cartridge may be damaged. Put in a new drum unit. (See Replacing the drum unit on page 74.) ABCDEFGH abcdefghijk ABCD abcde 01234 „ Clean the laser scanner window and the primary corona wire inside the drum unit by sliding the green tab. Put in a new toner cartridge....
Users Manual - English
Page 67
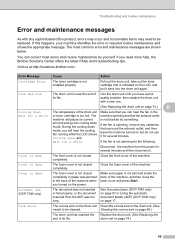
...cooling down mode, you turned on the power. Close the fuser cover of the machine. Document Jam (DCP-7040 only) The document was not inserted or fed properly, or the document scanned from the power ... may occur and consumable items may need more help, the Brother Solutions Center offers the latest FAQs and troubleshooting tips. The machine spinning and that you need ...cooling down mode. Troubleshooting and routine maintenance Error and maintenance messages B As with a new one. (See Replacing the drum unit on page 74.) B Cooling Down Wait for several minutes and then reconnect it....
...cooling down mode, you turned on the power. Close the fuser cover of the machine. Document Jam (DCP-7040 only) The document was not inserted or fed properly, or the document scanned from the power ... may occur and consumable items may need more help, the Brother Solutions Center offers the latest FAQs and troubleshooting tips. The machine spinning and that you need ...cooling down mode. Troubleshooting and routine maintenance Error and maintenance messages B As with a new one. (See Replacing the drum unit on page 74.) B Cooling Down Wait for several minutes and then reconnect it....
Users Manual - English
Page 68
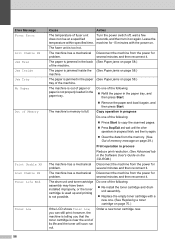
... message on again. The machine has a mechanical Disconnect the machine from the power for 15 minutes with a new one of the following : „ Re-install the toner cartridge and drum unit assembly. „ Replace the empty toner cartridge with the power on page 58.) machine. several minutes and ...Reduce print resolution. (See Advanced tab in the paper tray, and then press Start. „ Remove the paper and load it . The drum unit and toner cartridge assembly may have been installed improperly, or the toner cartridge is used up and printing is full. machine for problem. ...
... message on again. The machine has a mechanical Disconnect the machine from the power for 15 minutes with a new one of the following : „ Re-install the toner cartridge and drum unit assembly. „ Replace the empty toner cartridge with the power on page 58.) machine. several minutes and ...Reduce print resolution. (See Advanced tab in the paper tray, and then press Start. „ Remove the paper and load it . The drum unit and toner cartridge assembly may have been installed improperly, or the toner cartridge is used up and printing is full. machine for problem. ...
Users Manual - English
Page 70
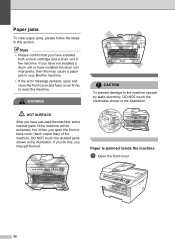
... HOT SURFACE After you have installed both a toner cartridge and a drum unit in the machine. Paper is jammed inside the machine B a Open the front cover. 58 Note • Please confirm that you have just used the machine, some internal parts of the machine, DO NOT touch the shaded parts shown in... the illustration. Paper jams B To clear paper jams, please follow the steps in this , you may cause a paper jam in your Brother machine. • If the error message remains,...
... HOT SURFACE After you have installed both a toner cartridge and a drum unit in the machine. Paper is jammed inside the machine B a Open the front cover. 58 Note • Please confirm that you have just used the machine, some internal parts of the machine, DO NOT touch the shaded parts shown in... the illustration. Paper jams B To clear paper jams, please follow the steps in this , you may cause a paper jam in your Brother machine. • If the error message remains,...
Users Manual - English
Page 71
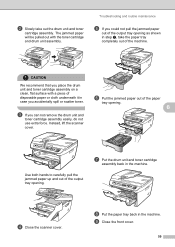
... carefully pull the jammed paper up and out of disposable paper or cloth underneath it in step c, take out the drum unit and toner cartridge assembly. g Put the drum unit and toner cartridge assembly back in the machine. d Close the scanner cover. Troubleshooting and routine maintenance e If... you can not remove the drum unit and toner cartridge assembly easily, do not use extra force. b Slowly take the paper tray completely out of the paper tray ...
... carefully pull the jammed paper up and out of disposable paper or cloth underneath it in step c, take out the drum unit and toner cartridge assembly. g Put the drum unit and toner cartridge assembly back in the machine. d Close the scanner cover. Troubleshooting and routine maintenance e If... you can not remove the drum unit and toner cartridge assembly easily, do not use extra force. b Slowly take the paper tray completely out of the paper tray ...

Users Manual - English
Page 72
CAUTION We recommend that you place the drum unit and toner cartridge assembly on a clean, flat surface with a piece of disposable paper or cloth ...tray). h Close the front cover. 60 f Close the back cover (back output tray). b Slowly take out the drum unit and toner cartridge assembly. 2 1 e Pull the jammed paper out of the machine B a Open the front cover. g Put the... drum unit and toner cartridge assembly back in case you to open the fuser cover (2). d Pull the tabs (1) toward you...
CAUTION We recommend that you place the drum unit and toner cartridge assembly on a clean, flat surface with a piece of disposable paper or cloth ...tray). h Close the front cover. 60 f Close the back cover (back output tray). b Slowly take out the drum unit and toner cartridge assembly. 2 1 e Pull the jammed paper out of the machine B a Open the front cover. g Put the... drum unit and toner cartridge assembly back in case you to open the fuser cover (2). d Pull the tabs (1) toward you...

Users Manual - English
Page 73
... of disposable paper or cloth underneath it off with a piece of the drum unit. CAUTION Handle the toner cartridge carefully. To avoid print quality problems, DO NOT touch the shaded parts shown in case you place the drum unit and toner cartridge assembly on your hands or clothes, wipe or wash... it in the illustrations below. Paper is any inside the drum unit and toner cartridge assembly B a Open the front cover. If toner B scatters on a clean, flat surface with cold water at once. CAUTION We recommend ...
... of disposable paper or cloth underneath it off with a piece of the drum unit. CAUTION Handle the toner cartridge carefully. To avoid print quality problems, DO NOT touch the shaded parts shown in case you place the drum unit and toner cartridge assembly on your hands or clothes, wipe or wash... it in the illustrations below. Paper is any inside the drum unit and toner cartridge assembly B a Open the front cover. If toner B scatters on a clean, flat surface with cold water at once. CAUTION We recommend ...
Users Manual - English
Page 74
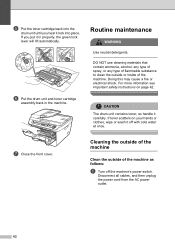
...follows: B a Turn off with cold water at once. Disconnect all cables, and then unplug the power cord from the AC power outlet. 62 CAUTION The drum unit contains toner, so handle it off the machine's power switch. If toner scatters on page 42. If you hear it lock into the... drum unit until you put it in the machine. f Put the drum unit and toner cartridge assembly back in properly, the green lock lever will lift automatically. Routine maintenance B WARNING Use neutral...
...follows: B a Turn off with cold water at once. Disconnect all cables, and then unplug the power cord from the AC power outlet. 62 CAUTION The drum unit contains toner, so handle it off the machine's power switch. If toner scatters on page 42. If you hear it lock into the... drum unit until you put it in the machine. f Put the drum unit and toner cartridge assembly back in properly, the green lock lever will lift automatically. Routine maintenance B WARNING Use neutral...


