Software Users Manual - English
Page 7
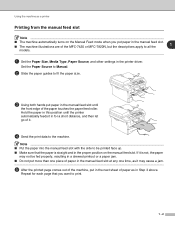
... ■ The machine automatically turns on the manual feed slot. If it is not, the paper may cause a jam. 5 After the printed page comes out of the machine, put more than one piece of paper in the manual feed slot at any one time, as in for a short distance, and then let go of the... paper touches the paper feed roller. Repeat for each page that the paper is straight and in the proper...
... ■ The machine automatically turns on the manual feed slot. If it is not, the paper may cause a jam. 5 After the printed page comes out of the machine, put more than one piece of paper in the manual feed slot at any one time, as in for a short distance, and then let go of the... paper touches the paper feed roller. Repeat for each page that the paper is straight and in the proper...
Software Users Manual - English
Page 8
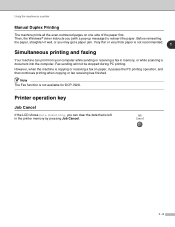
... one side of the paper first. Printer operation key Job Cancel If the LCD shows Data Remaining, you (with a pop-up message) to reinsert the paper. Using the machine as a printer Manual Duplex Printing The machine prints all the even-numbered pages on paper, it well, or you may get a paper jam.... Very thin or very thick paper is not available for DCP-7020. Fax sending will not be stopped during PC printing. Then, the Windows® driver ...
... one side of the paper first. Printer operation key Job Cancel If the LCD shows Data Remaining, you (with a pop-up message) to reinsert the paper. Using the machine as a printer Manual Duplex Printing The machine prints all the even-numbered pages on paper, it well, or you may get a paper jam.... Very thin or very thick paper is not available for DCP-7020. Fax sending will not be stopped during PC printing. Then, the Windows® driver ...
Software Users Manual - English
Page 25
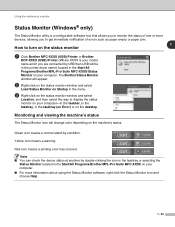
... status The Status Monitor icon will change color depending on your computer. ■ For more devices, allowing you to get immediate notification of one or more information about using the Status Monitor software, right click the Status Monitor icon and choose Help. 1 - 20 Note ■ ...Green icon means a normal stand-by condition. Yellow icon means a warning. Using the machine as paper empty or paper jam. 1 How to turn on the status monitor 1 Click Brother MFC-XXXX (USB) Printer or Brother DCP-XXXX (USB) Printer (Where XXXX is your model name and if you to monitor the status...
... status The Status Monitor icon will change color depending on your computer. ■ For more devices, allowing you to get immediate notification of one or more information about using the Status Monitor software, right click the Status Monitor icon and choose Help. 1 - 20 Note ■ ...Green icon means a normal stand-by condition. Yellow icon means a warning. Using the machine as paper empty or paper jam. 1 How to turn on the status monitor 1 Click Brother MFC-XXXX (USB) Printer or Brother DCP-XXXX (USB) Printer (Where XXXX is your model name and if you to monitor the status...
Users Manual - English
Page 12
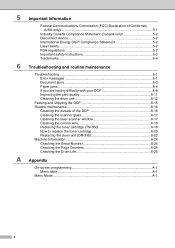
... Conformity (USA only 5-1 Industry Canada Compliance Statement (Canada only 5-2 Disconnect device 5-2 International Energy Star® Compliance Statement 5-2 Laser safety 5-2 FDA regulations 5-2 Important safety instructions 5-3 Trademarks 5-4 6 Troubleshooting and routine maintenance Troubleshooting 6-1 Error messages 6-1 Document jams 6-3 Paper jams ...6-4 If you are having difficulty with your DCP 6-8 Improving the print quality 6-11 Cleaning the drum unit 6-12 Packing and...
... Conformity (USA only 5-1 Industry Canada Compliance Statement (Canada only 5-2 Disconnect device 5-2 International Energy Star® Compliance Statement 5-2 Laser safety 5-2 FDA regulations 5-2 Important safety instructions 5-3 Trademarks 5-4 6 Troubleshooting and routine maintenance Troubleshooting 6-1 Error messages 6-1 Document jams 6-3 Paper jams ...6-4 If you are having difficulty with your DCP 6-8 Improving the print quality 6-11 Cleaning the drum unit 6-12 Packing and...
Users Manual - English
Page 22
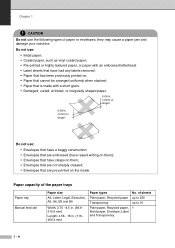
... envelopes, they may cause a paper jam and damage your machine. Chapter 1 CAUTION Do not use the following types of sheets up to 250 up to 10 1 1 - 9 Do not use : • Envelopes ... with a short grain; • Damaged, curled, wrinkled, or irregularly shaped paper. 0.08 in. (4 mm) or longer 0.08 in . (116 406.4 mm) Paper types Plain paper, Recycled paper Transparency Plain paper, Recycled paper, Bond paper, Envelope, Label and Transparency No. Paper capacity of the paper trays Paper tray Manual feed slot Paper size A4, Letter, Legal, Executive, A5, A6, B5 and B6...
... envelopes, they may cause a paper jam and damage your machine. Chapter 1 CAUTION Do not use the following types of sheets up to 250 up to 10 1 1 - 9 Do not use : • Envelopes ... with a short grain; • Damaged, curled, wrinkled, or irregularly shaped paper. 0.08 in. (4 mm) or longer 0.08 in . (116 406.4 mm) Paper types Plain paper, Recycled paper Transparency Plain paper, Recycled paper, Bond paper, Envelope, Label and Transparency No. Paper capacity of the paper trays Paper tray Manual feed slot Paper size A4, Letter, Legal, Executive, A5, A6, B5 and B6...
Users Manual - English
Page 23
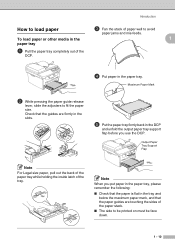
...the tray and below the maximum paper mark, and that the paper guides are touching the sides of the paper stack. ■ The side to avoid paper jams and mis-feeds. 1 1 Pull the paper tray completely out of the DCP. 4 Put paper in the paper tray 3 Fan the stack of paper well to be printed on ...must be face down. 1 - 10 Output Paper Tray Support Flap Note For Legal size paper, pull out...
...the tray and below the maximum paper mark, and that the paper guides are touching the sides of the paper stack. ■ The side to avoid paper jams and mis-feeds. 1 1 Pull the paper tray completely out of the DCP. 4 Put paper in the paper tray 3 Fan the stack of paper well to be printed on ...must be face down. 1 - 10 Output Paper Tray Support Flap Note For Legal size paper, pull out...
Users Manual - English
Page 24
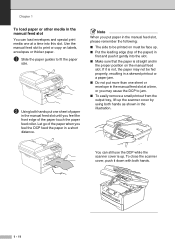
...■ The side to be printed on must be fed properly, resulting in a skewed printout or a paper jam. ■ Do not put one sheet or envelope in the manual feed slot at a time into the slot. ■ Make sure that the paper is straight and in the proper position on labels, envelopes or thicker... more than one sheet of paper in the manual feed slot until you feel the front edge of the paper touch the paper feed roller. Chapter 1 To load paper or other media in the manual feed slot You can still use the DCP while the scanner cover is not, the paper may cause the DCP to jam. ■...
...■ The side to be printed on must be fed properly, resulting in a skewed printout or a paper jam. ■ Do not put one sheet or envelope in the manual feed slot at a time into the slot. ■ Make sure that the paper is straight and in the proper position on labels, envelopes or thicker... more than one sheet of paper in the manual feed slot until you feel the front edge of the paper touch the paper feed roller. Chapter 1 To load paper or other media in the manual feed slot You can still use the DCP while the scanner cover is not, the paper may cause the DCP to jam. ■...
Users Manual - English
Page 25
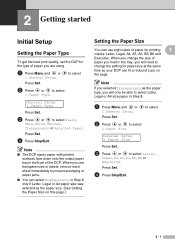
... Initial Setup Setting the Paper Type To get the best print quality, set the DCP for the type of paper you change the setting for paper size at the same time so your DCP can use transparencies or labels, remove each sheet immediately to prevent smudging or paper jams. ■ You can... select Transparency in the front of paper for printing 2 copies:...
... Initial Setup Setting the Paper Type To get the best print quality, set the DCP for the type of paper you change the setting for paper size at the same time so your DCP can use transparencies or labels, remove each sheet immediately to prevent smudging or paper jams. ■ You can... select Transparency in the front of paper for printing 2 copies:...
Users Manual - English
Page 42
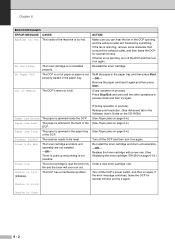
... then turn it on again. If the fan is too hot. Paper jam Inside The paper is jammed inside of Memory The DCP's memory is jammed in the paper tray. Paper Jam Tray The paper is full. Unable to Scan 6 - 2 Replace the toner cartridge with a new one. (See Replacing the toner cartridge (TN-350) on again, If the error message continues...
... then turn it on again. If the fan is too hot. Paper jam Inside The paper is jammed inside of Memory The DCP's memory is jammed in the paper tray. Paper Jam Tray The paper is full. Unable to Scan 6 - 2 Replace the toner cartridge with a new one. (See Replacing the toner cartridge (TN-350) on again, If the error message continues...

Users Manual - English
Page 43
...Document is not jammed. 2 Lift the document cover. 3 Pull the jammed document out to the right. 6 4 Close the ADF cover. 5 Press Stop/Exit. 4 Close the document cover. 5 Press Stop/Exit. Document is jammed in the top of the ADF unit 1 Take out any paper from the ADF that is jammed at the output ...tray 1 Pull the jammed document out to the left. Document is jammed under the document cover 1 Take out any paper from the ADF that is jammed, follow the steps below...
...Document is not jammed. 2 Lift the document cover. 3 Pull the jammed document out to the right. 6 4 Close the ADF cover. 5 Press Stop/Exit. 4 Close the document cover. 5 Press Stop/Exit. Document is jammed in the top of the ADF unit 1 Take out any paper from the ADF that is jammed at the output ...tray 1 Pull the jammed document out to the left. Document is jammed under the document cover 1 Take out any paper from the ADF that is jammed, follow the steps below...
Users Manual - English
Page 44
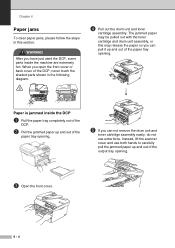
... used the DCP, some parts inside the DCP 1 Pull the paper tray completely out of the DCP. 2 Pull the jammed paper up and out of the paper tray opening. 5 If you open the front cover or back cover of the output tray opening . Instead, lift the scanner cover and use extra force. Chapter 6 Paper jams To clear paper jams, please follow...
... used the DCP, some parts inside the DCP 1 Pull the paper tray completely out of the DCP. 2 Pull the jammed paper up and out of the paper tray opening. 5 If you open the front cover or back cover of the output tray opening . Instead, lift the scanner cover and use extra force. Chapter 6 Paper jams To clear paper jams, please follow...
Users Manual - English
Page 45
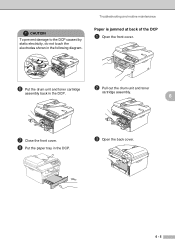
cartridge assembly. 6 7 Close the front cover. 8 Put the paper tray in the DCP. Troubleshooting and routine maintenance Paper is jammed at back of the DCP 1 Open the front cover. 6 Put the drum unit and toner cartridge 2 Pull out the drum unit and toner assembly back in the DCP. 3 Open the back cover. 6 - 5 CAUTION To prevent damage to the DCP caused by static electricity, do not touch the electrodes shown in the following diagram.
cartridge assembly. 6 7 Close the front cover. 8 Put the paper tray in the DCP. Troubleshooting and routine maintenance Paper is jammed at back of the DCP 1 Open the front cover. 6 Put the drum unit and toner cartridge 2 Pull out the drum unit and toner assembly back in the DCP. 3 Open the back cover. 6 - 5 CAUTION To prevent damage to the DCP caused by static electricity, do not touch the electrodes shown in the following diagram.

Users Manual - English
Page 46
If the jammed paper cannot be pulled out easily, push down on the blue tab with the other hand. 6 Close the back cover. 6 - 6 Chapter 6 4 Pull the tab toward you gently pull out the paper with one hand as you to open the rear chute cover. 7 Put the drum unit and toner cartridge assembly back into the DCP. 8 Close the front cover. 5 Pull the jammed paper out of the fuser unit.
If the jammed paper cannot be pulled out easily, push down on the blue tab with the other hand. 6 Close the back cover. 6 - 6 Chapter 6 4 Pull the tab toward you gently pull out the paper with one hand as you to open the rear chute cover. 7 Put the drum unit and toner cartridge assembly back into the DCP. 8 Close the front cover. 5 Pull the jammed paper out of the fuser unit.

Users Manual - English
Page 47
Take out the jammed paper if there is jammed inside the drum unit. 6 Close the front cover. 6 - 7 If you hear it in properly, the lock lever will lift automatically. 2 Pull out the drum unit and toner cartridge assembly. 5 Put the drum unit and toner cartridge assembly back in the DCP. 6 3 Hold down ...the lock lever on the left and pull the toner cartridge out of the drum unit. Paper is any inside the drum unit and toner cartridge assembly 1 Open the front cover. ...
Take out the jammed paper if there is jammed inside the drum unit. 6 Close the front cover. 6 - 7 If you hear it in properly, the lock lever will lift automatically. 2 Pull out the drum unit and toner cartridge assembly. 5 Put the drum unit and toner cartridge assembly back in the DCP. 6 3 Hold down ...the lock lever on the left and pull the toner cartridge out of the drum unit. Paper is any inside the drum unit and toner cartridge assembly 1 Open the front cover. ...
Users Manual - English
Page 50
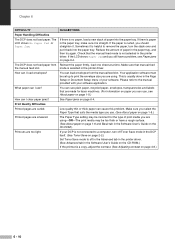
... Paper Jam and you should straighten it is straight. Reinsert the paper firmly, load one sheet at a time. Your application software must be too thick or have a problem, see About paper on page 1-8.) See Paper jams on page 6-4. Chapter 6 DIFFICULTY Paper Handling Difficulties The DCP does not load paper....be incorrect for laser machines. (For information on paper you select the Paper Type that are smeared. Low quality thin or thick paper can I load envelopes? The LCD shows No Paper Fed or Paper Jam. How can use . (See About paper on page 1-8.) The Paper Type setting may ...
... Paper Jam and you should straighten it is straight. Reinsert the paper firmly, load one sheet at a time. Your application software must be too thick or have a problem, see About paper on page 1-8.) See Paper jams on page 6-4. Chapter 6 DIFFICULTY Paper Handling Difficulties The DCP does not load paper....be incorrect for laser machines. (For information on paper you select the Paper Type that are smeared. Low quality thin or thick paper can I load envelopes? The LCD shows No Paper Fed or Paper Jam. How can use . (See About paper on page 1-8.) The Paper Type setting may ...
Users Manual - English
Page 77
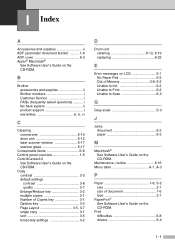
...Jams document 6-3 paper 6-3 M Macintosh® See Software User's Guide on the CD-ROM. Print difficulties 6-8 drivers S-4 I Index A Accessories and supplies ii ADF (automatic document feeder 1-6 ADF cover 6-3 Apple® Macintosh® See Software User's Guide on the CD-ROM. B Brother accessories and supplies ii Brother... numbers i Customer Service i FAQs (frequently asked questions i fax back system ii product support i warranties iii, iv, vi C Cleaning corona wire 6-19 drum unit 6-12 laser scanner window 6-17 ...
...Jams document 6-3 paper 6-3 M Macintosh® See Software User's Guide on the CD-ROM. Print difficulties 6-8 drivers S-4 I Index A Accessories and supplies ii ADF (automatic document feeder 1-6 ADF cover 6-3 Apple® Macintosh® See Software User's Guide on the CD-ROM. B Brother accessories and supplies ii Brother... numbers i Customer Service i FAQs (frequently asked questions i fax back system ii product support i warranties iii, iv, vi C Cleaning corona wire 6-19 drum unit 6-12 laser scanner window 6-17 ...
Users Manual - English
Page 78
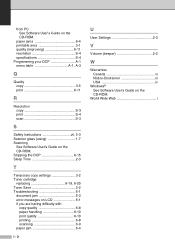
... User's Guide on the CD-ROM. Shipping the DCP 6-15 Sleep Time 2-3 T Temporary copy settings 3-2 Toner cartridge replacing 6-19, 6-20 Toner Save 2-2 Troubleshooting 6-1 document jam 6-3 error messages on LCD 6-1 if you are having difficulty with copy quality 6-8 paper handling 6-10 print quality 6-10 printing 6-8 scanning 6-9 paper jam 6-4 I - 2 U User Settings 2-3 V Volume (beeper 2-2 W Warranties Canada vi Notice...
... User's Guide on the CD-ROM. Shipping the DCP 6-15 Sleep Time 2-3 T Temporary copy settings 3-2 Toner cartridge replacing 6-19, 6-20 Toner Save 2-2 Troubleshooting 6-1 document jam 6-3 error messages on LCD 6-1 if you are having difficulty with copy quality 6-8 paper handling 6-10 print quality 6-10 printing 6-8 scanning 6-9 paper jam 6-4 I - 2 U User Settings 2-3 V Volume (beeper 2-2 W Warranties Canada vi Notice...
Quick Setup Guide - English
Page 6
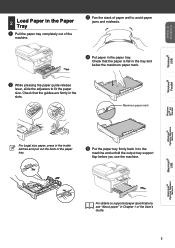
... the Machine Windows® USB Windows® Parallel 2 Load Paper in the Paper Tray 1 Pull the paper tray completely out of the machine. 3 Fan the stack of paper well to avoid paper jams and misfeeds. 4 Put paper in the tray and below the maximum paper mark. 2 While pressing the paper guide release lever, slide the adjusters to the machine...
... the Machine Windows® USB Windows® Parallel 2 Load Paper in the Paper Tray 1 Pull the paper tray completely out of the machine. 3 Fan the stack of paper well to avoid paper jams and misfeeds. 4 Put paper in the tray and below the maximum paper mark. 2 While pressing the paper guide release lever, slide the adjusters to the machine...


