
Procedure for sewing a DST file using PC - English
Page 1
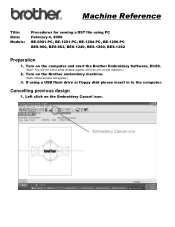
... BES-1260, BES-1262 Preparation 1. Turn on the Brother embroidery machine. (Note: White window will not see a white window appear until you turn on the machine.) 2. Left click on the computer and start the Brother Embroidery Software, ECSC. (Note: You will appear.) 3. Cancelling ...previous design 1. Turn on the Embroidery Cancel icon. Embroidery Cancel icon Machine Reference Title: Date: Models: Procedures for sewing a DST file ...
... BES-1260, BES-1262 Preparation 1. Turn on the Brother embroidery machine. (Note: White window will not see a white window appear until you turn on the machine.) 2. Left click on the computer and start the Brother Embroidery Software, ECSC. (Note: You will appear.) 3. Cancelling ...previous design 1. Turn on the Embroidery Cancel icon. Embroidery Cancel icon Machine Reference Title: Date: Models: Procedures for sewing a DST file ...
Instruction Manual - English
Page 1
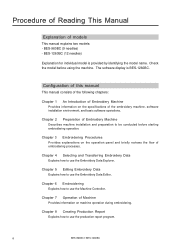
.... Chapter 8 Creating Production Report Explains how to use the production report program. 6 BES-960BC • BES-1260BC The software display is provided by identifying the model name. Chapter 5 Editing Embroidery Data Explains how to use the Embroidery Data Editor. Procedure of Reading This Manual Explanation of embroidering processes. Chapter 3 Embroidering Procedures Provides explanations on...
.... Chapter 8 Creating Production Report Explains how to use the production report program. 6 BES-960BC • BES-1260BC The software display is provided by identifying the model name. Chapter 5 Editing Embroidery Data Explains how to use the Embroidery Data Editor. Procedure of Reading This Manual Explanation of embroidering processes. Chapter 3 Embroidering Procedures Provides explanations on...
Instruction Manual - English
Page 3
... to Machines (for Embroidering 44 3-1. Installation of Preparation for Embroidering 64 Run the Software 65 Turn on the Machine Power 65 8 BES-960BC • BES-1260BC Bed Retract 55 3-6. Adjustment of Thread Tension 57 Chapter 3 Embroidering Procedures Functions of...sets) ..... 40 2-8. Notes on Tension Plate 62 Flowchart of Software 43 3. Transportation of Cotton Stand 37 2-6. Mounting of Personal Computer to Needle Bar Case 39 2-7. Connection of Table 33 2-5. Replacement of Embroidery Machine 1. Handling of floppy disk 23 Chapter 2 Preparation of ...
... to Machines (for Embroidering 44 3-1. Installation of Preparation for Embroidering 64 Run the Software 65 Turn on the Machine Power 65 8 BES-960BC • BES-1260BC Bed Retract 55 3-6. Adjustment of Thread Tension 57 Chapter 3 Embroidering Procedures Functions of...sets) ..... 40 2-8. Notes on Tension Plate 62 Flowchart of Software 43 3. Transportation of Cotton Stand 37 2-6. Mounting of Personal Computer to Needle Bar Case 39 2-7. Connection of Table 33 2-5. Replacement of Embroidery Machine 1. Handling of floppy disk 23 Chapter 2 Preparation of ...
Instruction Manual - English
Page 12
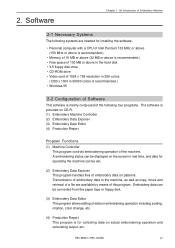
...from the paper tape or floppy disk. (3) Embroidery Data Editor This program allows editing of this program. Embroidery data can be displayed on the screen in 65000 colors is recommended.) • Windows 95 2-2 Configuration of Software This software is mainly composed of the following systems are ...This program handles files of the machine. 2. BES-960BC • BES-1260BC 17 Transmission of embroidery data to the machine, as well as copy, move and retrieval of a file are needed for installing the software. • Personal computer with a CPU of Intel Pentium 133 MHz or ...
...from the paper tape or floppy disk. (3) Embroidery Data Editor This program allows editing of this program. Embroidery data can be displayed on the screen in 65000 colors is recommended.) • Windows 95 2-2 Configuration of Software This software is mainly composed of the following systems are ...This program handles files of the machine. 2. BES-960BC • BES-1260BC 17 Transmission of embroidery data to the machine, as well as copy, move and retrieval of a file are needed for installing the software. • Personal computer with a CPU of Intel Pentium 133 MHz or ...
Instruction Manual - English
Page 13
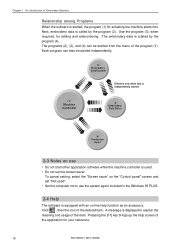
...brings up the help function as an accessory. Chapter 1 An Introduction of Embroidery Machine Relationship among Programs When the software is started, the program (1) for your reference. 18 BES-960BC • BES-1260BC The programs (2), (3), and (4) can also be started ʢ1ʣ ...Machine Controller ʢ3ʣ Embroidery Data Editor ʢ4ʣ Production report 2-3 Notes ...
...brings up the help function as an accessory. Chapter 1 An Introduction of Embroidery Machine Relationship among Programs When the software is started, the program (1) for your reference. 18 BES-960BC • BES-1260BC The programs (2), (3), and (4) can also be started ʢ1ʣ ...Machine Controller ʢ3ʣ Embroidery Data Editor ʢ4ʣ Production report 2-3 Notes ...
Instruction Manual - English
Page 14
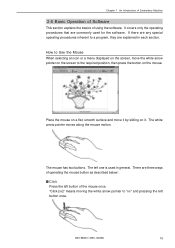
... arrow pointer to the required position, then press the button on the mouse. BES-960BC • BES-1260BC 19 The left button once. Place the mouse on a flat, smooth surface and move the white arrow... it by sliding on the screen to "xx" and pressing the left one is used for the software. The white arrow pointer moves along the mouse motion. There are commonly used in each section. If... s Click Press the left button of using the software. Chapter 1 An Introduction of Embroidery Machine 2-5 Basic Operation of Software This section explains the basics of the mouse once.
... arrow pointer to the required position, then press the button on the mouse. BES-960BC • BES-1260BC 19 The left button once. Place the mouse on a flat, smooth surface and move the white arrow... it by sliding on the screen to "xx" and pressing the left one is used for the software. The white arrow pointer moves along the mouse motion. There are commonly used in each section. If... s Click Press the left button of using the software. Chapter 1 An Introduction of Embroidery Machine 2-5 Basic Operation of Software This section explains the basics of the mouse once.
Instruction Manual - English
Page 16
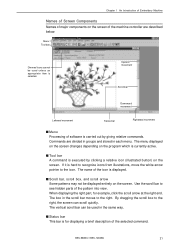
... the scroll arrow at the right end. Chapter 1 An Introduction of Embroidery Machine Names of Screen Components Names of major components on the screen of the selected command. The name of software is executed by giving relative commands. BES-960BC • BES-1260BC 21 s Tool bar A command is carried out by clicking a relative...
... the scroll arrow at the right end. Chapter 1 An Introduction of Embroidery Machine Names of Screen Components Names of major components on the screen of the selected command. The name of software is executed by giving relative commands. BES-960BC • BES-1260BC 21 s Tool bar A command is carried out by clicking a relative...
Instruction Manual - English
Page 17
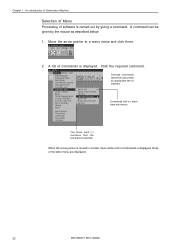
.... Move the arrow pointer to another menu while a list of commands is displayed, those of the latter menu are displayed. 22 BES-960BC • BES-1260BC Chapter 1 An Introduction of Embroidery Machine Selection of Menu Processing of software is carried out by the mouse as described below: 1. Commands with a T mark have sub menus.
.... Move the arrow pointer to another menu while a list of commands is displayed, those of the latter menu are displayed. 22 BES-960BC • BES-1260BC Chapter 1 An Introduction of Embroidery Machine Selection of Menu Processing of software is carried out by the mouse as described below: 1. Commands with a T mark have sub menus.
Instruction Manual - English
Page 38
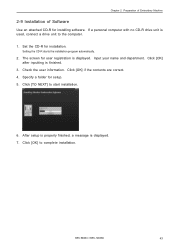
... your name and department. Click [OK] to start installation. 6. Set the CD-R for installing software. Click [OK] after inputting is displayed. 7. BES-960BC • BES-1260BC 43 Check the user information. Chapter 2 Preparation of Embroidery Machine 2-9 Installation of Software Use an attached CD-R for installation. If a personal computer with no CD-R drive unit is...
... your name and department. Click [OK] to start installation. 6. Set the CD-R for installing software. Click [OK] after inputting is displayed. 7. BES-960BC • BES-1260BC 43 Check the user information. Chapter 2 Preparation of Embroidery Machine 2-9 Installation of Software Use an attached CD-R for installation. If a personal computer with no CD-R drive unit is...
Instruction Manual - English
Page 59
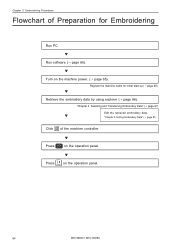
... panel. START 64 BES-960BC • BES-1260BC w "Chapter 5 Editing Embroidery Data" (¡ page 91) Click of Preparation for initial start-up (¡ page 65). w Press on the operation panel. Chapter 3 Embroidering Procedures Flowchart of the machine controller. w Run software (¡ page 65). w Retrieve the embroidery data by using explorer (¡ page 66). "Chapter...
... panel. START 64 BES-960BC • BES-1260BC w "Chapter 5 Editing Embroidery Data" (¡ page 91) Click of Preparation for initial start-up (¡ page 65). w Press on the operation panel. Chapter 3 Embroidering Procedures Flowchart of the machine controller. w Run software (¡ page 65). w Retrieve the embroidery data by using explorer (¡ page 66). "Chapter...
Instruction Manual - English
Page 60
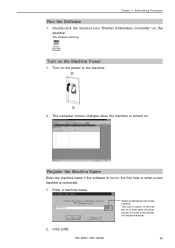
... the machine name if the software is run for the machine. Select an identifying color for the first time or when a new machine is shown on the desktop. BES-960BC • BES-1260BC 65 Enter a machine name. This color is connected. 1. Click [OK]. Double-click the shortcut icon "Brother Embroidery Controller" on the title...
... the machine name if the software is run for the machine. Select an identifying color for the first time or when a new machine is shown on the desktop. BES-960BC • BES-1260BC 65 Enter a machine name. This color is connected. 1. Click [OK]. Double-click the shortcut icon "Brother Embroidery Controller" on the title...
Instruction Manual - English
Page 67
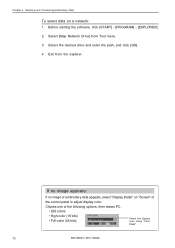
Exit from Tool menu. 3. If no image appears: If no image of embroidery data appears, select "Display Detail" on a network: 1. Select [Map Network Drive] from the explorer. Choose one of the following options, then restart PC. &#... bits) Select the display color using "Color Pallet". 72 BES-960BC • BES-1260BC Before starting the software, click [START] - [PROGRAM] - [EXPLORER]. 2. Select the desired drive and enter the path, and click [OK]. 4. Chapter 4 Selecting and Transferring Embroidery Data To select data on "Screen" of the control panel to adjust display color....
Exit from Tool menu. 3. If no image appears: If no image of embroidery data appears, select "Display Detail" on a network: 1. Select [Map Network Drive] from the explorer. Choose one of the following options, then restart PC. &#... bits) Select the display color using "Color Pallet". 72 BES-960BC • BES-1260BC Before starting the software, click [START] - [PROGRAM] - [EXPLORER]. 2. Select the desired drive and enter the path, and click [OK]. 4. Chapter 4 Selecting and Transferring Embroidery Data To select data on "Screen" of the control panel to adjust display color....
Instruction Manual - English
Page 230
s"Windows" can be started but the embroidery software cannot. • Is the selection of the screen and select the program (editor, explorer, or production report). panel screen. sThe display does not light up ... correct? • Can you double-click more on the control panel screen. s"Windows" cannot be started . • Is a floppy disk inserted? BES-960BC • BES-1260BC 235 Invalidate this function on the control mouse is not operated for a design and threads are not available. • The number of the editor, the...
s"Windows" can be started but the embroidery software cannot. • Is the selection of the screen and select the program (editor, explorer, or production report). panel screen. sThe display does not light up ... correct? • Can you double-click more on the control panel screen. s"Windows" cannot be started . • Is a floppy disk inserted? BES-960BC • BES-1260BC 235 Invalidate this function on the control mouse is not operated for a design and threads are not available. • The number of the editor, the...


