

Thread Tensions - English
Page 1
... a guide. Thread Tensions - All Machines For Technical Assistance Please Call Toll Free 1-877-4BROTHER Below are listed in the bobbin causing a very loose tension as illustrated. They are items related to be .5mm above the top of the fabric and reduce thread breaks. Use this procedure a few times until it is strongly recommend when replacing one, to make it ? Following this would cause the bobbin thread to thread tensions and tension problems...
... a guide. Thread Tensions - All Machines For Technical Assistance Please Call Toll Free 1-877-4BROTHER Below are listed in the bobbin causing a very loose tension as illustrated. They are items related to be .5mm above the top of the fabric and reduce thread breaks. Use this procedure a few times until it is strongly recommend when replacing one, to make it ? Following this would cause the bobbin thread to thread tensions and tension problems...
Thread Tensions - English
Page 2
... and find . At install and at which the tension spring will take into the bobbin case it 's own weight. One of the fabric while sewing. 2 Discard or fix that bobbin if possible. You may need a full bobbin to remove any lint buildup. Do not pull to fast or to further tighten the adjustment screw if the bobbin thread is with top thread to be a problem with 22 grams...
... and find . At install and at which the tension spring will take into the bobbin case it 's own weight. One of the fabric while sewing. 2 Discard or fix that bobbin if possible. You may need a full bobbin to remove any lint buildup. Do not pull to fast or to further tighten the adjustment screw if the bobbin thread is with top thread to be a problem with 22 grams...

Thread Tensions - English
Page 3
... individual needle tail lengths during trims. !" How do you adjust them ? If you adjust them ? All Machines For Technical Assistance Please Call Toll Free 1-877-4BROTHER 3. For looping problems, turn at a time. Pre-tensioners !" At install, after removing & cleaning them , and also as a last resort along with pretensioners for any tension problems after bobbin has been cleaned and adjusted first. For bobbin thread showing on the machine head. !" Main Tensioners !" Run a tension...
... individual needle tail lengths during trims. !" How do you adjust them ? If you adjust them ? All Machines For Technical Assistance Please Call Toll Free 1-877-4BROTHER 3. For looping problems, turn at a time. Pre-tensioners !" At install, after removing & cleaning them , and also as a last resort along with pretensioners for any tension problems after bobbin has been cleaned and adjusted first. For bobbin thread showing on the machine head. !" Main Tensioners !" Run a tension...
Thread Tensions - English
Page 4
... have to use a flat tip screwdriver to see if tension has changed dramatically. This would mean that the thread is one half turns clockwise. When do you just started having the problem. Remove the thread completely out of the check spring. The take-up lever is moving into position to the stop plate along the left . Make sure that the check spring will have...
... have to use a flat tip screwdriver to see if tension has changed dramatically. This would mean that the thread is one half turns clockwise. When do you just started having the problem. Remove the thread completely out of the check spring. The take-up lever is moving into position to the stop plate along the left . Make sure that the check spring will have...

Thread Tensions - English
Page 5
.... !" All bobbins are having "FALSE THREAD BREAKS". As a precaution, you are not wound exactly the same. Clean the bobbin tension spring, set to check your machine. Now that the thread is slides under the plate, that the bobbin is used with plenty of your bobbin tension when replacing the bobbin. Which is acceptable. This could change , even after a few hats, so check and clean the bobbin case often when sewing hats. Or...
.... !" All bobbins are having "FALSE THREAD BREAKS". As a precaution, you are not wound exactly the same. Clean the bobbin tension spring, set to check your machine. Now that the thread is slides under the plate, that the bobbin is used with plenty of your bobbin tension when replacing the bobbin. Which is acceptable. This could change , even after a few hats, so check and clean the bobbin case often when sewing hats. Or...
Wiper Problems and Solutions - English
Page 1
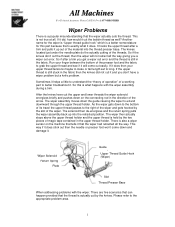
... helps a little to understand the "theory of operation" of the presser foot and the fabric to extend downward through the upper thread holder. The wiper assembly moves down on the machine that tells it that the wiper actually cuts the thread. Run your upper thread tensions maybe to loose or tail length set to better troubleshoot it will not retract all the way giving you get a wiper out error...
... helps a little to understand the "theory of operation" of the presser foot and the fabric to extend downward through the upper thread holder. The wiper assembly moves down on the machine that tells it that the wiper actually cuts the thread. Run your upper thread tensions maybe to loose or tail length set to better troubleshoot it will not retract all the way giving you get a wiper out error...

Wiper Problems and Solutions - English
Page 3
... grab the upper thread. • Nut on positioning spacer, B is not adjusted correctly. (See Wiper holder plate adjustment) 3 Wiper comes down and retracts but does not retract • Slot in thread presser base assembly are either missing or damaged. (See Wiper Assembly Parts Breakdown) • Thread presser base misadjusted or bent. (See checking thread presser base and cover alignment) • Spring is stretched, missing or not hooked correctly. (See Wiper Assembly Parts Breakdown...
... grab the upper thread. • Nut on positioning spacer, B is not adjusted correctly. (See Wiper holder plate adjustment) 3 Wiper comes down and retracts but does not retract • Slot in thread presser base assembly are either missing or damaged. (See Wiper Assembly Parts Breakdown) • Thread presser base misadjusted or bent. (See checking thread presser base and cover alignment) • Spring is stretched, missing or not hooked correctly. (See Wiper Assembly Parts Breakdown...
Wiper Problems and Solutions - English
Page 5
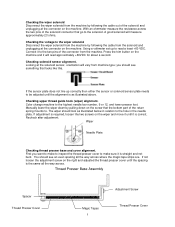
... make to inspect the thread presser cover to the hole in the needle plate. First you should look as illustrated above. If the sensor plate does not line up to the solenoid. If not loosen the adjustment screw on the right and adjusted the thread presser cover until it until the spacing is straight and not bent. Thread Presser Base Assembly Spacer Thread Presser Cover Magic Tapes 5 Adjustment Screw Thread Presser Cover Checking solenoid sensor alignment. Manually lower...
... make to inspect the thread presser cover to the hole in the needle plate. First you should look as illustrated above. If the sensor plate does not line up to the solenoid. If not loosen the adjustment screw on the right and adjusted the thread presser cover until it until the spacing is straight and not bent. Thread Presser Base Assembly Spacer Thread Presser Cover Magic Tapes 5 Adjustment Screw Thread Presser Cover Checking solenoid sensor alignment. Manually lower...
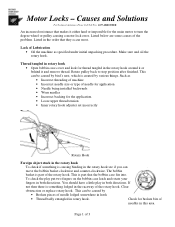
Motor Locks - English
Page 1
... various things. The bobbin basket is part that the bobbin case fits into. Lack of Lubrication • Oil the machine as • Incorrect threading of machine • Incorrect needle size or type of needle for application • Needle being installed backwards • Worn needles • Incorrect backing for broken bits of 3 This is part of the problem. Listed below are some causes of the rotary hook. Motor Locks - Rotate pulley back...
... various things. The bobbin basket is part that the bobbin case fits into. Lack of Lubrication • Oil the machine as • Incorrect threading of machine • Incorrect needle size or type of needle for application • Needle being installed backwards • Worn needles • Incorrect backing for broken bits of 3 This is part of the problem. Listed below are some causes of the rotary hook. Motor Locks - Rotate pulley back...
Upper Thread Breaks - English
Page 1
... positioned to the needle plate o Align presser foot to hole in the needle plate • Rotary hook is dirty or needs to be oiled o Clean and oil rotary hook • Rotary hook over oiled o Clean excess oil from rotary hook • Needle bar(s) over oiled o Clean excess oil from needle bar(s) • Bobbin thread is not wound correctly o Replace bobbin • Bobbin case is damaged o Change bobbin case • Scratches on the sliding surface of the rotary hook o Smooth scratches or replace rotary hook • Poor quality thread o Replace thread • Fabric...
... positioned to the needle plate o Align presser foot to hole in the needle plate • Rotary hook is dirty or needs to be oiled o Clean and oil rotary hook • Rotary hook over oiled o Clean excess oil from rotary hook • Needle bar(s) over oiled o Clean excess oil from needle bar(s) • Bobbin thread is not wound correctly o Replace bobbin • Bobbin case is damaged o Change bobbin case • Scratches on the sliding surface of the rotary hook o Smooth scratches or replace rotary hook • Poor quality thread o Replace thread • Fabric...
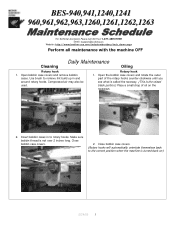
Maintenance Schedule - English
Page 1
....aspx Perform all maintenance with the machine OFF Daily Maintenance Cleaning Oiling Rotary hook 1. Close bobbin case covers. (Rotary hooks will automatically orientate themselves back to rotary hooks. Compressed air may also be used. Rotary hook 1. Make sure bobbin thread is not over 2 inches long. Open bobbin case covers and remove bobbin cases. Use brush to remove lint build up in to the correct position when the machine is the raised black portion.) Place a small drop of the rotary...
....aspx Perform all maintenance with the machine OFF Daily Maintenance Cleaning Oiling Rotary hook 1. Close bobbin case covers. (Rotary hooks will automatically orientate themselves back to rotary hooks. Compressed air may also be used. Rotary hook 1. Make sure bobbin thread is not over 2 inches long. Open bobbin case covers and remove bobbin cases. Use brush to remove lint build up in to the correct position when the machine is the raised black portion.) Place a small drop of the rotary...

Cap to Tubular - English
Page 1
... Settings, Embroidery Hoop, Tubular (All). Use the flat/cap switch on the panel to switch to flat. 12) Turn machine off machine arm. Stand Alone - It will ask you to confirm canceling the sewing data if using a stand-alone machine by pressing the key. 13) Place the tubular arms onto the machine using the needle select buttons . 6) Remove the cap needle plates (A) and replace with the flat needle plates. 7) Manually lower all the parts removed...
... Settings, Embroidery Hoop, Tubular (All). Use the flat/cap switch on the panel to switch to flat. 12) Turn machine off machine arm. Stand Alone - It will ask you to confirm canceling the sewing data if using a stand-alone machine by pressing the key. 13) Place the tubular arms onto the machine using the needle select buttons . 6) Remove the cap needle plates (A) and replace with the flat needle plates. 7) Manually lower all the parts removed...
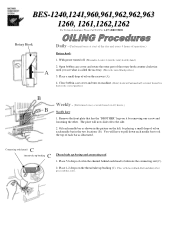
Oiling Procedures - English
Page 1
... connecting rod (C). 2. Remove the front plate that has the "BROTHER" logo on it easier to turn on machine. (Rotary hooks will have to pull down each needle bar to the correct position.) B B Weekly - (Performed once a week based on 40 hours.) Needle bars: 1. Open bobbin case cover and rotate the outer part of oil on the raceway (A). 4. Place 1-2 drops on the thread take up bushing (C). Place oil between black block...
... connecting rod (C). 2. Remove the front plate that has the "BROTHER" logo on it easier to turn on machine. (Rotary hooks will have to pull down each needle bar to the correct position.) B B Weekly - (Performed once a week based on 40 hours.) Needle bars: 1. Open bobbin case cover and rotate the outer part of oil on the raceway (A). 4. Place 1-2 drops on the thread take up bushing (C). Place oil between black block...
Parts Manual - English
Page 15
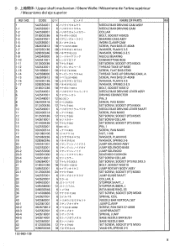
... CASE ASSY WORK CLAMP CAM SCREW, PAN SM3.57-40X8 WASHER, PLAIN 53.5 WASHER, SPRING 2-3.5 NEEDLE BEARING CONNECTTING ROD SET SCREW, SOCKET (FT) M5X5 THREAD TAKE-UP BASE SCREW, FLAT SM3.57X6 THREAD TAKE-UP DRIVING CAM, A SCREW, PAN SM3.57-40X8 WASHER, PLAIN 53.5 WASHER, SPRING 2-3.5 BOLT, SOCKET M5X12 NEEDLE BAR DRIVING LEVER ASSY DRIVNG CONNECTOR PIN, 3 SCREW, PAN M3X4 SET SCREW, SOCKET (FT) M4X4 NEEDLE BAR DRIVING LEVER SHAFT SCREW, PAN M4X5 SET SCREW...
... CASE ASSY WORK CLAMP CAM SCREW, PAN SM3.57-40X8 WASHER, PLAIN 53.5 WASHER, SPRING 2-3.5 NEEDLE BEARING CONNECTTING ROD SET SCREW, SOCKET (FT) M5X5 THREAD TAKE-UP BASE SCREW, FLAT SM3.57X6 THREAD TAKE-UP DRIVING CAM, A SCREW, PAN SM3.57-40X8 WASHER, PLAIN 53.5 WASHER, SPRING 2-3.5 BOLT, SOCKET M5X12 NEEDLE BAR DRIVING LEVER ASSY DRIVNG CONNECTOR PIN, 3 SCREW, PAN M3X4 SET SCREW, SOCKET (FT) M4X4 NEEDLE BAR DRIVING LEVER SHAFT SCREW, PAN M4X5 SET SCREW...
Instruction Manual - English
Page 3
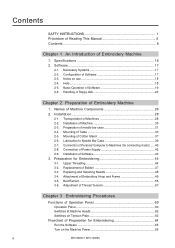
...Adjustment of Thread Tension 57 Chapter 3 Embroidering Procedures Functions of Operation Panel 60 Operation Panel 60 Switches at Machine Heads 62 Switches on Tension Plate 62 Flowchart of Cotton Stand 37 2-6. Installation of Software 43 3. Installation of Machine 30 2-3. Attachment of Software 19 2-6. Basic Operation of Embroidery Hoop and Frame 49 3-5. Preparation of Power Supply 42 2-9. Connection of needle bar case 31 2-4. Replacement of Personal Computer to Needle Bar Case 39 2-7. Connection of Bobbin 47 3-3. Replacing and Selecting Needle...
...Adjustment of Thread Tension 57 Chapter 3 Embroidering Procedures Functions of Operation Panel 60 Operation Panel 60 Switches at Machine Heads 62 Switches on Tension Plate 62 Flowchart of Cotton Stand 37 2-6. Installation of Software 43 3. Installation of Machine 30 2-3. Attachment of Software 19 2-6. Basic Operation of Embroidery Hoop and Frame 49 3-5. Preparation of Power Supply 42 2-9. Connection of needle bar case 31 2-4. Replacement of Personal Computer to Needle Bar Case 39 2-7. Connection of Bobbin 47 3-3. Replacing and Selecting Needle...
Instruction Manual - English
Page 5
... Delete 0 Stitch 107 Insert or Delete Code 108 Insert Lock Stitch 109 Changing Data 110 Changing Start 110 Changing End 111 Mask ...112 Group...113 Setting Group for Repetition 114 Selecting from Menu 114 Merge ...115 Saving Data 117 Save ...117 Save As...118 Viewing Data Information 119 Printing Data 120 Chapter 6 Embroidering Functions (Command Reference 122 When the Power to the Machine is...
... Delete 0 Stitch 107 Insert or Delete Code 108 Insert Lock Stitch 109 Changing Data 110 Changing Start 110 Changing End 111 Mask ...112 Group...113 Setting Group for Repetition 114 Selecting from Menu 114 Merge ...115 Saving Data 117 Save ...117 Save As...118 Viewing Data Information 119 Printing Data 120 Chapter 6 Embroidering Functions (Command Reference 122 When the Power to the Machine is...
Instruction Manual - English
Page 11
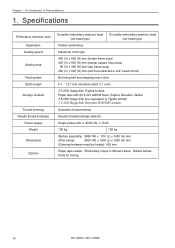
Specifications Embroidery machine used Application Sewing speed Sewing area Feed system Stitch length Storage medium Thread trimming Needle thread breakage Power supply Weight Dimensions Options 9 needle embroidery machine head 12 needle embroidery machine head (six-head type) (six-head type) Pattern embroidery Maximum 1000 spm 450 (V) x 400 (H) mm (border frame area) 430 (V) x 300 (H) mm (tubular square hoop area) 85 (V) x 360 (H) mm (cap frame area) 450 (V) x 600 (H) mm (with bed retracted or with head control) By timing belt and...
Specifications Embroidery machine used Application Sewing speed Sewing area Feed system Stitch length Storage medium Thread trimming Needle thread breakage Power supply Weight Dimensions Options 9 needle embroidery machine head 12 needle embroidery machine head (six-head type) (six-head type) Pattern embroidery Maximum 1000 spm 450 (V) x 400 (H) mm (border frame area) 430 (V) x 300 (H) mm (tubular square hoop area) 85 (V) x 360 (H) mm (cap frame area) 450 (V) x 600 (H) mm (with bed retracted or with head control) By timing belt and...
Instruction Manual - English
Page 42
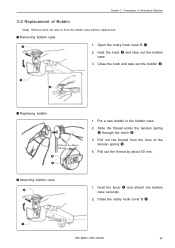
.... 2. q e s Replacing bobbin Pull out by about 50 mm t r 1. Slide the thread under the tension spring t through the notch r. 3. q BES-960BC • BES-1260BC 47 Open the rotary hook cover B q. 2. Put a new bobbin in the bobbin case. 2. Hold the knob w and take out the bobbin e. Close the rotary hook cover B q. Close the knob and take out the bobbin case. 3. Chapter 2 Preparation of Embroidery Machine 3-2 Replacement of Bobbin Note) Remove dust, lint and oil from the hole...
.... 2. q e s Replacing bobbin Pull out by about 50 mm t r 1. Slide the thread under the tension spring t through the notch r. 3. q BES-960BC • BES-1260BC 47 Open the rotary hook cover B q. 2. Put a new bobbin in the bobbin case. 2. Hold the knob w and take out the bobbin e. Close the rotary hook cover B q. Close the knob and take out the bobbin case. 3. Chapter 2 Preparation of Embroidery Machine 3-2 Replacement of Bobbin Note) Remove dust, lint and oil from the hole...

Instruction Manual - English
Page 185
.... Three needle bars with the needle bar during the specified period Thread breakage rate (*) Thread breakage rate per needle bar No. of times thread is trimmed (*) Number of thread breakage occurrences per 10,000 stitches (10000 x No. of stitches (*) Number of stitches embroidered with frequent thread breakage are indicated. Display Contents No. Chapter 8 Creating Production Report Display Example of Thread Breakage Information on Needle Bar Displays the information on the " Setting items...
.... Three needle bars with the needle bar during the specified period Thread breakage rate (*) Thread breakage rate per needle bar No. of times thread is trimmed (*) Number of thread breakage occurrences per 10,000 stitches (10000 x No. of stitches (*) Number of stitches embroidered with frequent thread breakage are indicated. Display Contents No. Chapter 8 Creating Production Report Display Example of Thread Breakage Information on Needle Bar Displays the information on the " Setting items...

Instruction Manual - English
Page 227
... rotary hook adjusted correctly? • Does the thread come out smoothly? 232 BES-960BC • BES-1260BC with embroidery hoop • Check the size and needle start position in the machine? (Are embroidery hoop and other related parts operating correctly?) • Is the material stretched properly? • Is thread tension proper? Chapter 12 Trouble Shooting Mechanical Section Check these points once again Problem sThread breakage Check Point • Is the machine properly threaded...
... rotary hook adjusted correctly? • Does the thread come out smoothly? 232 BES-960BC • BES-1260BC with embroidery hoop • Check the size and needle start position in the machine? (Are embroidery hoop and other related parts operating correctly?) • Is the material stretched properly? • Is thread tension proper? Chapter 12 Trouble Shooting Mechanical Section Check these points once again Problem sThread breakage Check Point • Is the machine properly threaded...


