User Guide
Page 6
... purchase date. • Accompanying Consumable and Accessories Items have a one-stage warranty: 90 days from other than defects in materials or workmanship. Supply Brother or the Brother Authorized Service Center with a photocopy of your Product is eligible for...DCP-8020 and DCP-8025D (USA only) Who is covered: • This limited warranty ("warranty") is given only to the original end-use of non Brother®-brand parts and Consumable and Accessory Items); (4)Consumable and Accessory Items that expired in accordance with a rated life; You are not limited to toner, drums...
... purchase date. • Accompanying Consumable and Accessories Items have a one-stage warranty: 90 days from other than defects in materials or workmanship. Supply Brother or the Brother Authorized Service Center with a photocopy of your Product is eligible for...DCP-8020 and DCP-8025D (USA only) Who is covered: • This limited warranty ("warranty") is given only to the original end-use of non Brother®-brand parts and Consumable and Accessory Items); (4)Consumable and Accessory Items that expired in accordance with a rated life; You are not limited to toner, drums...
User Guide
Page 9
...the use of supplies or consumable items that are non-Brother products. This Limited Warranty gives you specific legal rights and you . Operation of the DCP/Facsimile machine in excess of the specifications or with the ...Brother's Web Site: www.brother.com Brother International Corporation (Canada) Ltd. 1 Rue Hôtel de Ville Dollard-Des-Ormeaux, QC H9B 3H6 LIMITED WARRANTY (CANADA) vii Warranty Service is available at Brother Authorized Service Centers throughout Canada. Damage to your print head resulting from packing without limitation, print cartridges, print head, toner and drum...
...the use of supplies or consumable items that are non-Brother products. This Limited Warranty gives you specific legal rights and you . Operation of the DCP/Facsimile machine in excess of the specifications or with the ...Brother's Web Site: www.brother.com Brother International Corporation (Canada) Ltd. 1 Rue Hôtel de Ville Dollard-Des-Ormeaux, QC H9B 3H6 LIMITED WARRANTY (CANADA) vii Warranty Service is available at Brother Authorized Service Centers throughout Canada. Damage to your print head resulting from packing without limitation, print cartridges, print head, toner and drum...

User Guide
Page 19
......... 14-4 Original is jammed inside the ADF unit 14-4 Paper jams 14-5 Paper is jammed in the duplex tray (For DCP-8025D 14-9 If you are having difficulty with the DCP 12-1 Using the Scan key 12-5 Scan to E-mail (PC 12-5 Scan to Image 12-6 Scan to OCR 12-7 ...to replace the toner cartridge 14-25 Replacing the drum unit 14-30 xvii 12 Network Scanning (Windows® 98/98SE/Me/2000 Professional and XP only 12-1 Registering your PC with your safety 13-3 International ENERGY STAR® Compliance Statement 13-3 Laser safety 13-4 FDA regulations 13-4 Important safety instructions...
......... 14-4 Original is jammed inside the ADF unit 14-4 Paper jams 14-5 Paper is jammed in the duplex tray (For DCP-8025D 14-9 If you are having difficulty with the DCP 12-1 Using the Scan key 12-5 Scan to E-mail (PC 12-5 Scan to Image 12-6 Scan to OCR 12-7 ...to replace the toner cartridge 14-25 Replacing the drum unit 14-30 xvii 12 Network Scanning (Windows® 98/98SE/Me/2000 Professional and XP only 12-1 Registering your PC with your safety 13-3 International ENERGY STAR® Compliance Statement 13-3 Laser safety 13-4 FDA regulations 13-4 Important safety instructions...
User Guide
Page 23
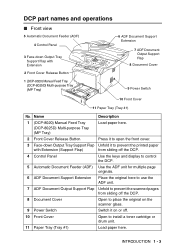
...the scanned pages from sliding off . 10 Front Cover Open to prevent the printed paper with Extension 2 Front Cover Release Button 1 (DCP-8020) Manual Feed Tray (DCP-8025D) Multi-purpose Tray (MP Tray) 6 ADF Document Support Extension 7 ADF Document Output Support Flap 8 Document Cover 9 Power Switch ...Document Feeder (ADF) 4 Control Panel 3 Face-down Output Tray Support Flap Unfold it on or off the DCP. 8 Document Cover Open to place the original on the scanner glass. 9 Power Switch Switch it to install a toner cartridge or drum unit. 11 Paper Tray (Tray #1) Load paper here.
...the scanned pages from sliding off . 10 Front Cover Open to prevent the printed paper with Extension 2 Front Cover Release Button 1 (DCP-8020) Manual Feed Tray (DCP-8025D) Multi-purpose Tray (MP Tray) 6 ADF Document Support Extension 7 ADF Document Output Support Flap 8 Document Cover 9 Power Switch ...Document Feeder (ADF) 4 Control Panel 3 Face-down Output Tray Support Flap Unfold it on or off the DCP. 8 Document Cover Open to place the original on the scanner glass. 9 Power Switch Switch it to install a toner cartridge or drum unit. 11 Paper Tray (Tray #1) Load paper here.

User Guide
Page 48
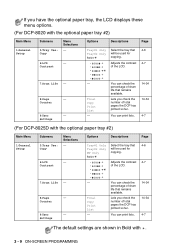
..., this menu does not appear.) (If you have the optional tray#2, see page 3-9.) 5.LCD Contrast (For DCP-8020) 6.LCD Contrast (For DCP-8025D) (If you have the optional tray#2, see page 3-9.) 6.Drum Life (For DCP-8020) 7.Drum Life (For DCP-8025D) (If you have the optional tray#2, see page 3-9.) Menu Selections Options - Low Med High Off 1.Toner Save...
..., this menu does not appear.) (If you have the optional tray#2, see page 3-9.) 5.LCD Contrast (For DCP-8020) 6.LCD Contrast (For DCP-8025D) (If you have the optional tray#2, see page 3-9.) 6.Drum Life (For DCP-8020) 7.Drum Life (For DCP-8025D) (If you have the optional tray#2, see page 3-9.) Menu Selections Options - Low Med High Off 1.Toner Save...
User Guide
Page 52
...can check the percentage of total pages the DCP has printed so far. Settings Options Descriptions Page Tray#1 Only Tray#2 Only Auto - + - + - + - + - + - Total Copy Print List - Lets you check the number of drum life that will be used for copying. ...- + - + - + - + - Lets you check the number of drum life that will be used for copying. Counter 9.User - Contrast 7.Drum Life - 8.Page - You can print lists. 4-6 4-7 14-34 14-34 4-7 (For DCP-8025D with . 3 - 9 ON-SCREEN PROGRAMMING Select the tray that remains available. Adjusts...
...can check the percentage of total pages the DCP has printed so far. Settings Options Descriptions Page Tray#1 Only Tray#2 Only Auto - + - + - + - + - + - Total Copy Print List - Lets you check the number of drum life that will be used for copying. ...- + - + - + - + - Lets you check the number of drum life that will be used for copying. Counter 9.User - Contrast 7.Drum Life - 8.Page - You can print lists. 4-6 4-7 14-34 14-34 4-7 (For DCP-8025D with . 3 - 9 ON-SCREEN PROGRAMMING Select the tray that remains available. Adjusts...
User Guide
Page 226
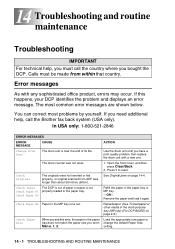
..., you must be made from ADF was not reset. Error messages As with a new one. 1. If you bought the DCP. Open the front cover, and then press Clear/Back. 2. Refill the paper in the ...technical help , call the Brother fax back system (USA only). Check Original The originals were not inserted or fed properly, or original scanned from within that country. ACTION Use the drum unit until you set ...a print quality problem; If this error, the paper in the multi-purpose tray (MP tray) (For DCP-8025D) on page 14-4. Check Paper #2 Check Paper MP Paper in the paper tray or MP tray. -OR...
..., you must be made from ADF was not reset. Error messages As with a new one. 1. If you bought the DCP. Open the front cover, and then press Clear/Back. 2. Refill the paper in the ...technical help , call the Brother fax back system (USA only). Check Original The originals were not inserted or fed properly, or original scanned from within that country. ACTION Use the drum unit until you set ...a print quality problem; If this error, the paper in the multi-purpose tray (MP tray) (For DCP-8025D) on page 14-4. Check Paper #2 Check Paper MP Paper in the paper tray or MP tray. -OR...

User Guide
Page 227
... cooling down mode. Fuser Open The fuser cover is not correctly set for duplex printing is open. In USA: 1-800-284-4329 In Canada: 1-877-BROTHER In Montreal: (514) 685-6464 No DX Tray You tried to cooling down mode, you will pause its current print job and go in to... is too hot. ERROR MESSAGES ERROR MESSAGE CAUSE ACTION Check Scan Lock The scanner lock is jammed in the duplex tray (For DCP-8025D) on page 14-9.) Out of the drum unit or toner cartridge is open . Set the duplex lever to cool. Please close the jam clear cover. (See Paper jams on...
... cooling down mode. Fuser Open The fuser cover is not correctly set for duplex printing is open. In USA: 1-800-284-4329 In Canada: 1-877-BROTHER In Montreal: (514) 685-6464 No DX Tray You tried to cooling down mode, you will pause its current print job and go in to... is too hot. ERROR MESSAGES ERROR MESSAGE CAUSE ACTION Check Scan Lock The scanner lock is jammed in the duplex tray (For DCP-8025D) on page 14-9.) Out of the drum unit or toner cartridge is open . Set the duplex lever to cool. Please close the jam clear cover. (See Paper jams on...
User Guide
Page 231
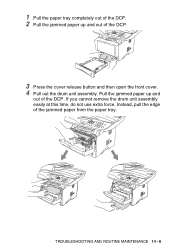
If you cannot remove the drum unit assembly easily at this time, do not use extra force. TROUBLESHOOTING AND ROUTINE MAINTENANCE 14 - 6 Pull the jammed paper up and out of the DCP. 3 Press the cover release button and then open the front cover. 4 Pull out the drum unit assembly. 1 Pull the paper tray completely out of the DCP. 2 Pull the jammed paper up and out of the DCP. Instead, pull the edge of the jammed paper from the paper tray.
If you cannot remove the drum unit assembly easily at this time, do not use extra force. TROUBLESHOOTING AND ROUTINE MAINTENANCE 14 - 6 Pull the jammed paper up and out of the DCP. 3 Press the cover release button and then open the front cover. 4 Pull out the drum unit assembly. 1 Pull the paper tray completely out of the DCP. 2 Pull the jammed paper up and out of the DCP. Instead, pull the edge of the jammed paper from the paper tray.
User Guide
Page 234
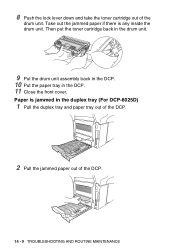
8 Push the lock lever down and take the toner cartridge out of the DCP. 14 - 9 TROUBLESHOOTING AND ROUTINE MAINTENANCE Paper is any inside the drum unit. Take out the jammed paper if there is jammed in the DCP. 11 Close the front cover. Then put the toner cartridge back in the drum unit. 9 Put the drum unit assembly back in the DCP. 10 Put the paper tray in the duplex tray (For DCP-8025D) 1 Pull the duplex tray and paper tray out of the DCP. 2 Pull the jammed paper out of the drum unit.
8 Push the lock lever down and take the toner cartridge out of the DCP. 14 - 9 TROUBLESHOOTING AND ROUTINE MAINTENANCE Paper is any inside the drum unit. Take out the jammed paper if there is jammed in the DCP. 11 Close the front cover. Then put the toner cartridge back in the drum unit. 9 Put the drum unit assembly back in the DCP. 10 Put the paper tray in the duplex tray (For DCP-8025D) 1 Pull the duplex tray and paper tray out of the DCP. 2 Pull the jammed paper out of the drum unit.
User Guide
Page 236
... toner cartridge and drum unit are the first two lines and last two lines, leaves 62 printable lines. Your computer is still problem, call Brother Customer Service at 1-800-284-4329 (in USA), 1-877-BROTHER (in Canada) or (514) 685-6464 (in copies. Most laser printers have text missing. The DCP prints unexpectedly or it...
... toner cartridge and drum unit are the first two lines and last two lines, leaves 62 printable lines. Your computer is still problem, call Brother Customer Service at 1-800-284-4329 (in USA), 1-877-BROTHER (in Canada) or (514) 685-6464 (in copies. Most laser printers have text missing. The DCP prints unexpectedly or it...

User Guide
Page 239
... tab to a computer, turn off Toner Save mode in the DCP itself. (See Toner Save on page 4-4.) Try installing a new toner cartridge. (See Replacing the toner cartridge on page 14-24.) Try installing a new drum unit. (See Replacing the drum unit on page 14-30.) Make sure that you use paper... the recommended specifications. (See About paper on page 2-1.) Check the printer's environment - If your DCP is too light, Toner Save mode may clear the problem by cleaning the primary corona wire inside the drum unit by sliding the blue tab. Rough-surfaced paper or thick print media may cause this...
... tab to a computer, turn off Toner Save mode in the DCP itself. (See Toner Save on page 4-4.) Try installing a new toner cartridge. (See Replacing the toner cartridge on page 14-24.) Try installing a new drum unit. (See Replacing the drum unit on page 14-30.) Make sure that you use paper... the recommended specifications. (See About paper on page 2-1.) Check the printer's environment - If your DCP is too light, Toner Save mode may clear the problem by cleaning the primary corona wire inside the drum unit by sliding the blue tab. Rough-surfaced paper or thick print media may cause this...

User Guide
Page 244
5 Remove the drum unit and toner cartridge assembly. Fold down the face-down output tray flap. 8 Wrap the DCP in the plastic bag and place it in the drum unit. 6 Place the drum unit and toner cartridge assembly into the plastic bag and seal the bag. 7 Close the front cover. Leave the toner cartridge installed in the original carton with the original packing material. 14 - 19 TROUBLESHOOTING AND ROUTINE MAINTENANCE
5 Remove the drum unit and toner cartridge assembly. Fold down the face-down output tray flap. 8 Wrap the DCP in the plastic bag and place it in the drum unit. 6 Place the drum unit and toner cartridge assembly into the plastic bag and seal the bag. 7 Close the front cover. Leave the toner cartridge installed in the original carton with the original packing material. 14 - 19 TROUBLESHOOTING AND ROUTINE MAINTENANCE
User Guide
Page 245
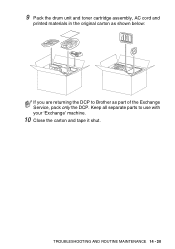
Keep all separate parts to Brother as part of the Exchange Service, pack only the DCP. TROUBLESHOOTING AND ROUTINE MAINTENANCE 14 - 20 9 Pack the drum unit and toner cartridge assembly, AC cord and printed materials in the original carton as shown below: If you are returning the DCP to use with your 'Exchange' machine. 10 Close the carton and tape it shut.
Keep all separate parts to Brother as part of the Exchange Service, pack only the DCP. TROUBLESHOOTING AND ROUTINE MAINTENANCE 14 - 20 9 Pack the drum unit and toner cartridge assembly, AC cord and printed materials in the original carton as shown below: If you are returning the DCP to use with your 'Exchange' machine. 10 Close the carton and tape it shut.

User Guide
Page 247
...DCP, some internal parts of the DCP, never touch the shaded parts shown in the diagram below. Front view 3 Gently clean the scanner window by wiping it with cold water. 1 Turn the DCP power switch off with a clean soft dry cloth. If toner scatters and your finger. ■ The drum... ■ Do not use isopropyl alcohol to remove dirt from the control panel. Laser Scanner Window TROUBLESHOOTING AND ROUTINE MAINTENANCE 14 - 22 WARNING Just after you open the front cover. 2 Remove the drum unit and toner cartridge assembly. Cleaning the printer Caution ■ Do not use isopropyl...
...DCP, some internal parts of the DCP, never touch the shaded parts shown in the diagram below. Front view 3 Gently clean the scanner window by wiping it with cold water. 1 Turn the DCP power switch off with a clean soft dry cloth. If toner scatters and your finger. ■ The drum... ■ Do not use isopropyl alcohol to remove dirt from the control panel. Laser Scanner Window TROUBLESHOOTING AND ROUTINE MAINTENANCE 14 - 22 WARNING Just after you open the front cover. 2 Remove the drum unit and toner cartridge assembly. Cleaning the printer Caution ■ Do not use isopropyl...

User Guide
Page 248
...Caution If the blue tab is not at Home position (▼), printed pages may have vertical stripes. 3 Reinstall the drum unit and toner cartridge assembly into the DCP. (See Replacing the drum unit on a cloth or large disposable paper to avoid spilling and scattering toner. 1 Clean the primary corona wire ...inside the drum unit by gently sliding the blue tab from right to left several times. 2 Return the blue tab ...
...Caution If the blue tab is not at Home position (▼), printed pages may have vertical stripes. 3 Reinstall the drum unit and toner cartridge assembly into the DCP. (See Replacing the drum unit on a cloth or large disposable paper to avoid spilling and scattering toner. 1 Clean the primary corona wire ...inside the drum unit by gently sliding the blue tab from right to left several times. 2 Return the blue tab ...

User Guide
Page 250
So, never touch the shaded parts shown in the illustration. HOT! 1 Open the front cover and pull out the drum unit. 14 - 25 TROUBLESHOOTING AND ROUTINE MAINTENANCE How to replace the toner cartridge WARNING Just after you use the DCP, some internal parts of the machine will be extremely HOT!
So, never touch the shaded parts shown in the illustration. HOT! 1 Open the front cover and pull out the drum unit. 14 - 25 TROUBLESHOOTING AND ROUTINE MAINTENANCE How to replace the toner cartridge WARNING Just after you use the DCP, some internal parts of the machine will be extremely HOT!
User Guide
Page 251
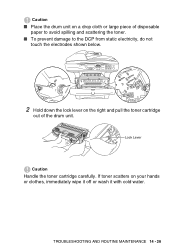
TROUBLESHOOTING AND ROUTINE MAINTENANCE 14 - 26 If toner scatters on the right and pull the toner cartridge out of disposable paper to avoid spilling and scattering the toner. ■ To prevent damage to the DCP from static electricity, do not touch the electrodes shown below. 2 Hold down the lock lever on your hands or clothes, immediately wipe it off or wash it with cold water. Caution ■ Place the drum unit on a drop cloth or large piece of the drum unit. Lock Lever Caution Handle the toner cartridge carefully.
TROUBLESHOOTING AND ROUTINE MAINTENANCE 14 - 26 If toner scatters on the right and pull the toner cartridge out of disposable paper to avoid spilling and scattering the toner. ■ To prevent damage to the DCP from static electricity, do not touch the electrodes shown below. 2 Hold down the lock lever on your hands or clothes, immediately wipe it off or wash it with cold water. Caution ■ Place the drum unit on a drop cloth or large piece of the drum unit. Lock Lever Caution Handle the toner cartridge carefully.
User Guide
Page 255
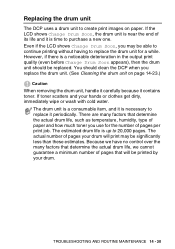
.... You should be significantly less than these estimates. Replacing the drum unit The DCP uses a drum unit to replace it contains toner. However, if there is up to purchase a new one. Even if the LCD shows Change Drum Soon, you may be replaced. The estimated drum life is a noticeable deterioration in the output print quality (even...
.... You should be significantly less than these estimates. Replacing the drum unit The DCP uses a drum unit to replace it contains toner. However, if there is up to purchase a new one. Even if the LCD shows Change Drum Soon, you may be replaced. The estimated drum life is a noticeable deterioration in the output print quality (even...

User Guide
Page 256
WARNING Just after you have used the DCP, some internal parts of the DCP are extremely HOT! Follow these steps to avoid scattering toner. 14 - 31 TROUBLESHOOTING AND ROUTINE MAINTENANCE So please be careful. Place it on a drop cloth or disposable paper to replace the drum unit: 1 Press the cover release button and then open the front cover. 2 Remove the old drum unit and toner cartridge assembly. HOT!
WARNING Just after you have used the DCP, some internal parts of the DCP are extremely HOT! Follow these steps to avoid scattering toner. 14 - 31 TROUBLESHOOTING AND ROUTINE MAINTENANCE So please be careful. Place it on a drop cloth or disposable paper to replace the drum unit: 1 Press the cover release button and then open the front cover. 2 Remove the old drum unit and toner cartridge assembly. HOT!

