User Manual
Page 1
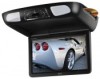
USER'S MANUAL BV12.1MCH 12.1" (307mm) WIDESCREEN FLIP-DOWN TFT MONITOR INCLUDING TWO-PAIRS OF DUAL CHANNEL HEADPHONES 30SS AUDIO SYSTEMS BOSS Audio Systems 3451 Lunar Court • Oxnard, CA 93030 www.bossaudio.com I 800.999.1236 tech support: www.bossaudio.com/support OCE V 0114 USER'S MANUAL BV12.1MCH 121" (307mm) WIDESCREEN FLIP-DOWN TFT MONITOR INCLUDING TWO-PAIRS OF DUAL CHANNEL HEADPHONES I AN 'USB, ' I&Nr % INPUx 0 G TR, I_ C. WIRELESS 30bN AUDIO SYSTEMS
USER'S MANUAL BV12.1MCH 12.1" (307mm) WIDESCREEN FLIP-DOWN TFT MONITOR INCLUDING TWO-PAIRS OF DUAL CHANNEL HEADPHONES 30SS AUDIO SYSTEMS BOSS Audio Systems 3451 Lunar Court • Oxnard, CA 93030 www.bossaudio.com I 800.999.1236 tech support: www.bossaudio.com/support OCE V 0114 USER'S MANUAL BV12.1MCH 121" (307mm) WIDESCREEN FLIP-DOWN TFT MONITOR INCLUDING TWO-PAIRS OF DUAL CHANNEL HEADPHONES I AN 'USB, ' I&Nr % INPUx 0 G TR, I_ C. WIRELESS 30bN AUDIO SYSTEMS
User Manual
Page 2
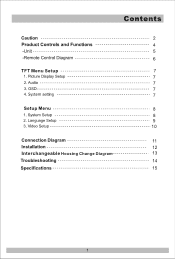
Video Setup 10 Connection Diagram 11 Installation 12 Interchangeable Housing Change Diagram 13 Troubleshooting 14 Specifications 15 1 System setting 7 Setup Menu 8 1. Language Setup 9 3. OSD 7 4. Audio 7 3. Contents Caution 2 Product Controls and Functions 4 -Unit 5 -Remote Control Diagram 6 TFT Menu Setup 7 1. System Setup 8 2. Picture Display Setup 7 2.
Video Setup 10 Connection Diagram 11 Installation 12 Interchangeable Housing Change Diagram 13 Troubleshooting 14 Specifications 15 1 System setting 7 Setup Menu 8 1. Language Setup 9 3. OSD 7 4. Audio 7 3. Contents Caution 2 Product Controls and Functions 4 -Unit 5 -Remote Control Diagram 6 TFT Menu Setup 7 1. System Setup 8 2. Picture Display Setup 7 2.
User Manual
Page 3
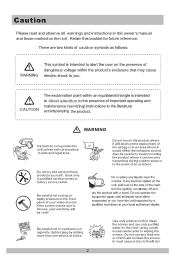
...screen. Be careful not to the front panel of an accident. Caution Please read and observe all warnings and instructions in this owner's manual and those marked on the cloth ,wring out all liquids have the unit inspected by adding more than one device at your video monitor. In most cases a dry cloth will do not operate.... Do not try and service these products yourself . There are two kinds of the road, turn the ignition completely off and dry the product with a towel. Retain this unit unless vehicle is intended to alert the user on the unit, pull over to you ...
...screen. Be careful not to the front panel of an accident. Caution Please read and observe all warnings and instructions in this owner's manual and those marked on the cloth ,wring out all liquids have the unit inspected by adding more than one device at your video monitor. In most cases a dry cloth will do not operate.... Do not try and service these products yourself . There are two kinds of the road, turn the ignition completely off and dry the product with a towel. Retain this unit unless vehicle is intended to alert the user on the unit, pull over to you ...
User Manual
Page 4
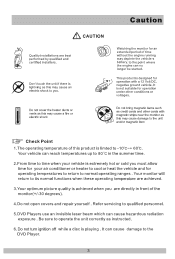
... servicing to operate the unit correctly as instructed. 6. Be sure to qualified personnel. 5.DVD Players use an invisible laser beam which can no longer be started. Do not turn ignition off while a disc is lightning as this may cause damage to the unit and/or magnetic item Check Point 1.The operating temperature of the monitor(+/-30 degrees). 4.Do not open covers and repair yourself...
... servicing to operate the unit correctly as instructed. 6. Be sure to qualified personnel. 5.DVD Players use an invisible laser beam which can no longer be started. Do not turn ignition off while a disc is lightning as this may cause damage to the unit and/or magnetic item Check Point 1.The operating temperature of the monitor(+/-30 degrees). 4.Do not open covers and repair yourself...
User Manual
Page 5
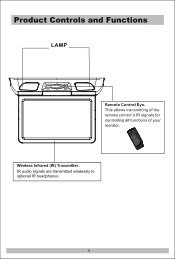
This allows transmitting of the remote control's IR signals for controlling all functions of your monitor. IR audio signals are transmitted wirelessly to optional IR headphones 4 Product Controls and Functions LAMP Remote Control Eye. Wireless Infrared (IR) Transmitter.
This allows transmitting of the remote control's IR signals for controlling all functions of your monitor. IR audio signals are transmitted wirelessly to optional IR headphones 4 Product Controls and Functions LAMP Remote Control Eye. Wireless Infrared (IR) Transmitter.

User Manual
Page 6
HD 'nput Card slot USB AV 2 IN 5 L _J L 3D 7 1 # LJ F- 4_/I_ll REMARKS: Following functions work when long pressing 1-2 seconds. Product Controls and Functions /OPEN/ M -,O,- "OPEN" "►" " USB " " SW1 S Disc loading slot *Caution Do not bring magnetic items such as credit cards or other cards with magnetic strips near the monitor as this may cause damage to the unit and/or magnetic item.
HD 'nput Card slot USB AV 2 IN 5 L _J L 3D 7 1 # LJ F- 4_/I_ll REMARKS: Following functions work when long pressing 1-2 seconds. Product Controls and Functions /OPEN/ M -,O,- "OPEN" "►" " USB " " SW1 S Disc loading slot *Caution Do not bring magnetic items such as credit cards or other cards with magnetic strips near the monitor as this may cause damage to the unit and/or magnetic item.
User Manual
Page 7
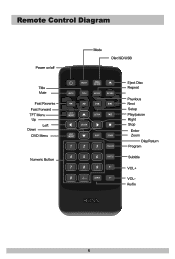
DVD Menu Numeric Button 00 00 0 0 - Previous - Play/pause Right - Audio 3OSS 6 Repeat - VOL- Left Down - Setup - Stop ZOOM - Zoom DispReturn - Up - Enter - Subtitle - Program - VOL+ - Next - Mute • Fast Reverse - Fast Forward TFT Menu - Eject Disc - Remote Control Diagram Power on/off Mode Disc/SD/USB Title -
DVD Menu Numeric Button 00 00 0 0 - Previous - Play/pause Right - Audio 3OSS 6 Repeat - VOL- Left Down - Setup - Stop ZOOM - Zoom DispReturn - Up - Enter - Subtitle - Program - VOL+ - Next - Mute • Fast Reverse - Fast Forward TFT Menu - Eject Disc - Remote Control Diagram Power on/off Mode Disc/SD/USB Title -

User Manual
Page 8
... Volume: Speakers volume range 0-60 IR: Dual channels(A or B) can be selected or turned off FM: Frequencies range:87. 7-107. 9MHz 3, OSD 6 A Mi IMPI.In a 4, SYSTEM SETTING ISM Language and screen position adjustments Reset: Return to factory settings Scale: Screen display 16:9 and 4:3 Sleep: Auto turn off time setting from 10 to 120 minutes 7 1. pia ara Ili I = IS M=S ■ WO, i16 , 14.24 pal Contrast/Brightness/Saturation...
... Volume: Speakers volume range 0-60 IR: Dual channels(A or B) can be selected or turned off FM: Frequencies range:87. 7-107. 9MHz 3, OSD 6 A Mi IMPI.In a 4, SYSTEM SETTING ISM Language and screen position adjustments Reset: Return to factory settings Scale: Screen display 16:9 and 4:3 Sleep: Auto turn off time setting from 10 to 120 minutes 7 1. pia ara Ili I = IS M=S ■ WO, i16 , 14.24 pal Contrast/Brightness/Saturation...
User Manual
Page 9
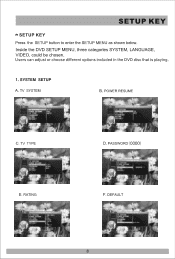
RATING RAP .1 NM LW, w 4 • F. TV SYSTEM r-_. TV TYPE D. SETUP KEY SETUP KEY Press the SETUP button to enter the SETUP MENU as shown below. Inside the DVD SETUP MENU, three categories SYSTEM, LANGUAGE, VIDEO, could be chosen. POWER RESUME .10 .1,111. Users can adjust or choose different options included in the DVD disc that is playing. 1. PASSWORD (0000) E. DEFAULT 4 8 l R, rn1, 413 C. SYSTEM SETUP A. S are LW ' • .4 ,40p1 LENIKiri r B.
RATING RAP .1 NM LW, w 4 • F. TV SYSTEM r-_. TV TYPE D. SETUP KEY SETUP KEY Press the SETUP button to enter the SETUP MENU as shown below. Inside the DVD SETUP MENU, three categories SYSTEM, LANGUAGE, VIDEO, could be chosen. POWER RESUME .10 .1,111. Users can adjust or choose different options included in the DVD disc that is playing. 1. PASSWORD (0000) E. DEFAULT 4 8 l R, rn1, 413 C. SYSTEM SETUP A. S are LW ' • .4 ,40p1 LENIKiri r B.

User Manual
Page 12
Connect unit one correct trigger wire (positive "+" or negative "-" ) with vechicle' s door trigger in accordance 11 IN(YELL0W) AUDIO R OUT(RED) AUDIO L OUT(WHITE) D=. Check your vechicle' s door trigger is positive "+" or negative "-" 3. R IN(RED) AUDIO I FUSE BEE L Co me AUDIO? Connect yellow positive (+) wire 2. Connection Diagram END (BLACK) ACC (RED) I L IN(WHITE) NE D = , VIDEO? IMI VIDEO OUT(YELL0W) a a TR+ (BLUE) TR- (BLACK) B+ (YELLOW) FM An te nna (BLACK) *How to connect the DOOR TRIGGER wire 1.
Connect unit one correct trigger wire (positive "+" or negative "-" ) with vechicle' s door trigger in accordance 11 IN(YELL0W) AUDIO R OUT(RED) AUDIO L OUT(WHITE) D=. Check your vechicle' s door trigger is positive "+" or negative "-" 3. R IN(RED) AUDIO I FUSE BEE L Co me AUDIO? Connect yellow positive (+) wire 2. Connection Diagram END (BLACK) ACC (RED) I L IN(WHITE) NE D = , VIDEO? IMI VIDEO OUT(YELL0W) a a TR+ (BLUE) TR- (BLACK) B+ (YELLOW) FM An te nna (BLACK) *How to connect the DOOR TRIGGER wire 1.
User Manual
Page 13
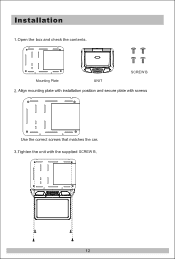
Align mounting plate with installation position and secure plate with screws Use the correct screws that matches the car. 3.Tighten the unit with the supplied SCREW B. 0 O o Installation 1.Open the box and check the contents. 0 0 ▪ T ▪ T Mounting Plate UNIT SCREW B 2.
Align mounting plate with installation position and secure plate with screws Use the correct screws that matches the car. 3.Tighten the unit with the supplied SCREW B. 0 O o Installation 1.Open the box and check the contents. 0 0 ▪ T ▪ T Mounting Plate UNIT SCREW B 2.

User Manual
Page 14
... Tighting the shroud by hooking the area and press the Shroud/Screenback over the pod. z o SNAP JOINT Swivel cover moving/assembling Use supplied small tool to release the Screen back. Assembling the screen back Begin by screws supplied.Removing shroud Release screws and take out the shroud as diagram Removing Screen back From The Housing working on a soft surface...
... Tighting the shroud by hooking the area and press the Shroud/Screenback over the pod. z o SNAP JOINT Swivel cover moving/assembling Use supplied small tool to release the Screen back. Assembling the screen back Begin by screws supplied.Removing shroud Release screws and take out the shroud as diagram Removing Screen back From The Housing working on a soft surface...
User Manual
Page 15
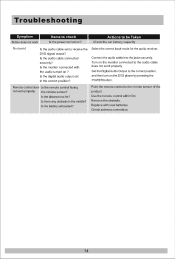
... the audio turned on the DVD player by pressing the POWER button. Is the digital audio output set to receive the DVD signal output? Is the battery exhausted? Actions to the correct position, and then turn on ? Select the correct input mode for the audio receiver. Is the monitor connected with new batteries Check antenna connection. 14 Remote control does Is the remote control facing not work properly Set the Digital Audio Output to be Taken Check the car battery capacity No sound Is the audio cable set...
... the audio turned on the DVD player by pressing the POWER button. Is the digital audio output set to receive the DVD signal output? Is the battery exhausted? Actions to the correct position, and then turn on ? Select the correct input mode for the audio receiver. Is the monitor connected with new batteries Check antenna connection. 14 Remote control does Is the remote control facing not work properly Set the Digital Audio Output to be Taken Check the car battery capacity No sound Is the audio cable set...
User Manual
Page 16
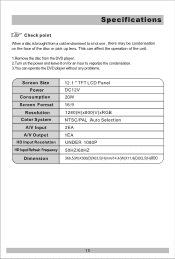
Specifications Check point When a disc is brought from the DVD player. 2.Tum on the power and leave it on for an hour to a hot one , there may be condensation on the face of the unit. 1.Remove the disc from a cold environment to vaporize the condensation. 3.You can operate the DVD player without any problems. Screen Size Power Consumption Screen Format Resolution Color System A/V Input A/V Output HD Input Resolution HD Input Refresh Frequency...
Specifications Check point When a disc is brought from the DVD player. 2.Tum on the power and leave it on for an hour to a hot one , there may be condensation on the face of the unit. 1.Remove the disc from a cold environment to vaporize the condensation. 3.You can operate the DVD player without any problems. Screen Size Power Consumption Screen Format Resolution Color System A/V Input A/V Output HD Input Resolution HD Input Refresh Frequency...


