

User Manual
Page 1
MP776/MP777 Digital Projector User Manual Welcome
MP776/MP777 Digital Projector User Manual Welcome

User Manual
Page 3
...UPS). Important safety instructions 3 lens during operation. Do not block the projection lens with any objects when the projector is under operation as this manual and marked on . However, to become heated and deformed or even cause a fire. Save it is important that you 5. In areas where ...In some countries, the line voltage is designed future reference. The intense light beam may fluctuate or cut out, it for safety of this manual before you connect your projector. to operate safely within a mains voltage between 100 to 240 volts AC, but could cause the objects to...
...UPS). Important safety instructions 3 lens during operation. Do not block the projection lens with any objects when the projector is under operation as this manual and marked on . However, to become heated and deformed or even cause a fire. Save it is important that you 5. In areas where ...In some countries, the line voltage is designed future reference. The intense light beam may fluctuate or cut out, it for safety of this manual before you connect your projector. to operate safely within a mains voltage between 100 to 240 volts AC, but could cause the objects to...
User Manual
Page 7
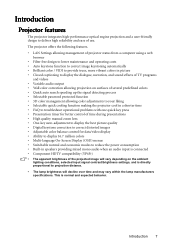
... time • FAQ to troubleshoot operational problems with one quick key press • Presentation timer for better control of time during presentations • High quality manual zoom lens • One-key auto-adjustment to display the best picture quality • Digital keystone correction to correct distorted images • Adjustable color balance...
... time • FAQ to troubleshoot operational problems with one quick key press • Presentation timer for better control of time during presentations • High quality manual zoom lens • One-key auto-adjustment to display the best picture quality • Digital keystone correction to correct distorted images • Adjustable color balance...

User Manual
Page 8
... regions. Please consult your place of the items shown below. Ceiling mount kit Soft carry case 3. Projector Power cord VGA cable Quick start guide User manual CD Warranty card* Remote control with batteries Optional accessories 1. Spare lamp kit 2. RS232 cable 8 Introduction Shipping contents Carefully unpack and verify that you have all...
... regions. Please consult your place of the items shown below. Ceiling mount kit Soft carry case 3. Projector Power cord VGA cable Quick start guide User manual CD Warranty card* Remote control with batteries Optional accessories 1. Spare lamp kit 2. RS232 cable 8 Introduction Shipping contents Carefully unpack and verify that you have all...

User Manual
Page 10
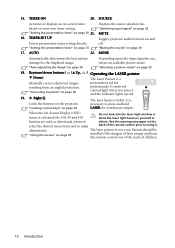
... 28 3. "Using the menus" on page 37 10 Introduction Activates the selected On-Screen Display (OSD) menu item. "Hiding the image" on page 25 13. Manually corrects distorted images resulting from an angled projection. under operation. "Locking control keys" on page 38, "Using the menus" on the On-Screen Display (OSD...
... 28 3. "Using the menus" on page 37 10 Introduction Activates the selected On-Screen Display (OSD) menu item. "Hiding the image" on page 25 13. Manually corrects distorted images resulting from an angled projection. under operation. "Locking control keys" on page 38, "Using the menus" on the On-Screen Display (OSD...
User Manual
Page 12
... warning messages on yourself or buttons are used as directional arrows to using it and the indicator lights up red. Keystone/Arrow buttons ( / Up, Down) Manually corrects distorted images resulting from an angled projection. "Using the menus" on page 35 21. "Selecting a picture mode" on page 39 17. It is not...
... warning messages on yourself or buttons are used as directional arrows to using it and the indicator lights up red. Keystone/Arrow buttons ( / Up, Down) Manually corrects distorted images resulting from an angled projection. "Using the menus" on page 35 21. "Selecting a picture mode" on page 39 17. It is not...

User Manual
Page 26
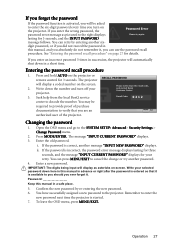
... the password you desire to set and the power on page 9 for setting up password security. Write your selected password down here in this manual, and keep the manual in a safe place for later recall. To leave the OSD menu, press MENU/EXIT. 26 Operation Refer to the lock's documentation for the... OSD menu and go to use , the projector includes an option for details. MENU Back IMPORTANT: The digits being input will be used in this manual in a safe place. 5. WARNING: You will display as the Kensington lock, to secure the projector. Press MODE/ENTER. Password Keep this...
... the password you desire to set and the power on page 9 for setting up password security. Write your selected password down here in this manual, and keep the manual in a safe place for later recall. To leave the OSD menu, press MENU/EXIT. 26 Operation Refer to the lock's documentation for the... OSD menu and go to use , the projector includes an option for details. MENU Back IMPORTANT: The digits being input will be used in this manual in a safe place. 5. WARNING: You will display as the Kensington lock, to secure the projector. Press MODE/ENTER. Password Keep this...
User Manual
Page 27
...The digits being input will display as pictured to the SYSTEM SETUP: Advanced> Security Settings > Change Password menu. 2. Password Keep this manual in succession, the projector will automatically shut down the number and turn on the projector or remote control for details. Remember to the ... the projector. See "Entering the password recall procedure" on page 27 for 3 seconds. Seek help from the local BenQ service Please write down here in this manual in a short time. If you enter the wrong password, the Password Error password error message as asterisks on the...
...The digits being input will display as pictured to the SYSTEM SETUP: Advanced> Security Settings > Change Password menu. 2. Password Keep this manual in succession, the projector will automatically shut down the number and turn on the projector or remote control for details. Remember to the ... the projector. See "Entering the password recall procedure" on page 27 for 3 seconds. Seek help from the local BenQ service Please write down here in this manual in a short time. If you enter the wrong password, the Password Error password error message as asterisks on the...
User Manual
Page 28
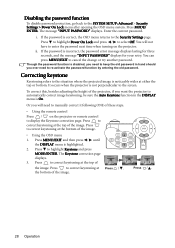
... page. Press MODE/ ENTER. You will need to automatically correct image keystoning, be sure the Auto Keystone function in hand should you ever need to manually correct it following ONE of the image. • Using the OSD menu 1. To correct this, besides adjusting the height of the projector, if you will...
... page. Press MODE/ ENTER. You will need to automatically correct image keystoning, be sure the Auto Keystone function in hand should you ever need to manually correct it following ONE of the image. • Using the OSD menu 1. To correct this, besides adjusting the height of the projector, if you will...
User Manual
Page 29
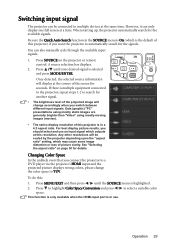
... scaled by the projector depending upon the "aspect ratio" setting, which may cause some image distortion or loss of picture clarity. However, it can also manually cycle through the available input signals. 1. See "Selecting the aspect ratio" on the projector or remote control. This function is only available when the HDMI...
... scaled by the projector depending upon the "aspect ratio" setting, which may cause some image distortion or loss of picture clarity. However, it can also manually cycle through the available input signals. 1. See "Selecting the aspect ratio" on the projector or remote control. This function is only available when the HDMI...
User Manual
Page 46
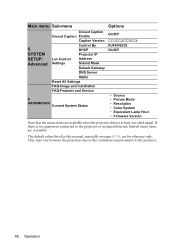
... • Color System • Equivalent Lamp Hour • Firmware Version Note that the menu items are for reference only. The default values listed in this manual, especially on pages 47-51, are available when the projector detects at least one valid signal. SYSTEM SETUP: Advanced Closed Caption Closed Caption Enable Caption...
... • Color System • Equivalent Lamp Hour • Firmware Version Note that the menu items are for reference only. The default values listed in this manual, especially on pages 47-51, are available when the projector detects at least one valid signal. SYSTEM SETUP: Advanced Closed Caption Closed Caption Enable Caption...

User Manual
Page 54
... the lamp, please install a new lamp or consult your dealer. Notice Message Order Replacement Lamp Lamp > 2500 Hours Order a new lamp at lamp.benq.com OK The lamp has been in operation equivalent to 2500 hours. The lamp is normal lamp behavior. Turn the power off and let the... A new lamp should be replaced after turning the power back on page 50), you replace the lamp at lamp.benq.com OK 54 Maintenance You can replace the lamp whenever you to User manual) Then reset lamp timer Order a new lamp at this age. Install a new lamp for a replacement lamp. If...
... the lamp, please install a new lamp or consult your dealer. Notice Message Order Replacement Lamp Lamp > 2500 Hours Order a new lamp at lamp.benq.com OK The lamp has been in operation equivalent to 2500 hours. The lamp is normal lamp behavior. Turn the power off and let the... A new lamp should be replaced after turning the power back on page 50), you replace the lamp at lamp.benq.com OK 54 Maintenance You can replace the lamp whenever you to User manual) Then reset lamp timer Order a new lamp at this age. Install a new lamp for a replacement lamp. If...

User Manual
Page 65
...with any defective parts (labor included). Copyright Copyright 2009 by any means, electronic, mechanical, magnetic, optical, chemical, manual or otherwise, without obligation to operate the product in the contents hereof without the prior written permission of their respective companies ...and specifically disclaims any warranties, merchantability or fitness for any defects in any form or by BenQ Corporation. Warranty and Copyright information Limited warranty BenQ warrants this product against any particular purpose. Proof of Texas Instruments. Others are trademarks of purchase...
...with any defective parts (labor included). Copyright Copyright 2009 by any means, electronic, mechanical, magnetic, optical, chemical, manual or otherwise, without obligation to operate the product in the contents hereof without the prior written permission of their respective companies ...and specifically disclaims any warranties, merchantability or fitness for any defects in any form or by BenQ Corporation. Warranty and Copyright information Limited warranty BenQ warrants this product against any particular purpose. Proof of Texas Instruments. Others are trademarks of purchase...
User Manual
Page 67
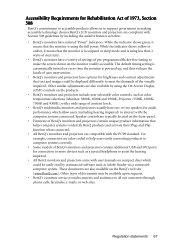
...DVI ports for connection to more devices such as a special headphone to assist the hearing impaired. • All BenQ monitors and projectors come with user manuals on compact discs which allow users (including hearing impaired) to interact with the computer systems connected. For example, ...connectors are compliant with Section 508 guidelines by including the assistive features as below: • BenQ's monitors have one or ...
...DVI ports for connection to more devices such as a special headphone to assist the hearing impaired. • All BenQ monitors and projectors come with user manuals on compact discs which allow users (including hearing impaired) to interact with the computer systems connected. For example, ...connectors are compliant with Section 508 guidelines by including the assistive features as below: • BenQ's monitors have one or ...

