
User Manual
Page 2
... type of this equipment from time to make changes from the AC supply. • The power supply cord serves as dropping or mishandling occurs, contact qualified service personnel for ventilation. No part of power available, consult your monitor iii Power Safety • The AC plug isolates this publication may expose you are for servicing. 2 Copyright Your monitor should never be placed near the equipment...
... type of this equipment from time to make changes from the AC supply. • The power supply cord serves as dropping or mishandling occurs, contact qualified service personnel for ventilation. No part of power available, consult your monitor iii Power Safety • The AC plug isolates this publication may expose you are for servicing. 2 Copyright Your monitor should never be placed near the equipment...

User Manual
Page 3
... Monitor 6 Front View ...6 Back View (1) ...6 Back View (2): Locations of plugs & sockets 7 How to install your monitor hardware 8 How to install your monitor's software 10 Choosing the best picture resolution 38 How to choose the right Refresh Rate 40 How to set the Picture Optimization 42 How to adjust your Monitor 43 A Look at the Control Panel 43 Hot Key Mode ...43 Main Menu Mode ...44 Troubleshooting ...51 Frequently Asked Questions (FAQ 51 Need More Help? ...52 Supported operating modes 53 Specifications...
... Monitor 6 Front View ...6 Back View (1) ...6 Back View (2): Locations of plugs & sockets 7 How to install your monitor hardware 8 How to install your monitor's software 10 Choosing the best picture resolution 38 How to choose the right Refresh Rate 40 How to set the Picture Optimization 42 How to adjust your Monitor 43 A Look at the Control Panel 43 Hot Key Mode ...43 Main Menu Mode ...44 Troubleshooting ...51 Frequently Asked Questions (FAQ 51 Need More Help? ...52 Supported operating modes 53 Specifications...

User Manual
Page 8
3 How to install your monitor. 3. Place the monitor into the base plate until it locks into place. Connect the power cord to your monitor hardware Make sure that the computer and monitor's power are both turned off. Please follow these five steps to install your LCD monitor. 1. There will be a clicking sound. 2. Connect the signal cable to your monitor. 8 How to install your monitor hardware
3 How to install your monitor. 3. Place the monitor into the base plate until it locks into place. Connect the power cord to your monitor hardware Make sure that the computer and monitor's power are both turned off. Please follow these five steps to install your LCD monitor. 1. There will be a clicking sound. 2. Connect the signal cable to your monitor. 8 How to install your monitor hardware

User Manual
Page 9
Connect power cord to install your computer. 5. Detach the base Pull the clip back and detach the base plate. How to an AC power socket. Connect the other end of signal cable to the signal connector of your monitor hardware 9 4.
Connect power cord to install your computer. 5. Detach the base Pull the clip back and detach the base plate. How to an AC power socket. Connect the other end of signal cable to the signal connector of your monitor hardware 9 4.
User Manual
Page 10
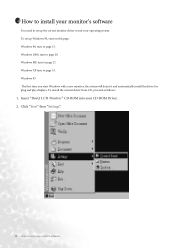
... install the driver for plug and play displays. Insert "BenQ LCD Monitor" CD-ROM into your monitor's software Windows ME turn to page 20. Windows 2000, turn to page 27. Windows 95 The first time you start on this page. To install the current driver from CD, proceed as follows: 1. Windows 98, turn to page 33. Click "Start" then "Settings". 10 How to install your CD-ROM Driver. 2. 4 How to install your monitor's software You need to set...
... install the driver for plug and play displays. Insert "BenQ LCD Monitor" CD-ROM into your monitor's software Windows ME turn to page 20. Windows 2000, turn to page 27. Windows 95 The first time you start on this page. To install the current driver from CD, proceed as follows: 1. Windows 98, turn to page 33. Click "Start" then "Settings". 10 How to install your CD-ROM Driver. 2. 4 How to install your monitor's software You need to set...

User Manual
Page 11
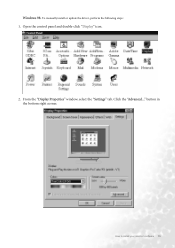
Click the "Advanced..." button in the Control Panel. 4. How to install your monitor's software 11 3. From the "Display properties" window, select the "Settings" tab. Double click the "Display" icon in the bottom right corner.
Click the "Advanced..." button in the Control Panel. 4. How to install your monitor's software 11 3. From the "Display properties" window, select the "Settings" tab. Double click the "Display" icon in the bottom right corner.
User Manual
Page 15
Click the "Advanced..." How to install your monitor's software 15 Open the control panel and double-click "Display" icon. 2. button in the bottom right corner. To manually install or update the driver, perform the following steps: 1. Windows 98. From the "Display Properties" window, select the "Settings" tab.
Click the "Advanced..." How to install your monitor's software 15 Open the control panel and double-click "Display" icon. 2. button in the bottom right corner. To manually install or update the driver, perform the following steps: 1. Windows 98. From the "Display Properties" window, select the "Settings" tab.

User Manual
Page 17
5. Now click the "Have Disk" button in a specific location, so you can select the driver you want." Select the "Browse" button. Another window appears. and press "Next". 6. How to install your monitor's software 17 Select "Display a list of all drivers in the bottom right corner.
5. Now click the "Have Disk" button in a specific location, so you can select the driver you want." Select the "Browse" button. Another window appears. and press "Next". 6. How to install your monitor's software 17 Select "Display a list of all drivers in the bottom right corner.
User Manual
Page 20
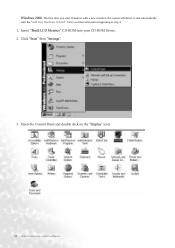
Windows 2000. Carry out the instructions beginning at step 4. 1. Insert "BenQ LCD Monitor" CD-ROM into your monitor's software Click "Start" then "Settings". 3. The first time you start Windows with a new monitor, the system will detect it and automatically start the "Add New Hardware Wizard". Open the Control Panel and double click on the "Display" icon. 20 How to install your CD-ROM Driver. 2.
Windows 2000. Carry out the instructions beginning at step 4. 1. Insert "BenQ LCD Monitor" CD-ROM into your monitor's software Click "Start" then "Settings". 3. The first time you start Windows with a new monitor, the system will detect it and automatically start the "Add New Hardware Wizard". Open the Control Panel and double click on the "Display" icon. 20 How to install your CD-ROM Driver. 2.
User Manual
Page 21
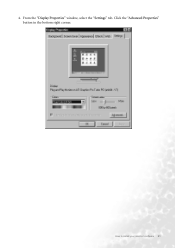
How to install your monitor's software 21 4. Click the "Advanced Properties" button in the bottom right corner. From the "Display Properties" window, select the "Settings" tab.
How to install your monitor's software 21 4. Click the "Advanced Properties" button in the bottom right corner. From the "Display Properties" window, select the "Settings" tab.
User Manual
Page 24
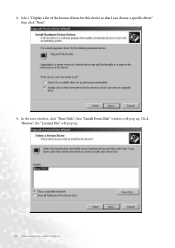
In the next window, click "Have Disk", then "Install From Disk" window will pop up . Click "Browse", the "Located File" will pop up . 24 How to install your monitor's software 8. Select "Display a list of the known drivers for this device so that I can choose a specific driver" then click "Next". 9.
In the next window, click "Have Disk", then "Install From Disk" window will pop up . Click "Browse", the "Located File" will pop up . 24 How to install your monitor's software 8. Select "Display a list of the known drivers for this device so that I can choose a specific driver" then click "Next". 9.
User Manual
Page 26
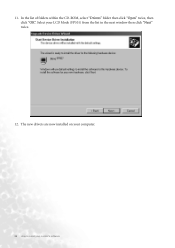
In the list of folders within the CD-ROM, select "Drivers" folder then click "Open" twice, then click "OK". Select your monitor's software 11. The new drivers are now installed on your computer. 26 How to install your LCD Mode (FP531) from the list in the next window then click "Next" twice. 12.
In the list of folders within the CD-ROM, select "Drivers" folder then click "Open" twice, then click "OK". Select your monitor's software 11. The new drivers are now installed on your computer. 26 How to install your LCD Mode (FP531) from the list in the next window then click "Next" twice. 12.
User Manual
Page 27
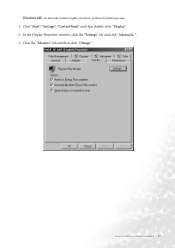
Windows ME. Click "Start", "Settings", "Control Panel" and then double-click "Display". 2. To manually install or update the driver, perform the following steps: 1. In the Display Properties window, click the "Settings" tab and click "Advanced...". 3. How to install your monitor's software 27 Click the "Monitor" tab and then click "Change".
Windows ME. Click "Start", "Settings", "Control Panel" and then double-click "Display". 2. To manually install or update the driver, perform the following steps: 1. In the Display Properties window, click the "Settings" tab and click "Advanced...". 3. How to install your monitor's software 27 Click the "Monitor" tab and then click "Change".

User Manual
Page 38
... must use the native resolution. Lower resolutions are using the slider on a full screen through an interpolation circuit. Double-click the "Display" icon in the Control Panel. 2. If you are displayed on the right-hand side. 38 Choosing the best picture resolution So if you want to the nature of 1024 x 768. You can change the picture resolution as follows: 1. The best picture possible for your FP531 is always fixed...
... must use the native resolution. Lower resolutions are using the slider on a full screen through an interpolation circuit. Double-click the "Display" icon in the Control Panel. 2. If you are displayed on the right-hand side. 38 Choosing the best picture resolution So if you want to the nature of 1024 x 768. You can change the picture resolution as follows: 1. The best picture possible for your FP531 is always fixed...

User Manual
Page 40
...) for an LCD display to choose the right Refresh Rate 6 How to choose the right Refresh Rate You don't have to choose the highest possible refresh rate on an LCD display, because it is a table with the factory modes in this user's guide. There is not technically possible for the native resolution of 1024 x 768. The best results are obtained by using the factory modes already set in the Control Panel. 2. Click the...
...) for an LCD display to choose the right Refresh Rate 6 How to choose the right Refresh Rate You don't have to choose the highest possible refresh rate on an LCD display, because it is a table with the factory modes in this user's guide. There is not technically possible for the native resolution of 1024 x 768. The best results are obtained by using the factory modes already set in the Control Panel. 2. Click the...

User Manual
Page 42
... set the Picture Optimization The easiest way to obtain an optimal display is horizontal noise observed, press t or u key to select "Geometry" and press "Enter" key. As you use one of your operating system. If the "iKey" does not work properly and the "NON PRESET MODE" message is the best way to use any other image, such as the desktop of the supported modes...
... set the Picture Optimization The easiest way to obtain an optimal display is horizontal noise observed, press t or u key to select "Geometry" and press "Enter" key. As you use one of your operating system. If the "iKey" does not work properly and the "NON PRESET MODE" message is the best way to use any other image, such as the desktop of the supported modes...

User Manual
Page 43
... a power swith. How to adjust your Monitor A Look at the Control Panel There are the introduction of these keys & switch. 1. "iKey" : Adjust vertical position, phase, horizontal position and pixel clock automatically. 3. 8How to adjust your Monitor 43 The following descriptions are 6 keys for OSD Lock. 5. (Left) key: For Left/Decrease adjustment. "Exit" key: Back to exit OSD. Right key is the hot key for Brightness. Hot Key Mode Brightness and Contrast hot...
... a power swith. How to adjust your Monitor A Look at the Control Panel There are the introduction of these keys & switch. 1. "iKey" : Adjust vertical position, phase, horizontal position and pixel clock automatically. 3. 8How to adjust your Monitor 43 The following descriptions are 6 keys for OSD Lock. 5. (Left) key: For Left/Decrease adjustment. "Exit" key: Back to exit OSD. Right key is the hot key for Brightness. Hot Key Mode Brightness and Contrast hot...
User Manual
Page 51
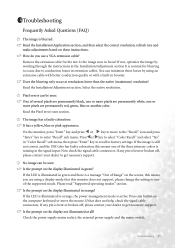
..., optimize the image by using a display mode that does not help, check the signal cable connectors. You can minimize these instructions. Select the native resolution. Read the Pixel error rates section. No image can be seen: Is the prompt on the screen, this means you use a VGA extension cable? If the LED is illuminated in "Color Recall" sub menu, then press "Enter" key to recall to select "Color Recall" and select "Yes" in orange, the power...
..., optimize the image by using a display mode that does not help, check the signal cable connectors. You can minimize these instructions. Select the native resolution. Read the Pixel error rates section. No image can be seen: Is the prompt on the screen, this means you use a VGA extension cable? If the LED is illuminated in "Color Recall" sub menu, then press "Enter" key to recall to select "Color Recall" and select "Yes" in orange, the power...

User Manual
Page 52
The image is distorted, flashes or flickers: Read the Installation//section and then select the correct resolution, refresh rate and make adjustments based on these instructions. If your problems remain after checking this manual, please contact your place of purchase or e-mail us at: Support@BenQ.com 52 Troubleshooting The image is displaced in one direction: Read the Installation//section and then select the correct resolution, refresh rate and make adjustments based on these instructions. Need More Help?
The image is distorted, flashes or flickers: Read the Installation//section and then select the correct resolution, refresh rate and make adjustments based on these instructions. If your problems remain after checking this manual, please contact your place of purchase or e-mail us at: Support@BenQ.com 52 Troubleshooting The image is displaced in one direction: Read the Installation//section and then select the correct resolution, refresh rate and make adjustments based on these instructions. Need More Help?

User Manual
Page 53
...; There are 14 available modes that you switch off the monitor, interference lines can occur on your computer's power management function. But do not correspond with Windows. • Image disruption may improve this , as it is not, however, an error. For an optimal picture, we recommend that are compatible with the usual standard. 10 Supported operating modes Incoming display mode (Input timing) Resolution 640 x 350 720...
...; There are 14 available modes that you switch off the monitor, interference lines can occur on your computer's power management function. But do not correspond with Windows. • Image disruption may improve this , as it is not, however, an error. For an optimal picture, we recommend that are compatible with the usual standard. 10 Supported operating modes Incoming display mode (Input timing) Resolution 640 x 350 720...


