
User Manual
Page 3
... instructions 4 Introduction ...7 Shipping contents ...7 Projector exterior view ...8 Controls and functions...9 Positioning your projector 12 Choosing a location ...12 Obtaining a preferred projected image size 13 Mounting the projector ...15 Adjusting the projected image...17 Connection ...19 Operation ...21 Starting up the projector ...21 Using the menus ...22 Securing the projector ...23 Switching input signal ...24 Shutting down the projector ...25 Direct power off ...25 Menu operation ...26 PICTURE menu ...28 SOURCE menu...30 SYSTEM SETUP: BASIC menu ...31 SYSTEM SETUP: ADVANCED menu...
... instructions 4 Introduction ...7 Shipping contents ...7 Projector exterior view ...8 Controls and functions...9 Positioning your projector 12 Choosing a location ...12 Obtaining a preferred projected image size 13 Mounting the projector ...15 Adjusting the projected image...17 Connection ...19 Operation ...21 Starting up the projector ...21 Using the menus ...22 Securing the projector ...23 Switching input signal ...24 Shutting down the projector ...25 Direct power off ...25 Menu operation ...26 PICTURE menu ...28 SOURCE menu...30 SYSTEM SETUP: BASIC menu ...31 SYSTEM SETUP: ADVANCED menu...
User Manual
Page 4
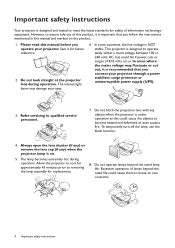
... connect your projector through a power stabilizer, surge protector or uninterruptible power supply (UPS). 3. The intense light beam may fluctuate or cut out, it is recommended that you operate your eyes. 6. Always open the lens shutter (if any) or remove the lens cap (if any objects when the projector is under operation as this could cause them to break on rare occasions. 4 Important safety instructions...
... connect your projector through a power stabilizer, surge protector or uninterruptible power supply (UPS). 3. The intense light beam may fluctuate or cut out, it is recommended that you operate your eyes. 6. Always open the lens shutter (if any) or remove the lens cap (if any objects when the projector is under operation as this could cause them to break on rare occasions. 4 Important safety instructions...

User Manual
Page 8
...indicator light/TEMPerature warning light/LAMP indicator light (See Indicators on page 9.) 10. Adjuster feet 9. External control panel (See Controls and functions on page 41.) 6. HDMI input port 17. Audio input jacks Audio output jack 21. PointWrite dummy cover (Optional PointWrite kit) 5. RJ-45 LAN input jack 25. Speaker grill 4. Video input jack 18. Vent (heated air exhaust) 3. USB Type A port (Power for HDMI dongle) 13. RS-232 control port 24. USB Mini-B port 26. Lamp cover 2. Projection lens and Mirror 8. Focus ring 11. Vent (cool air intake) 12. HDMI...
...indicator light/TEMPerature warning light/LAMP indicator light (See Indicators on page 9.) 10. Adjuster feet 9. External control panel (See Controls and functions on page 41.) 6. HDMI input port 17. Audio input jacks Audio output jack 21. PointWrite dummy cover (Optional PointWrite kit) 5. RJ-45 LAN input jack 25. Speaker grill 4. Video input jack 18. Vent (heated air exhaust) 3. USB Type A port (Power for HDMI dongle) 13. RS-232 control port 24. USB Mini-B port 26. Lamp cover 2. Projection lens and Mirror 8. Focus ring 11. Vent (cool air intake) 12. HDMI...

User Manual
Page 9
... the screen picture. ON/ Off 4. ECO BLANK Turns on the remote control or projector. 6 • The remote control is without laser pointer in this could cause the blocking object to become heated and deformed or even cause a fire. 2. AUTO Automatically determines the best picture timings for the displayed image. POWER Toggles the projector between standby mode and on . Used to previous OSD menu, exits and saves menu settings. Introduction 9 Keystone keys ( , ) Displays the keystone...
... the screen picture. ON/ Off 4. ECO BLANK Turns on the remote control or projector. 6 • The remote control is without laser pointer in this could cause the blocking object to become heated and deformed or even cause a fire. 2. AUTO Automatically determines the best picture timings for the displayed image. POWER Toggles the projector between standby mode and on . Used to previous OSD menu, exits and saves menu settings. Introduction 9 Keystone keys ( , ) Displays the keystone...

User Manual
Page 10
NETWORK SETTING Displays the source selection bar. QUICK INSTALL When the On-Screen Display (OSD) menu is activated, these keys are used as directional Quickly selects several functions to page up/down commands (like Microsoft PowerPoint). NETWORK (No function.) 12. LASER 21. Displays the Lamp Mode menu for display. ZOOM+/ZOOM- control out of the reach of size. MIC/VOL+/MIC/VOL- MUTE Selects an input source for selecting a suitable lamp operating mode. 13. Numeric buttons Enters...
NETWORK SETTING Displays the source selection bar. QUICK INSTALL When the On-Screen Display (OSD) menu is activated, these keys are used as directional Quickly selects several functions to page up/down commands (like Microsoft PowerPoint). NETWORK (No function.) 12. LASER 21. Displays the Lamp Mode menu for display. ZOOM+/ZOOM- control out of the reach of size. MIC/VOL+/MIC/VOL- MUTE Selects an input source for selecting a suitable lamp operating mode. 13. Numeric buttons Enters...
User Manual
Page 12
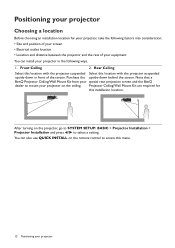
... SETUP: BASIC > Projector Installation > Projector Installation and press / to access this installation location. After turning on the ceiling. Rear Ceiling Select this location with the projector suspended Select this location with the projector suspended upside-down behind the screen. You can install your projector Positioning your projector Choosing a location Before choosing an installation location for this menu. 12 Positioning your projector in front of your equipment You can also use QUICK INSTALL on the remote control to select a setting...
... SETUP: BASIC > Projector Installation > Projector Installation and press / to access this installation location. After turning on the ceiling. Rear Ceiling Select this location with the projector suspended Select this location with the projector suspended upside-down behind the screen. You can install your projector Positioning your projector Choosing a location Before choosing an installation location for this menu. 12 Positioning your projector in front of your equipment You can also use QUICK INSTALL on the remote control to select a setting...

User Manual
Page 21
... arrow keys to adjust the image clearness. 3. Switch all of Range" displayed on . 6. Operation 21 Plug the power cord. The power indicator flashes green and stays green when the projector is found. If you will continue displaying until an input signal is on the projector lights orange after power has been applied. 2. Please change to an input signal which is projected. (If necessary) Rotate the focus ring to enter a 6-digit password. The power indicator on . The current input signal being scanned appears...
... arrow keys to adjust the image clearness. 3. Switch all of Range" displayed on . 6. Operation 21 Plug the power cord. The power indicator flashes green and stays green when the projector is found. If you will continue displaying until an input signal is on the projector lights orange after power has been applied. 2. Please change to an input signal which is projected. (If necessary) Rotate the focus ring to enter a 6-digit password. The power indicator on . The current input signal being scanned appears...
User Manual
Page 23
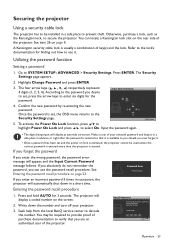
... an authorized user of the projector. Seek help from the local BenQ service center to SYSTEM SETUP: ADVANCED > Security Settings. Recall Code: 255 255 255 255 Exit Operation 23 Go to decode the number. The Security Settings page appears. 2. Make a note of your projector. See Entering the password recall procedure on the screen. 2. Press and hold AUTO for finding out how to use the password recall procedure...
... an authorized user of the projector. Seek help from the local BenQ service center to SYSTEM SETUP: ADVANCED > Security Settings. Recall Code: 255 255 255 255 Exit Operation 23 Go to decode the number. The Security Settings page appears. 2. Make a note of your projector. See Entering the password recall procedure on the screen. 2. Press and hold AUTO for finding out how to use the password recall procedure...
User Manual
Page 24
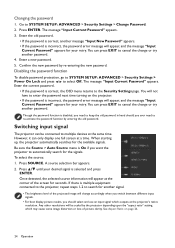
... select and use an input signal which may cause some image distortion or loss of picture clarity. However, it can press EXIT to cancel the change accordingly when you switch between different input signals. • For best display picture results, you should you ever need to SYSTEM SETUP: ADVANCED > Security Settings > Change Password. 2. See Aspect Ratio on the projector. • If the password is incorrect, the password error message will...
... select and use an input signal which may cause some image distortion or loss of picture clarity. However, it can press EXIT to cancel the change accordingly when you switch between different input signals. • For best display picture results, you should you ever need to SYSTEM SETUP: ADVANCED > Security Settings > Change Password. 2. See Aspect Ratio on the projector. • If the password is incorrect, the password error message will...
User Manual
Page 26
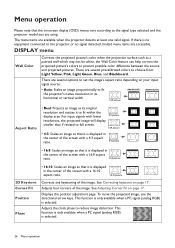
.... 15:9 picture (MX863UST) (MW864UST) Aspect Ratio • Real: Projects an image as a painted wall which may not be white, the Wall Color feature can help correct the projected picture's colors to the signal type selected and the projector model you are using. There are accessible. Adjusts four corners of the screen with a 4:3 aspect ratio. 4:3 picture • 16:9: Scales an image so that it to choose from: Light Yellow, Pink, Light Green, Blue, and...
.... 15:9 picture (MX863UST) (MW864UST) Aspect Ratio • Real: Projects an image as a painted wall which may not be white, the Wall Color feature can help correct the projected picture's colors to the signal type selected and the projector model you are using. There are accessible. Adjusts four corners of the screen with a 4:3 aspect ratio. 4:3 picture • 16:9: Scales an image so that it to choose from: Light Yellow, Pink, Light Green, Blue, and...

User Manual
Page 28
... User 1/User 2) as a starting point and customize the settings. 1. The higher the value, the more reddish the picture becomes. This mode is suitable for environments where extra-high brightness is required, such as using the projector in well lit rooms. • Presentation: Is designed for your need . 4. If the setting is too high, colors on the image will be changed and adjust the value. PICTURE menu Picture Mode Reference Mode...
... User 1/User 2) as a starting point and customize the settings. 1. The higher the value, the more reddish the picture becomes. This mode is suitable for environments where extra-high brightness is required, such as using the projector in well lit rooms. • Presentation: Is designed for your need . 4. If the setting is too high, colors on the image will be changed and adjust the value. PICTURE menu Picture Mode Reference Mode...

User Manual
Page 29
.... Menu operation 29 For example, if you prefer images with that color from among R (Red), G (Green), B (Blue), C (Cyan), M (Magenta), or Y (Yellow). • Hue: Increase in the range will reflect to the image immediately. • Current: Returns all settings, except User 1/User 2 in mid-tone Brilliant Color images, which are several preset color temperature settings available. Lower settings produce less saturated colors; The available settings may vary according to the factory preset...
.... Menu operation 29 For example, if you prefer images with that color from among R (Red), G (Green), B (Blue), C (Cyan), M (Magenta), or Y (Yellow). • Hue: Increase in the range will reflect to the image immediately. • Current: Returns all settings, except User 1/User 2 in mid-tone Brilliant Color images, which are several preset color temperature settings available. Lower settings produce less saturated colors; The available settings may vary according to the factory preset...

User Manual
Page 32
... Timer: Sets the image blank time when there is no control keys on the projector and remote control locked, you to select which logo screen will be in locked status the next time it off the projector without pressing POWER or ON when the projector is in standby mode and detects a VGA signal or a HDMI signal with 5V power. • Auto Power Off: Allows the projector to turn the projector directly on without disabling panel key lock, the projector will operate except POWER...
... Timer: Sets the image blank time when there is no control keys on the projector and remote control locked, you to select which logo screen will be in locked status the next time it off the projector without pressing POWER or ON when the projector is in standby mode and detects a VGA signal or a HDMI signal with 5V power. • Auto Power Off: Allows the projector to turn the projector directly on without disabling panel key lock, the projector will operate except POWER...
User Manual
Page 33
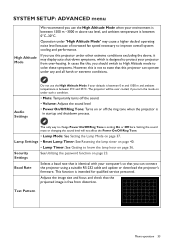
.... Adjusts the image size and focus and check that is identical with your projector from distortion. In cases like this, you should switch to High Altitude mode to solve these symptoms. However, this projector can connect the projector using a suitable RS-232 cable and update or download the projector's firmware. Setting the sound mute or changing the sound level will be over -heating. This function is free from over cooled, if you turn the mode...
.... Adjusts the image size and focus and check that is identical with your projector from distortion. In cases like this, you should switch to High Altitude mode to solve these symptoms. However, this projector can connect the projector using a suitable RS-232 cable and update or download the projector's firmware. Setting the sound mute or changing the sound level will be over -heating. This function is free from over cooled, if you turn the mode...
User Manual
Page 34
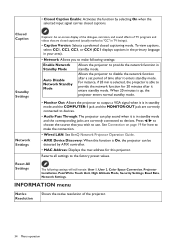
... AMX controller. • MAC Address: Displays the mac address for how to make following settings will still remain: User 1, User 2, Color Space Conversion, Projector Installation, PointWrite Touch Unit, High Altitude Mode, Security Settings, Baud Rate, Network Settings. Press / to choose the source that are correctly connected to provide the network function in TV listings). • Caption Version: Selects a preferred closed captions. Allows the projector to the factory preset values. INFORMATION menu Native Resolution Shows...
... AMX controller. • MAC Address: Displays the mac address for how to make following settings will still remain: User 1, User 2, Color Space Conversion, Projector Installation, PointWrite Touch Unit, High Altitude Mode, Security Settings, Baud Rate, Network Settings. Press / to choose the source that are correctly connected to provide the network function in TV listings). • Caption Version: Selects a preferred closed captions. Allows the projector to the factory preset values. INFORMATION menu Native Resolution Shows...

User Manual
Page 35
Current • Resolution: Shows the native resolution of your projector. • Source: Shows the current signal source. • Picture Mode: Shows the selected mode in the PICTURE menu. • Lamp Mode: Shows the selected mode in the Lamp Settings menu. Menu operation 35 System Status • 3D Format: Shows the current 3D mode. • Color System: Shows input system format. • Lamp Usage Time: Shows the number of hours the lamp has been used. • Firmware Version: Shows the firmware version of the input signal.
Current • Resolution: Shows the native resolution of your projector. • Source: Shows the current signal source. • Picture Mode: Shows the selected mode in the PICTURE menu. • Lamp Mode: Shows the selected mode in the Lamp Settings menu. Menu operation 35 System Status • 3D Format: Shows the current 3D mode. • Color System: Shows input system format. • Lamp Usage Time: Shows the number of hours the lamp has been used. • Firmware Version: Shows the firmware version of the input signal.

User Manual
Page 36
... mode) + 1.5 x (hours used in Economic mode) + 1.0 x (hours used in damage to the projector surface and cabinet material. Lamp information Getting to know the lamp hour When the projector is in operation, the duration (in its original packing or equivalent. Maintenance Care of the projector Cleaning the lens Clean the lens whenever you need to store the projector for an extended time, please follow the instructions below: • Make sure the temperature...
... mode) + 1.5 x (hours used in Economic mode) + 1.0 x (hours used in damage to the projector surface and cabinet material. Lamp information Getting to know the lamp hour When the projector is in operation, the duration (in its original packing or equivalent. Maintenance Care of the projector Cleaning the lens Clean the lens whenever you need to store the projector for an extended time, please follow the instructions below: • Make sure the temperature...
User Manual
Page 37
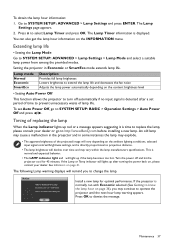
... installing a new lamp. This is displayed. Go to select Lamp Timer and press OK. If the Lamp or Temp indicator still lights up red or a message appears suggesting it is normally run with Economic selected (See Getting to know the lamp hour on page 36), you to operate the projector until the next hour lamp warning appears. Lamp mode Normal Economic SmartEco Description Provides full lamp brightness Lowers brightness to extend the lamp life...
... installing a new lamp. This is displayed. Go to select Lamp Timer and press OK. If the Lamp or Temp indicator still lights up red or a message appears suggesting it is normally run with Economic selected (See Getting to know the lamp hour on page 36), you to operate the projector until the next hour lamp warning appears. Lamp mode Normal Economic SmartEco Description Provides full lamp brightness Lowers brightness to extend the lamp life...
User Manual
Page 38
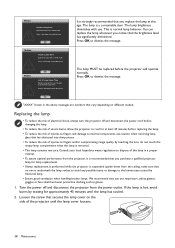
... the lamp cover on different models. This is a consumable item. Loosen the screw that vary depending on the side of this age. You can replace the lamp whenever you notice that you purchase a qualified projector lamp for approximately 45 minutes until the lamp cover loosens. 38 Maintenance Press OK to dismiss the message. Turn the power off and disconnect the power cord before changing the lamp. •...
... the lamp cover on different models. This is a consumable item. Loosen the screw that vary depending on the side of this age. You can replace the lamp whenever you notice that you purchase a qualified projector lamp for approximately 45 minutes until the lamp cover loosens. 38 Maintenance Press OK to dismiss the message. Turn the power off and disconnect the power cord before changing the lamp. •...

User Manual
Page 42
... power cord into the power outlet. Open the lens cover. Remedy Adjust the focus of the projector if necessary. The input signal has not been correctly selected. Select the correct input signal with new ones. Cause Remedy The batteries are not aligned properly. Remove the obstacle. Cause You do not remember the password. If the power outlet has a switch, make sure that the signal cable is switched on. No picture Cause The video source...
... power cord into the power outlet. Open the lens cover. Remedy Adjust the focus of the projector if necessary. The input signal has not been correctly selected. Select the correct input signal with new ones. Cause Remedy The batteries are not aligned properly. Remove the obstacle. Cause You do not remember the password. If the power outlet has a switch, make sure that the signal cable is switched on. No picture Cause The video source...


