

User Manual
Page 2
... projected image size 19 Connection 21 Connecting video source devices........22 Playing sound through the projector 23 Operation 24 Starting up the projector 24 Adjusting the projected image 25 Using the menus 28 Securing the projector 29 Utilizing the password function ...........29 Switching input signal 32 Magnifying and searching for details ...33 Selecting the aspect ratio 33 Optimizing the image 35 Setting the presentation timer 39 Remote paging operations 40 Freezing the image 40 Hiding the image 40 Locking control...
... projected image size 19 Connection 21 Connecting video source devices........22 Playing sound through the projector 23 Operation 24 Starting up the projector 24 Adjusting the projected image 25 Using the menus 28 Securing the projector 29 Utilizing the password function ...........29 Switching input signal 32 Magnifying and searching for details ...33 Selecting the aspect ratio 33 Optimizing the image 35 Setting the presentation timer 39 Remote paging operations 40 Freezing the image 40 Hiding the image 40 Locking control...
User Manual
Page 3
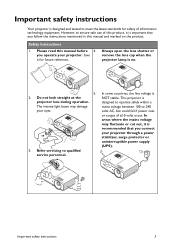
... mains voltage may damage mains voltage between 100 to 240 your projector. Important safety instructions Your projector is designed and tested to meet the latest standards for future reference. However, to qualified service personnel. Please read this manual and marked on . 5. Always open the lens shutter or remove the lens cap when the projector lamp is important that you operate your eyes.
... mains voltage may damage mains voltage between 100 to 240 your projector. Important safety instructions Your projector is designed and tested to meet the latest standards for future reference. However, to qualified service personnel. Please read this manual and marked on . 5. Always open the lens shutter or remove the lens cap when the projector lamp is important that you operate your eyes.
User Manual
Page 4
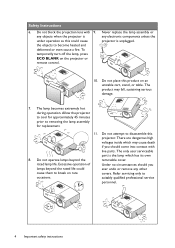
... projection lens with live parts. Allow the projector to cool for replacement. 11. suitably qualified professional service personnel. 4 Important safety instructions To temporarily turn off the lamp, press ECO BLANK on an unstable cart, stand, or table. Do not place this projector. Do not attempt to removing the lamp assembly for approximately 45 minutes prior to disassemble this product on the projector or remote control...
... projection lens with live parts. Allow the projector to cool for replacement. 11. suitably qualified professional service personnel. 4 Important safety instructions To temporarily turn off the lamp, press ECO BLANK on an unstable cart, stand, or table. Do not place this projector. Do not attempt to removing the lamp assembly for approximately 45 minutes prior to disassemble this product on the projector or remote control...
User Manual
Page 6
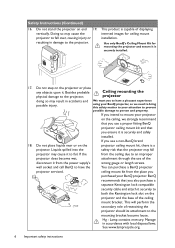
... to both the Kensington lock slot on the projector ceiling mount kit, there is securely and safely installed. Hg - wall socket and call BenQ to have a pleasant experience using your BenQ projector, so we strongly recommend that you use a proper fitting BenQ projector ceiling mount kit and that you ensure it . This will perform the secondary role of displaying inverted images for mounting the projector and ensure it to...
... to both the Kensington lock slot on the projector ceiling mount kit, there is securely and safely installed. Hg - wall socket and call BenQ to have a pleasant experience using your BenQ projector, so we strongly recommend that you use a proper fitting BenQ projector ceiling mount kit and that you ensure it . This will perform the secondary role of displaying inverted images for mounting the projector and ensure it to...
User Manual
Page 7
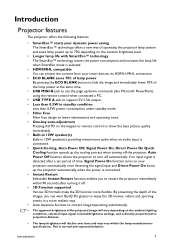
... up/down commands (like Microsoft PowerPoint) using the remote control when connected a PC. • USB TYPE A jack to support 5V/1.5A output. • Less than 0.5W in standby condition Less than 0.5W power consumption under standby mode. • Filter Free Filter free design to lower maintenance and operating costs. • One-key auto-adjustment Pressing AUTO on the keypad or remote control to turn off automatically if no input signal is detected after turning it...
... up/down commands (like Microsoft PowerPoint) using the remote control when connected a PC. • USB TYPE A jack to support 5V/1.5A output. • Less than 0.5W in standby condition Less than 0.5W power consumption under standby mode. • Filter Free Filter free design to lower maintenance and operating costs. • One-key auto-adjustment Pressing AUTO on the keypad or remote control to turn off automatically if no input signal is detected after turning it...
User Manual
Page 11
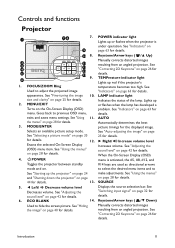
... "Auto-adjusting the image" on page See "Selecting a picture mode" on page 25 for details. When the On-Screen Display (OSD) 4. Introduction 11 resulting from an angled projection. FOCUS/ZOOM Ring temperature becomes too high. for the displayed image. POWER Toggles the projector between standby mode and on page 24 make adjustments. menu is under operation. "Switching input signal" on page 28 for details. 44 for details. 6. Controls and functions Projector 1 78 7. Indicates the status of the lamp. See "Using...
... "Auto-adjusting the image" on page See "Selecting a picture mode" on page 25 for details. When the On-Screen Display (OSD) 4. Introduction 11 resulting from an angled projection. FOCUS/ZOOM Ring temperature becomes too high. for the displayed image. POWER Toggles the projector between standby mode and on page 24 make adjustments. menu is under operation. "Switching input signal" on page 28 for details. 44 for details. 6. Controls and functions Projector 1 78 7. Indicates the status of the lamp. See "Using...

User Manual
Page 12
... to switch between standby mode and on remote control for the displayed image. Remote Control 1 2 14 3 4 15 5 16 17 6 18 7 3 8 19 9 20 10 11 21 12 22 23 13 1. ZOOM+/ZOOM- NETWORK SETTING Displays the Network Settings OSD menu. 13. Numeric buttons Enters numbers in MHL mode. 9. NETWORK Selects Network Display as the input signal source. 15. Source selection buttons Selects an input source for presentation purposes. 8. MHL control buttons Goes to the previous file/Plays/Pauses/ Goes to hide the screen picture. 7. Magnifies...
... to switch between standby mode and on remote control for the displayed image. Remote Control 1 2 14 3 4 15 5 16 17 6 18 7 3 8 19 9 20 10 11 21 12 22 23 13 1. ZOOM+/ZOOM- NETWORK SETTING Displays the Network Settings OSD menu. 13. Numeric buttons Enters numbers in MHL mode. 9. NETWORK Selects Network Display as the input signal source. 15. Source selection buttons Selects an input source for presentation purposes. 8. MHL control buttons Goes to the previous file/Plays/Pauses/ Goes to hide the screen picture. 7. Magnifies...

User Manual
Page 13
...-Screen Display (OSD) menu is visible. MODE/ENTER Do not look into the laser light window or shine the laser light beam on the back of red light when you can use the remote control to page up/down commands (like Microsoft PowerPoint). 20. SMART ECO Switch the lamp mode between on a connected PC) which responds to control your display software program (on and off. 22. Activates the selected On-Screen Display warning messages...
...-Screen Display (OSD) menu is visible. MODE/ENTER Do not look into the laser light window or shine the laser light beam on the back of red light when you can use the remote control to page up/down commands (like Microsoft PowerPoint). 20. SMART ECO Switch the lamp mode between on a connected PC) which responds to control your display software program (on and off. 22. Activates the selected On-Screen Display warning messages...

User Manual
Page 14
... are used as directional arrows to select the desired menu items and to hide the screen picture. 7. MODE/ENTER Selects an available picture setup mode. Operate your display software program (on a connected PC) which responds to switch between standby mode and on. 2. AUTO Automatically determines the best picture timings for display. 3. (Available in network settings. ON / OFF Toggles the projector between MHL mode and DLP mode on the On-Screen Display (OSD) menu. Source selection buttons Selects an input source for the displayed image. Keystone...
... are used as directional arrows to select the desired menu items and to hide the screen picture. 7. MODE/ENTER Selects an available picture setup mode. Operate your display software program (on a connected PC) which responds to switch between standby mode and on. 2. AUTO Automatically determines the best picture timings for display. 3. (Available in network settings. ON / OFF Toggles the projector between MHL mode and DLP mode on the On-Screen Display (OSD) menu. Source selection buttons Selects an input source for the displayed image. Keystone...

User Manual
Page 24
... 32 for details. If the projector is found. The current input signal being scanned displays in the upper left corner of start up the projector 1. Check that the POWER indicator light on the projector or remote control to start the projector and a start to search for a password, press the arrow keys to a lower setting. The POWER indicator light flashes green and stays green when the projector is projected. (If necessary) Rotate the focus ring to avoid possible dangers...
... 32 for details. If the projector is found. The current input signal being scanned displays in the upper left corner of start up the projector 1. Check that the POWER indicator light on the projector or remote control to start the projector and a start to search for a password, press the arrow keys to a lower setting. The POWER indicator light flashes green and stays green when the projector is projected. (If necessary) Rotate the focus ring to avoid possible dangers...
User Manual
Page 30
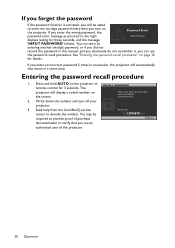
... the wrong password, the Password Error password error message as pictured to decode the number. Please write down the number and turn on the projector or remote control for three seconds, and the message 'INPUT PASSWORD' follows. If you enter an incorrect password 5 times in succession, the projector will automatically shut down in this manual, and you absolutely do not remember it, you can retry by entering another six-digit password, or if...
... the wrong password, the Password Error password error message as pictured to decode the number. Please write down the number and turn on the projector or remote control for three seconds, and the message 'INPUT PASSWORD' follows. If you enter an incorrect password 5 times in succession, the projector will automatically shut down in this manual, and you absolutely do not remember it, you can retry by entering another six-digit password, or if...
User Manual
Page 31
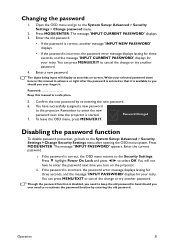
... Power On Lock and press ◄/► to enter the new password next time the projector is incorrect, the password error message displays lasting for three seconds, and the message 'INPUT PASSWORD' displays for your retry. Enter the current password. If the password is started. Open the OSD menu and go back to you should you ever forget it is available to the System Setup: Advanced > Security Settings > Change Security Settings menu after opening the...
... Power On Lock and press ◄/► to enter the new password next time the projector is incorrect, the password error message displays lasting for three seconds, and the message 'INPUT PASSWORD' displays for your retry. Enter the current password. If the password is started. Open the OSD menu and go back to you should you ever forget it is available to the System Setup: Advanced > Security Settings > Change Security Settings menu after opening the...

User Manual
Page 40
... the screen, the pictures are running on page 21 for your presentation, select Disable. Remote paging operations Connect the projector to your display software program (on the projector or remote control to restore the picture. • Do not block the projection lens from 5 to 30 minutes in the System Setup: Basic > Operating Settings > Blank Timer menu to let the projector return the image automatically after a period of time when there is updated to...
... the screen, the pictures are running on page 21 for your presentation, select Disable. Remote paging operations Connect the projector to your display software program (on the projector or remote control to restore the picture. • Do not block the projection lens from 5 to 30 minutes in the System Setup: Basic > Operating Settings > Blank Timer menu to let the projector return the image automatically after a period of time when there is updated to...

User Manual
Page 41
... release panel key lock, use the High Altitude Mode if your projector from being changed accidentally (by pressing ◄/► on the projector speakers. Highlight Yes and press MODE/ENTER. INPUT SOURCE PC HDMI-1, HDMI-2/MHL VIDEO S-VIDEO AUDIO IN mini jack HDMI RCA RCA AUDIO OUT mini jack mini jack mini jack mini jack Operation 41 A confirmation message displays. 3. If you should switch to High Altitude mode to the System Setup: Basic > Panel Key Lock menu, and...
... release panel key lock, use the High Altitude Mode if your projector from being changed accidentally (by pressing ◄/► on the projector speakers. Highlight Yes and press MODE/ENTER. INPUT SOURCE PC HDMI-1, HDMI-2/MHL VIDEO S-VIDEO AUDIO IN mini jack HDMI RCA RCA AUDIO OUT mini jack mini jack mini jack mini jack Operation 41 A confirmation message displays. 3. If you should switch to High Altitude mode to the System Setup: Basic > Panel Key Lock menu, and...

User Manual
Page 47
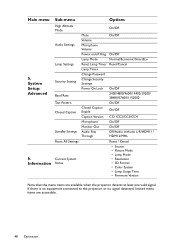
... Operation Setting Instant Restart On/Off On/Off Blank Timer Disable/5 mins/10 mins/ 15 mins/20 mins/25 mins/ 30 mins Sleep Timer Disable/30 mins/1 hr/2 hrs/3hrs/ 4hrs/8 hrs/12hrs Remote Receiver Front+Rear/Front/Rear Panel Key Lock On/Off Background Color BenQ/Black/Blue/Purple Splash Screen BenQ/Black/Blue Operation 47 Main menu Sub-menu Presentation Timer Timer Period Timer Display Timer Position Timer Counting Direction Sound...
... Operation Setting Instant Restart On/Off On/Off Blank Timer Disable/5 mins/10 mins/ 15 mins/20 mins/25 mins/ 30 mins Sleep Timer Disable/30 mins/1 hr/2 hrs/3hrs/ 4hrs/8 hrs/12hrs Remote Receiver Front+Rear/Front/Rear Panel Key Lock On/Off Background Color BenQ/Black/Blue/Purple Splash Screen BenQ/Black/Blue Operation 47 Main menu Sub-menu Presentation Timer Timer Period Timer Display Timer Position Timer Counting Direction Sound...
User Manual
Page 48
If there is no equipment connected to the projector or no signal detected, limited menu items are available when the projector detects at least one valid signal. Information Sub-menu Options High Altitude Mode Audio Settings Lamp Settings Security Setting Baud Rate Test Pattern Closed Caption Standby Settings Reset All Settings Current System Status Mute Volume Microphone Volume Power on/off Ring Lamp Mode Reset Lamp Timer Lamp Timer Change Passward Change Security Settings Power On Lock Closed Caption Enable Caption Version Microphone...
If there is no equipment connected to the projector or no signal detected, limited menu items are available when the projector detects at least one valid signal. Information Sub-menu Options High Altitude Mode Audio Settings Lamp Settings Security Setting Baud Rate Test Pattern Closed Caption Standby Settings Reset All Settings Current System Status Mute Volume Microphone Volume Power on/off Ring Lamp Mode Reset Lamp Timer Lamp Timer Change Passward Change Security Settings Power On Lock Closed Caption Enable Caption Version Microphone...

User Manual
Page 51
... color presentation. Management Reset picture See "Resetting current or all picture modes" on page 36 for details. Adjusts the degree of each color in the image. Adjusts the color saturation level -- See "Adjusting Sharpness" on page 38 for details. the amount of difference between dark and light in a video image. The function is only available when Video or S-Video with NTSC system is selected. settings Quick Auto Search See "Switching input signal...
... color presentation. Management Reset picture See "Resetting current or all picture modes" on page 36 for details. Adjusts the degree of each color in the image. Adjusts the color saturation level -- See "Adjusting Sharpness" on page 38 for details. the amount of difference between dark and light in a video image. The function is only available when Video or S-Video with NTSC system is selected. settings Quick Auto Search See "Switching input signal...

User Manual
Page 54
... (CC1 displays captions in the primary language in operation mode. The built-in speaker(s) will still remain: Position, Phase, H. It helps you adjust the image size and focus and check that you can output an audio signal to the device, the projector can connect the projector using a suitable RS-232 cable and update or download the projector's firmware. 5. System Setup: Advanced menu FUNCTION Baud Rate Test Pattern Closed Caption Standby Settings Reset All Settings DESCRIPTION Selects...
... (CC1 displays captions in the primary language in operation mode. The built-in speaker(s) will still remain: Position, Phase, H. It helps you adjust the image size and focus and check that you can output an audio signal to the device, the projector can connect the projector using a suitable RS-232 cable and update or download the projector's firmware. 5. System Setup: Advanced menu FUNCTION Baud Rate Test Pattern Closed Caption Standby Settings Reset All Settings DESCRIPTION Selects...

User Manual
Page 63
... error. Off Off The fans are not Off working. Please contact your dealer for assistance. Please contact your dealer for assistance. Off The projector has shutdown automatically. Red Off Red Red Orange Off The projector has shutdown automatically. Lamp door is open or not closed properly. Off Thermal IC #1 I2C connection error. Please check if the lamp door is open error. Indicators Light Status & Description Power Temp Lamp Power events Orange Off Green Off Flashing Green Off Orange Off Flashing Lamp...
... error. Off Off The fans are not Off working. Please contact your dealer for assistance. Please contact your dealer for assistance. Off The projector has shutdown automatically. Red Off Red Red Orange Off The projector has shutdown automatically. Lamp door is open or not closed properly. Off Thermal IC #1 I2C connection error. Please check if the lamp door is open error. Indicators Light Status & Description Power Temp Lamp Power events Orange Off Green Off Flashing Green Off Orange Off Flashing Lamp...

User Manual
Page 64
... turn the projector on . Attempting to the input signal device. Turn the video source on . Blurred image. Remote control does not work. Replace the battery with the SOURCE key on the projector, and plug the power cord into the AC inlet on the projector or remote control. Cause Remedy You do not remember the password. No picture. Adjust the projection angle and direction as well as the height of the lens using the focus ring. Open the lens cover...
... turn the projector on . Attempting to the input signal device. Turn the video source on . Blurred image. Remote control does not work. Replace the battery with the SOURCE key on the projector, and plug the power cord into the AC inlet on the projector or remote control. Cause Remedy You do not remember the password. No picture. Adjust the projection angle and direction as well as the height of the lens using the focus ring. Open the lens cover...


