

User Manual
Page 2
Your monitor should be placed near the equipment and be easily accessible. • This product should never be operated from the AC supply. • The power supply cord serves as a power disconnect device for pluggable equipment. ii Disclaimer BenQ Corporation makes no representations or ...Never push objects or spill liquid of any kind into any language or computer language, in any form or by BenQ Corporation. Clean the LCD monitor surface with respect to the contents hereof and specifically disclaims any warranties, merchantability or fitness for servicing. 2 If ...
Your monitor should be placed near the equipment and be easily accessible. • This product should never be operated from the AC supply. • The power supply cord serves as a power disconnect device for pluggable equipment. ii Disclaimer BenQ Corporation makes no representations or ...Never push objects or spill liquid of any kind into any language or computer language, in any form or by BenQ Corporation. Clean the LCD monitor surface with respect to the contents hereof and specifically disclaims any warranties, merchantability or fitness for servicing. 2 If ...
User Manual
Page 5
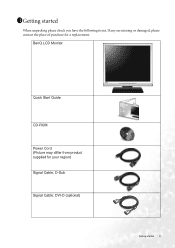
1111Getting started 5 BenQ LCD Monitor Quick Start Guide CD-ROM Power Cord (Picture may differ from product supplied for your region) Signal Cable: D-Sub Signal Cable: DVI-D (optional) Getting started When unpacking please check you have the following items. If any are missing or damaged, please contact the place of purchase for a replacement.
1111Getting started 5 BenQ LCD Monitor Quick Start Guide CD-ROM Power Cord (Picture may differ from product supplied for your region) Signal Cable: D-Sub Signal Cable: DVI-D (optional) Getting started When unpacking please check you have the following items. If any are missing or damaged, please contact the place of purchase for a replacement.
User Manual
Page 8
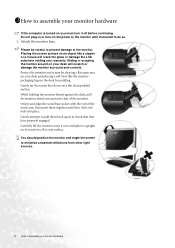
... light sources. 8 How to check that they click and lock into place. Do not plug-in or turn it upright on its stand on your monitor hardware Gently lay the screen face down on your desk and placing a soft item like a stapler or a mouse will scratch or damage the... careful to prevent damage to do so. 1. While holding the monitor firmly against the desk, pull the monitor stand arm upwards clear of the stand arm, then push them back apart to assemble your desk will crack the glass or damage the LCD substrate voiding your warranty. Gently attempt to pull them together...
... light sources. 8 How to check that they click and lock into place. Do not plug-in or turn it upright on its stand on your monitor hardware Gently lay the screen face down on your desk and placing a soft item like a stapler or a mouse will scratch or damage the... careful to prevent damage to do so. 1. While holding the monitor firmly against the desk, pull the monitor stand arm upwards clear of the stand arm, then push them back apart to assemble your desk will crack the glass or damage the LCD substrate voiding your warranty. Gently attempt to pull them together...
User Manual
Page 9
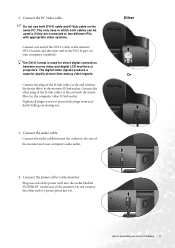
...a superior quality picture than analog video signals. Connect the audio cable between source video and digital LCD monitors or projectors. The only case in which both DVI-D cable and D-Sub cable on the rear of the monitor. 2. Connect the plug of the D-Sub cable (at the end with appropriate video systems. Connect...connected to two different PCs with the ferrite filter) to a power point just yet. Connect the other plug of the DVI-D cable to the monitor DVI-D socket and the other end to the computer video D-Sub socket. Do not connect the other end to the DVI-D port on the ...
...a superior quality picture than analog video signals. Connect the audio cable between source video and digital LCD monitors or projectors. The only case in which both DVI-D cable and D-Sub cable on the rear of the monitor. 2. Connect the plug of the D-Sub cable (at the end with appropriate video systems. Connect...connected to two different PCs with the ferrite filter) to a power point just yet. Connect the other plug of the DVI-D cable to the monitor DVI-D socket and the other end to the computer video D-Sub socket. Do not connect the other end to the DVI-D port on the ...
User Manual
Page 11
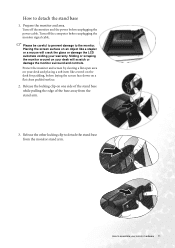
... like a stapler or a mouse will crack the glass or damage the LCD substrate voiding your desk will scratch or damage the monitor surround and controls. Release the other locking clip to detach the stand base 1. Prepare the monitor and area. Protect the monitor and screen by clearing a flat open area on your warranty. Turn...
... like a stapler or a mouse will crack the glass or damage the LCD substrate voiding your desk will scratch or damage the monitor surround and controls. Release the other locking clip to detach the stand base 1. Prepare the monitor and area. Protect the monitor and screen by clearing a flat open area on your warranty. Turn...
User Manual
Page 12
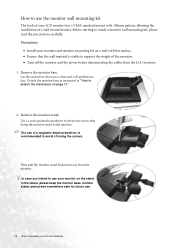
... kit The back of a wall mount bracket. Then pull the monitor stand backward away from the LCD monitor. 1. Detach the monitor base as instructed in the future, please keep the monitor base, monitor stand, and screws somewhere safe for future use. 12 How to assemble your LCD monitor has a VESA standard mount with flat surface. • Ensure that...
... kit The back of a wall mount bracket. Then pull the monitor stand backward away from the LCD monitor. 1. Detach the monitor base as instructed in the future, please keep the monitor base, monitor stand, and screws somewhere safe for future use. 12 How to assemble your LCD monitor has a VESA standard mount with flat surface. • Ensure that...

User Manual
Page 14
... prevent you from installing software on your computer. 14 Getting the most benefit from your BenQ monitor Furthermore, if your computer is connected to successfully install the BenQ LCD Monitor driver software. The circumstances under which you should install the custom BenQ LCD Monitor driver software as a member of Microsoft Windows you are using, and whether you are...
... prevent you from installing software on your computer. 14 Getting the most benefit from your BenQ monitor Furthermore, if your computer is connected to successfully install the BenQ LCD Monitor driver software. The circumstances under which you should install the custom BenQ LCD Monitor driver software as a member of Microsoft Windows you are using, and whether you are...

User Manual
Page 15
... procedure for which the BenQ LCD Monitor is the first ever monitor to be following these instructions. Follow the instructions in How to assemble your BenQ monitor 15 When Windows (2000 or later) starts, it displays the option to an existing computer that the wizard has selected the correct name of your monitor as "BenQ FP72E" and click Next...
... procedure for which the BenQ LCD Monitor is the first ever monitor to be following these instructions. Follow the instructions in How to assemble your BenQ monitor 15 When Windows (2000 or later) starts, it displays the option to an existing computer that the wizard has selected the correct name of your monitor as "BenQ FP72E" and click Next...
User Manual
Page 16
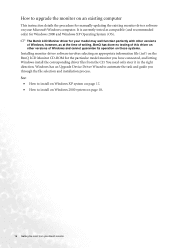
... need only steer it in the right direction. How to upgrade the monitor on an existing computer This instruction details the procedure for Windows 2000 and Windows XP Operating System (OS). The BenQ LCD Monitor driver for your model may well function perfectly with other versions of Windows..., however, as compatible (and recommended only) for manually updating the existing monitor driver software on the BenQ LCD Monitor CD-ROM for the particular model monitor you through the file selection and installation process. It is currently tested as at the time of...
... need only steer it in the right direction. How to upgrade the monitor on an existing computer This instruction details the procedure for Windows 2000 and Windows XP Operating System (OS). The BenQ LCD Monitor driver for your model may well function perfectly with other versions of Windows..., however, as compatible (and recommended only) for manually updating the existing monitor driver software on the BenQ LCD Monitor CD-ROM for the particular model monitor you through the file selection and installation process. It is currently tested as at the time of...

User Manual
Page 17
... menu. Insert the BenQ LCD Monitor CD-ROM into a CD drive on Windows XP system 1. When complete, the wizard should have found and selected the BenQ driver on the CD, and click the Next button. Select (single-click) the file named 'BenQ FP72E' on the CD appropriate to your monitor model, in this case 'BenQ FP72E' in these property...
... menu. Insert the BenQ LCD Monitor CD-ROM into a CD drive on Windows XP system 1. When complete, the wizard should have found and selected the BenQ driver on the CD, and click the Next button. Select (single-click) the file named 'BenQ FP72E' on the CD appropriate to your monitor model, in this case 'BenQ FP72E' in these property...

User Manual
Page 19
.... 12. You could then print it out for details. Select (single-click) the file named BenQ FP72E, and click the Next button. 10. See How to work off-line. How to the BenQ LCD Monitor CD-ROM. The autorun User's Guide language selection page will have a Windows designated drive letter (like...to the drive you to the Install from Disk window, and it is the CD you can change the screen refresh rate and other monitor properties to the BenQ LCD Monitor CD 'Driver' folder into . 6. The contents of the 'Driver' folder will display. 5. Click the Open button. This will have...
.... 12. You could then print it out for details. Select (single-click) the file named BenQ FP72E, and click the Next button. 10. See How to work off-line. How to the BenQ LCD Monitor CD-ROM. The autorun User's Guide language selection page will have a Windows designated drive letter (like...to the drive you to the Install from Disk window, and it is the CD you can change the screen refresh rate and other monitor properties to the BenQ LCD Monitor CD 'Driver' folder into . 6. The contents of the 'Driver' folder will display. 5. Click the Open button. This will have...

User Manual
Page 35
... primary colors is blurred: Read the How to adjust the screen resolution on or off . • These are using a display mode that occurs in LCD technology. If the LED is illuminated in green and there is bent or broken off , please contact your dealer to the factory defaults. Please read... 21 section, and then select the correct resolution, refresh rate and make adjustments based on page 22 section It is a natural defect that this monitor does not support, please change the setting to adjust the screen refresh rate on these losses by working through the instructions in the How to...
... primary colors is blurred: Read the How to adjust the screen resolution on or off . • These are using a display mode that occurs in LCD technology. If the LED is illuminated in green and there is bent or broken off , please contact your dealer to the factory defaults. Please read... 21 section, and then select the correct resolution, refresh rate and make adjustments based on page 22 section It is a natural defect that this monitor does not support, please change the setting to adjust the screen refresh rate on these losses by working through the instructions in the How to...
Brochure
Page 2
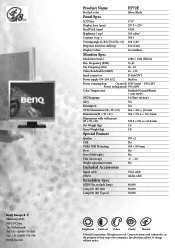
...Ekkersrijt 4130, 5692 DC Son, The Netherlands Tel: +31-(0)499-750-500 Fax: +31-(0)499-750-599 BenQ-eu.com Product Name FP72E Product color Silver-Black Panel Spec LCD Size 17.0" Display Area (mm) 337.9 × 270 Pixel Pitch (mm) 0.264 Brightness ( typ.) ...300 cd/m2 Contrast ( typ. ) 500:1 Viewing angle (L/R;U/D) (CR>=5) 160˚/160˚ Response time(rise+fall) typ. 8 (6+2)ms Display Colors 16.2 million Monitor...
...Ekkersrijt 4130, 5692 DC Son, The Netherlands Tel: +31-(0)499-750-500 Fax: +31-(0)499-750-599 BenQ-eu.com Product Name FP72E Product color Silver-Black Panel Spec LCD Size 17.0" Display Area (mm) 337.9 × 270 Pixel Pitch (mm) 0.264 Brightness ( typ.) ...300 cd/m2 Contrast ( typ. ) 500:1 Viewing angle (L/R;U/D) (CR>=5) 160˚/160˚ Response time(rise+fall) typ. 8 (6+2)ms Display Colors 16.2 million Monitor...


