

User Manual
Page 2
... these safety instructions for best performance, and long life for pluggable equipment. iv Care And Cleaning • Cleaning. Further, BenQ Corporation reserves the right to revise this equipment from the AC supply. • The power supply cord serves as opening or removing covers may be blocked or covered. Always unplug your monitor iii Power Safety • The AC plug isolates this publication and to make changes from time...
... these safety instructions for best performance, and long life for pluggable equipment. iv Care And Cleaning • Cleaning. Further, BenQ Corporation reserves the right to revise this equipment from the AC supply. • The power supply cord serves as opening or removing covers may be blocked or covered. Always unplug your monitor iii Power Safety • The AC plug isolates this publication and to make changes from time...

User Manual
Page 3
... Windows XP system 17 How to install on Windows 2000 system 18 How to complete the Windows Upgrade Device Driver Wizard 19 How to adjust the screen resolution 21 How to adjust the screen refresh rate 22 Picture optimization ...23 How to adjust your monitor 24 The control panel ...24 On Screen Display (OSD) menu structure 25 Hot key mode ...26 Main menu mode ...27 Troubleshooting ...35 Frequently asked questions (FAQ 35 Need more help? ...36 Supported PC Timings ...37 Specifications...
... Windows XP system 17 How to install on Windows 2000 system 18 How to complete the Windows Upgrade Device Driver Wizard 19 How to adjust the screen resolution 21 How to adjust the screen refresh rate 22 Picture optimization ...23 How to adjust your monitor 24 The control panel ...24 On Screen Display (OSD) menu structure 25 Hot key mode ...26 Main menu mode ...27 Troubleshooting ...35 Frequently asked questions (FAQ 35 Need more help? ...36 Supported PC Timings ...37 Specifications...
User Manual
Page 10
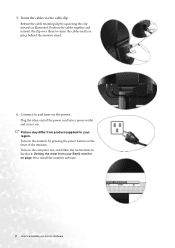
... install the monitor software. 10 How to retain the cables neatly in Section 4: Getting the most from product supplied for your monitor hardware Plug the other end of the monitor. Turn on the power. 5. Position the cables together and reinsert the clip over them to assemble your region. Release the cable retaining clip by pressing the power button on the front of the power cord into a power outlet and turn...
... install the monitor software. 10 How to retain the cables neatly in Section 4: Getting the most from product supplied for your monitor hardware Plug the other end of the monitor. Turn on the power. 5. Position the cables together and reinsert the clip over them to assemble your region. Release the cable retaining clip by pressing the power button on the front of the power cord into a power outlet and turn...
User Manual
Page 12
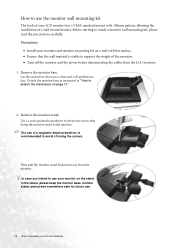
... the screws. Remove the monitor stand. Detach the monitor base as instructed in the future, please keep the monitor base, monitor stand, and screws somewhere safe for future use. 12 How to assemble your monitor hardware How to use the monitor wall mounting kit The back of your LCD monitor has a VESA standard mount with flat surface. • Ensure that fixing the monitor stand to the monitor. In case you intend to use your monitor on the stand in "How to install a monitor wall mounting kit...
... the screws. Remove the monitor stand. Detach the monitor base as instructed in the future, please keep the monitor base, monitor stand, and screws somewhere safe for future use. 12 How to assemble your monitor hardware How to use the monitor wall mounting kit The back of your LCD monitor has a VESA standard mount with flat surface. • Ensure that fixing the monitor stand to the monitor. In case you intend to use your monitor on the stand in "How to install a monitor wall mounting kit...

User Manual
Page 14
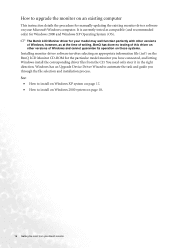
... group in order to successfully install the BenQ LCD Monitor driver software. 1411Getting the most from your BenQ monitor To gain the most from your new BenQ color LCD flat screen monitor, you need to follow . Further details and step-by-step instructions for both an automatic (new) or upgrade (existing) installation follow to install the monitor driver software. In either case however, the very next time you turn on your computer. 14...
... group in order to successfully install the BenQ LCD Monitor driver software. 1411Getting the most from your BenQ monitor To gain the most from your new BenQ color LCD flat screen monitor, you need to follow . Further details and step-by-step instructions for both an automatic (new) or upgrade (existing) installation follow to install the monitor driver software. In either case however, the very next time you turn on your computer. 14...

User Manual
Page 15
... selecting and installing the BenQ LCD Monitor driver software on an existing computer. 1. This instruction is the first ever monitor to be following the instructions for How to upgrade the monitor on a new computer which the BenQ LCD Monitor is only suitable for a computer which has never been used before, and for which has never had another monitor connected to it displays the option to Install Hardware Device drivers. 2. You...
... selecting and installing the BenQ LCD Monitor driver software on an existing computer. 1. This instruction is the first ever monitor to be following the instructions for How to upgrade the monitor on a new computer which the BenQ LCD Monitor is only suitable for a computer which has never been used before, and for which has never had another monitor connected to it displays the option to Install Hardware Device drivers. 2. You...
User Manual
Page 16
... operation on those systems. Installing monitor driver software involves selecting an appropriate information file (.inf) on the BenQ LCD Monitor CD-ROM for the particular model monitor you through the file selection and installation process. Windows has an Upgrade Device Driver Wizard to automate the task and guide you have connected, and letting Windows install the corresponding driver files from your Microsoft Windows computer. You need only steer it in...
... operation on those systems. Installing monitor driver software involves selecting an appropriate information file (.inf) on the BenQ LCD Monitor CD-ROM for the particular model monitor you through the file selection and installation process. Windows has an Upgrade Device Driver Wizard to automate the task and guide you have connected, and letting Windows install the corresponding driver files from your Microsoft Windows computer. You need only steer it in...

User Manual
Page 17
... install the appropriate monitor driver files to your system. • Under the Classic view, click Start | Control Panel | Display. • Under the Category view, click Start | Control Panel | Appearance and Themes | Change the screen resolution. Check the option 'Search for your computer. 10. This will display. Click Close, OK, and OK. Getting the most from the example above depending upon which type of your monitor model, in this case 'BenQ FP72E...
... install the appropriate monitor driver files to your system. • Under the Classic view, click Start | Control Panel | Display. • Under the Category view, click Start | Control Panel | Appearance and Themes | Change the screen resolution. Check the option 'Search for your computer. 10. This will display. Click Close, OK, and OK. Getting the most from the example above depending upon which type of your monitor model, in this case 'BenQ FP72E...

User Manual
Page 18
... Display Properties window will display. The quickest shortcut to Display Properties is located under the Settings menu item. In Windows 2000, click the Driver tab and the Update Driver button. The Upgrade Device Driver Wizard will display. 3. Click Start | Settings | Control Panel | Display. In Windows 2000, click the Monitor tab and the Properties button. The Display Properties window will display. 4. The Monitor Properties window will display. 2. Alternatively, the Windows menu to follow this instruction if you are installing onto a computer which has a Windows...
... Display Properties window will display. The quickest shortcut to Display Properties is located under the Settings menu item. In Windows 2000, click the Driver tab and the Update Driver button. The Upgrade Device Driver Wizard will display. 3. Click Start | Settings | Control Panel | Display. In Windows 2000, click the Monitor tab and the Properties button. The Display Properties window will display. 4. The Monitor Properties window will display. 2. Alternatively, the Windows menu to follow this instruction if you are installing onto a computer which has a Windows...

User Manual
Page 19
The Install From Disk window will copy the appropriate monitor driver files to suit your web browser. Click Next. This will display. 5. See How to complete the Windows Upgrade Device Driver Wizard 1. How to adjust the screen refresh rate on page 22 for details. 12. You can select a language and view the online version of this is the CD you can change the screen resolution (area and color). Launch...
The Install From Disk window will copy the appropriate monitor driver files to suit your web browser. Click Next. This will display. 5. See How to complete the Windows Upgrade Device Driver Wizard 1. How to adjust the screen refresh rate on page 22 for details. 12. You can select a language and view the online version of this is the CD you can change the screen resolution (area and color). Launch...
User Manual
Page 21
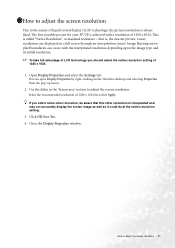
...-up menu. 2. Open Display Properties and select the Settings tab. Select the recommended resolution of 1280 x 1024. 1. Close the Display Properties window. 1511How to adjust the screen resolution Due to adjust the screen resolution 21 If you should select the native resolution setting of 1280 x 1024 then click Apply. The best possible picture for your FP72E is called "Native Resolution" or maximal resolution - Click OK then Yes. 4. Image blurring across pixel boundaries can open Display Properties...
...-up menu. 2. Open Display Properties and select the Settings tab. Select the recommended resolution of 1280 x 1024. 1. Close the Display Properties window. 1511How to adjust the screen resolution Due to adjust the screen resolution 21 If you should select the native resolution setting of 1280 x 1024 then click Apply. The best possible picture for your FP72E is called "Native Resolution" or maximal resolution - Click OK then Yes. 4. Image blurring across pixel boundaries can open Display Properties...

User Manual
Page 22
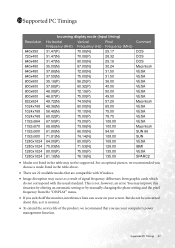
... button. 3. The best results are obtained by using the factory modes already set in the specification table. 4. Double click the Display icon in the specification section of 1280 x 1024. 1. Close the Display Properties window. 22 How to adjust the screen refresh rate There is not technically possible for the native resolution of this User's Manual: Supported PC Timings on an LCD display, because it is a table with the factory modes in Control Panel. 2. 1611How to adjust the screen refresh rate...
... button. 3. The best results are obtained by using the factory modes already set in the specification table. 4. Double click the Display icon in the specification section of 1280 x 1024. 1. Close the Display Properties window. 22 How to adjust the screen refresh rate There is not technically possible for the native resolution of this User's Manual: Supported PC Timings on an LCD display, because it is a table with the factory modes in Control Panel. 2. 1611How to adjust the screen refresh rate...
User Manual
Page 23
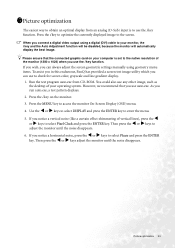
... best image. When you connect a digital video output using geometry menu items. To assist you in this endeavour, BenQ has provided a screen test image utility which you notice a vertical noise (like a curtain effect-shimmering of vertical lines), press the W or X keys to select Phase and press the ENTER key. Run the test program auto.exe from an analog (D-Sub) input is set to access the monitor On-Screen Display (OSD) menu. 4. Picture optimization...
... best image. When you connect a digital video output using geometry menu items. To assist you in this endeavour, BenQ has provided a screen test image utility which you notice a vertical noise (like a curtain effect-shimmering of vertical lines), press the W or X keys to select Phase and press the ENTER key. Run the test program auto.exe from an analog (D-Sub) input is set to access the monitor On-Screen Display (OSD) menu. 4. Picture optimization...
User Manual
Page 27
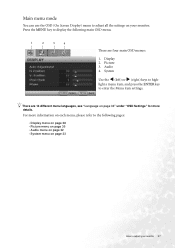
Display 2. light a menu item, and press the ENTER key to high- For more details. System Use the W (left) or X (right) keys to enter the Menu item settings. There are four main OSD menus: 1. Picture 3. Audio 4. Main menu mode You can use the OSD (On Screen Display) menu to adjust all the settings on your monitor 27 Press the MENU key to display the following pages: • Display menu on page 28 • Picture menu on page...
Display 2. light a menu item, and press the ENTER key to high- For more details. System Use the W (left) or X (right) keys to enter the Menu item settings. There are four main OSD menus: 1. Picture 3. Audio 4. Main menu mode You can use the OSD (On Screen Display) menu to adjust all the settings on your monitor 27 Press the MENU key to display the following pages: • Display menu on page 28 • Picture menu on page...
User Manual
Page 28
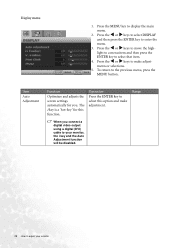
... ENTER key to adjust your monitor Display menu 1. The i key is a 'hot-key' for you connect a digital video output using a digital (DVI) cable to your monitor, the i key and the Auto Adjustment function will be disabled. 28 How to select this function. light to a menu item and then press the ENTER key to enter the menu. 3. Item Auto Adjustment Function Optimizes and adjusts the screen settings automatically for this option and make adjust- Press the W or...
... ENTER key to adjust your monitor Display menu 1. The i key is a 'hot-key' for you connect a digital video output using a digital (DVI) cable to your monitor, the i key and the Auto Adjustment function will be disabled. 28 How to select this function. light to a menu item and then press the ENTER key to enter the menu. 3. Item Auto Adjustment Function Optimizes and adjusts the screen settings automatically for this option and make adjust- Press the W or...
User Manual
Page 34
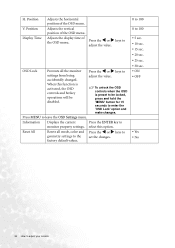
Position V. Adjusts the display time of the OSD menu. Resets all the monitor settings from being accidentally changed. Information Reset All Displays the current monitor property settings. Position Display Time Adjusts the horizontal position of the OSD menu. OSD Lock Prevents all mode, color and geometry settings to be disabled. Press the W or X keys to set the changes. 0 to 100 0 to 100 • 5 sec. • 10 sec. • 15 sec. • 20 sec. • 25 sec. • 30 sec...
Position V. Adjusts the display time of the OSD menu. Resets all the monitor settings from being accidentally changed. Information Reset All Displays the current monitor property settings. Position Display Time Adjusts the horizontal position of the OSD menu. OSD Lock Prevents all mode, color and geometry settings to be disabled. Press the W or X keys to set the changes. 0 to 100 0 to 100 • 5 sec. • 10 sec. • 15 sec. • 20 sec. • 25 sec. • 30 sec...

User Manual
Page 35
... permanently red, green, blue or another color. • Clean the LCD screen. • Cycle power on-off and is blurred: Read the How to get necessary support. Pixel errors can minimize these instructions. You can be seen: Is the prompt on the computer keyboard or move the mouse. Read the How to the factory defaults. Select the native resolution. Select MENU > PICTURE > Color > Reset Color, and then choose "Yes" in focus? Troubleshooting...
... permanently red, green, blue or another color. • Clean the LCD screen. • Cycle power on-off and is blurred: Read the How to get necessary support. Pixel errors can minimize these instructions. You can be seen: Is the prompt on the computer keyboard or move the mouse. Read the How to the factory defaults. Select the native resolution. Select MENU > PICTURE > Color > Reset Color, and then choose "Yes" in focus? Troubleshooting...

User Manual
Page 36
The image is displaced in one direction: Read the How to adjust the screen resolution on page 21 section and then select the correct resolution, refresh rate and make adjustments based on these instructions. If your problems remain after checking this manual, please contact your place of purchase or e-mail us at: Support@BenQ.com 36 Troubleshooting Need more help? The image is distorted, flashes or flickers: Read the How to adjust the screen resolution on page 21 section and then select the correct resolution, refresh rate and make adjustments based on these instructions.
The image is displaced in one direction: Read the How to adjust the screen resolution on page 21 section and then select the correct resolution, refresh rate and make adjustments based on these instructions. If your problems remain after checking this manual, please contact your place of purchase or e-mail us at: Support@BenQ.com 36 Troubleshooting Need more help? The image is distorted, flashes or flickers: Read the How to adjust the screen resolution on page 21 section and then select the correct resolution, refresh rate and make adjustments based on these instructions.
User Manual
Page 37
... modes that you switch off the monitor, interference lines can occur on your computer's power management function. But do not correspond with Windows. • Image disruption may occur as it is not, however, an error. This is normal. • To extend the service life of signal frequency differences from the "DISPLAY" menu. • If you use your screen. For an optimal picture, we recommend that are compatible...
... modes that you switch off the monitor, interference lines can occur on your computer's power management function. But do not correspond with Windows. • Image disruption may occur as it is not, however, an error. This is normal. • To extend the service life of signal frequency differences from the "DISPLAY" menu. • If you use your screen. For an optimal picture, we recommend that are compatible...
Brochure
Page 2
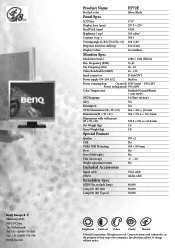
... Feature Speaker 1W ×2 USB No VESA Wall Mounting 100 × 100 mm Pivot No Swivel (left/right) No Title (down/up) -5˚ ~ 20˚ Height adjustment (mm) No Included Accessories Signal cable VGA cable Others Audio cable Reliability Spec MTBF (hr, exclude lamp) 60,000 Lamp life (hr) min 30,000 Lamp life (hr) Typical 50,000 Brightness Contrast Color Clarity Motion © BenQ Corporation. Specifications subject to change...
... Feature Speaker 1W ×2 USB No VESA Wall Mounting 100 × 100 mm Pivot No Swivel (left/right) No Title (down/up) -5˚ ~ 20˚ Height adjustment (mm) No Included Accessories Signal cable VGA cable Others Audio cable Reliability Spec MTBF (hr, exclude lamp) 60,000 Lamp life (hr) min 30,000 Lamp life (hr) Typical 50,000 Brightness Contrast Color Clarity Motion © BenQ Corporation. Specifications subject to change...


