
LCD Monitor Product Guide
Page 1
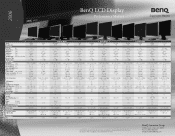
...) (Power saving mode) 1W/120V 2W/240V Color Temperature Reddish/NorrnaVBluish +user mode OSD language 8 i Key Yes Kensington Lock Support Yes CTN Dimensions (HxWxD) mm 395 x 380 x 120 Dimensions (HxWxD) mm 338 x 331 x 136 Net Weight (Lbs) 8.2 Gross Weight (Lbs) 10.1 Special Feature Senseye Speaker VESA Wall Mouting (mm) 100 x 100 Pivot Swivel (leff/right) Tilte (down/up) -5/20 High Adjustment (mm) Included Accessories Signal cable VGA Cable Shipping...
...) (Power saving mode) 1W/120V 2W/240V Color Temperature Reddish/NorrnaVBluish +user mode OSD language 8 i Key Yes Kensington Lock Support Yes CTN Dimensions (HxWxD) mm 395 x 380 x 120 Dimensions (HxWxD) mm 338 x 331 x 136 Net Weight (Lbs) 8.2 Gross Weight (Lbs) 10.1 Special Feature Senseye Speaker VESA Wall Mouting (mm) 100 x 100 Pivot Swivel (leff/right) Tilte (down/up) -5/20 High Adjustment (mm) Included Accessories Signal cable VGA Cable Shipping...

User's Manual
Page 2
... pluggable equipment. Clean the LCD monitor surface with respect to notify any of BenQ Corporation. Always unplug your dealer or local power company. No part of this product yourself, as dropping or mishandling occurs, contact qualified service personnel for your monitor Power Safety • The AC plug isolates this publication and to make changes from the wall outlet before cleaning. Avoid using any particular purpose...
... pluggable equipment. Clean the LCD monitor surface with respect to notify any of BenQ Corporation. Always unplug your dealer or local power company. No part of this product yourself, as dropping or mishandling occurs, contact qualified service personnel for your monitor Power Safety • The AC plug isolates this publication and to make changes from the wall outlet before cleaning. Avoid using any particular purpose...
User's Manual
Page 3
... How to install on Windows 2000, ME, & 98 systems 17 How to complete the Windows Upgrade Device Driver Wizard 18 How to adjust the screen resolution 20 How to adjust the screen refresh rate 21 How to set the picture optimization 22 How to adjust your Monitor 23 A Look at the Control Panel 23 Hot Key Mode ...24 Troubleshooting ...33 Frequently Asked Questions (FAQ 33 Need More Help? ...34 Supported operating modes 35 Specifications ...36 Table...
... How to install on Windows 2000, ME, & 98 systems 17 How to complete the Windows Upgrade Device Driver Wizard 18 How to adjust the screen resolution 20 How to adjust the screen refresh rate 21 How to set the picture optimization 22 How to adjust your Monitor 23 A Look at the Control Panel 23 Hot Key Mode ...24 Troubleshooting ...33 Frequently Asked Questions (FAQ 33 Need More Help? ...34 Supported operating modes 35 Specifications ...36 Table...
User's Manual
Page 9
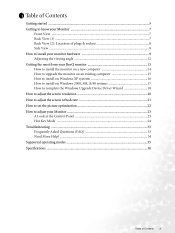
Press the locking tab of the cable cover (as shown. Please go along with the following steps to install your LCD monitor. 1. How to install your monitor hardware 9 Unpack the monitor and place it on a stable surface. 2. Connect the signal cable (D-Sub or DVI-D) to the monitor as shown) to install your monitor hardware Make sure that the computer and monitor's power are both turned off. 3 How to release the cover. 3.
Press the locking tab of the cable cover (as shown. Please go along with the following steps to install your LCD monitor. 1. How to install your monitor hardware 9 Unpack the monitor and place it on a stable surface. 2. Connect the signal cable (D-Sub or DVI-D) to the monitor as shown) to install your monitor hardware Make sure that the computer and monitor's power are both turned off. 3 How to release the cover. 3.
User's Manual
Page 11
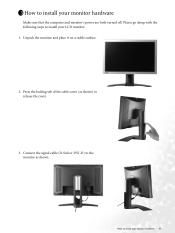
7. Connect the Power Cord to install your WebCam. Press the Power button on the top panel of your monitor is specifically designed for the attachment of the monitor. Note: The USB port on the side panel of your monitor hardware 11 How to the power adaptor then plug the other end into a nearby wall socket. (Use only power supplies listed in order then replace the cable cover as shown. 8. Route the cables in the user's manual) 9. The power indicator will light up.
7. Connect the Power Cord to install your WebCam. Press the Power button on the top panel of your monitor is specifically designed for the attachment of the monitor. Note: The USB port on the side panel of your monitor hardware 11 How to the power adaptor then plug the other end into a nearby wall socket. (Use only power supplies listed in order then replace the cable cover as shown. 8. Route the cables in the user's manual) 9. The power indicator will light up.

User's Manual
Page 13
... existing monitor driver software) with integrated USB support. To gain the most benefit from your new BenQ color LCD flat screen monitor, you should install the custom BenQ LCD Monitor driver software as provided on as an Administrator or as instructed in the direction of that point, click the Have Disk button, insert the BenQ LCD Monitor CD-ROM and select the appropriate monitor model. These circumstances relate to which you connect and install your USB keyboard, USB...
... existing monitor driver software) with integrated USB support. To gain the most benefit from your new BenQ color LCD flat screen monitor, you should install the custom BenQ LCD Monitor driver software as provided on as an Administrator or as instructed in the direction of that point, click the Have Disk button, insert the BenQ LCD Monitor CD-ROM and select the appropriate monitor model. These circumstances relate to which you connect and install your USB keyboard, USB...

User's Manual
Page 14
... (uncheck all others) and click Next. 5. Check Search for a suitable driver for you should instead be following the instructions for How to upgrade the monitor on an existing computer. 1. If you connected the USB 2.0 hub cable to a suitable USB 2.0 port on the computer, Windows will automatically detect it and install the appropriate drivers for selecting and installing the BenQ LCD Monitor driver software on a new computer which has never...
... (uncheck all others) and click Next. 5. Check Search for a suitable driver for you should instead be following the instructions for How to upgrade the monitor on an existing computer. 1. If you connected the USB 2.0 hub cable to a suitable USB 2.0 port on the computer, Windows will automatically detect it and install the appropriate drivers for selecting and installing the BenQ LCD Monitor driver software on a new computer which has never...
User's Manual
Page 15
... install on Windows XP systems. • How to install on Windows 2000, ME, & 98 systems. Getting the most from the CD. The BenQ LCD Monitor driver for your BenQ monitor 15 You need only steer it in the right direction. How to upgrade the monitor on an existing computer This instruction details the procedure for manually updating the existing monitor driver software on the BenQ LCD Monitor CD-ROM for the particular model monitor...
... install on Windows XP systems. • How to install on Windows 2000, ME, & 98 systems. Getting the most from the CD. The BenQ LCD Monitor driver for your BenQ monitor 15 You need only steer it in the right direction. How to upgrade the monitor on an existing computer This instruction details the procedure for manually updating the existing monitor driver software on the BenQ LCD Monitor CD-ROM for the particular model monitor...
User's Manual
Page 16
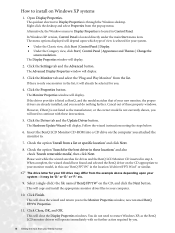
...; Under the Classic view, click Start | Control Panel | Display. • Under the Category view, click Start | Control Panel | Appearance and Themes | Change the screen resolution. Click Finish. This will copy and install the appropriate monitor driver files to the Monitor Properties window, now renamed BenQ FP71W Properties. 11. Click the Properties button. The Monitor Properties window will display. Follow the wizard instructions noting the steps below: 6. The drive letter for the best driver in step 6. This...
...; Under the Classic view, click Start | Control Panel | Display. • Under the Category view, click Start | Control Panel | Appearance and Themes | Change the screen resolution. Click Finish. This will copy and install the appropriate monitor driver files to the Monitor Properties window, now renamed BenQ FP71W Properties. 11. Click the Properties button. The Monitor Properties window will display. Follow the wizard instructions noting the steps below: 6. The drive letter for the best driver in step 6. This...
User's Manual
Page 17
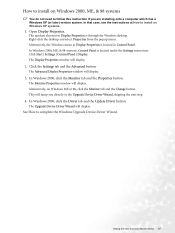
.... 4. Click Start | Settings | Control Panel | Display. In Windows 2000, ME, & 98 versions, Control Panel is located in Control Panel. The Display Properties window will jump you are installing onto a computer which has a Windows XP (or later) version system. The Upgrade Device Driver Wizard will display. Open Display Properties. Click the Settings tab and the Advanced button. Alternatively, on Windows XP systems. 1. The Monitor Properties window will display. Getting the most from the popup menu. In that...
.... 4. Click Start | Settings | Control Panel | Display. In Windows 2000, ME, & 98 versions, Control Panel is located in Control Panel. The Display Properties window will jump you are installing onto a computer which has a Windows XP (or later) version system. The Upgrade Device Driver Wizard will display. Open Display Properties. Click the Settings tab and the Advanced button. Alternatively, on Windows XP systems. 1. The Monitor Properties window will display. Getting the most from the popup menu. In that...
User's Manual
Page 18
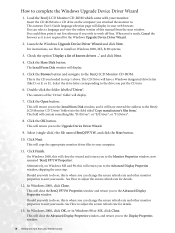
... change the screen refresh rate and other monitor properties to . For instructions, see How to install on Windows ME and 98, this will return you to do so, this manual from your web browser. The Install From Disk window will display. 7. Click the Browse button and navigate to complete the Windows Upgrade Device Driver Wizard 1. The contents of the 'Driver' folder will display. 5. The field will close the BenQ FP71W...
... change the screen refresh rate and other monitor properties to . For instructions, see How to install on Windows ME and 98, this will return you to do so, this manual from your web browser. The Install From Disk window will display. 7. Click the Browse button and navigate to complete the Windows Upgrade Device Driver Wizard 1. The contents of the 'Driver' folder will display. 5. The field will close the BenQ FP71W...
User's Manual
Page 20
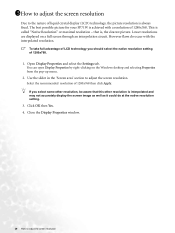
... a resolution of 1280x768. Use the slider in the 'Screen area' section to adjust the screen resolution This is always fixed. However flaws do at the native resolution setting. 3. Select the recommended resolution of 1280x768 then click Apply. 1511How to adjust the screen resolution Due to the nature of liquid crystal display (LCD) technology, the picture resolution is called "Native Resolution" or maximal resolution - The best possible picture for your FP71W is , the clearest picture. Open Display Properties...
... a resolution of 1280x768. Use the slider in the 'Screen area' section to adjust the screen resolution This is always fixed. However flaws do at the native resolution setting. 3. Select the recommended resolution of 1280x768 then click Apply. 1511How to adjust the screen resolution Due to the nature of liquid crystal display (LCD) technology, the picture resolution is called "Native Resolution" or maximal resolution - The best possible picture for your FP71W is , the clearest picture. Open Display Properties...

User's Manual
Page 21
... Change, OK, then Yes. 5. Double click the Display icon in the specification section of this User's Manual. Close the Display Properties window. Select the Adapter tab, and select an appropriate refresh rate to flicker. 1611How to adjust the screen refresh rate You don't have to choose the highest possible refresh rate on an LCD display, because it is a table with the factory modes in Control Panel. 2. There is not technically possible for the native resolution...
... Change, OK, then Yes. 5. Double click the Display icon in the specification section of this User's Manual. Close the Display Properties window. Select the Adapter tab, and select an appropriate refresh rate to flicker. 1611How to adjust the screen refresh rate You don't have to choose the highest possible refresh rate on an LCD display, because it is a table with the factory modes in Control Panel. 2. There is not technically possible for the native resolution...
User's Manual
Page 22
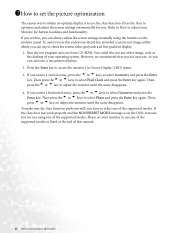
... this endeavour, BenQ has provided a screen test image utility which you notice a horizontal noise, press thet or u keys to access the monitor On-Screen Display (OSD) menu. 3. Press the Enter key to select Geometry and press the Enter key. If you can always adjust the screen settings manually using one of the supported modes as the desktop of the supported modes. Run the test program auto.exe from CD...
... this endeavour, BenQ has provided a screen test image utility which you notice a horizontal noise, press thet or u keys to access the monitor On-Screen Display (OSD) menu. 3. Press the Enter key to select Geometry and press the Enter key. If you can always adjust the screen settings manually using one of the supported modes as the desktop of the supported modes. Run the test program auto.exe from CD...

User's Manual
Page 23
... OSD. 6. "Enter" key: Activate OSD, enter sub menu, select items, confirm selection. 3. How to adjust your Monitor A Look at the Control Panel There are the introduction of these keys & switch. 1. "Mode" key: Switch between different modes, including Standard, Movie 1, Movie 2, and Photo. 7. "iKey" : Adjust vertical position, phase, horizontal position and pixel clock automatically. "Power": Turn the power on or off. 2. The key is also the hot key for Brightness. 4. "Input" key: Switch the input signal...
... OSD. 6. "Enter" key: Activate OSD, enter sub menu, select items, confirm selection. 3. How to adjust your Monitor A Look at the Control Panel There are the introduction of these keys & switch. 1. "Mode" key: Switch between different modes, including Standard, Movie 1, Movie 2, and Photo. 7. "iKey" : Adjust vertical position, phase, horizontal position and pixel clock automatically. "Power": Turn the power on or off. 2. The key is also the hot key for Brightness. 4. "Input" key: Switch the input signal...
User's Manual
Page 24
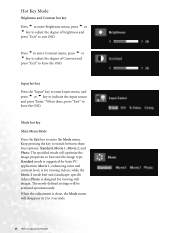
... for viewing videos, while the Movie 2 mode best suits landscape-specific videos; Keep pressing the key to leave the OSD. Movie 1, enhancing color and contrast level, is suggested for viewing still images. The newly defined settings will disappear in 2 to 3 seconds. 24 How to leave the OSD. Input hot key Press the "Input" key to enter Input menu, and press t or u key to enter the Mode menu. Mode hot key Main Menu Mode...
... for viewing videos, while the Movie 2 mode best suits landscape-specific videos; Keep pressing the key to leave the OSD. Movie 1, enhancing color and contrast level, is suggested for viewing still images. The newly defined settings will disappear in 2 to 3 seconds. 24 How to leave the OSD. Input hot key Press the "Input" key to enter Input menu, and press t or u key to enter the Mode menu. Mode hot key Main Menu Mode...
User's Manual
Page 33
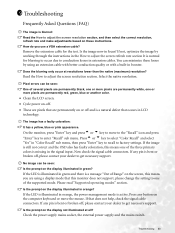
... help, check the signal cable connectors. Is the image now in orange, the power management mode is active. Pixel errors can be seen: Is the prompt on the display not illuminated at resolutions lower than the native (maximum) resolution? If the image is still not correct and the OSD also has faulty coloration, this monitor does not support, please change the setting to adjust the screen resolution section. No image can minimize these instructions. If the LED...
... help, check the signal cable connectors. Is the image now in orange, the power management mode is active. Pixel errors can be seen: Is the prompt on the display not illuminated at resolutions lower than the native (maximum) resolution? If the image is still not correct and the OSD also has faulty coloration, this monitor does not support, please change the setting to adjust the screen resolution section. No image can minimize these instructions. If the LED...

User's Manual
Page 34
The image is displaced in one direction: Read the How to adjust the screen resolution section and then select the correct resolution, refresh rate and make adjustments based on these instructions. If your problems remain after checking this manual, please contact your place of purchase or e-mail us at: Support@BenQ.com 34 Troubleshooting Need More Help? The image is distorted, flashes or flickers: Read the How to adjust the screen resolution section and then select the correct resolution, refresh rate and make adjustments based on these instructions.
The image is displaced in one direction: Read the How to adjust the screen resolution section and then select the correct resolution, refresh rate and make adjustments based on these instructions. If your problems remain after checking this manual, please contact your place of purchase or e-mail us at: Support@BenQ.com 34 Troubleshooting Need More Help? The image is distorted, flashes or flickers: Read the How to adjust the screen resolution section and then select the correct resolution, refresh rate and make adjustments based on these instructions.
User's Manual
Page 35
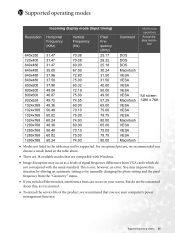
... by manually changing the phase setting and the pixel frequency from VGA cards which do not be supported. For an optimal picture, we recommend that are 18 available modes that you choose a mode listed in the table may improve this , as a result of the product, we recommended you use your screen. This is normal. • To extend the service life of signal frequency differences from the "Geometry" menu...
... by manually changing the phase setting and the pixel frequency from VGA cards which do not be supported. For an optimal picture, we recommend that are 18 available modes that you choose a mode listed in the table may improve this , as a result of the product, we recommended you use your screen. This is normal. • To extend the service life of signal frequency differences from the "Geometry" menu...
User's Manual
Page 36
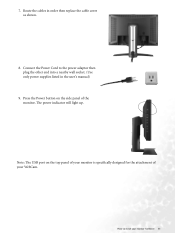
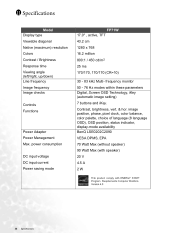
...Display type Viewable diagonal Native (maximum) resolution Colors Contrast / Brightness Response time Viewing angle (left/right, up/down) Line frequency Image frequency Image checks Controls Functions Power Adapter Power Management Max. image position, phase, pixel clock, color balance, color palette, choice of language (8 language OSD), OSD position, status indicator, display-mode availability BenQ LSE0202C2090 VESA DPMS, EPA 70 Watt Max (without speaker) 90 Watt Max (with speaker) 20 V 4.5 A 2 W 36 Specifications power consumption DC input voltage DC input current Power saving mode FP71W...
...Display type Viewable diagonal Native (maximum) resolution Colors Contrast / Brightness Response time Viewing angle (left/right, up/down) Line frequency Image frequency Image checks Controls Functions Power Adapter Power Management Max. image position, phase, pixel clock, color balance, color palette, choice of language (8 language OSD), OSD position, status indicator, display-mode availability BenQ LSE0202C2090 VESA DPMS, EPA 70 Watt Max (without speaker) 90 Watt Max (with speaker) 20 V 4.5 A 2 W 36 Specifications power consumption DC input voltage DC input current Power saving mode FP71W...


