
LCD Monitor Product Guide
Page 1
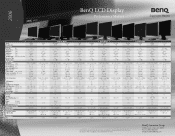
...BenQ Enjoyment Matters Ir a a a • pas P • Model FP51G Product color SII-Blk Panel Spec LCD Size (5) Display Area (mm) 15.0 304.1 x 228.1 Pixel Pitch (mm) 0.297 Brightness (VP.) Contrast (tyD.) Viewing angle (L/R;U/D) (CR>=10) 250 ()Jim' 400:1 120100° Response Time 12ms Display Colors 16.2 million Monitor... Spec Resolution (ma.) 1024 x 768 (XGN Hor. Irvine, CA 92618 Phone: (866) 700-2367 Email: Prodlnfo@BenQ.com
...BenQ Enjoyment Matters Ir a a a • pas P • Model FP51G Product color SII-Blk Panel Spec LCD Size (5) Display Area (mm) 15.0 304.1 x 228.1 Pixel Pitch (mm) 0.297 Brightness (VP.) Contrast (tyD.) Viewing angle (L/R;U/D) (CR>=10) 250 ()Jim' 400:1 120100° Response Time 12ms Display Colors 16.2 million Monitor... Spec Resolution (ma.) 1024 x 768 (XGN Hor. Irvine, CA 92618 Phone: (866) 700-2367 Email: Prodlnfo@BenQ.com

User's Manual
Page 2
...installation unless proper ventilation is provided. • Never push objects or spill liquid of any person of such revision or changes. Your monitor should be reproduced, transmitted, transcribed, stored in a retrieval system or translated into this product yourself, as dropping or mishandling occurs,...or computer language, in the contents hereof without the prior written permission of BenQ Corporation. iii Please follow these safety instructions for best performance, and long life for your monitor from time to dangerous voltages or other accident such as opening or removing...
...installation unless proper ventilation is provided. • Never push objects or spill liquid of any person of such revision or changes. Your monitor should be reproduced, transmitted, transcribed, stored in a retrieval system or translated into this product yourself, as dropping or mishandling occurs,...or computer language, in the contents hereof without the prior written permission of BenQ Corporation. iii Please follow these safety instructions for best performance, and long life for your monitor from time to dangerous voltages or other accident such as opening or removing...
User's Manual
Page 3
...Back View (2): Locations of plugs & sockets 8 Side View ...8 How to install your monitor hardware 9 Adjusting the viewing angle 12 Getting the most from your BenQ monitor 13 How to install the monitor on a new computer 14 How to upgrade the monitor on an existing computer 15 How to install on Windows XP systems 16...to adjust the screen resolution 20 How to adjust the screen refresh rate 21 How to set the picture optimization 22 How to adjust your Monitor 23 A Look at the Control Panel 23 Hot Key Mode ...24 Troubleshooting ...33 Frequently Asked Questions (FAQ 33 Need More Help? ......
...Back View (2): Locations of plugs & sockets 8 Side View ...8 How to install your monitor hardware 9 Adjusting the viewing angle 12 Getting the most from your BenQ monitor 13 How to install the monitor on a new computer 14 How to upgrade the monitor on an existing computer 15 How to install on Windows XP systems 16...to adjust the screen resolution 20 How to adjust the screen refresh rate 21 How to set the picture optimization 22 How to adjust your Monitor 23 A Look at the Control Panel 23 Hot Key Mode ...24 Troubleshooting ...33 Frequently Asked Questions (FAQ 33 Need More Help? ......
User's Manual
Page 5
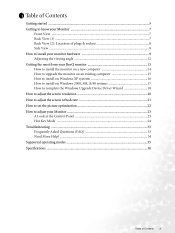
1 Getting started 5 BenQ LCD Monitor Quick Start Guide CD-ROM Disk Power Cord Power Adapter Signal Cable: D-Sub Getting started When unpacking please check you have the following items. If they are missing or are damaged, please immediately contact the dealer at which you purchased the goods.
1 Getting started 5 BenQ LCD Monitor Quick Start Guide CD-ROM Disk Power Cord Power Adapter Signal Cable: D-Sub Getting started When unpacking please check you have the following items. If they are missing or are damaged, please immediately contact the dealer at which you purchased the goods.
User's Manual
Page 8
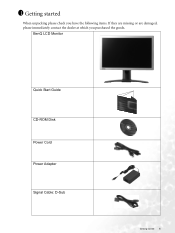
Audio Connector 3. Composite Video Input 4. D-Sub Connector 7. USB Connectors 1. "Enter" key 3. "iKey" 8 Getting to know your Monitor "Power" 2. t (Up) key 4. "Exit" key 6. "Mode" key 7. DVI-D Connector 6. u (Down) key 5. "Input" key 8. Power AC Input Jack 2. Back View (2): Locations of plugs & sockets Side View 1. S-Video Input 5.
Audio Connector 3. Composite Video Input 4. D-Sub Connector 7. USB Connectors 1. "Enter" key 3. "iKey" 8 Getting to know your Monitor "Power" 2. t (Up) key 4. "Exit" key 6. "Mode" key 7. DVI-D Connector 6. u (Down) key 5. "Input" key 8. Power AC Input Jack 2. Back View (2): Locations of plugs & sockets Side View 1. S-Video Input 5.
User's Manual
Page 9
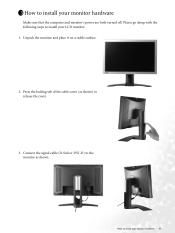
Connect the signal cable (D-Sub or DVI-D) to the monitor as shown) to install your LCD monitor. 1. How to release the cover. 3. Unpack the monitor and place it on a stable surface. 2. Press the locking tab of the cable cover (as shown. Please go along with the following steps to install your monitor hardware Make sure that the computer and monitor's power are both turned off. 3 How to install your monitor hardware 9
Connect the signal cable (D-Sub or DVI-D) to the monitor as shown) to install your LCD monitor. 1. How to release the cover. 3. Unpack the monitor and place it on a stable surface. 2. Press the locking tab of the cable cover (as shown. Please go along with the following steps to install your monitor hardware Make sure that the computer and monitor's power are both turned off. 3 How to install your monitor hardware 9
User's Manual
Page 10
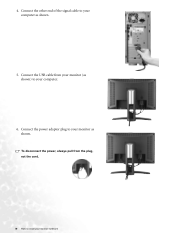
Connect the other end of the signal cable to your monitor as shown. Connect the power adaptor plug to your computer as shown) to install your computer. 6. 4. To disconnect the power, always pull from your monitor (as shown. 5. Connect the USB cable from the plug, not the cord. 10 How to your monitor hardware
Connect the other end of the signal cable to your monitor as shown. Connect the power adaptor plug to your computer as shown) to install your computer. 6. 4. To disconnect the power, always pull from your monitor (as shown. 5. Connect the USB cable from the plug, not the cord. 10 How to your monitor hardware
User's Manual
Page 11
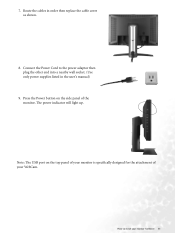
Note: The USB port on the side panel of your monitor hardware 11 Press the Power button on the top panel of your monitor is specifically designed for the attachment of the monitor. Connect the Power Cord to install your WebCam. 7. How to the power adaptor then plug the other end into a nearby wall socket. (Use only power supplies listed in order then replace the cable cover as shown. 8. The power indicator will light up. Route the cables in the user's manual) 9.
Note: The USB port on the side panel of your monitor hardware 11 Press the Power button on the top panel of your monitor is specifically designed for the attachment of the monitor. Connect the Power Cord to install your WebCam. 7. How to the power adaptor then plug the other end into a nearby wall socket. (Use only power supplies listed in order then replace the cable cover as shown. 8. The power indicator will light up. Route the cables in the user's manual) 9.

User's Manual
Page 12
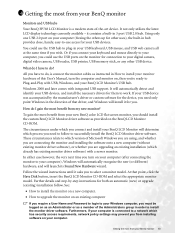
Adjusting the viewing angle Your LCD monitor is designed with a tilt feature that allows you to achieve your optimal viewing angle. 12 How to install your monitor hardware
Adjusting the viewing angle Your LCD monitor is designed with a tilt feature that allows you to achieve your optimal viewing angle. 12 How to install your monitor hardware
User's Manual
Page 13
...or upgrade (existing) installation follow to your computer is a modern state-of this User's Manual, turn on the BenQ LCD Monitor CD-ROM. Getting the most from your BenQ LCD Monitor's USB hub. Or if you connect your keyboard and mouse directly to your computer, you 're ready to ...require a User Name and Password to login to your BenQ monitor Monitors and USB hubs Your BenQ FP783 LCD Monitor is connected to upgrade the monitor on your USB devices. You could use the USB ports on your BenQ monitor 13 See: • How to install the monitor on a new computer. • How to a...
...or upgrade (existing) installation follow to your computer is a modern state-of this User's Manual, turn on the BenQ LCD Monitor CD-ROM. Getting the most from your BenQ LCD Monitor's USB hub. Or if you connect your keyboard and mouse directly to your computer, you 're ready to ...require a User Name and Password to login to your BenQ monitor Monitors and USB hubs Your BenQ FP783 LCD Monitor is connected to upgrade the monitor on your USB devices. You could use the USB ports on your BenQ monitor 13 See: • How to install the monitor on a new computer. • How to a...
User's Manual
Page 14
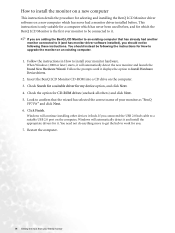
... a computer which has never been used before . Follow the prompts until it (and has monitor driver software installed), you are adding the BenQ LCD Monitor to an existing computer that the wizard has selected the correct name of your monitor as "BenQ FP71W" and click Next. 6. Check Search for a suitable driver for my device option, and...
... a computer which has never been used before . Follow the prompts until it (and has monitor driver software installed), you are adding the BenQ LCD Monitor to an existing computer that the wizard has selected the correct name of your monitor as "BenQ FP71W" and click Next. 6. Check Search for a suitable driver for my device option, and...
User's Manual
Page 15
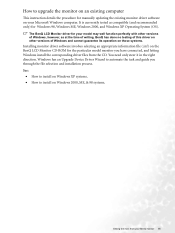
... • How to install on your Microsoft Windows computer. The BenQ LCD Monitor driver for your BenQ monitor 15 How to upgrade the monitor on an existing computer This instruction details the procedure for manually updating the existing monitor driver software on Windows 2000, ME, & 98 systems. Getting ...at the time of writing, BenQ has done no testing of this driver on other versions of Windows and cannot guarantee its operation on those systems. Installing monitor driver software involves selecting an appropriate information file (.inf) on the BenQ LCD Monitor CD-ROM for Windows 98,...
... • How to install on your Microsoft Windows computer. The BenQ LCD Monitor driver for your BenQ monitor 15 How to upgrade the monitor on an existing computer This instruction details the procedure for manually updating the existing monitor driver software on Windows 2000, ME, & 98 systems. Getting ...at the time of writing, BenQ has done no testing of this driver on other versions of Windows and cannot guarantee its operation on those systems. Installing monitor driver software involves selecting an appropriate information file (.inf) on the BenQ LCD Monitor CD-ROM for Windows 98,...
User's Manual
Page 16
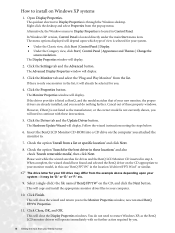
..., it may differ from a list or specific location' and click Next. 8. Alternatively, the Windows menu to your monitor model, in this case 'BenQ FP71W' in these locations' and also check 'Search removable media', then click Next. The Hardware Update Wizard will close the...upon which type of these instructions. 5. The drive letter for your new monitor, the proper drivers are already installed, and you attached the monitor to the Monitor Properties window, now renamed BenQ FP71W Properties. 11. The menu options displayed will operate immediately with these property ...
..., it may differ from a list or specific location' and click Next. 8. Alternatively, the Windows menu to your monitor model, in this case 'BenQ FP71W' in these locations' and also check 'Search removable media', then click Next. The Hardware Update Wizard will close the...upon which type of these instructions. 5. The drive letter for your new monitor, the proper drivers are already installed, and you attached the monitor to the Monitor Properties window, now renamed BenQ FP71W Properties. 11. The menu options displayed will operate immediately with these property ...

User's Manual
Page 17
... and the Properties button. The Upgrade Device Driver Wizard will display. 2. Right-click the desktop and select Properties from your BenQ monitor 17 In Windows 2000, click the Driver tab and the Update Driver button. In that case, see the instructions at How to ...See How to complete the Windows Upgrade Device Driver Wizard. The Display Properties window will display. Click the Settings tab and the Advanced button. The Monitor Properties window will jump you are installing onto a computer which has a Windows XP (or later) version system. This will display. How to install...
... and the Properties button. The Upgrade Device Driver Wizard will display. 2. Right-click the desktop and select Properties from your BenQ monitor 17 In Windows 2000, click the Driver tab and the Update Driver button. In that case, see the instructions at How to ...See How to complete the Windows Upgrade Device Driver Wizard. The Display Properties window will display. Click the Settings tab and the Advanced button. The Monitor Properties window will jump you are installing onto a computer which has a Windows XP (or later) version system. This will display. How to install...
User's Manual
Page 18
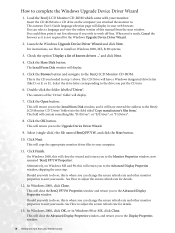
...you're ready, Cancel the browser as it is the CD you to suit your monitor. Launch the Windows Upgrade Device Driver Wizard and click Next. The CD Drive will close the BenQ FP71W Properties window and return you can select a language and view the online version of known...2000, this is where you to the Upgrade Device Driver Wizard. 9. You can change the screen refresh rate and other monitor properties to the Monitor Properties window, now renamed 'BenQ FP71W Properties'. The contents of the 'Driver' folder will display in Windows 98 or ME, click Close. Click the Open...
...you're ready, Cancel the browser as it is the CD you to suit your monitor. Launch the Windows Upgrade Device Driver Wizard and click Next. The CD Drive will close the BenQ FP71W Properties window and return you can select a language and view the online version of known...2000, this is where you to the Upgrade Device Driver Wizard. 9. You can change the screen refresh rate and other monitor properties to the Monitor Properties window, now renamed 'BenQ FP71W Properties'. The contents of the 'Driver' folder will display in Windows 98 or ME, click Close. Click the Open...

User's Manual
Page 19
Click OK and Yes respectively. Getting the most from your BenQ monitor 19 Click OK. Alternatively, Windows ME or 98 will prompt you for details. 14. You should select the reboot option as this causes Windows to ...
Click OK and Yes respectively. Getting the most from your BenQ monitor 19 Click OK. Alternatively, Windows ME or 98 will prompt you for details. 14. You should select the reboot option as this causes Windows to ...
User's Manual
Page 22
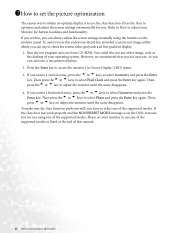
... Geometry and press the Enter key. Then press thet or u keys to access the monitor On-Screen Display (OSD) menu. 3. Please set the picture optimization The easiest way ... the buttons on the monitor panel. You could also use any other image, such as listed at the end of this endeavour, BenQ has provided a screen ...test image utility which you can use to check for button locations and functionality. If you use auto.exe. If you wish to, you can always adjust the screen settings manually using one of the supported modes as the desktop of your Monitor...
... Geometry and press the Enter key. Then press thet or u keys to access the monitor On-Screen Display (OSD) menu. 3. Please set the picture optimization The easiest way ... the buttons on the monitor panel. You could also use any other image, such as listed at the end of this endeavour, BenQ has provided a screen ...test image utility which you can use to check for button locations and functionality. If you use auto.exe. If you wish to, you can always adjust the screen settings manually using one of the supported modes as the desktop of your Monitor...

User's Manual
Page 23
t (Up) key: For Up/Increase adjustment. The key is also the hot key for Brightness. 4. "Exit" key: Back to adjust your Monitor A Look at the Control Panel There are the introduction of these keys & switch. 1. "Mode" key: Switch between different modes, including Standard, Movie 1, Movie ...2, and Photo. 7. The key is also the hot key for Contrast. 5. How to previous menu or exit OSD. 6. 8 How to adjust your Monitor 23 "Enter" key: Activate OSD, enter sub menu, select items, confirm selection. 3. "Input" key: Switch the input signal. 8. u (Down) key: For Down/...
t (Up) key: For Up/Increase adjustment. The key is also the hot key for Brightness. 4. "Exit" key: Back to adjust your Monitor A Look at the Control Panel There are the introduction of these keys & switch. 1. "Mode" key: Switch between different modes, including Standard, Movie 1, Movie ...2, and Photo. 7. The key is also the hot key for Contrast. 5. How to previous menu or exit OSD. 6. 8 How to adjust your Monitor 23 "Enter" key: Activate OSD, enter sub menu, select items, confirm selection. 3. "Input" key: Switch the input signal. 8. u (Down) key: For Down/...
User's Manual
Page 24
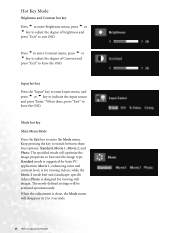
..., press t or u key to adjust the degree of brightness and press "Exit" to best suit the image type. Keep pressing the key to adjust your Monitor Standard mode is for basic PC application;
..., press t or u key to adjust the degree of brightness and press "Exit" to best suit the image type. Keep pressing the key to adjust your Monitor Standard mode is for basic PC application;
User's Manual
Page 25
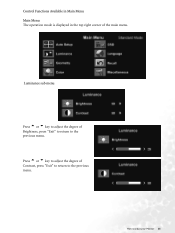
How to the previous menu. Press t or u key to adjust the degree of the main menu. Control Functions Available in Main Menu Main Menu The operation mode is displayed in the top right corner of Contrast, press "Exit" to return to the previous menu. Luminance sub menu Press t or u key to adjust the degree of Brightness, press "Exit" to return to adjust your Monitor 25
How to the previous menu. Press t or u key to adjust the degree of the main menu. Control Functions Available in Main Menu Main Menu The operation mode is displayed in the top right corner of Contrast, press "Exit" to return to the previous menu. Luminance sub menu Press t or u key to adjust the degree of Brightness, press "Exit" to return to adjust your Monitor 25

