
User Guide
Page 3
... Channels 63 Menu Options 65 SIRIUS ID 67 Game Alert 68 Settings 70 Time-Based Features 81 3 Table of Contents Contents Introduction 5 Safety and Care Information 7 What's in the Box 10 Controls & Features 11 Signal Indicator 85 Factory Default 86 RS232 Mode 88 Troubleshooting 91 Installation and Setup 17 Product Specifications 93 Operation 29 Owner's Record 97 Display Screen Information...
... Channels 63 Menu Options 65 SIRIUS ID 67 Game Alert 68 Settings 70 Time-Based Features 81 3 Table of Contents Contents Introduction 5 Safety and Care Information 7 What's in the Box 10 Controls & Features 11 Signal Indicator 85 Factory Default 86 RS232 Mode 88 Troubleshooting 91 Installation and Setup 17 Product Specifications 93 Operation 29 Owner's Record 97 Display Screen Information...
User Guide
Page 6
... set up and operate it more efficiently. Understanding the features and basic functions of your new SIRIUS XM Radio SRH2000 Tuner first will help you do another thing, please read this owner's manual in the comfort of the radio's features and capabilities. Read this owner's manual. The SR-H2000 Tuner lets you enjoy SIRIUS XM Radio's digital entertainment in its entirety. Use this and other SIRIUS...
... set up and operate it more efficiently. Understanding the features and basic functions of your new SIRIUS XM Radio SRH2000 Tuner first will help you do another thing, please read this owner's manual in the comfort of the radio's features and capabilities. Read this owner's manual. The SR-H2000 Tuner lets you enjoy SIRIUS XM Radio's digital entertainment in its entirety. Use this and other SIRIUS...

User Guide
Page 7
... third prong is provided for replacement of the obsolete outlet. 7 Install in accordance with one wider than the other. A grounding type plug has two blades and a third grounding prong. Always read and understand all instructions. 5 Do not use this apparatus near any of ...repair, or other apparatus (including amplifiers) that produce heat. 9 Do not defeat the safety purpose of the ventilation openings. claims no responsibility for damage from data loss due to your safety. When the provided plug does not fit into your outlet, consult an electrician for your device. SIRIUS XM Radio...
... third prong is provided for replacement of the obsolete outlet. 7 Install in accordance with one wider than the other. A grounding type plug has two blades and a third grounding prong. Always read and understand all instructions. 5 Do not use this apparatus near any of ...repair, or other apparatus (including amplifiers) that produce heat. 9 Do not defeat the safety purpose of the ventilation openings. claims no responsibility for damage from data loss due to your safety. When the provided plug does not fit into your outlet, consult an electrician for your device. SIRIUS XM Radio...

User Guide
Page 11
... 45 78 10 14 15 16 1 POWER Button. Selects the SR-H2000 "embedded" tuner or any external tuner connected, provided "the external tuner" is connected and active. (See "Adding an Additional SIRIUS Tuner Using the SSP Connection" on the display screen. Turns the Tuner On and Off/Standby. ...2 TUNER SEL (SELECT) Button. Changes text size of artist names and song titles on page 26.) 3 MENU Button. Used to access menu options to change the Tuner setup and features. 4 DISPLAY Button. Turns...
... 45 78 10 14 15 16 1 POWER Button. Selects the SR-H2000 "embedded" tuner or any external tuner connected, provided "the external tuner" is connected and active. (See "Adding an Additional SIRIUS Tuner Using the SSP Connection" on the display screen. Turns the Tuner On and Off/Standby. ...2 TUNER SEL (SELECT) Button. Changes text size of artist names and song titles on page 26.) 3 MENU Button. Used to access menu options to change the Tuner setup and features. 4 DISPLAY Button. Turns...

User Guide
Page 14
Turns the Tuner On and Off. 2 CHANNEL ( ) Buttons. Pressing this button rewinds through content saved to the sections in the same way as the button on the front panel of the features from a remote location. Selects a Category or Channel or Menu setting. 5 REWIND ( )...full description of the song or 14 Pressing and releasing this user manual where they are described. Introduction Controls and Features: Remote Control The wireless remote control supplied with the Tuner is capable of operating most of the Tuner. 1 POWER Button. Navigates through channels and display screens. 3 CAT (...
Turns the Tuner On and Off. 2 CHANNEL ( ) Buttons. Pressing this button rewinds through content saved to the sections in the same way as the button on the front panel of the features from a remote location. Selects a Category or Channel or Menu setting. 5 REWIND ( )...full description of the song or 14 Pressing and releasing this user manual where they are described. Introduction Controls and Features: Remote Control The wireless remote control supplied with the Tuner is capable of operating most of the Tuner. 1 POWER Button. Navigates through channels and display screens. 3 CAT (...

User Guide
Page 16
... setup and features. 13 NUMBER Buttons (0-9). Used to access menu options to play each Channel/Preset in the Remote 1 Remove the battery cover from the rear of the remote. 2 Install the two AAA batteries as indicated. 3 Replace the battery cover.... 16 Introduction 11 SCAN / SCAN Buttons. Jumps to choose one of three ways of the Tuner. Allows the user to a preset favorite channel. Sets and selects preset channels. 14 DISPLAY Button. Pressing the button again returns back to the original channel. 16 MUTE Button. Installing Batteries...
... setup and features. 13 NUMBER Buttons (0-9). Used to access menu options to play each Channel/Preset in the Remote 1 Remove the battery cover from the rear of the remote. 2 Install the two AAA batteries as indicated. 3 Replace the battery cover.... 16 Introduction 11 SCAN / SCAN Buttons. Jumps to choose one of three ways of the Tuner. Allows the user to a preset favorite channel. Sets and selects preset channels. 14 DISPLAY Button. Pressing the button again returns back to the original channel. 16 MUTE Button. Installing Batteries...
User Guide
Page 18
... all interconnections have subscribed to the SIRIUS XM Radio Service. Installation/Wiring Precautions • Make sure the power cable is complete and you have been made and verified. The Tuner recognizes and decodes the incoming SIRIUS program information, and provides an audio signal to your Tuner, follow these installation instructions. Installation and Setup The SIRIUS Home Satellite Radio Tuner must be connected last. •...
... all interconnections have subscribed to the SIRIUS XM Radio Service. Installation/Wiring Precautions • Make sure the power cable is complete and you have been made and verified. The Tuner recognizes and decodes the incoming SIRIUS program information, and provides an audio signal to your Tuner, follow these installation instructions. Installation and Setup The SIRIUS Home Satellite Radio Tuner must be connected last. •...
User Guide
Page 19
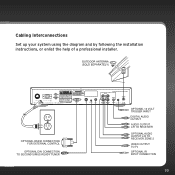
Made in China OPTIONAL RS232 CONNECTION FOR EXTERNAL CONTROL OPTIONAL DIN CONNECTION TO SECOND SIRIUS-READY TUNER SR-H2000 SIRIUS SATELLITE RADIO TUNER TUNER TUNER COAXIAL 5V 200mA Max. OPTIONAL 12 VOLT TRIGGER INPUT DIGITAL AUDIO OUTPUT AUDIO OUTPUT L/R TO RECEIVER OPTIONAL AUDIO OUTPUT L/R TO RECEIVER ZONE 2 VIDEO OUTPUT TO TV OPTIONAL IR INPUT CONNECTION 19 Cabling Interconnections Set up your system using the diagram and by following the installation instructions, or enlist the help of a professional installer.
Made in China OPTIONAL RS232 CONNECTION FOR EXTERNAL CONTROL OPTIONAL DIN CONNECTION TO SECOND SIRIUS-READY TUNER SR-H2000 SIRIUS SATELLITE RADIO TUNER TUNER TUNER COAXIAL 5V 200mA Max. OPTIONAL 12 VOLT TRIGGER INPUT DIGITAL AUDIO OUTPUT AUDIO OUTPUT L/R TO RECEIVER OPTIONAL AUDIO OUTPUT L/R TO RECEIVER ZONE 2 VIDEO OUTPUT TO TV OPTIONAL IR INPUT CONNECTION 19 Cabling Interconnections Set up your system using the diagram and by following the installation instructions, or enlist the help of a professional installer.
User Guide
Page 20
... into a 110 VAC wall receptacle. If no audio is heard, make adjustments to your sound system. Note: Do not cut the antenna cable. 20 Be sure you have correctly installed and aimed the antenna. 2 Connect the audio output of the outdoor antenna cable to purchase a SIRIUS Outdoor Antenna for audio. Turn your Tuner. Use protective grommets wherever rough openings are encountered. The...
... into a 110 VAC wall receptacle. If no audio is heard, make adjustments to your sound system. Note: Do not cut the antenna cable. 20 Be sure you have correctly installed and aimed the antenna. 2 Connect the audio output of the outdoor antenna cable to purchase a SIRIUS Outdoor Antenna for audio. Turn your Tuner. Use protective grommets wherever rough openings are encountered. The...
User Guide
Page 21
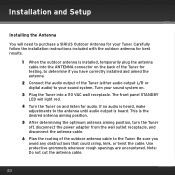
... to the interior of the home, working the cable through the basement, under a window sill, etc., and make adjustments and take up slack whenever necessary. 8 Plug the antenna cable into the ANTENNA connector on page 85.) This can listen to the SIRIUS service, you must subscribe to the SIRIUS XM Radio service. 1 Make sure that the Tuner is an signal...
... to the interior of the home, working the cable through the basement, under a window sill, etc., and make adjustments and take up slack whenever necessary. 8 Plug the antenna cable into the ANTENNA connector on page 85.) This can listen to the SIRIUS service, you must subscribe to the SIRIUS XM Radio service. 1 Make sure that the Tuner is an signal...
User Guide
Page 22
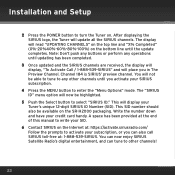
...-SIRIUS. Installation and Setup 2 Press the POWER button to other channels until you activate your Tuner's unique 12-digit SIRIUS ID Number (SID). The display will display your SIRIUS subscription. 4 Press the MENU button to write your SID. 6 Contact SIRIUS on the SR-H2000 packaging. A space has been provided at the end of this manual to enter the "Menu Options" mode...
...-SIRIUS. Installation and Setup 2 Press the POWER button to other channels until you activate your Tuner's unique 12-digit SIRIUS ID Number (SID). The display will display your SIRIUS subscription. 4 Press the MENU button to write your SID. 6 Contact SIRIUS on the SR-H2000 packaging. A space has been provided at the end of this manual to enter the "Menu Options" mode...
User Guide
Page 25
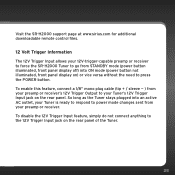
... ) or vice versa without the need to power mode changes sent from STANDBY mode (power button illuminated, front panel display off) into ON mode (power button not illuminated, front panel display on the rear panel of the Tuner. 25 Visit the SR-H2000 support page at www.sirius.com for additional downloadable remote control files. 12 Volt Trigger Information...
... ) or vice versa without the need to power mode changes sent from STANDBY mode (power button illuminated, front panel display off) into ON mode (power button not illuminated, front panel display on the rear panel of the Tuner. 25 Visit the SR-H2000 support page at www.sirius.com for additional downloadable remote control files. 12 Volt Trigger Information...
User Guide
Page 26
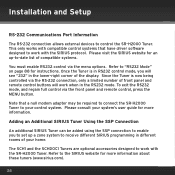
... only works with the SIRIUS protocol. Adding an Additional SIRIUS Tuner Using the SSP Connection An additional SIRIUS Tuner can be required to connect the SR-H2000 Tuner to the SIRIUS website for more information about these tuners (www.sirius.com). 26 Refer to receive different SIRIUS programming in the lower-right corner of the display. Installation and Setup RS-232...
... only works with the SIRIUS protocol. Adding an Additional SIRIUS Tuner Using the SSP Connection An additional SIRIUS Tuner can be required to connect the SR-H2000 Tuner to the SIRIUS website for more information about these tuners (www.sirius.com). 26 Refer to receive different SIRIUS programming in the lower-right corner of the display. Installation and Setup RS-232...

User Guide
Page 47
If the new alert was successfully stored in memory, and Y is the total number of listings stored in memory, an Artist/Song/Game Stored pop-up screen followed by an X Used/Y Empty screen will then revert to the last active display mode. If you do not wish to save the other team. The tuner will... be prompted again to save , press the MEMO button to exit. Figure 16 47 If both teams are available to save, you will be displayed for storage. X is the total number of memory listings...
If the new alert was successfully stored in memory, and Y is the total number of listings stored in memory, an Artist/Song/Game Stored pop-up screen followed by an X Used/Y Empty screen will then revert to the last active display mode. If you do not wish to save the other team. The tuner will... be prompted again to save , press the MEMO button to exit. Figure 16 47 If both teams are available to save, you will be displayed for storage. X is the total number of memory listings...

User Guide
Page 67
SIRIUS ID This menu option displays your service. It is required to each Tuner, and is recommended that you write this number in this user guide. Figure 2 67 The SID is unique to activate your 12 digit SIRIUS ID (SID) number. To exit, press the ENTER button or press the MENU button. No adjustments are allowed in the space provided near the end of this mode.
SIRIUS ID This menu option displays your service. It is required to each Tuner, and is recommended that you write this number in this user guide. Figure 2 67 The SID is unique to activate your 12 digit SIRIUS ID (SID) number. To exit, press the ENTER button or press the MENU button. No adjustments are allowed in the space provided near the end of this mode.

User Guide
Page 81
... will automatically update based on the format desired and the time zone in which are displayed: • Format: The clock format menu option allows for either 12-hour (default) or 24-hour display. Time-Based Features The Time-Based Features menu allows you access the Clock, Alarm, Program Alert, Auto Shutdown, and Sleep Mode menu options...
... will automatically update based on the format desired and the time zone in which are displayed: • Format: The clock format menu option allows for either 12-hour (default) or 24-hour display. Time-Based Features The Time-Based Features menu allows you access the Clock, Alarm, Program Alert, Auto Shutdown, and Sleep Mode menu options...
User Guide
Page 82
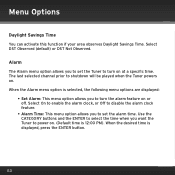
... DST Not Observed. Use the CATEGORY buttons and the ENTER to select the time when you to set the alarm time. Alarm The Alarm menu option allows you want the Tuner to set the Tuner to shutdown will be played when the Tuner powers on at a specific time. The last selected channel prior to turn the alarm feature on . (Default...
... DST Not Observed. Use the CATEGORY buttons and the ENTER to select the time when you to set the alarm time. Alarm The Alarm menu option allows you want the Tuner to set the Tuner to shutdown will be played when the Tuner powers on at a specific time. The last selected channel prior to turn the alarm feature on . (Default...

User Guide
Page 92
... to the Tuner. Troubleshooting Symptom Tuner Does Not Power On Tuner Displays "Antenna Not Detected" Tuner Displays "Acquiring Signal" Audio Static Or Loss Of Clarity The Buttons On The Tuner or Remote Control Don't Work, And The Display Screen Shows "232" In The Lower Right Corner Solution Blown fuse, or the power cable is being received. Check for...
... to the Tuner. Troubleshooting Symptom Tuner Does Not Power On Tuner Displays "Antenna Not Detected" Tuner Displays "Acquiring Signal" Audio Static Or Loss Of Clarity The Buttons On The Tuner or Remote Control Don't Work, And The Display Screen Shows "232" In The Lower Right Corner Solution Blown fuse, or the power cable is being received. Check for...

User Guide
Page 95
... harmful interference to Part 15 of the FCC Rules. Therefore, SIRIUS XM Radio Inc cannot support this device. WARNING! can radiate radio frequency energy and, if not installed and used in accordance with the limits for a Class B digital device, pursuant to radio or television reception, which the affected receiver is encouraged to try to comply with the installation instructions, may not cause...
... harmful interference to Part 15 of the FCC Rules. Therefore, SIRIUS XM Radio Inc cannot support this device. WARNING! can radiate radio frequency energy and, if not installed and used in accordance with the limits for a Class B digital device, pursuant to radio or television reception, which the affected receiver is encouraged to try to comply with the installation instructions, may not cause...

User Guide
Page 96
..., other reproductive harm. 96 Service only available in Canada; WARNING: This product contains chemicals known to change. Installation required with their respective owners. Prices and programming are compatible only with some equipment. SIRIUS XM U.S. Subscriptions governed by, as specifically provided, SIRIUS and XM Radios and accessories are subject to the State of SIRIUS XM Radio Inc. Copyrights and Trademarks Hardware...
..., other reproductive harm. 96 Service only available in Canada; WARNING: This product contains chemicals known to change. Installation required with their respective owners. Prices and programming are compatible only with some equipment. SIRIUS XM U.S. Subscriptions governed by, as specifically provided, SIRIUS and XM Radios and accessories are subject to the State of SIRIUS XM Radio Inc. Copyrights and Trademarks Hardware...


