
User Manual
Page 6
... limits are designed to operate this unit not expressly approved by the party responsible for compliance could void the user's authority to provide reasonable protection against harmful interference in a residential installation. The use of shielded cables for connection of the monitor to the graphics card is encouraged to try to correct the interference by turning the equipment off and on...
... limits are designed to operate this unit not expressly approved by the party responsible for compliance could void the user's authority to provide reasonable protection against harmful interference in a residential installation. The use of shielded cables for connection of the monitor to the graphics card is encouraged to try to correct the interference by turning the equipment off and on...

User Manual
Page 8
... chapter gives information about the ASUS Vintage V-series M4A3000E barebone system. This product has been designed to change system settings through the BIOS Setup menus and describes the BIOS parameters. Chapter 2: Starting up This chapter helps you power up the system and install drivers and utilities from the support DVD. 3. This chapter includes the motherboard layout, jumper settings, and connector locations. 4. Check local regulations for experienced users and integrators with the system...
... chapter gives information about the ASUS Vintage V-series M4A3000E barebone system. This product has been designed to change system settings through the BIOS Setup menus and describes the BIOS parameters. Chapter 2: Starting up This chapter helps you power up the system and install drivers and utilities from the support DVD. 3. This chapter includes the motherboard layout, jumper settings, and connector locations. 4. Check local regulations for experienced users and integrators with the system...

User Manual
Page 12
... to 8 GB of power computing. 1.2 Front panel The front panel includes the optical drive bays, power button, and several I/O ports are located at the front panel. 1.2.1 V6-M4A3000E front panel 1 2 3 4 5 6 7 8 9 R 1-2 Chapter 1: System introduction The ASUS V-series M4A3000E is an all-in the world of system memory using DDR3-1800(O.C.)/ 1600(O.C.)/1333/1066MHz DIMMs. High-resolution graphics via integrated graphics controller or PCI Express x16 slot, Serial ATA, USB 2.0, and 8-channel audio feature the system and...
... to 8 GB of power computing. 1.2 Front panel The front panel includes the optical drive bays, power button, and several I/O ports are located at the front panel. 1.2.1 V6-M4A3000E front panel 1 2 3 4 5 6 7 8 9 R 1-2 Chapter 1: System introduction The ASUS V-series M4A3000E is an all-in the world of system memory using DDR3-1800(O.C.)/ 1600(O.C.)/1333/1066MHz DIMMs. High-resolution graphics via integrated graphics controller or PCI Express x16 slot, Serial ATA, USB 2.0, and 8-channel audio feature the system and...
User Manual
Page 13
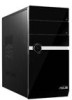
...-plug. 9. Two empty 5.25-inch drive bays. MemoryStick® / Memory Stick Pro™ card slot 4. USB 2.0 ports. Press this button to turn the system on. 1.2.2 V7-M4A3000E front panel 1 2 3 4 6 5 R R ASUS V-series M4A3000E 1-3 Microphone port. These bays are for 3.5-inch hard disk drives. 3. This Mic (pink) port connects a microphone. 8. Headphone port. Two empty 3.5-inch drive bays. These bays are for connecting USB 2.0 devices such as a mouse, printer, scanner, camera, PDA, and others. 7. Secure Digital™/ Multimedia Card slot 5. These Universal Serial...
...-plug. 9. Two empty 5.25-inch drive bays. MemoryStick® / Memory Stick Pro™ card slot 4. USB 2.0 ports. Press this button to turn the system on. 1.2.2 V7-M4A3000E front panel 1 2 3 4 6 5 R R ASUS V-series M4A3000E 1-3 Microphone port. These bays are for 3.5-inch hard disk drives. 3. This Mic (pink) port connects a microphone. 8. Headphone port. Two empty 3.5-inch drive bays. These bays are for connecting USB 2.0 devices such as a mouse, printer, scanner, camera, PDA, and others. 7. Secure Digital™/ Multimedia Card slot 5. These Universal Serial...

User Manual
Page 16
... 100 Mbps connection BLINKING Data activity GREEN 1 Gbps connection ACT/LINK SPEED LED LED LAN port 12. PS/2 mouse port. This port is for any DVI-D compatible device and is for a VGA monitor or other audio sources. 1-6 Chapter 1: System introduction Refer to a Local Area Network (LAN) through a network hub. These 4-pin Universal Serial Bus (USB) ports are available for switching on/off the power supply unit. 5. This vent is for a PS/2 keyboard. 8. Video Graphics Adapter (VGA) port. This 15-pin port is for...
... 100 Mbps connection BLINKING Data activity GREEN 1 Gbps connection ACT/LINK SPEED LED LED LAN port 12. PS/2 mouse port. This port is for any DVI-D compatible device and is for a VGA monitor or other audio sources. 1-6 Chapter 1: System introduction Refer to a Local Area Network (LAN) through a network hub. These 4-pin Universal Serial Bus (USB) ports are available for switching on/off the power supply unit. 5. This vent is for a PS/2 keyboard. 8. Video Graphics Adapter (VGA) port. This 15-pin port is for...
User Manual
Page 22
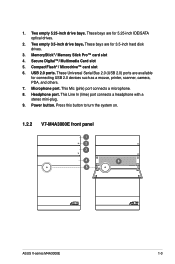
... system supports Windows® XP/Vista/7 operating systems (OS). Always install the latest OS version and corresponding updates so you can maximize the features of the support DVD are subject to change at www.asus.com for updates. 2-2 Chapter 2: Starting up Press the system power button ( ) to your hardware. Refer to enter the OS. Use a RAID driver disk when installing Windows XP OS to a Serial ATA hard drive included in a RAID set . • From the Windows XP setup screen, press...
... system supports Windows® XP/Vista/7 operating systems (OS). Always install the latest OS version and corresponding updates so you can maximize the features of the support DVD are subject to change at www.asus.com for updates. 2-2 Chapter 2: Starting up Press the system power button ( ) to your hardware. Refer to enter the OS. Use a RAID driver disk when installing Windows XP OS to a Serial ATA hard drive included in a RAID set . • From the Windows XP setup screen, press...

User Manual
Page 23
... PCI-E Ethernet Controller. ASUS V-series M4A3000E 2-3 The DVD automatically displays the Drivers menu if Autorun is NOT enabled in your optical drive. Double-click the ASSETUP.EXE to locate the file ASSETUP.EXE from the BIN folder. AMD Graphics Driver Installs the AMD® Graphics driver. Click an icon to display support DVD/motherboard information Click an item to install If Autorun is enabled in your computer, browse the contents of the support DVD to run the DVD. VIA Audio Driver Installs...
... PCI-E Ethernet Controller. ASUS V-series M4A3000E 2-3 The DVD automatically displays the Drivers menu if Autorun is NOT enabled in your optical drive. Double-click the ASSETUP.EXE to locate the file ASSETUP.EXE from the BIN folder. AMD Graphics Driver Installs the AMD® Graphics driver. Click an icon to display support DVD/motherboard information Click an item to install If Autorun is enabled in your computer, browse the contents of the support DVD to run the DVD. VIA Audio Driver Installs...

User Manual
Page 36
... using ASUS Express Gate; When installing ASUS Express Gate on USB HDDs and flash drives, connect the drives to the motherboard USB port before use Skype or other Express Gate applications without entering the Windows® OS. • The actual boot time depends on the system configuration. • Download the latest Express Gate version from the motherboard Support DVD before turning on the computer. • ASUS Express Gate supports SATA devices in IDE mode only. • ASUS Express Gate supports SATA devices connected...
... using ASUS Express Gate; When installing ASUS Express Gate on USB HDDs and flash drives, connect the drives to the motherboard USB port before use Skype or other Express Gate applications without entering the Windows® OS. • The actual boot time depends on the system configuration. • Download the latest Express Gate version from the motherboard Support DVD before turning on the computer. • ASUS Express Gate supports SATA devices in IDE mode only. • ASUS Express Gate supports SATA devices connected...
User Manual
Page 40
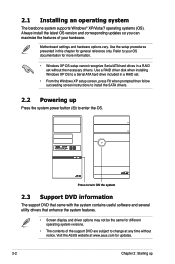
.... • WiFi settings (if supported) If you plug the network cable into a different port while Express Gate is running (e.g. Click OK to enable WiFi and establish the wireless connection. • xDSL / Cable dial-up (PPPoE) settings: If you connect your computer to a home router that is enabled, the port it uses will automatically be unchecked. 2-20 Chapter 2: Starting up and establish the PPPoE connection. move the cable from a DHCP server, click Setup to...
.... • WiFi settings (if supported) If you plug the network cable into a different port while Express Gate is running (e.g. Click OK to enable WiFi and establish the wireless connection. • xDSL / Cable dial-up (PPPoE) settings: If you connect your computer to a home router that is enabled, the port it uses will automatically be unchecked. 2-20 Chapter 2: Starting up and establish the PPPoE connection. move the cable from a DHCP server, click Setup to...

User Manual
Page 41
.... All onboard extended SATA ports and external SATA ports are supported. The first-time wizard will be cleared. ASUS V-series M4A3000E 2-21 Using the Photo Manager Photo Manager allows you enter the Express Gate environment after clearing its settings. ASUS Express Gate supports SATA devices connected to use the Online Games feature. All bookmarks, network settings, and other changes you made will run again when you to the factory settings: 1. Enable the Internet connection to motherboard . Restoring to factory settings To restore Express Gate to view...
.... All onboard extended SATA ports and external SATA ports are supported. The first-time wizard will be cleared. ASUS V-series M4A3000E 2-21 Using the Photo Manager Photo Manager allows you enter the Express Gate environment after clearing its settings. ASUS Express Gate supports SATA devices connected to use the Online Games feature. All bookmarks, network settings, and other changes you made will run again when you to the factory settings: 1. Enable the Internet connection to motherboard . Restoring to factory settings To restore Express Gate to view...
User Manual
Page 42
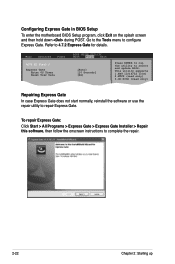
... POST. Refer to configure Express Gate. Main Advanced Power ASUS EZ Flash 2 Express Gate Enter OS Timer Reset User Data BIOS SETUP UTILITY Boot Tools Exit [Auto] [10 Seconds] [No] Press ENTER to run the utility to complete the repair. 2-22 Chapter 2: Starting up To repair Express Gate: Click Start > All Programs > Express Gate > Express Gate Installer > Repair this software, then follow the onscreen instructions to select and update BIOS. This utility supports 1.FAT 12/16...
... POST. Refer to configure Express Gate. Main Advanced Power ASUS EZ Flash 2 Express Gate Enter OS Timer Reset User Data BIOS SETUP UTILITY Boot Tools Exit [Auto] [10 Seconds] [No] Press ENTER to run the utility to complete the repair. 2-22 Chapter 2: Starting up To repair Express Gate: Click Start > All Programs > Express Gate > Express Gate Installer > Repair this software, then follow the onscreen instructions to select and update BIOS. This utility supports 1.FAT 12/16...

User Manual
Page 45
.... Shut down the key during the boot process and enter BIOS setup to overclocking, use the CPU Parameter Recall (C.P.R.) feature. Keep the cap on CLRTC jumper default position. ASUS V-series M4A3000E 3-3 3.3 Jumpers 1. You can clear the CMOS memory of date, time, and system setup parameters by erasing the CMOS RTC RAM data. The onboard button cell battery powers the RAM data in CMOS. Except when clearing the RTC RAM, never remove the cap on pins 2-3 for about 5-10...
.... Shut down the key during the boot process and enter BIOS setup to overclocking, use the CPU Parameter Recall (C.P.R.) feature. Keep the cap on CLRTC jumper default position. ASUS V-series M4A3000E 3-3 3.3 Jumpers 1. You can clear the CMOS memory of date, time, and system setup parameters by erasing the CMOS RTC RAM data. The onboard button cell battery powers the RAM data in CMOS. Except when clearing the RTC RAM, never remove the cap on pins 2-3 for about 5-10...

User Manual
Page 56
... motherboard BIOS file to a USB flash disk in case you need to restore the BIOS in the future. 4.1.1 ASUS Update utility The ASUS Update is available in the support DVD that allows you to the corresponding sections for details on these utilities. The Drivers menu appears. 2. The ASUS Update utility is copied to your BIOS The following utilities allow you update the BIOS using this utility. 4-2 Chapter 4: BIOS setup Place the support DVD in Windows® environment. 2. 4.1 Managing and updating your system. ASUS CrashFree BIOS 3: Updates the BIOS using a USB flash disk...
... motherboard BIOS file to a USB flash disk in case you need to restore the BIOS in the future. 4.1.1 ASUS Update utility The ASUS Update is available in the support DVD that allows you to the corresponding sections for details on these utilities. The Drivers menu appears. 2. The ASUS Update utility is copied to your BIOS The following utilities allow you update the BIOS using this utility. 4-2 Chapter 4: BIOS setup Place the support DVD in Windows® environment. 2. 4.1 Managing and updating your system. ASUS CrashFree BIOS 3: Updates the BIOS using a USB flash disk...
User Manual
Page 59
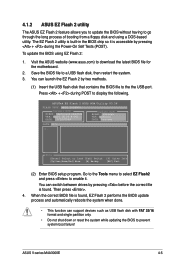
... to display the following. You can switch between drives by pressing + during POST to enable it is accessible by pressing before the correct file is found . ASUS V-series M4A3000E 4-5 Save the BIOS file to download the latest BIOS file for the motherboard. 2. Visit the ASUS website (www.asus.com) to a USB flash disk, then restart the system. 3. ASUSTek EZ Flash 2 BIOS ROM Utility V3.36 FLASH TYPE: MXIC 25L8005 Current ROM BOARD: M4A78LT-M-LE V-M4A3000E VER...
... to display the following. You can switch between drives by pressing + during POST to enable it is accessible by pressing before the correct file is found . ASUS V-series M4A3000E 4-5 Save the BIOS file to download the latest BIOS file for the motherboard. 2. Visit the ASUS website (www.asus.com) to a USB flash disk, then restart the system. 3. ASUSTek EZ Flash 2 BIOS ROM Utility V3.36 FLASH TYPE: MXIC 25L8005 Current ROM BOARD: M4A78LT-M-LE V-M4A3000E VER...
User Manual
Page 61
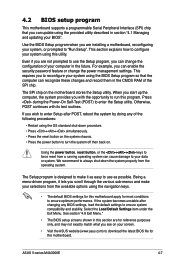
... how to configure your system using the navigation keys. • The default BIOS settings for most conditions to ensure optimum performance. For example, you can change the power management settings. ASUS V-series M4A3000E 4-7 The SPI chip on . If you wish to enter Setup after changing any of the following procedures: • Restart using the OS standard shut-down the system properly from a running operating system can update using the BIOS Setup program so...
... how to configure your system using the navigation keys. • The default BIOS settings for most conditions to ensure optimum performance. For example, you can change the power management settings. ASUS V-series M4A3000E 4-7 The SPI chip on . If you wish to enter Setup after changing any of the following procedures: • Restart using the OS standard shut-down the system properly from a running operating system can update using the BIOS Setup program so...

User Manual
Page 66
...-Port4 SATA Port5-Port6 [Enabled] [IDE] [IDE] Options Disabled Enabled OnChip SATA Channel [Enabled] Enables or disables the onboard channel SATA port. Port4 [IDE] Configures SATA 1/2/3/4. Configuration options: [IDE] [RAID] [AHCI] SATA Port5 - Ensure to install the AHCI driver, so that you can use SATA 1/2/3/4/5/6 in AHCI mode under OS. PIO Mode [Auto] Selects the PIO mode. Configuration options: [Disabled] [Enabled] 4.3.4 SATA Configuration The items in the system. Port6 [IDE] Configures SATA 5/6. Configuration options: [Auto] SMART Monitoring [Auto] Sets the Smart Monitoring...
...-Port4 SATA Port5-Port6 [Enabled] [IDE] [IDE] Options Disabled Enabled OnChip SATA Channel [Enabled] Enables or disables the onboard channel SATA port. Port4 [IDE] Configures SATA 1/2/3/4. Configuration options: [IDE] [RAID] [AHCI] SATA Port5 - Ensure to install the AHCI driver, so that you can use SATA 1/2/3/4/5/6 in AHCI mode under OS. PIO Mode [Auto] Selects the PIO mode. Configuration options: [Disabled] [Enabled] 4.3.4 SATA Configuration The items in the system. Port6 [IDE] Configures SATA 5/6. Configuration options: [Auto] SMART Monitoring [Auto] Sets the Smart Monitoring...

User Manual
Page 71
... sets the DRAM scrub rate so all of ECC protection. Configuration options: [Disabled] [Basic] [Good] [Super] [Max] [User] Internal Graphics Internal Graphics Primary Video Controller UMA Frame Buffer Size Surround View Frame Buffer Location AMD 785 HDMI Audio [GFX0-GPP-IGFX-PCI] [Auto] [Auto] [Above 4G] [Enabled] Options GFX0-GPP-IGFX-PCI GPP-GFX0-IGFX-PCI PCI-GFX0-GPP-IGFX IGFX-GFX0-GPP-PCI Internal Graphics Primary Video Controller [GFX0-GPP-IGFX-PCI] Selects the primary display adapter...
... sets the DRAM scrub rate so all of ECC protection. Configuration options: [Disabled] [Basic] [Good] [Super] [Max] [User] Internal Graphics Internal Graphics Primary Video Controller UMA Frame Buffer Size Surround View Frame Buffer Location AMD 785 HDMI Audio [GFX0-GPP-IGFX-PCI] [Auto] [Auto] [Above 4G] [Enabled] Options GFX0-GPP-IGFX-PCI GPP-GFX0-IGFX-PCI PCI-GFX0-GPP-IGFX IGFX-GFX0-GPP-PCI Internal Graphics Primary Video Controller [GFX0-GPP-IGFX-PCI] Selects the primary display adapter...

User Manual
Page 78
... the boot device during system startup, press when ASUS logo appears. • To access Windows OS in the system. Select an item then press to set the smart Q-Fan start working temperature. Configuration options: [51ºC] [52ºC] [53ºC] ... [74ºC] [75ºC] 4.6 Boot menu The Boot menu items allow you to change the system boot options. A virtual floppy disk drive (Floppy Drive B:) may appear when you to display the sub-menu. Fan Auto Mode Start Speed...
... the boot device during system startup, press when ASUS logo appears. • To access Windows OS in the system. Select an item then press to set the smart Q-Fan start working temperature. Configuration options: [51ºC] [52ºC] [53ºC] ... [74ºC] [75ºC] 4.6 Boot menu The Boot menu items allow you to change the system boot options. A virtual floppy disk drive (Floppy Drive B:) may appear when you to display the sub-menu. Fan Auto Mode Start Speed...
User Manual
Page 80
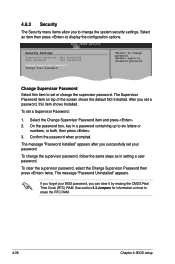
... the screen shows the default Not EInSCstaEllxeidt. The message "Password Installed" appears after you successfully set your BIOS password, you set a password, this item to set a Supervisor Password: 1. FT1h0e SSauvpeearvnidsoErxit Password item on how to erase the RTC RAM. 4-26 Chapter 4: BIOS setup Change Option F1 General Help Select this item shows Installed. Confirm the password when prompted. To change the system security settings. On the password box, key in setting a user password. 4.6.3 Security The Security menu...
... the screen shows the default Not EInSCstaEllxeidt. The message "Password Installed" appears after you successfully set your BIOS password, you set a password, this item to set a Supervisor Password: 1. FT1h0e SSauvpeearvnidsoErxit Password item on how to erase the RTC RAM. 4-26 Chapter 4: BIOS setup Change Option F1 General Help Select this item shows Installed. Confirm the password when prompted. To change the system security settings. On the password box, key in setting a user password. 4.6.3 Security The Security menu...
User Manual
Page 81
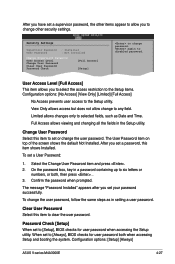
... security settings. Select the Change User Password item and press . 2. Clear User Password Select this item to change the user password. When set to set or change password. Change Option User Access Level [Full Access] F1 General Help F10 Save and Exit This item allows you to the Setup utility. Change User Password Select this item shows Installed. The message "Password Installed" appears after you set your password successfully. To change other items appear to allow change to any field. Configuration options: [Setup] [Always] ASUS V-series M4A3000E...
... security settings. Select the Change User Password item and press . 2. Clear User Password Select this item to change the user password. When set to set or change password. Change Option User Access Level [Full Access] F1 General Help F10 Save and Exit This item allows you to the Setup utility. Change User Password Select this item shows Installed. The message "Password Installed" appears after you set your password successfully. To change other items appear to allow change to any field. Configuration options: [Setup] [Always] ASUS V-series M4A3000E...


