P8Z77-V User's Manual
Page 117
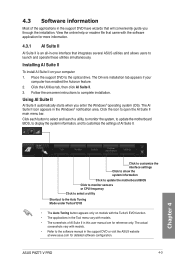
...II. 3. Follow the onscreen instructions to the optical drive. Using AI Suite II AI Suite II automatically starts when you through the installation. ASUS P8Z77-V PRO 4-3 The Drivers installation tab appears if your computer 1. Place the support DVD to complete installation. Click each button to select and launch a ...utility, to monitor the system, to update the motherboard BIOS, to display the system information, and to open the AI Suite II main menu bar. View the online help or readme file that ...
...II. 3. Follow the onscreen instructions to the optical drive. Using AI Suite II AI Suite II automatically starts when you through the installation. ASUS P8Z77-V PRO 4-3 The Drivers installation tab appears if your computer 1. Place the support DVD to complete installation. Click each button to select and launch a ...utility, to monitor the system, to update the motherboard BIOS, to display the system information, and to open the AI Suite II main menu bar. View the online help or readme file that ...
P8Z77-V User's Manual
Page 119
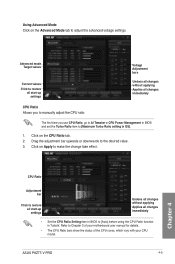
... changes immediately CPU Ratio Allows you use CPU Ratio, go to AI Tweaker > CPU Power Management in BIOS and set the Turbo Ratio item to manually adjust the CPU ratio. Refer to the desired value. 3. ASUS P8Z77-V PRO 4-5 Chapter 4 Using Advanced Mode Click on the Advanced Mode tab to [Auto] before using the CPU... bar Click to restore all start -up settings Undoes all changes without applying Applies all changes immediately • Set the CPU Ratio Setting item in BIOS to adjust the advanced voltage settings.
... changes immediately CPU Ratio Allows you use CPU Ratio, go to AI Tweaker > CPU Power Management in BIOS and set the Turbo Ratio item to manually adjust the CPU ratio. Refer to the desired value. 3. ASUS P8Z77-V PRO 4-5 Chapter 4 Using Advanced Mode Click on the Advanced Mode tab to [Auto] before using the CPU... bar Click to restore all start -up settings Undoes all changes without applying Applies all changes immediately • Set the CPU Ratio Setting item in BIOS to adjust the advanced voltage settings.
P8Z77-V User's Manual
Page 121
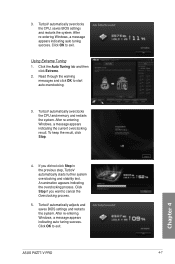
...Tuning 1. TurboV automatically overclocks the CPU and memory and restarts the system. Chapter 4 4. TurboV automatically adjusts and saves BIOS settings and restarts the system. After re-entering Windows, a message appears indicating auto tuning success. Click the Auto ...TurboV automatically starts further system overclocking and stability test. TurboV automatically overclocks the CPU, saves BIOS settings and restarts the system. To keep the result, click Stop. ASUS P8Z77-V PRO 4-7 An animation appears indicating the overclocking process. Read through the warning messages and click ...
...Tuning 1. TurboV automatically overclocks the CPU and memory and restarts the system. Chapter 4 4. TurboV automatically adjusts and saves BIOS settings and restarts the system. After re-entering Windows, a message appears indicating auto tuning success. Click the Auto ...TurboV automatically starts further system overclocking and stability test. TurboV automatically overclocks the CPU, saves BIOS settings and restarts the system. To keep the result, click Stop. ASUS P8Z77-V PRO 4-7 An animation appears indicating the overclocking process. Read through the warning messages and click ...
P8Z77-V User's Manual
Page 131
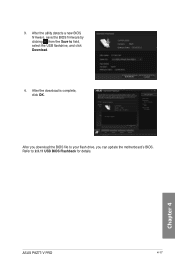
3. After you download the BIOS file to 2.3.11 USB BIOS Flashback for details. Refer to your flash drive, you can update the motherboard's BIOS. After the utility detects a new BIOS firmware, save the BIOS firmware by clicking from the Save to field, select the USB flashdrive, and click Download. 4. After the download is complete, click OK. Chapter 4 ASUS P8Z77-V PRO 4-17
3. After you download the BIOS file to 2.3.11 USB BIOS Flashback for details. Refer to your flash drive, you can update the motherboard's BIOS. After the utility detects a new BIOS firmware, save the BIOS firmware by clicking from the Save to field, select the USB flashdrive, and click Download. 4. After the download is complete, click OK. Chapter 4 ASUS P8Z77-V PRO 4-17

P8Z77-V User's Manual
Page 133
... your boot logo. Under Current BIOS, click Browse and choose the desired image for your computer from the motherboard support DVD, launch MyLogo by clicking Update> MyLogo on screen during the Power‑On‑Self-Tests (POST). Chapter 4 ASUS P8Z77-V PRO 4-19 Using MyLogo Select the way... you customize the boot logo. Then click Next and follow the given instructions. Change the BIOS boot logo of my motherboard 1. The boot logo is the image that ...
... your boot logo. Under Current BIOS, click Browse and choose the desired image for your computer from the motherboard support DVD, launch MyLogo by clicking Update> MyLogo on screen during the Power‑On‑Self-Tests (POST). Chapter 4 ASUS P8Z77-V PRO 4-19 Using MyLogo Select the way... you customize the boot logo. Then click Next and follow the given instructions. Change the BIOS boot logo of my motherboard 1. The boot logo is the image that ...
P8Z77-V User's Manual
Page 137
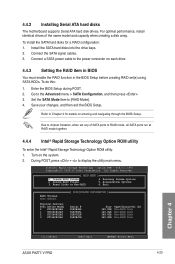
...Serial ATA hard disk drives. v10.5.1.1070 Copyright(C) 2003-10 Intel Corporation. Go to Non-RAID 4. Save your changes, and then exit the BIOS Setup. Physical Devices: Port Device Model 0 ST3160812AS 1 ST3160812AS 2 ST3160812AS 3 ST3160812AS [ DISK/VOLUME INFORMATION ] Serial # 9LS0HJA4 9LS0F4HL 3LS0JYL8 ... Disk Non-RAID Disk Non-RAID Disk Non-RAID Disk Chapter 4 [↑↓]-Select [ESC]-Exit [ENTER]-Select Menu ASUS P8Z77-V PRO 4-23 Turn on the system. 2. Create RAID Volume 2. Reset Disks to the Advanced menu > SATA Configuration, and then press . 3....
...Serial ATA hard disk drives. v10.5.1.1070 Copyright(C) 2003-10 Intel Corporation. Go to Non-RAID 4. Save your changes, and then exit the BIOS Setup. Physical Devices: Port Device Model 0 ST3160812AS 1 ST3160812AS 2 ST3160812AS 3 ST3160812AS [ DISK/VOLUME INFORMATION ] Serial # 9LS0HJA4 9LS0F4HL 3LS0JYL8 ... Disk Non-RAID Disk Non-RAID Disk Non-RAID Disk Chapter 4 [↑↓]-Select [ESC]-Exit [ENTER]-Select Menu ASUS P8Z77-V PRO 4-23 Turn on the system. 2. Create RAID Volume 2. Reset Disks to the Advanced menu > SATA Configuration, and then press . 3....
P8Z77-V User's Manual
Page 143
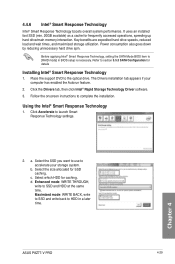
...; Smart Response Technology, setting the SATA Mode BIOS item to launch Smart Response Technology settings. 2. Place the support DVD to SSD and HDD at the same time. The Drivers installation tab appears if your storage system. Using the Intel® Smart Response Technology 1. a. Chapter 4 ASUS P8Z77-V PRO 4-29 d. Click the Drivers tab, then click...
...; Smart Response Technology, setting the SATA Mode BIOS item to launch Smart Response Technology settings. 2. Place the support DVD to SSD and HDD at the same time. The Drivers installation tab appears if your storage system. Using the Intel® Smart Response Technology 1. a. Chapter 4 ASUS P8Z77-V PRO 4-29 d. Click the Drivers tab, then click...
P8Z77-V User's Manual
Page 153
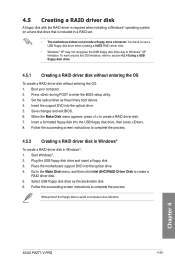
...RAID driver disk. 7. Place the motherboard support DVD into the optical drive. 5. When the Make Disk menu appears, press to enter the BIOS setup utility. 3. Follow the succeeding screen instructions to complete the process. Follow the succeeding screen instructions to complete the process. 4.5.2 Creating a.... Set the optical drive as the destination disk. 6. To work around this OS limitation, refer to Windows® XP limitation. Chapter 4 ASUS P8Z77-V PRO 4-39 You have to use a USB floppy disk drive when creating a SATA RAID driver disk. • Windows® XP may not ...
...RAID driver disk. 7. Place the motherboard support DVD into the optical drive. 5. When the Make Disk menu appears, press to enter the BIOS setup utility. 3. Follow the succeeding screen instructions to complete the process. Follow the succeeding screen instructions to complete the process. 4.5.2 Creating a.... Set the optical drive as the destination disk. 6. To work around this OS limitation, refer to Windows® XP limitation. Chapter 4 ASUS P8Z77-V PRO 4-39 You have to use a USB floppy disk drive when creating a SATA RAID driver disk. • Windows® XP may not ...


