
User Manual
Page 1
Motherboard
Motherboard
User Manual
Page 1
P5Q-VM Motherboard
P5Q-VM Motherboard

User Manual
Page 3
Contents Contents...iii Notices...vi Safety information vii About this guide viii P5Q-VM specifications summary x Chapter 1: Product introduction 1.1 Welcome 1-2 1.2 Package contents 1-2 1.3 Special features 1-3 1.3.1 Product highlights 1-3 1.3.2 ASUS unique features 1-5 1.3.3 ASUS Intelligent Performance & Overclocking features.. 1-7 1.4 Before you proceed 1-9 1.5 Motherboard overview 1-10 1.5.1 Motherboard layout 1-10 1.5.2 Layout contents 1-11 1.5.3 Placement direction 1-12 1.5.4 Screw holes 1-12 1.6 Central Processing Unit (CPU 1-13...
Contents Contents...iii Notices...vi Safety information vii About this guide viii P5Q-VM specifications summary x Chapter 1: Product introduction 1.1 Welcome 1-2 1.2 Package contents 1-2 1.3 Special features 1-3 1.3.1 Product highlights 1-3 1.3.2 ASUS unique features 1-5 1.3.3 ASUS Intelligent Performance & Overclocking features.. 1-7 1.4 Before you proceed 1-9 1.5 Motherboard overview 1-10 1.5.1 Motherboard layout 1-10 1.5.2 Layout contents 1-11 1.5.3 Placement direction 1-12 1.5.4 Screw holes 1-12 1.6 Central Processing Unit (CPU 1-13...
User Manual
Page 7
Contact a qualified service technician or your area. Operation safety • Before installing the motherboard and adding devices on a stable surface. • If you detect any damage, contact your retailer. If you are not sure about the voltage of the ...electrical outlet you add a device. • Before connecting or removing signal cables from the motherboard, ensure that the power cables for disposal of the crossed out wheeled bin indicates that your power supply is broken, do not try to fix...
Contact a qualified service technician or your area. Operation safety • Before installing the motherboard and adding devices on a stable surface. • If you detect any damage, contact your retailer. If you are not sure about the voltage of the ...electrical outlet you add a device. • Before connecting or removing signal cables from the motherboard, ensure that the power cables for disposal of the crossed out wheeled bin indicates that your power supply is broken, do not try to fix...

User Manual
Page 8
...the BIOS parameters are not part of the motherboard and the new technology it supports. These documents are also provided. • Chapter 3: Software support This chapter describes the contents of the jumpers and connectors on ASUS hardware and software products. Refer to the following... updates. 1. Where to find more information Refer to the ASUS contact information. 2. Optional documentation Your product package may include optional documentation, such as warranty flyers, that comes with the motherboard package. How this guide This user guide contains the information ...
...the BIOS parameters are not part of the motherboard and the new technology it supports. These documents are also provided. • Chapter 3: Software support This chapter describes the contents of the jumpers and connectors on ASUS hardware and software products. Refer to the following... updates. 1. Where to find more information Refer to the ASUS contact information. 2. Optional documentation Your product package may include optional documentation, such as warranty flyers, that comes with the motherboard package. How this guide This user guide contains the information ...

User Manual
Page 13
This chapter describes the motherboard features and the new technologies it supports. 1Product introduction
This chapter describes the motherboard features and the new technologies it supports. 1Product introduction

User Manual
Page 14
... technologies, making it , check the items in the long line of the above items is damaged or missing, contact your motherboard package for the following items. Motherboard Cables Accessories Application DVD Documentation ASUS P5Q-VM 2 x S��A�T�A��s�i�g�n�a�l�c�a��b�le�s� 1 x SATA...
... technologies, making it , check the items in the long line of the above items is damaged or missing, contact your motherboard package for the following items. Motherboard Cables Accessories Application DVD Documentation ASUS P5Q-VM 2 x S��A�T�A��s�i�g�n�a�l�c�a��b�le�s� 1 x SATA...
User Manual
Page 15
It can also support Intel® 45nm multi-core CPUs. ASUS P5Q-VM 1-3 With new Intel® Core™ microarchitecture technology and 1600/1333/1066/800MHz FSB, Intel® Core™2 processor is the latest chipset designed to ...��il�s�. Intel® Core™2 Extreme / Core™ 2 Quad / Core™2 Duo Processor Support This motherboard supports the latest Intel® Core™2 processors in line with the ASUS vision of the memory accesses. This is in LGA775 package. The Intel® G45 Express Chipset delivers optimized 3D...
It can also support Intel® 45nm multi-core CPUs. ASUS P5Q-VM 1-3 With new Intel® Core™ microarchitecture technology and 1600/1333/1066/800MHz FSB, Intel® Core™2 processor is the latest chipset designed to ...��il�s�. Intel® Core™2 Extreme / Core™ 2 Quad / Core™2 Duo Processor Support This motherboard supports the latest Intel® Core™2 processors in line with the ASUS vision of the memory accesses. This is in LGA775 package. The Intel® G45 Express Chipset delivers optimized 3D...

User Manual
Page 16
...65533;�g�e��1�-�3�0��f�o�r�d��e�ta��il�s�. This motherboard supports dual VGA output-DVI and RGB-and is HDCP compliant, allowing playback of HD DVD and Blu-ray Discs. S/PDIF ...digital sound ready This motherboard provides convenient connectivity to analog format, and therefore well preserves signal quality. You can now talk to different destinations. It allows digital...
...65533;�g�e��1�-�3�0��f�o�r�d��e�ta��il�s�. This motherboard supports dual VGA output-DVI and RGB-and is HDCP compliant, allowing playback of HD DVD and Blu-ray Discs. S/PDIF ...digital sound ready This motherboard provides convenient connectivity to analog format, and therefore well preserves signal quality. You can now talk to different destinations. It allows digital...
User Manual
Page 17
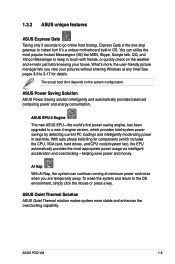
...temporarily away. You can continue running at any time! 1.3.2 ASUS unique features ASUS Express Gate Taking only 5 seconds to go online from bootup, Express Gate is the one-stop gateway to instant fun! It's a unique motherboard built-in touch with friends, or quickly check on the ...system configuration. AI Nap With AI Nap, the system can utilize the most appropriate power usage via intelligent acceleration and overclocking-helping save power and money. ASUS P5Q-VM 1-5
...temporarily away. You can continue running at any time! 1.3.2 ASUS unique features ASUS Express Gate Taking only 5 seconds to go online from bootup, Express Gate is the one-stop gateway to instant fun! It's a unique motherboard built-in touch with friends, or quickly check on the ...system configuration. AI Nap With AI Nap, the system can utilize the most appropriate power usage via intelligent acceleration and overclocking-helping save power and money. ASUS P5Q-VM 1-5

User Manual
Page 18
...freedom to different ambient temperature, which is a user-friendly BIOS update utility. Profile The motherboard features the ASUS O.C. See page 2-9 for details. 1-6 Chapter 1: Product Introduction ASUS EZ DIY ASUS EZ DIY feature collection provides you easy ways to install computer components, update the BIOS ...to launch the utility and update the BIOS without preparing a bootable diskette or using an OS-based flash utility. ASUS CrashFree BIOS 3 ASUS CrashFree BIOS 3 allows users to conveniently store or load multiple BIOS settings. Profile that allows users to restore ...
...freedom to different ambient temperature, which is a user-friendly BIOS update utility. Profile The motherboard features the ASUS O.C. See page 2-9 for details. 1-6 Chapter 1: Product Introduction ASUS EZ DIY ASUS EZ DIY feature collection provides you easy ways to install computer components, update the BIOS ...to launch the utility and update the BIOS without preparing a bootable diskette or using an OS-based flash utility. ASUS CrashFree BIOS 3 ASUS CrashFree BIOS 3 allows users to conveniently store or load multiple BIOS settings. Profile that allows users to restore ...
User Manual
Page 19
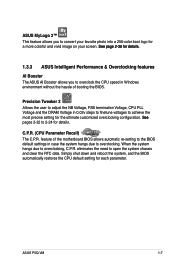
...The C.P.R. Simply shut down and reboot the system, and the BIOS automatically restores the CPU default setting for details. ASUS P5Q-VM 1-7 eliminates the need to overclocking, C.P.R. ASUS MyLogo 2™ This feature allows you to convert your favorite photo into a 256-color boot logo for a more ...65533;ta��il�s�. 1.3.3 ASUS Intelligent Performance & Overclocking features AI Booster The ASUS AI Booster allows you to overclock the CPU speed in Windows environment without the hassle of the motherboard BIOS allows automatic re-setting to the BIOS default...
...The C.P.R. Simply shut down and reboot the system, and the BIOS automatically restores the CPU default setting for details. ASUS P5Q-VM 1-7 eliminates the need to overclocking, C.P.R. ASUS MyLogo 2™ This feature allows you to convert your favorite photo into a 256-color boot logo for a more ...65533;ta��il�s�. 1.3.3 ASUS Intelligent Performance & Overclocking features AI Booster The ASUS AI Booster allows you to overclock the CPU speed in Windows environment without the hassle of the motherboard BIOS allows automatic re-setting to the BIOS default...

User Manual
Page 21
...• Hold components by the edges to avoid touching the ICs on them. • Whenever you install motherboard components or change any motherboard settings. • Unplug the power cord from the power supply. The illustration below shows the location of the... following precautions before you uninstall any motherboard component. Failure to do so may cause severe damage to indicate that the system is a reminder that the ATX power supply is switched off or the power cord is ... is ON, in sleep mode, or in the bag that came with a standby power LED. ASUS P5Q-VM 1-9
...• Hold components by the edges to avoid touching the ICs on them. • Whenever you install motherboard components or change any motherboard settings. • Unplug the power cord from the power supply. The illustration below shows the location of the... following precautions before you uninstall any motherboard component. Failure to do so may cause severe damage to indicate that the system is a reminder that the ATX power supply is switched off or the power cord is ... is ON, in sleep mode, or in the bag that came with a standby power LED. ASUS P5Q-VM 1-9

User Manual
Page 22
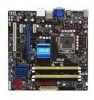
1.5 Motherboard overview 1.5.1 Motherboard layout Refer to 1.10 Connectors for more information about rear panel connectors and internal connectors. 1-10 Chapter 1: Product introduction
1.5 Motherboard overview 1.5.1 Motherboard layout Refer to 1.10 Connectors for more information about rear panel connectors and internal connectors. 1-10 Chapter 1: Product introduction

User Manual
Page 24
Place this side towards the rear of the chassis as indicated in the image below. 1.5.4 Screw holes Place eight (8) screws into the chassis in the correct orientation. DO NOT overtighten the screws! The edge with external ports goes to the chassis. Doing so can damage the motherboard. 1.5.3 Placement direction When installing the motherboard, make sure that you place it into the holes indicated by circles to secure the motherboard to the rear part of the chassis 1-12 Chapter 1: Product introduction
Place this side towards the rear of the chassis as indicated in the image below. 1.5.4 Screw holes Place eight (8) screws into the chassis in the correct orientation. DO NOT overtighten the screws! The edge with external ports goes to the chassis. Doing so can damage the motherboard. 1.5.3 Placement direction When installing the motherboard, make sure that you place it into the holes indicated by circles to secure the motherboard to the rear part of the chassis 1-12 Chapter 1: Product introduction
User Manual
Page 25
... is shipment/transit-related. • Keep the cap after installing the motherboard. ASUS will process Return Merchandise Authorization (RMA) requests only if the motherboard comes with a surface mount LGA775 socket designed for the Intel®...motherboard, make sure that all power cables are unplugged before installing the CPU. • If installing a dual-core CPU, connect the chassis fan cable to the CHA_FAN1 connector to ensure system stability. • Due to the chipset limitation, we recommend you see any damage to the PnP cap/socket contacts/motherboard components. ASUS P5Q-VM...
... is shipment/transit-related. • Keep the cap after installing the motherboard. ASUS will process Return Merchandise Authorization (RMA) requests only if the motherboard comes with a surface mount LGA775 socket designed for the Intel®...motherboard, make sure that all power cables are unplugged before installing the CPU. • If installing a dual-core CPU, connect the chassis fan cable to the CHA_FAN1 connector to ensure system stability. • Due to the chipset limitation, we recommend you see any damage to the PnP cap/socket contacts/motherboard components. ASUS P5Q-VM...

User Manual
Page 26
... cam box is facing towards you are installing a CPU. Retention tab A B Load lever 3. Locate the CPU socket on your left (B) until it is on the motherboard. To prevent damage to the socket pins, do not remove the PnP cap unless you and the load lever is released from the load plate...
... cam box is facing towards you are installing a CPU. Retention tab A B Load lever 3. Locate the CPU socket on your left (B) until it is on the motherboard. To prevent damage to the socket pins, do not remove the PnP cap unless you and the load lever is released from the load plate...
User Manual
Page 28
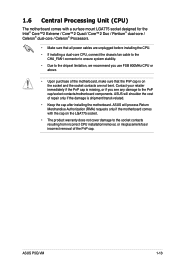
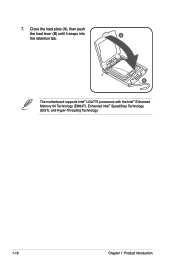
Close the load plate (A), then push the load lever (B) until it snaps into A the retention tab. 7. B The motherboard supports Intel® LGA775 processors with the Intel® Enhanced Memory 64 Technology (EM64T), Enhanced Intel® SpeedStep Technology (EIST), and Hyper-Threading Technology. 1-16 Chapter 1: Product introduction
Close the load plate (A), then push the load lever (B) until it snaps into A the retention tab. 7. B The motherboard supports Intel® LGA775 processors with the Intel® Enhanced Memory 64 Technology (EM64T), Enhanced Intel® SpeedStep Technology (EIST), and Hyper-Threading Technology. 1-16 Chapter 1: Product introduction
User Manual
Page 29
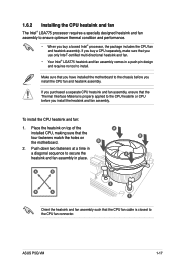
B 2. ASUS P5Q-VM 1-17 Push down two fasteners at a time in a diagonal sequence to the CPU fan connector. To install the CPU heatsink... to secure the heatsink and fan assembly in place. Place the heatsink on top of the installed CPU, making sure that you have installed the motherboard to the chassis before you buy a boxed Intel® processor, the package includes the CPU fan and heatsink assembly. A B A A B B A...design and requires no tool to install. Make sure that the four fasteners match the holes on the motherboard. If you install the heatsink and fan assembly.
B 2. ASUS P5Q-VM 1-17 Push down two fasteners at a time in a diagonal sequence to the CPU fan connector. To install the CPU heatsink... to secure the heatsink and fan assembly in place. Place the heatsink on top of the installed CPU, making sure that you have installed the motherboard to the chassis before you buy a boxed Intel® processor, the package includes the CPU fan and heatsink assembly. A B A A B B A...design and requires no tool to install. Make sure that the four fasteners match the holes on the motherboard. If you install the heatsink and fan assembly.
User Manual
Page 30
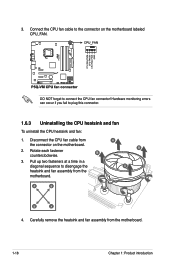
... 1.6.3 Uninstalling the CPU heatsink and fan To uninstall the CPU heatsink and fan: 1. Disconnect the CPU fan cable from the motherboard. Pull up two fasteners at a time in a diagonal sequence to connect the CPU fan connector! Carefully remove the heatsink and fan... assembly from the motherboard. 1-18 Chapter 1: Product introduction Hardware monitoring errors can occur if you fail to the connector on the motherboard. 2. 3. Rotate each fastener counterclockwise. B 3. DO NOT forget to disengage the ...
... 1.6.3 Uninstalling the CPU heatsink and fan To uninstall the CPU heatsink and fan: 1. Disconnect the CPU fan cable from the motherboard. Pull up two fasteners at a time in a diagonal sequence to connect the CPU fan connector! Carefully remove the heatsink and fan... assembly from the motherboard. 1-18 Chapter 1: Product introduction Hardware monitoring errors can occur if you fail to the connector on the motherboard. 2. 3. Rotate each fastener counterclockwise. B 3. DO NOT forget to disengage the ...


