User Manual
Page 15
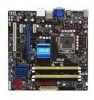
.../800 FSB (Front Side Bus), PCIe 2.0, and multi-core CPUs. Intel® Core™2 Extreme / Core™ 2 Quad / Core™2 Duo Processor Support This motherboard supports the latest Intel® Core™2 processors in LGA775 package. The Intel® G45 Express Chipset delivers optimized 3D graphics performance and support for Microsoft DirectX 10, Shader Model 4.0 and OpenGL 2.1. ASUS P5Q-VM 1-3 It especially includes Intel® Fast Memory Access technology that significantly optimizes the...
.../800 FSB (Front Side Bus), PCIe 2.0, and multi-core CPUs. Intel® Core™2 Extreme / Core™ 2 Quad / Core™2 Duo Processor Support This motherboard supports the latest Intel® Core™2 processors in LGA775 package. The Intel® G45 Express Chipset delivers optimized 3D graphics performance and support for Microsoft DirectX 10, Shader Model 4.0 and OpenGL 2.1. ASUS P5Q-VM 1-3 It especially includes Intel® Fast Memory Access technology that significantly optimizes the...
User Manual
Page 19
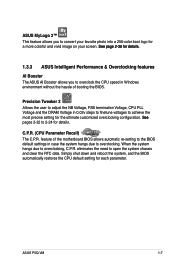
... open the system chassis and clear the RTC data. feature of booting the BIOS. Simply shut down and reboot the system, and the BIOS automatically restores the CPU default setting for details. eliminates the need to overclocking, C.P.R. Precision Tweaker 2 Allows the user to adjust the NB Voltage, FSB termination Voltage, CPU PLL Voltage and the DRAM Voltage in case the system hangs due to overclocking. ASUS P5Q-VM 1-7 ASUS MyLogo 2™ This...
... open the system chassis and clear the RTC data. feature of booting the BIOS. Simply shut down and reboot the system, and the BIOS automatically restores the CPU default setting for details. eliminates the need to overclocking, C.P.R. Precision Tweaker 2 Allows the user to adjust the NB Voltage, FSB termination Voltage, CPU PLL Voltage and the DRAM Voltage in case the system hangs due to overclocking. ASUS P5Q-VM 1-7 ASUS MyLogo 2™ This...
User Manual
Page 37
... do not need to unplug the power cord before adding or removing expansion cards. Failure to the table on BIOS setup. 2. Replace the system cover. 1.8.2 Configuring an expansion card After installing the expansion card, configure it and make the necessary hardware settings for the expansion card. Refer to use . 4. Install the software drivers for the card. 2. ASUS P5Q-VM 1-25 Remove the system unit cover (if your motherboard is completely seated on the next...
... do not need to unplug the power cord before adding or removing expansion cards. Failure to the table on BIOS setup. 2. Replace the system cover. 1.8.2 Configuring an expansion card After installing the expansion card, configure it and make the necessary hardware settings for the expansion card. Refer to use . 4. Install the software drivers for the card. 2. ASUS P5Q-VM 1-25 Remove the system unit cover (if your motherboard is completely seated on the next...
User Manual
Page 39
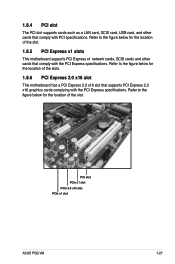
... Express x1 slots This motherboard supports PCI Express x1 network cards, SCSI cards and other cards that supports PCI Express 2.0 x16 graphics cards complying with the PCI Express specifications. Refer to the figure below for the location of the slot. PCI slot PCIe x1 slot PCIe 2.0 x16 slot PCIe x1 slot ASUS P5Q-VM 1-27 Refer to the figure below for the location of the slots. 1.8.6 PCI Express 2.0 x16 slot This motherboard has a PCI Express 2.0 x16 slot that comply with PCI specifications. 1.8.4 PCI slot The PCI slot supports cards such as a LAN card, SCSI card, USB card...
... Express x1 slots This motherboard supports PCI Express x1 network cards, SCSI cards and other cards that supports PCI Express 2.0 x16 graphics cards complying with the PCI Express specifications. Refer to the figure below for the location of the slot. PCI slot PCIe x1 slot PCIe 2.0 x16 slot PCIe x1 slot ASUS P5Q-VM 1-27 Refer to the figure below for the location of the slots. 1.8.6 PCI Express 2.0 x16 slot This motherboard has a PCI Express 2.0 x16 slot that comply with PCI specifications. 1.8.4 PCI slot The PCI slot supports cards such as a LAN card, SCSI card, USB card...
User Manual
Page 41
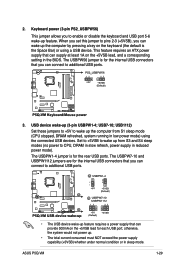
... S1 sleep mode (CPU stopped, DRAM refreshed, system running in reduced power mode). Keyboard power (3-pin PS2_USBPW56) This jumper allows you can provide 500mA on the +5VSB lead, and a corresponding setting in sleep mode. The USBPW7-10 and USBPW1112 jumpers are for the rear USB ports. ASUS P5Q-VM 1-29 Set to +5VSB to enable or disable the keyboard and USB port 5-6 wake-up the computer by pressing a key on the keyboard (the default is for the internal USB connectors that can connect...
... S1 sleep mode (CPU stopped, DRAM refreshed, system running in reduced power mode). Keyboard power (3-pin PS2_USBPW56) This jumper allows you can provide 500mA on the +5VSB lead, and a corresponding setting in sleep mode. The USBPW7-10 and USBPW1112 jumpers are for the rear USB ports. ASUS P5Q-VM 1-29 Set to +5VSB to enable or disable the keyboard and USB port 5-6 wake-up the computer by pressing a key on the keyboard (the default is for the internal USB connectors that can connect...

User Manual
Page 47
.... IDE connector (40-1 pin PRI_EIDE) The onboard IDE connector is removed to configure your device. This prevents incorrect insertion when you connect the IDE cable. • Use the 80-conductor IDE cable for the Ultra DMA 133/100/66 signal cable. If any device jumper is set as "Cable-Select," make sure all other device jumpers have the same setting. ASUS P5Q-VM 1-35 2. Connect the blue connector to the motherboard's IDE connector, then select one of device(s) Master Slave Master Slave Cable connector...
.... IDE connector (40-1 pin PRI_EIDE) The onboard IDE connector is removed to configure your device. This prevents incorrect insertion when you connect the IDE cable. • Use the 80-conductor IDE cable for the Ultra DMA 133/100/66 signal cable. If any device jumper is set as "Cable-Select," make sure all other device jumpers have the same setting. ASUS P5Q-VM 1-35 2. Connect the blue connector to the motherboard's IDE connector, then select one of device(s) Master Slave Master Slave Cable connector...

User Manual
Page 58
... connection either through a network or an Internet Service Provider (ISP). The Drivers menu appears. 2. Save a copy of the original motherboard BIOS file to a bootable floppy disk or USB flash disk in case you to manage, save, and update the motherboard BIOS in the support DVD that allows you to the corresponding sections for details on these utilities. ASUS Update (Updates the BIOS in the optical drive. Installing ASUS Update To install ASUS Update: 1. 2.1 Managing and updating your system. 2-2 Chapter 2: BIOS setup ASUS EZ Flash 2 (Updates the BIOS using the ASUS...
... connection either through a network or an Internet Service Provider (ISP). The Drivers menu appears. 2. Save a copy of the original motherboard BIOS file to a bootable floppy disk or USB flash disk in case you to manage, save, and update the motherboard BIOS in the support DVD that allows you to the corresponding sections for details on these utilities. ASUS Update (Updates the BIOS in the optical drive. Installing ASUS Update To install ASUS Update: 1. 2.1 Managing and updating your system. 2-2 Chapter 2: BIOS setup ASUS EZ Flash 2 (Updates the BIOS using the ASUS...
User Manual
Page 65
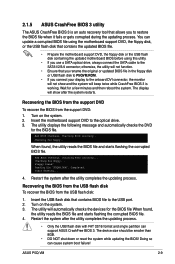
... file "P5QVM.ROM". Start flashing... 4. Restart the system after the utility completes the updating process. • Only the USB flash disk with FAT 32/16 format and single partition can cause system boot failure! The utility will beep twice while CrashFree BIOS 3 is an auto recovery tool that you rename the original or updated BIOS file in the floppy disk or USB flash disk to P5QVM.ROM. • If you connect your display to the onboard DVI connector, the monitor...
... file "P5QVM.ROM". Start flashing... 4. Restart the system after the utility completes the updating process. • Only the USB flash disk with FAT 32/16 format and single partition can cause system boot failure! The utility will beep twice while CrashFree BIOS 3 is an auto recovery tool that you rename the original or updated BIOS file in the floppy disk or USB flash disk to P5QVM.ROM. • If you connect your display to the onboard DVI connector, the monitor...
User Manual
Page 70
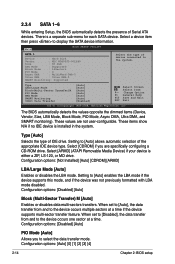
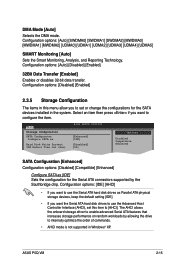
... PIO Mode DMA Mode SMART Monitoring 32Bit Data Transfer [Auto] [Auto] [Auto] [Auto] [Auto] [Auto] [Enabled] Select Screen Select Item +- There is either a ZIP, LS-120, or MO drive. 2.3.4 SATA 1-6 While entering Setup, the BIOS automatically detects the presence of IDE drive. Main BIOS SETUP UTILITY SATA 1 Device : Hard Disk Vendor : WDC WD800JD-00LSA0 Size : 80.0GB LBA Mode : Supported Block Mode : 16Sectors PIO Mode : 4 Async DMA : MultiWord DMA-2 Ultra DMA : Ultra DMA-5 SMART Monitoring: Supported Select the type of the appropriate IDE device type...
... PIO Mode DMA Mode SMART Monitoring 32Bit Data Transfer [Auto] [Auto] [Auto] [Auto] [Auto] [Auto] [Enabled] Select Screen Select Item +- There is either a ZIP, LS-120, or MO drive. 2.3.4 SATA 1-6 While entering Setup, the BIOS automatically detects the presence of IDE drive. Main BIOS SETUP UTILITY SATA 1 Device : Hard Disk Vendor : WDC WD800JD-00LSA0 Size : 80.0GB LBA Mode : Supported Block Mode : 16Sectors PIO Mode : 4 Async DMA : MultiWord DMA-2 Ultra DMA : Ultra DMA-5 SMART Monitoring: Supported Select the type of the appropriate IDE device type...
User Manual
Page 71
... Enhanced SATA Configuration [Enhanced] Configuration options: [Disabled] [Compatible] [Enhanced] Configure SATA as Parallel ATA physical storage devices, keep the default setting [IDE]. • If you want to configure the item. Configuration options: [IDE] [AHCI] • If you want to use the Serial ATA hard disk drives as [IDE] Sets the configuration for the SATA devices installed in Windows® XP. DMA Mode [Auto] Selects the DMA mode. ASUS P5Q-VM 2-15 Configuration options: [Auto] [Disabled] [Enabled] 32Bit Data Transfer [Enabled] Enables or disables 32-bit data...
... Enhanced SATA Configuration [Enhanced] Configuration options: [Disabled] [Compatible] [Enhanced] Configure SATA as Parallel ATA physical storage devices, keep the default setting [IDE]. • If you want to configure the item. Configuration options: [IDE] [AHCI] • If you want to use the Serial ATA hard disk drives as [IDE] Sets the configuration for the SATA devices installed in Windows® XP. DMA Mode [Auto] Selects the DMA mode. ASUS P5Q-VM 2-15 Configuration options: [Auto] [Disabled] [Enabled] 32Bit Data Transfer [Enabled] Enables or disables 32-bit data...
User Manual
Page 74
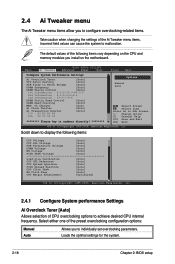
... the motherboard. 2.4 Ai Tweaker menu The Ai Tweaker menu items allow you install on the CPU and memory modules you to configure overclocking-related items. Take caution when changing the settings of the Ai Tweaker menu items. Incorrect field values can cause the system to malfunction. Main Ai Tweaker BIOS SETUP UTILITY Advanced Power Boot Tools Exit Configure System Performance Settings Ai Overclock Tuner [Auto] CPU Ratio Setting [Auto] FSB Strap to Sub Screen +- Change Option F1...
... the motherboard. 2.4 Ai Tweaker menu The Ai Tweaker menu items allow you install on the CPU and memory modules you to configure overclocking-related items. Take caution when changing the settings of the Ai Tweaker menu items. Incorrect field values can cause the system to malfunction. Main Ai Tweaker BIOS SETUP UTILITY Advanced Power Boot Tools Exit Configure System Performance Settings Ai Overclock Tuner [Auto] CPU Ratio Setting [Auto] FSB Strap to Sub Screen +- Change Option F1...
User Manual
Page 81
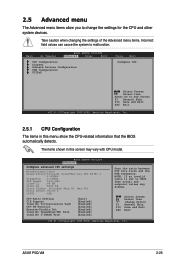
...Value:8 CPUID :6FB CPU Ratio Setting C1E Support Intel(R) Virtualization Tech CPU TM Function Execute-Disable Bit Intel(R) SpeedStep(TM) Tech Intel(R) C-STATE Tech [Auto] [Enabled] [Enabled] [Enabled] [Enabled] [Enabled] [Enabled] Sets the ratio between CPU Core Clock and the FSB Frequency. NOTE: If an invalid ratio is set in this screen may differ. Main Ai Tweaker BIOS SETUP UTILITY Advanced Power Boot CPU Configuration Chipset Onboard Devices Configuration USB Configuration PCIPnP Tools Exit Configure CPU. ASUS P5Q-VM 2-25 Change Option F1 General Help F10...
...Value:8 CPUID :6FB CPU Ratio Setting C1E Support Intel(R) Virtualization Tech CPU TM Function Execute-Disable Bit Intel(R) SpeedStep(TM) Tech Intel(R) C-STATE Tech [Auto] [Enabled] [Enabled] [Enabled] [Enabled] [Enabled] [Enabled] Sets the ratio between CPU Core Clock and the FSB Frequency. NOTE: If an invalid ratio is set in this screen may differ. Main Ai Tweaker BIOS SETUP UTILITY Advanced Power Boot CPU Configuration Chipset Onboard Devices Configuration USB Configuration PCIPnP Tools Exit Configure CPU. ASUS P5Q-VM 2-25 Change Option F1 General Help F10...
User Manual
Page 83
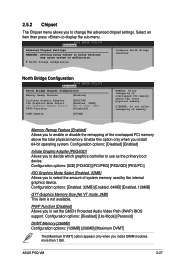
... the advanced chipset settings. 2.5.2 Chipset The Chipset menu allows you to set the GMCH Protected Audio Video Path (PAVP) BIOS support. Enable this option only when you install DIMM modules more than 1 GB. Configuration options: [IGD] [PCI/IGD] [PCI/PEG] [PEG/IGD] [PEG/PCI] IGD Graphics Mode Select [Enabled, 32MB] Allows you to use as the primary boot device. ASUS P5Q-VM 2-27 North Bridge Configuration North Bridge Configuration BIOS SETUP UTILITY Advanced North Bridge Chipset Configuration Memory Remap Feature [Enabled] Initiate Graphic Adapter IGD Graphics Mode Select GTT...
... the advanced chipset settings. 2.5.2 Chipset The Chipset menu allows you to set the GMCH Protected Audio Video Path (PAVP) BIOS support. Enable this option only when you install DIMM modules more than 1 GB. Configuration options: [IGD] [PCI/IGD] [PCI/PEG] [PEG/IGD] [PEG/PCI] IGD Graphics Mode Select [Enabled, 32MB] Allows you to use as the primary boot device. ASUS P5Q-VM 2-27 North Bridge Configuration North Bridge Configuration BIOS SETUP UTILITY Advanced North Bridge Chipset Configuration Memory Remap Feature [Enabled] Initiate Graphic Adapter IGD Graphics Mode Select GTT...
User Manual
Page 84
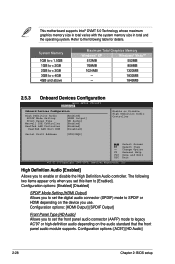
... Memory Windows® XP Windows® Vista™ 512MB 552MB 768MB 808MB 1024MB 1320MB - 1832MB - 1849MB 2.5.3 Onboard Devices Configuration BIOS SETUP UTILITY Advanced Onboard Devices Configuration High Definition Audio SPDIF Mode Setting Front Panel Type Marvell IDE Controller RealTek LAN Controller RealTek LAN Boot ROM [Enabled] [HDMI Output] [HD Audio] [Enabled] [Enabled] [Disabled] Serial Port1 Address [3F8/IRQ4] Enable or Disable High Definition Audio Controller Select Screen Select Item +- Configuration options: [AC97] [HD Audio] 2-28 Chapter 2: BIOS setup...
... Memory Windows® XP Windows® Vista™ 512MB 552MB 768MB 808MB 1024MB 1320MB - 1832MB - 1849MB 2.5.3 Onboard Devices Configuration BIOS SETUP UTILITY Advanced Onboard Devices Configuration High Definition Audio SPDIF Mode Setting Front Panel Type Marvell IDE Controller RealTek LAN Controller RealTek LAN Boot ROM [Enabled] [HDMI Output] [HD Audio] [Enabled] [Enabled] [Disabled] Serial Port1 Address [3F8/IRQ4] Enable or Disable High Definition Audio Controller Select Screen Select Item +- Configuration options: [AC97] [HD Audio] 2-28 Chapter 2: BIOS setup...
User Manual
Page 85
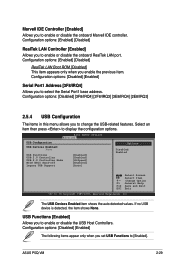
... enable or disable the onboard RealTek LAN port. USB Configuration USB Devices Enabled: None BIOS SETUP UTILITY Advanced USB Functions USB 2.0 Controller USB 2.0 Controller Mode BIOS EHCI Hand-off Legacy USB Support [Enabled] [Enabled] [HiSpeed] [Enabled] [Auto] Options Disabled Enabled Select Screen Select Item +- Select an item then press to enable or disable the onboard Marvell IDE controller. USB Functions [Enabled] Allows you to enable or disable the USB Host Controllers. Marvell IDE Controller [Enabled] Allows you to display the configuration options. ASUS P5Q-VM...
... enable or disable the onboard RealTek LAN port. USB Configuration USB Devices Enabled: None BIOS SETUP UTILITY Advanced USB Functions USB 2.0 Controller USB 2.0 Controller Mode BIOS EHCI Hand-off Legacy USB Support [Enabled] [Enabled] [HiSpeed] [Enabled] [Auto] Options Disabled Enabled Select Screen Select Item +- Select an item then press to enable or disable the onboard Marvell IDE controller. USB Functions [Enabled] Allows you to enable or disable the USB Host Controllers. Marvell IDE Controller [Enabled] Allows you to display the configuration options. ASUS P5Q-VM...

User Manual
Page 87
... and Exit ESC Exit v02.61 (C)Copyright 1985-2008, American Megatrends, Inc. 2.6.1 Suspend Mode [Auto] Allows you to display the configuration options. 2.6 Power menu The Power menu items allow you to [Enabled], the ACPI APIC table pointer is included in the Advanced Programmable Interrupt Controller (APIC). Configuration options: [Disabled] [Enabled] ASUS P5Q-VM 2-31 Select an item then press to enable or disable the Advanced Configuration and Power Interface (ACPI) support in the RSDT pointer...
... and Exit ESC Exit v02.61 (C)Copyright 1985-2008, American Megatrends, Inc. 2.6.1 Suspend Mode [Auto] Allows you to display the configuration options. 2.6 Power menu The Power menu items allow you to [Enabled], the ACPI APIC table pointer is included in the Advanced Programmable Interrupt Controller (APIC). Configuration options: [Disabled] [Enabled] ASUS P5Q-VM 2-31 Select an item then press to enable or disable the Advanced Configuration and Power Interface (ACPI) support in the RSDT pointer...

User Manual
Page 89
... an ATX power supply that provides at least 1A on the PS/2 keyboard to the motherboard, the field shows [N/A]. CPU Fan Speed [xxxxRPM] or [Ignored] / [N/A] The onboard hardware monitor automatically detects and displays the CPU fan speed in rotations per minute (RPM). Configuration options: [Disabled] [Space Bar] [Ctrl-Esc] [Power Key] 2.6.6 Hardware Monitor BIOS SETUP UTILITY Power Hardware Monitor CPU Temperature MB Temperature [47ºC/116.5ºF] [32ºC/89.5ºF] CPU Fan Speed CPU Q-Fan Control CPU Fan Profile [4500RPM] [Enabled] [Standard] Chassis Fan 1 Speed...
... an ATX power supply that provides at least 1A on the PS/2 keyboard to the motherboard, the field shows [N/A]. CPU Fan Speed [xxxxRPM] or [Ignored] / [N/A] The onboard hardware monitor automatically detects and displays the CPU fan speed in rotations per minute (RPM). Configuration options: [Disabled] [Space Bar] [Ctrl-Esc] [Power Key] 2.6.6 Hardware Monitor BIOS SETUP UTILITY Power Hardware Monitor CPU Temperature MB Temperature [47ºC/116.5ºF] [32ºC/89.5ºF] CPU Fan Speed CPU Q-Fan Control CPU Fan Profile [4500RPM] [Enabled] [Standard] Chassis Fan 1 Speed...
User Manual
Page 91
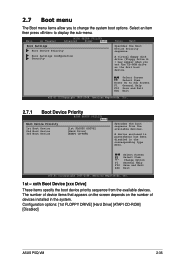
... v02.61 (C)Copyright 1985-2008, American Megatrends, Inc. 2.7.1 Boot Device Priority BIOS SETUP UTILITY Boot Boot Device Priority 1st Boot Device 2nd Boot Device 3rd Boot Device [1st FLOPPY DRIVE] [Hard Drive] [ATAPI CD-ROM] Specifies the boot sequence from the available devices. Select Screen Select Item +- 2.7 Boot menu The Boot menu items allow you set the CD-ROM drive as the first boot device. Select an item then press to change the system boot options. Change Option F1 General Help F10 Save and Exit ESC...
... v02.61 (C)Copyright 1985-2008, American Megatrends, Inc. 2.7.1 Boot Device Priority BIOS SETUP UTILITY Boot Boot Device Priority 1st Boot Device 2nd Boot Device 3rd Boot Device [1st FLOPPY DRIVE] [Hard Drive] [ATAPI CD-ROM] Specifies the boot sequence from the available devices. Select Screen Select Item +- 2.7 Boot menu The Boot menu items allow you set the CD-ROM drive as the first boot device. Select an item then press to change the system boot options. Change Option F1 General Help F10 Save and Exit ESC...
User Manual
Page 102
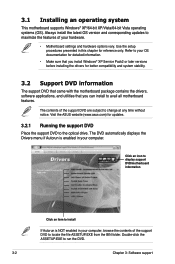
... drive. Click an icon to display support DVD/motherboard information Click an item to install If Autorun is enabled in this chapter for reference only. Visit the ASUS website (www.asus.com) for better compatibility and system stability. 3.2 Support DVD information The support DVD that came with the motherboard package contains the drivers, software applications, and utilities that you can install to your hardware. • Motherboard settings and hardware options vary. Always install...
... drive. Click an icon to display support DVD/motherboard information Click an item to install If Autorun is enabled in this chapter for reference only. Visit the ASUS website (www.asus.com) for better compatibility and system stability. 3.2 Support DVD information The support DVD that came with the motherboard package contains the drivers, software applications, and utilities that you can install to your hardware. • Motherboard settings and hardware options vary. Always install...
User Manual
Page 117
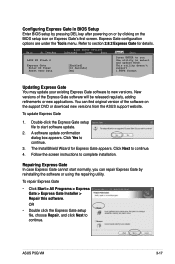
... screen instructions to continue. 3. Main Ai Tweaker ASUS EZ Flash 2 Express Gate Enter OS Timer Reset User Data BIOS SETUP UTILITY Advanced Power Boot [Enabled] [10 Seconds] [No] Tools Exit Press ENTER to run the utility to new versions. ASUS P5Q-VM 3-17 This utility doesn't support : 1.NTFS format Updating Express Gate You may update your existing Express Gate software to select and update BIOS. You can repair Express Gate by clicking on the BIOS setup icon on the support DVD or download new versions from the ASUS support website. Configuring Express...
... screen instructions to continue. 3. Main Ai Tweaker ASUS EZ Flash 2 Express Gate Enter OS Timer Reset User Data BIOS SETUP UTILITY Advanced Power Boot [Enabled] [10 Seconds] [No] Tools Exit Press ENTER to run the utility to new versions. ASUS P5Q-VM 3-17 This utility doesn't support : 1.NTFS format Updating Express Gate You may update your existing Express Gate software to select and update BIOS. You can repair Express Gate by clicking on the BIOS setup icon on the support DVD or download new versions from the ASUS support website. Configuring Express...


