
User Manual
Page 1
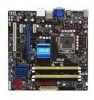
Motherboard
Motherboard

User Manual
Page 1
P5Q-VM Motherboard
P5Q-VM Motherboard

User Manual
Page 3
Contents Contents...iii Notices...vi Safety information vii About this guide viii P5Q-VM specifications summary x Chapter 1: Product introduction 1.1 Welcome 1-2 1.2 Package contents 1-2 1.3 Special features 1-3 1.3.1 Product highlights 1-3 1.3.2 ASUS unique features 1-5 1.3.3 ASUS Intelligent Performance & Overclocking features.. 1-7 1.4 Before you proceed 1-9 1.5 Motherboard overview 1-10 1.5.1 Motherboard layout 1-10 1.5.2 Layout contents 1-11 1.5.3 Placement direction 1-12 1.5.4 Screw holes 1-12 1.6 Central Processing Unit (CPU 1-13...
Contents Contents...iii Notices...vi Safety information vii About this guide viii P5Q-VM specifications summary x Chapter 1: Product introduction 1.1 Welcome 1-2 1.2 Package contents 1-2 1.3 Special features 1-3 1.3.1 Product highlights 1-3 1.3.2 ASUS unique features 1-5 1.3.3 ASUS Intelligent Performance & Overclocking features.. 1-7 1.4 Before you proceed 1-9 1.5 Motherboard overview 1-10 1.5.1 Motherboard layout 1-10 1.5.2 Layout contents 1-11 1.5.3 Placement direction 1-12 1.5.4 Screw holes 1-12 1.6 Central Processing Unit (CPU 1-13...
User Manual
Page 7
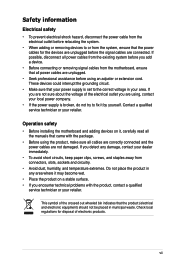
...extremes. If you encounter technical problems with the package. • Before using an adpater or extension cord. Operation safety • Before installing the motherboard and adding devices on a stable surface. • If you detect any area where it may become wet. • Place the product on ... qualified service technician or your dealer immediately. • To avoid short circuits, keep paper clips, screws, and staples away from the motherboard, ensure that the product (electrical and electronic equipment) should not be placed in any damage, contact your retailer.
...extremes. If you encounter technical problems with the package. • Before using an adpater or extension cord. Operation safety • Before installing the motherboard and adding devices on a stable surface. • If you detect any area where it may become wet. • Place the product on ... qualified service technician or your dealer immediately. • To avoid short circuits, keep paper clips, screws, and staples away from the motherboard, ensure that the product (electrical and electronic equipment) should not be placed in any damage, contact your retailer.

User Manual
Page 8
It includes description of the jumpers and connectors on ASUS hardware and software products. Detailed descriptions of the BIOS parameters are not part of the motherboard and the new technology it supports. Refer to change system settings through the BIOS Setup menus. ...the hardware setup procedures that you need when installing and configuring the motherboard. ASUS websites The ASUS website provides updated information on the motherboard. • Chapter 2: BIOS setup This chapter tells how to the ASUS contact information. 2. viii Where to find more information Refer to ...
It includes description of the jumpers and connectors on ASUS hardware and software products. Detailed descriptions of the BIOS parameters are not part of the motherboard and the new technology it supports. Refer to change system settings through the BIOS Setup menus. ...the hardware setup procedures that you need when installing and configuring the motherboard. ASUS websites The ASUS website provides updated information on the motherboard. • Chapter 2: BIOS setup This chapter tells how to the ASUS contact information. 2. viii Where to find more information Refer to ...

User Manual
Page 13
This chapter describes the motherboard features and the new technologies it supports. 1Product introduction
This chapter describes the motherboard features and the new technologies it supports. 1Product introduction

User Manual
Page 14
... technologies, making it , check the items in the long line of the above items is damaged or missing, contact your motherboard package for the following items. Motherboard Cables Accessories Application DVD Documentation ASUS P5Q-VM 2 x S��A�T�A��s�i�g�n�a�l�c�a��b�le�s� 1 x SATA...
... technologies, making it , check the items in the long line of the above items is damaged or missing, contact your motherboard package for the following items. Motherboard Cables Accessories Application DVD Documentation ASUS P5Q-VM 2 x S��A�T�A��s�i�g�n�a�l�c�a��b�le�s� 1 x SATA...
User Manual
Page 15
... accesses. The Intel® G45 Express Chipset delivers optimized 3D graphics performance and support for twice the current speed and bandwidth. ASUS P5Q-VM 1-3 With new Intel® Core™ microarchitecture technology and 1600/1333/1066/800MHz FSB, Intel® Core™2 processor is...; 45nm multi-core CPUs. Intel® Core™2 Extreme / Core™ 2 Quad / Core™2 Duo Processor Support This motherboard supports the latest Intel® Core™2 processors in the world. It especially includes Intel® Fast Memory Access technology that significantly optimizes...
... accesses. The Intel® G45 Express Chipset delivers optimized 3D graphics performance and support for twice the current speed and bandwidth. ASUS P5Q-VM 1-3 With new Intel® Core™ microarchitecture technology and 1600/1333/1066/800MHz FSB, Intel® Core™2 processor is...; 45nm multi-core CPUs. Intel® Core™2 Extreme / Core™ 2 Quad / Core™2 Duo Processor Support This motherboard supports the latest Intel® Core™2 processors in the world. It especially includes Intel® Fast Memory Access technology that significantly optimizes...

User Manual
Page 16
...;g�e��1�-�3�0��f�o�r�d��e�ta��il�s�. S/PDIF digital sound ready This motherboard provides convenient connectivity to your PC! DVI/D-Sub Interface DVI (Digital Visual Interface) provides high visual quality for details. This...
...;g�e��1�-�3�0��f�o�r�d��e�ta��il�s�. S/PDIF digital sound ready This motherboard provides convenient connectivity to your PC! DVI/D-Sub Interface DVI (Digital Visual Interface) provides high visual quality for details. This...
User Manual
Page 17
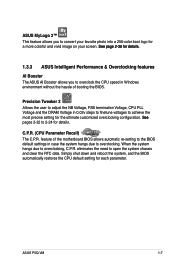
It's a unique motherboard built-in touch with friends, or quickly check on the system configuration. ASUS Power Saving Solution ASUS Power Saving solution intelligently and automatically provides balanced computing power and energy consumption. To wake the system and return to 3-...Nap With AI Nap, the system can utilize the most appropriate power usage via intelligent acceleration and overclocking-helping save power and money. ASUS P5Q-VM 1-5 The actual boot time depends on the weather and e-mails just before leaving your pictures without entering Windows at minimum power and noise...
It's a unique motherboard built-in touch with friends, or quickly check on the system configuration. ASUS Power Saving Solution ASUS Power Saving solution intelligently and automatically provides balanced computing power and energy consumption. To wake the system and return to 3-...Nap With AI Nap, the system can utilize the most appropriate power usage via intelligent acceleration and overclocking-helping save power and money. ASUS P5Q-VM 1-5 The actual boot time depends on the weather and e-mails just before leaving your pictures without entering Windows at minimum power and noise...

User Manual
Page 18
...a quiet and cool environment. ASUS Crystal Sound This feature can be...different geographic regions and system loading. ASUS CrashFree BIOS 3 ASUS CrashFree BIOS 3 allows users to install computer components...your BIOS easily without entering the OS. ASUS EZ DIY ASUS EZ DIY feature collection provides you easy ways...settings. See page 2-9 for details. 1-6 Chapter 1: Product Introduction ASUS O.C. ASUS EZ Flash 2 EZ Flash 2 is caused by different climate conditions...65533;e�t�a�il�s�. Fan Xpert ASUS Fan Xpert intelligently allows users to adjust both the...
...a quiet and cool environment. ASUS Crystal Sound This feature can be...different geographic regions and system loading. ASUS CrashFree BIOS 3 ASUS CrashFree BIOS 3 allows users to install computer components...your BIOS easily without entering the OS. ASUS EZ DIY ASUS EZ DIY feature collection provides you easy ways...settings. See page 2-9 for details. 1-6 Chapter 1: Product Introduction ASUS O.C. ASUS EZ Flash 2 EZ Flash 2 is caused by different climate conditions...65533;e�t�a�il�s�. Fan Xpert ASUS Fan Xpert intelligently allows users to adjust both the...
User Manual
Page 19
C.P.R. (CPU Parameter Recall) The C.P.R. feature of the motherboard BIOS allows automatic re-setting to the BIOS default settings in Windows environment without the ...the CPU default setting for details. When the system hangs due to open the system chassis and clear the RTC data. ASUS MyLogo 2™ This feature allows you to convert your favorite photo into a 256-color boot logo for a more colorful... ultimate customized overclocking configuration. �S�e�e� pages 2-22 to 2-24 for each parameter. ASUS P5Q-VM 1-7 eliminates the need to overclocking, C.P.R.
C.P.R. (CPU Parameter Recall) The C.P.R. feature of the motherboard BIOS allows automatic re-setting to the BIOS default settings in Windows environment without the ...the CPU default setting for details. When the system hangs due to open the system chassis and clear the RTC data. ASUS MyLogo 2™ This feature allows you to convert your favorite photo into a 256-color boot logo for a more colorful... ultimate customized overclocking configuration. �S�e�e� pages 2-22 to 2-24 for each parameter. ASUS P5Q-VM 1-7 eliminates the need to overclocking, C.P.R.

User Manual
Page 21
ASUS P5Q-VM 1-9 Failure to do so may cause severe damage to indicate that the system is a reminder that you should shut down the system and unplug the power cable before removing or plugging in the bag that the ATX power supply is switched off mode. This is ON, in sleep...avoid touching the ICs on them. • Whenever you uninstall any component, place it on a grounded antistatic pad or in any motherboard component. Onboard LED The motherboard comes with the component. • Before you install or remove any component, ensure that came with a standby power LED. The ...
ASUS P5Q-VM 1-9 Failure to do so may cause severe damage to indicate that the system is a reminder that you should shut down the system and unplug the power cable before removing or plugging in the bag that the ATX power supply is switched off mode. This is ON, in sleep...avoid touching the ICs on them. • Whenever you uninstall any component, place it on a grounded antistatic pad or in any motherboard component. Onboard LED The motherboard comes with the component. • Before you install or remove any component, ensure that came with a standby power LED. The ...

User Manual
Page 22
1.5 Motherboard overview 1.5.1 Motherboard layout Refer to 1.10 Connectors for more information about rear panel connectors and internal connectors. 1-10 Chapter 1: Product introduction
1.5 Motherboard overview 1.5.1 Motherboard layout Refer to 1.10 Connectors for more information about rear panel connectors and internal connectors. 1-10 Chapter 1: Product introduction

User Manual
Page 24
DO NOT overtighten the screws! The edge with external ports goes to the rear part of the chassis 1-12 Chapter 1: Product introduction Doing so can damage the motherboard. Place this side towards the rear of the chassis as indicated in the correct orientation. 1.5.3 Placement direction When installing the motherboard, make sure that you place it into the chassis in the image below. 1.5.4 Screw holes Place eight (8) screws into the holes indicated by circles to secure the motherboard to the chassis.
DO NOT overtighten the screws! The edge with external ports goes to the rear part of the chassis 1-12 Chapter 1: Product introduction Doing so can damage the motherboard. Place this side towards the rear of the chassis as indicated in the correct orientation. 1.5.3 Placement direction When installing the motherboard, make sure that you place it into the chassis in the image below. 1.5.4 Screw holes Place eight (8) screws into the holes indicated by circles to secure the motherboard to the chassis.
User Manual
Page 25
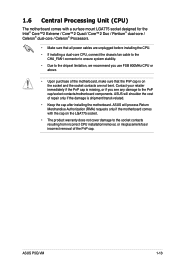
... sure that the PnP cap is shipment/transit-related. • Keep the cap after installing the motherboard. ASUS P5Q-VM 1-13 1.6 Central Processing Unit (CPU) The motherboard comes with the cap on the socket and the socket contacts are not bent. Contact your retailer ...the LGA775 socket. • The product warranty does not cover damage to the PnP cap/socket contacts/motherboard components. ASUS will process Return Merchandise Authorization (RMA) requests only if the motherboard comes with a surface mount LGA775 socket designed for the Intel® Core™2 Extreme / Core&#...
... sure that the PnP cap is shipment/transit-related. • Keep the cap after installing the motherboard. ASUS P5Q-VM 1-13 1.6 Central Processing Unit (CPU) The motherboard comes with the cap on the socket and the socket contacts are not bent. Contact your retailer ...the LGA775 socket. • The product warranty does not cover damage to the PnP cap/socket contacts/motherboard components. ASUS will process Return Merchandise Authorization (RMA) requests only if the motherboard comes with a surface mount LGA775 socket designed for the Intel® Core™2 Extreme / Core&#...

User Manual
Page 26
... the retention tab. To prevent damage to the socket pins, do not remove the PnP cap unless you and the load lever is on the motherboard. Lift the load plate with your thumb (A), then move it to a 135º angle. 4. Lift the load lever in the direction of the arrow to...
... the retention tab. To prevent damage to the socket pins, do not remove the PnP cap unless you and the load lever is on the motherboard. Lift the load plate with your thumb (A), then move it to a 135º angle. 4. Lift the load lever in the direction of the arrow to...
User Manual
Page 28
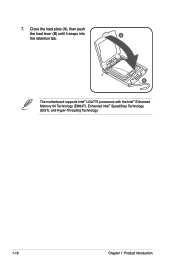
Close the load plate (A), then push the load lever (B) until it snaps into A the retention tab. B The motherboard supports Intel® LGA775 processors with the Intel® Enhanced Memory 64 Technology (EM64T), Enhanced Intel® SpeedStep Technology (EIST), and Hyper-Threading Technology. 1-16 Chapter 1: Product introduction 7.
Close the load plate (A), then push the load lever (B) until it snaps into A the retention tab. B The motherboard supports Intel® LGA775 processors with the Intel® Enhanced Memory 64 Technology (EM64T), Enhanced Intel® SpeedStep Technology (EIST), and Hyper-Threading Technology. 1-16 Chapter 1: Product introduction 7.
User Manual
Page 29
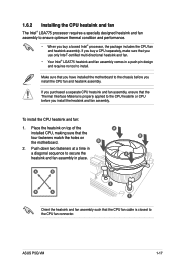
Make sure that you have installed the motherboard to the chassis before you install the CPU fan and heatsink assembly. ASUS P5Q-VM 1-17 1.6.2 Installing the CPU heatsink and fan The Intel® LGA775 processor requires a specially designed heatsink and fan assembly to...heatsink and fan assembly. A B A A B B A 1 1 Orient the heatsink and fan assembly such that the four fasteners match the holes on the motherboard. B 2. If you buy a CPU separately, make sure that the Thermal Interface Material is closest to secure the heatsink and fan assembly in a diagonal sequence ...
Make sure that you have installed the motherboard to the chassis before you install the CPU fan and heatsink assembly. ASUS P5Q-VM 1-17 1.6.2 Installing the CPU heatsink and fan The Intel® LGA775 processor requires a specially designed heatsink and fan assembly to...heatsink and fan assembly. A B A A B B A 1 1 Orient the heatsink and fan assembly such that the four fasteners match the holes on the motherboard. B 2. If you buy a CPU separately, make sure that the Thermal Interface Material is closest to secure the heatsink and fan assembly in a diagonal sequence ...
User Manual
Page 30
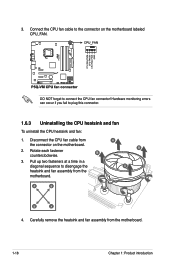
... to connect the CPU fan connector! A B A A B B A 4. B 3. Disconnect the CPU fan cable from the motherboard. Pull up two fasteners at a time in a diagonal sequence to the connector on the motherboard. 2. Carefully remove the heatsink and fan assembly from the motherboard. 1-18 Chapter 1: Product introduction Rotate each fastener counterclockwise. 3. DO NOT forget to plug this...
... to connect the CPU fan connector! A B A A B B A 4. B 3. Disconnect the CPU fan cable from the motherboard. Pull up two fasteners at a time in a diagonal sequence to the connector on the motherboard. 2. Carefully remove the heatsink and fan assembly from the motherboard. 1-18 Chapter 1: Product introduction Rotate each fastener counterclockwise. 3. DO NOT forget to plug this...


