Motherboard Installation Guide
Page 3
... About this guide viii Typography ix P5LD2-VM specifications summary x Chapter 1: Product introduction 1.1 Welcome 1-2 1.2 Package contents 1-2 1.3 Special features 1-2 1.3.1 Product highlights 1-2 1.3.2 Innovative ASUS features 1-5 1.4 Before you proceed 1-6 1.5 Motherboard overview 1-7 1.5.1 Placement direction 1-7 1.5.2 Screw holes 1-7 1.5.3 Motherboard layout 1-8 1.6 Central Processing Unit (CPU 1-9 1.6.1 Installling the CPU 1-9 1.6.2 Installling the CPU heatsink and fan 1-12 1.6.3 Uninstalling the CPU heatsink and fan 1-14 1.7 System memory...
... About this guide viii Typography ix P5LD2-VM specifications summary x Chapter 1: Product introduction 1.1 Welcome 1-2 1.2 Package contents 1-2 1.3 Special features 1-2 1.3.1 Product highlights 1-2 1.3.2 Innovative ASUS features 1-5 1.4 Before you proceed 1-6 1.5 Motherboard overview 1-7 1.5.1 Placement direction 1-7 1.5.2 Screw holes 1-7 1.5.3 Motherboard layout 1-8 1.6 Central Processing Unit (CPU 1-9 1.6.1 Installling the CPU 1-9 1.6.2 Installling the CPU heatsink and fan 1-12 1.6.3 Uninstalling the CPU heatsink and fan 1-14 1.7 System memory...
Motherboard Installation Guide
Page 4
... connectors 1-26 Chapter 2: BIOS setup 2.1 Managing and updating your BIOS 2-2 2.1.1 Creating a bootable floppy disk 2-2 2.1.2 ASUS EZ Flash utility 2-3 2.1.3 AFUDOS utility 2-4 2.1.4 ASUS CrashFree BIOS 2 utility 2-6 2.1.5 ASUS Update utility 2-8 2.2 BIOS setup program 2-11 2.2.1 BIOS menu screen 2-12 2.2.2 Menu bar 2-12 2.2.3 Navigation keys ...2-16 2.3.6 System Information 2-18 2.4 Advanced menu 2-19 2.4.1 JumperFree Configuration 2-19 2.4.2 USB Configuration 2-22 2.4.3 CPU Configuration 2-23 2.4.4 Chipset 2-25 2.4.5 Onboard Devices Configuration 2-26 2.4.6 PCI PnP 2-28 iv
... connectors 1-26 Chapter 2: BIOS setup 2.1 Managing and updating your BIOS 2-2 2.1.1 Creating a bootable floppy disk 2-2 2.1.2 ASUS EZ Flash utility 2-3 2.1.3 AFUDOS utility 2-4 2.1.4 ASUS CrashFree BIOS 2 utility 2-6 2.1.5 ASUS Update utility 2-8 2.2 BIOS setup program 2-11 2.2.1 BIOS menu screen 2-12 2.2.2 Menu bar 2-12 2.2.3 Navigation keys ...2-16 2.3.6 System Information 2-18 2.4 Advanced menu 2-19 2.4.1 JumperFree Configuration 2-19 2.4.2 USB Configuration 2-22 2.4.3 CPU Configuration 2-23 2.4.4 Chipset 2-25 2.4.5 Onboard Devices Configuration 2-26 2.4.6 PCI PnP 2-28 iv
Motherboard Installation Guide
Page 5
... 2.7 Exit menu 2-38 Chapter 3: Software support 3.1 Installing an operating system 3-2 3.2 Support CD information 3-2 3.2.1 Running the support CD 3-2 3.2.2 Drivers menu 3-3 3.2.3 Utilities menu 3-4 3.2.4 Manuals menu 3-6 3.2.5 ASUS Contact information 3-6 Appendix: CPU features A.1 Intel® EM64T A-2 Using the Intel® EM64T feature A-2 A.2 Enhanced Intel SpeedStep® Technology (EIST A-2 A.2.1 System requirements A-2 A.2.2 Using the EIST A-3 A.3 Intel® Hyper...
... 2.7 Exit menu 2-38 Chapter 3: Software support 3.1 Installing an operating system 3-2 3.2 Support CD information 3-2 3.2.1 Running the support CD 3-2 3.2.2 Drivers menu 3-3 3.2.3 Utilities menu 3-4 3.2.4 Manuals menu 3-6 3.2.5 ASUS Contact information 3-6 Appendix: CPU features A.1 Intel® EM64T A-2 Using the Intel® EM64T feature A-2 A.2 Enhanced Intel SpeedStep® Technology (EIST A-2 A.2.1 System requirements A-2 A.2.2 Using the EIST A-3 A.3 Intel® Hyper...

Motherboard Installation Guide
Page 11
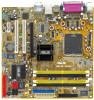
P5LD2-VM DH specifications summary BIOS features 8 Mb Flash ROM, AMI BIOS, PnP, WfM2.0, DMI2.0, SM BIOS 2.3, ASUS EZ Flash, CrashFree BIOS2, Intel Quick Resume Special features ASUS EZ Flash ASUS CrashFree BIOS 2 ASUS MyLogo™ ASUS CPR (CPU Parameter Recall) I n d u s t r y s t a n d a r d PCI 2.2, USB 2.0 Manageability WOR by Ring, WOL/WOR by PME, WO USB, WO KB/MS PXE, RPL Internal connectors...
P5LD2-VM DH specifications summary BIOS features 8 Mb Flash ROM, AMI BIOS, PnP, WfM2.0, DMI2.0, SM BIOS 2.3, ASUS EZ Flash, CrashFree BIOS2, Intel Quick Resume Special features ASUS EZ Flash ASUS CrashFree BIOS 2 ASUS MyLogo™ ASUS CPR (CPU Parameter Recall) I n d u s t r y s t a n d a r d PCI 2.2, USB 2.0 Manageability WOR by Ring, WOL/WOR by PME, WO USB, WO KB/MS PXE, RPL Internal connectors...

Motherboard Installation Guide
Page 14
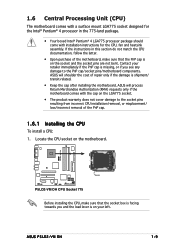
...) socket designed for the following items. Motherboard ASUS P5LD2-VM DH motherboard Cables 1 x Serial ATA signal cable 1 x Serial ATA power cable 1 x Ultra DMA 133 cable 1 x Floppy disk drive cable Accessories I/O shield A p p l i c a t i o n C D s ASUS motherboard support CD D o c u m e n t a t i o n User guide If any of ASUS quality motherboards! Intel® 65nm Dual-Core Technology CPU support This motherboard supports Intel(R) Pentium(R) D/Pentium...
...) socket designed for the following items. Motherboard ASUS P5LD2-VM DH motherboard Cables 1 x Serial ATA signal cable 1 x Serial ATA power cable 1 x Ultra DMA 133 cable 1 x Floppy disk drive cable Accessories I/O shield A p p l i c a t i o n C D s ASUS motherboard support CD D o c u m e n t a t i o n User guide If any of ASUS quality motherboards! Intel® 65nm Dual-Core Technology CPU support This motherboard supports Intel(R) Pentium(R) D/Pentium...

Motherboard Installation Guide
Page 15
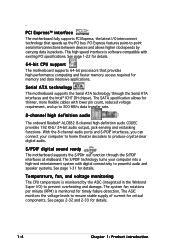
... sharp graphics, flawless video playback, and support for details. Enabling Intel Viiv platform also requires: - Dual-core processors contain two physical CPU cores with dedicated L2 caches to install the Intel® Viiv™ Technology driver and software. Intel(R) 65nm dual-core processors utilize ...(FSB), dual channel DDR2 at speeds of 600 MHz (FSB 800) or 533 MHz (FSB 1066/800) to the BIOS screen on page 2-33. ASUS P5LD2-VM DH 1-3 To enable Intel® Viiv™ Technology, make sure you to 8.5 GB/s. See pages 3-4 and 3-5 for a thinner, lighter design without ...
... sharp graphics, flawless video playback, and support for details. Enabling Intel Viiv platform also requires: - Dual-core processors contain two physical CPU cores with dedicated L2 caches to install the Intel® Viiv™ Technology driver and software. Intel(R) 65nm dual-core processors utilize ...(FSB), dual channel DDR2 at speeds of 600 MHz (FSB 800) or 533 MHz (FSB 1066/800) to the BIOS screen on page 2-33. ASUS P5LD2-VM DH 1-3 To enable Intel® Viiv™ Technology, make sure you to 8.5 GB/s. See pages 3-4 and 3-5 for a thinner, lighter design without ...
Motherboard Installation Guide
Page 16
... packets. S/PDIF digital sound ready The motherboard supports the S/PDIF Out function through the Serial ATA interfaces and the Intel® ICH7 DH chipset. The ASIC monitors the voltage levels to prevent overheating and damage. The system fan rotations per minute (RPM) is monitored for ...to ensure stable supply of current for thinner, more flexible cables with existing PCI specifications. See page 1-22 for details. 64-bit CPU support The motherboard supports 64-bit processors that speeds up to produce crystal-clear digital audio. Temperature, fan, and voltage monitoring The...
... packets. S/PDIF digital sound ready The motherboard supports the S/PDIF Out function through the Serial ATA interfaces and the Intel® ICH7 DH chipset. The ASIC monitors the voltage levels to prevent overheating and damage. The system fan rotations per minute (RPM) is monitored for ...to ensure stable supply of current for thinner, more flexible cables with existing PCI specifications. See page 1-22 for details. 64-bit CPU support The motherboard supports 64-bit processors that speeds up to produce crystal-clear digital audio. Temperature, fan, and voltage monitoring The...
Motherboard Installation Guide
Page 17
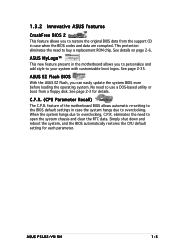
... Recall) The C.P.R. Simply shut down and reboot the system, and the BIOS automatically restores the CPU default setting for details. ASUS EZ Flash BIOS With the ASUS EZ Flash, you can easily update the system BIOS even before loading the operating system. When the...due to restore the original BIOS data from a floppy disk. See details on page 2-6. 1.3.2 Innovative ASUS features CrashFree BIOS 2 This feature allows you to overclocking, C.P.R. See page 2-35. ASUS P5LD2-VM DH 1-5 This protection eliminates the need to buy a replacement ROM chip. eliminates the need to open the...
... Recall) The C.P.R. Simply shut down and reboot the system, and the BIOS automatically restores the CPU default setting for details. ASUS EZ Flash BIOS With the ASUS EZ Flash, you can easily update the system BIOS even before loading the operating system. When the...due to restore the original BIOS data from a floppy disk. See details on page 2-6. 1.3.2 Innovative ASUS features CrashFree BIOS 2 This feature allows you to overclocking, C.P.R. See page 2-35. ASUS P5LD2-VM DH 1-5 This protection eliminates the need to buy a replacement ROM chip. eliminates the need to open the...
Motherboard Installation Guide
Page 21
... socket. • The product warranty does not cover damage to the PnP cap/socket pins/motherboard components. ASUS P5LD2-VM DH 1-9 ASUS will process Return Merchandise Authorization (RMA) requests only if the motherboard comes with installation instructions for the CPU, fan and heatsink assembly. If the instructions in the 775-land package. • Your boxed Intel...
... socket. • The product warranty does not cover damage to the PnP cap/socket pins/motherboard components. ASUS P5LD2-VM DH 1-9 ASUS will process Return Merchandise Authorization (RMA) requests only if the motherboard comes with installation instructions for the CPU, fan and heatsink assembly. If the instructions in the 775-land package. • Your boxed Intel...
Motherboard Installation Guide
Page 22
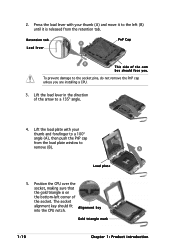
... Chapter 1: Product introduction Retention tab A Load lever PnP Cap B This side of the cam box should fit A l i g n m e n t k e y into the CPU notch. Position the CPU over the socket, making sure that the gold triangle is released from the load plate window to the left corner of the arrow to...forefinger to a 100º angle (A), then push the PnP cap from the retention tab. 2. The socket alignment key should face you are installing a CPU. 3. Press the load lever with your thumb (A) and move it is on the bottom-left (B) until it to remove (B). To prevent damage to...
... Chapter 1: Product introduction Retention tab A Load lever PnP Cap B This side of the cam box should fit A l i g n m e n t k e y into the CPU notch. Position the CPU over the socket, making sure that the gold triangle is released from the load plate window to the left corner of the arrow to...forefinger to a 100º angle (A), then push the PnP cap from the retention tab. 2. The socket alignment key should face you are installing a CPU. 3. Press the load lever with your thumb (A) and move it is on the bottom-left (B) until it to remove (B). To prevent damage to...
Motherboard Installation Guide
Page 23
... prevent bending the connectors on these CPU features. Close the load plate (A), then A push the load lever (B) until it snaps into the socket to the Appendix for more information on the socket and damaging the CPU! DO NOT force the CPU into the retention tab. ASUS P5LD2-VM DH 1-11 B The CPU fits in only one correct orientation...
... prevent bending the connectors on these CPU features. Close the load plate (A), then A push the load lever (B) until it snaps into the socket to the Appendix for more information on the socket and damaging the CPU! DO NOT force the CPU into the retention tab. ASUS P5LD2-VM DH 1-11 B The CPU fits in only one correct orientation...

Motherboard Installation Guide
Page 24
... fan assembly comes in a push-pin design and requires no tool to install. Place the heatsink on the motherboard. 1.6.2 Installing the CPU heatsink and fan The Intel® Pentium® 4 LGA775 processor requires a specially designed heatsink and fan assembly to ensure optimum thermal condition... and performance. • Install the motherboard to the CPU heatsink or CPU before you install the CPU fan and heatsink assembly • When you buy a CPU separately, make sure that a Thermal Interface Material is oriented as shown, with the narrow...
... fan assembly comes in a push-pin design and requires no tool to install. Place the heatsink on the motherboard. 1.6.2 Installing the CPU heatsink and fan The Intel® Pentium® 4 LGA775 processor requires a specially designed heatsink and fan assembly to ensure optimum thermal condition... and performance. • Install the motherboard to the CPU heatsink or CPU before you install the CPU fan and heatsink assembly • When you buy a CPU separately, make sure that a Thermal Interface Material is oriented as shown, with the narrow...

Motherboard Installation Guide
Page 25
A A A B B B A 3. Push down two fasteners at a time in a diagonal sequence to secure the heatsink and fan B assembly in place, connect the CPU fan cable to the connector on the motherboard labeled CPU_FAN. CPU_FAN CPU FAN PWM CPU FAN IN CPU FAN PWR GND ® P5LD2-VM DH P5LD2-VM DH CPU fan connector Do not forget to plug this connector. Hardware monitoring errors can occur if you fail to connect the CPU fan connector! When the fan and heatsink assembly is in place. ASUS P5LD2-VM DH 1-13 2.
A A A B B B A 3. Push down two fasteners at a time in a diagonal sequence to secure the heatsink and fan B assembly in place, connect the CPU fan cable to the connector on the motherboard labeled CPU_FAN. CPU_FAN CPU FAN PWM CPU FAN IN CPU FAN PWR GND ® P5LD2-VM DH P5LD2-VM DH CPU fan connector Do not forget to plug this connector. Hardware monitoring errors can occur if you fail to connect the CPU fan connector! When the fan and heatsink assembly is in place. ASUS P5LD2-VM DH 1-13 2.
Motherboard Installation Guide
Page 26
Pull up two fasteners at a time in a diagonal sequence to disengage the heatsink B and fan assembly from the connector on the motherboard. 2. 1.6.3 Uninstalling the CPU heatsink and fan To uninstall the CPU heatsink and fan: 1. Rotate each fastener counterclockwise. 3. B A B B A 1-14 Chapter 1: Product introduction Disconnect the CPU fan cable from the A A motherboard.
Pull up two fasteners at a time in a diagonal sequence to disengage the heatsink B and fan assembly from the connector on the motherboard. 2. 1.6.3 Uninstalling the CPU heatsink and fan To uninstall the CPU heatsink and fan: 1. Rotate each fastener counterclockwise. 3. B A B B A 1-14 Chapter 1: Product introduction Disconnect the CPU fan cable from the A A motherboard.

Motherboard Installation Guide
Page 29
Refer to the memory Qualified Vendors List on the next page for details. • Due to CPU limitation, DIMM modules with 128 Mb memory chips or double-sided x16 memory chips are not supported in this motherboard. 1.7.3 DDR2 Qualified Vendors...••• ••• ••• ••• ••• ••• ••• ••• ASUS P5LD2-VM DH 1-17 • When using one DDR DIMM module, install into DIMM_B1 slot only. • When using two DDR DIMM modules, install into DIMM_A1 and DIMM_B1...
Refer to the memory Qualified Vendors List on the next page for details. • Due to CPU limitation, DIMM modules with 128 Mb memory chips or double-sided x16 memory chips are not supported in this motherboard. 1.7.3 DDR2 Qualified Vendors...••• ••• ••• ••• ••• ••• ••• ••• ASUS P5LD2-VM DH 1-17 • When using one DDR DIMM module, install into DIMM_B1 slot only. • When using two DDR DIMM modules, install into DIMM_A1 and DIMM_B1...

Motherboard Installation Guide
Page 35
... Except when clearing the RTC RAM, never remove the cap on pins 2-3 for about 5~10 seconds, then move the cap back to pins 1-2. 4. ASUS P5LD2-VM DH 1-23 For system failure due to overclocking. 1.9 Jumpers 1. The onboard button cell battery powers the RAM data in CMOS. Removing the cap will cause ... 12 23 Normal (Default) Clear CMOS You do not need to clear the RTC when the system hangs due to overclocking, use the C.P.R. (CPU Parameter Recall) feature. Plug the power cord and turn ON the computer. 6. Shut down the key during the boot process and enter BIOS setup...
... Except when clearing the RTC RAM, never remove the cap on pins 2-3 for about 5~10 seconds, then move the cap back to pins 1-2. 4. ASUS P5LD2-VM DH 1-23 For system failure due to overclocking. 1.9 Jumpers 1. The onboard button cell battery powers the RAM data in CMOS. Removing the cap will cause ... 12 23 Normal (Default) Clear CMOS You do not need to clear the RTC when the system hangs due to overclocking, use the C.P.R. (CPU Parameter Recall) feature. Plug the power cord and turn ON the computer. 6. Shut down the key during the boot process and enter BIOS setup...

Motherboard Installation Guide
Page 41
... not forget to connect the fan cables to the fan connectors on the fan connectors. ® P5LD2-VM DH P5LD2-VM DH Fan connectors CPU_FAN CPU FAN PWM CPU FAN IN CPU FAN PWR GND PWR_FAN GND +12V Rotation CHA_FAN GND +12V Rotation ASUS P5LD2-VM DH 1-29 These are not jumpers! Insufficient air flow inside the system may damage the motherboard components...
... not forget to connect the fan cables to the fan connectors on the fan connectors. ® P5LD2-VM DH P5LD2-VM DH Fan connectors CPU_FAN CPU FAN PWM CPU FAN IN CPU FAN PWR GND PWR_FAN GND +12V Rotation CHA_FAN GND +12V Rotation ASUS P5LD2-VM DH 1-29 These are not jumpers! Insufficient air flow inside the system may damage the motherboard components...

Motherboard Installation Guide
Page 64
AMIBIOS Version : 0128 Build Date : 05/11/05 Processor Type Speed Count : Genuine Intel(R) CPU 3.20GHz : 3200 MHz : 1 System Memory Size : 512MB Appropriated : 0MB Available : 504MB AMI BIOS Displays the auto-detected BIOS information Processor Displays the auto-detected CPU specification System Memory Displays the auto-detected system memory 2-18 Chapter 2: BIOS setup The BIOS automatically detects the items in this menu. 2.3.6 System Information This menu gives you an overview of the general system specifications.
AMIBIOS Version : 0128 Build Date : 05/11/05 Processor Type Speed Count : Genuine Intel(R) CPU 3.20GHz : 3200 MHz : 1 System Memory Size : 512MB Appropriated : 0MB Available : 504MB AMI BIOS Displays the auto-detected BIOS information Processor Displays the auto-detected CPU specification System Memory Displays the auto-detected system memory 2-18 Chapter 2: BIOS setup The BIOS automatically detects the items in this menu. 2.3.6 System Information This menu gives you an overview of the general system specifications.
Motherboard Installation Guide
Page 65
...ASUS P5LD2-VM DH 2-19 If the system AI Overclocking [Auto] Allows selection of CPU overclocking options to individually set overclocking parameters. allows you to change the settings for the system. O v e r c l o c k P r o f i l e - loads overclocking profiles with optimal parameters for the system. loads the optimal settings for the CPU... and other system devices. Frequencies higher than CPU manufacturer recommends are not guaranteed to malfunction. Select either one of the Advanced ...
...ASUS P5LD2-VM DH 2-19 If the system AI Overclocking [Auto] Allows selection of CPU overclocking options to individually set overclocking parameters. allows you to change the settings for the system. O v e r c l o c k P r o f i l e - loads overclocking profiles with optimal parameters for the system. loads the optimal settings for the CPU... and other system devices. Frequencies higher than CPU manufacturer recommends are not guaranteed to malfunction. Select either one of the Advanced ...

Motherboard Installation Guide
Page 66
... c k i n g item to [Manual]. Configuration options: [Auto] [1.812V] [1.904V] Refer to the table below for the correct Front Side Bus and CPU External Frequency settings. CPU Frequency [XXX] Displays the frequency sent by the clock generator to [Auto] by the BIOS. Configuration options: [Auto] [DDR2-400MHz] [DDR2-533MHz] [DDR-...select the DDR2 reference voltage. The value of this happens, revert to synchronize the PCI frequency with the PCI Express or CPU frequency. If this item is set the DDR2 operating frequency. Configuration options: [To PCI Express] [Fixed 33.3MHz] [...
... c k i n g item to [Manual]. Configuration options: [Auto] [1.812V] [1.904V] Refer to the table below for the correct Front Side Bus and CPU External Frequency settings. CPU Frequency [XXX] Displays the frequency sent by the clock generator to [Auto] by the BIOS. Configuration options: [Auto] [DDR2-400MHz] [DDR2-533MHz] [DDR-...select the DDR2 reference voltage. The value of this happens, revert to synchronize the PCI frequency with the PCI Express or CPU frequency. If this item is set the DDR2 operating frequency. Configuration options: [To PCI Express] [Fixed 33.3MHz] [...


