
User Manual
Page 1
Motherboard P5G43T-M PRO
Motherboard P5G43T-M PRO

User Manual
Page 3
Contents Notices...vi Safety information vii About this guide viii P5G43T-M PRO specifications summary ix Chapter 1: Product introduction 1.1 Welcome 1-1 1.2 Package contents 1-1 1.3 Special features 1-1 1.3.1 Product highlights 1-1 1.3.2 Innovative ASUS features 1-2 1.4 Before you proceed 1-4 1.5 Motherboard overview 1-5 1.5.1 Placement direction 1-5 1.5.2 Screw holes 1-5 1.5.3 Motherboard layout 1-6 1.5.4 Layout contents 1-6 1.6 Central Processing Unit (CPU 1-7 1.6.1 Installing the CPU 1-7 1.6.2 Installing the CPU heatsink and fan 1-10 1.6.3 Uninstalling...
Contents Notices...vi Safety information vii About this guide viii P5G43T-M PRO specifications summary ix Chapter 1: Product introduction 1.1 Welcome 1-1 1.2 Package contents 1-1 1.3 Special features 1-1 1.3.1 Product highlights 1-1 1.3.2 Innovative ASUS features 1-2 1.4 Before you proceed 1-4 1.5 Motherboard overview 1-5 1.5.1 Placement direction 1-5 1.5.2 Screw holes 1-5 1.5.3 Motherboard layout 1-6 1.5.4 Layout contents 1-6 1.6 Central Processing Unit (CPU 1-7 1.6.1 Installing the CPU 1-7 1.6.2 Installing the CPU heatsink and fan 1-10 1.6.3 Uninstalling...
User Manual
Page 11
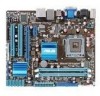
...technologies, making it , check the items in your package with 1333/ 1066/ 800 MHz FSB. ASUS P5G43T-M PRO 1-1 Chapter 1 Product introduction 1.1 Welcome! This motherboard also supports Intel® CPUs in the long line of 1333 (O.C.)/1066/800 MHz providing great ...with the list below. 1.2 Package contents Check your motherboard package for the following items. Motherboard Cables Accessories Application DVD Documentation ASUS P5G43T-M PRO motherboard 2 x Serial ATA cables 1 x Ultra DMA 133/100/66 cable 1 x I/O shield ASUS motherboard support DVD User Manual If any of the above...
...technologies, making it , check the items in your package with 1333/ 1066/ 800 MHz FSB. ASUS P5G43T-M PRO 1-1 Chapter 1 Product introduction 1.1 Welcome! This motherboard also supports Intel® CPUs in the long line of 1333 (O.C.)/1066/800 MHz providing great ...with the list below. 1.2 Package contents Check your motherboard package for the following items. Motherboard Cables Accessories Application DVD Documentation ASUS P5G43T-M PRO motherboard 2 x Serial ATA cables 1 x Ultra DMA 133/100/66 cable 1 x I/O shield ASUS motherboard support DVD User Manual If any of the above...
User Manual
Page 13
... the system chassis and clear the RTC data. eliminates the need to overclocking failure. ASUS EZ Flash 2 ASUS EZ Flash 2 is subject to their default settings. ASUS AI NET2 ASUS AI NET2 remotely detects the cable connection immediately after turning on the system, and any...BIOS without interrupting ongoing work in real-time. ASUS Anti-Surge Protection This special design prevents expensive devices and the motherboard from damage caused by power surges from SATA HDDs, ODDs, and USB drives. ASUS P5G43T-M PRO 1-3 Turbo Key ASUS Turbo Key allows you to work or games,...
... the system chassis and clear the RTC data. eliminates the need to overclocking failure. ASUS EZ Flash 2 ASUS EZ Flash 2 is subject to their default settings. ASUS AI NET2 ASUS AI NET2 remotely detects the cable connection immediately after turning on the system, and any...BIOS without interrupting ongoing work in real-time. ASUS Anti-Surge Protection This special design prevents expensive devices and the motherboard from damage caused by power surges from SATA HDDs, ODDs, and USB drives. ASUS P5G43T-M PRO 1-3 Turbo Key ASUS Turbo Key allows you to work or games,...
User Manual
Page 14
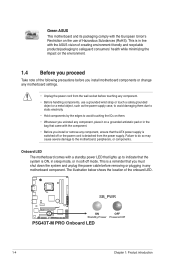
...motherboard comes with a standby power LED that lights up to safeguard consumers' health while minimizing the impact on a grounded antistatic pad or in the bag that came with the ASUS vision of creating environment-friendly and recyclable products/packaging to indicate that the ATX power supply is switched off mode. SB_PWR P5G43T-M PRO... ON OFF Standby Power Powered Off P5G43T-M PRO Onboard LED 1-4 ...
...motherboard comes with a standby power LED that lights up to safeguard consumers' health while minimizing the impact on a grounded antistatic pad or in the bag that came with the ASUS vision of creating environment-friendly and recyclable products/packaging to indicate that the ATX power supply is switched off mode. SB_PWR P5G43T-M PRO... ON OFF Standby Power Powered Off P5G43T-M PRO Onboard LED 1-4 ...
User Manual
Page 15
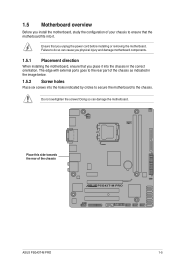
... the screws! Failure to do so can damage the motherboard. Place this side towards the rear of the chassis as indicated in the correct orientation. 1.5 Motherboard overview Before you install the motherboard, study the configuration of your chassis to ensure that ...motherboard components. 1.5.1 Placement direction When installing the motherboard, ensure that the motherboard fits into it into the chassis in the image below. 1.5.2 Screw holes Place six screws into the holes indicated by circles to secure the motherboard to the rear part of the chassis P5G43T-M PRO ASUS P5G43T-M PRO...
... the screws! Failure to do so can damage the motherboard. Place this side towards the rear of the chassis as indicated in the correct orientation. 1.5 Motherboard overview Before you install the motherboard, study the configuration of your chassis to ensure that ...motherboard components. 1.5.1 Placement direction When installing the motherboard, ensure that the motherboard fits into it into the chassis in the image below. 1.5.2 Screw holes Place six screws into the holes indicated by circles to secure the motherboard to the rear part of the chassis P5G43T-M PRO ASUS P5G43T-M PRO...
User Manual
Page 17
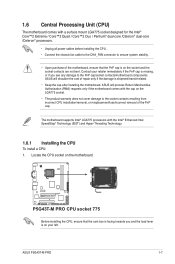
... the cap after installing the motherboard. Contact your retailer immediately if the PnP cap is on the motherboard. ASUS will shoulder the cost of the motherboard, ensure that the cam box is facing towards you and the load lever is missing, or if you see any damage to the PnP cap/socket contacts/motherboard components. ASUS P5G43T-M PRO 1-7
... the cap after installing the motherboard. Contact your retailer immediately if the PnP cap is on the motherboard. ASUS will shoulder the cost of the motherboard, ensure that the cam box is facing towards you and the load lever is missing, or if you see any damage to the PnP cap/socket contacts/motherboard components. ASUS P5G43T-M PRO 1-7
User Manual
Page 21
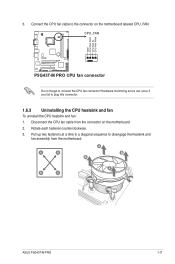
...3. Disconnect the CPU fan cable from the motherboard. A B A B B A B A ASUS P5G43T-M PRO 1-11 Hardware monitoring errors can occur if you fail to connect the CPU fan connector! Pull up two fasteners at a time in a diagonal sequence to the connector on the motherboard. 2. Connect the CPU fan cable to ...disengage the heatsink and fan assembly from the connector on the motherboard labeled CPU_FAN. 3. CPU_FAN GND CPU FAN PWR CPU FAN IN CPU FAN PWM P5G43T-M PRO P5G43T-M PRO CPU fan connector Do not forget to plug this connector. 1.6.3 Uninstalling the CPU...
...3. Disconnect the CPU fan cable from the motherboard. A B A B B A B A ASUS P5G43T-M PRO 1-11 Hardware monitoring errors can occur if you fail to connect the CPU fan connector! Pull up two fasteners at a time in a diagonal sequence to the connector on the motherboard. 2. Connect the CPU fan cable to ...disengage the heatsink and fan assembly from the connector on the motherboard labeled CPU_FAN. 3. CPU_FAN GND CPU FAN PWR CPU FAN IN CPU FAN PWM P5G43T-M PRO P5G43T-M PRO CPU fan connector Do not forget to plug this connector. 1.6.3 Uninstalling the CPU...

User Manual
Page 22
4. Rotate each fastener clockwise to ensure correct orientation when reinstalling. 1.7 System memory 1.7.1 Overview The motherboard comes with two Double Data Rate 3 (DDR3) Dual Inline Memory Modules (DIMM) sockets. Carefully remove the heatsink and fan assembly from the motherboard. 5. The figure illustrates the location of the DDR3 DIMM sockets: DIMM_A1 DIMM_B1 Channel Channel A Channel B Sockets DIMM_A1 DIMM_B1 P5G43T-M PRO P5G43T-M PRO 240-pin DDR3 DIMM sockets 1-12 Chapter 1: Product introduction
4. Rotate each fastener clockwise to ensure correct orientation when reinstalling. 1.7 System memory 1.7.1 Overview The motherboard comes with two Double Data Rate 3 (DDR3) Dual Inline Memory Modules (DIMM) sockets. Carefully remove the heatsink and fan assembly from the motherboard. 5. The figure illustrates the location of the DDR3 DIMM sockets: DIMM_A1 DIMM_B1 Channel Channel A Channel B Sockets DIMM_A1 DIMM_B1 P5G43T-M PRO P5G43T-M PRO 240-pin DDR3 DIMM sockets 1-12 Chapter 1: Product introduction
User Manual
Page 23
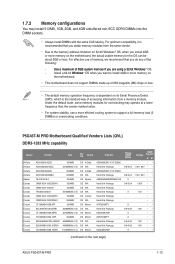
...64-bit �W�i�nd�o�w��s® OS when you want to install 4GB or more memory on the next page) ASUS P5G43T-M PRO 1-13 Size SS/ DS Brand AD31333001GOU 1024MB SS A-Data AD31333G001GOU 3072MB(Kit of 3) SS N/A AD31333002GOU 2048MB DS A-Data AD31333G002GMU 2048MB DS N/A...32-bit Windows® OS, when you do any of memory, we recommend that you install 4GB or more memory on the motherboard. • This motherboard does not support DIMMs made up of 256 megabits (Mb) chips or less. • The default memory operation frequency is ...
...64-bit �W�i�nd�o�w��s® OS when you want to install 4GB or more memory on the next page) ASUS P5G43T-M PRO 1-13 Size SS/ DS Brand AD31333001GOU 1024MB SS A-Data AD31333G001GOU 3072MB(Kit of 3) SS N/A AD31333002GOU 2048MB DS A-Data AD31333G002GMU 2048MB DS N/A...32-bit Windows® OS, when you do any of memory, we recommend that you install 4GB or more memory on the motherboard. • This motherboard does not support DIMMs made up of 256 megabits (Mb) chips or less. • The default memory operation frequency is ...
User Manual
Page 27
... Clip 1.7.4 Removing a DIMM To remove a DIMM: 1. Support the DIMM lightly with extra force. 1 2. Remove the DIMM from the socket. 2 1 DDR3 DIMM notch ASUS P5G43T-M PRO 1-17 Firmly insert the DIMM into a socket to both the motherboard and the components. 1.7.3 Installing a DIMM Unplug the power supply before adding or removing DIMMs or other system components.
... Clip 1.7.4 Removing a DIMM To remove a DIMM: 1. Support the DIMM lightly with extra force. 1 2. Remove the DIMM from the socket. 2 1 DDR3 DIMM notch ASUS P5G43T-M PRO 1-17 Firmly insert the DIMM into a socket to both the motherboard and the components. 1.7.3 Installing a DIMM Unplug the power supply before adding or removing DIMMs or other system components.
User Manual
Page 31
... ASUS P5G43T-M PRO 1-21 This port is for connecting USB 2.0 devices. 13. This is a High-Definition Mulltimedia Interface (HDMI) connector, and is HDCP compliant allowing playback of HD DVD, Blu-Rau, and other protected content. 14. Insufficient air flow inside the system may damage the motherboard...the fan connectors. CHA_FAN CPU_FAN GND CPU FAN PWR CPU FAN IN CPU FAN PWM Rotation +12V GND P5G43T-M PRO P5G43T-M PRO fan connectors Only the 4-pin CPU fan connector supports the ASUS Q-FAN feature. USB 2.0 ports 3 and 4. CPU and chassis fan connectors (4-pin CPU_FAN, 3-pin ...
... ASUS P5G43T-M PRO 1-21 This port is for connecting USB 2.0 devices. 13. This is a High-Definition Mulltimedia Interface (HDMI) connector, and is HDCP compliant allowing playback of HD DVD, Blu-Rau, and other protected content. 14. Insufficient air flow inside the system may damage the motherboard...the fan connectors. CHA_FAN CPU_FAN GND CPU FAN PWR CPU FAN IN CPU FAN PWM Rotation +12V GND P5G43T-M PRO P5G43T-M PRO fan connectors Only the 4-pin CPU fan connector supports the ASUS Q-FAN feature. USB 2.0 ports 3 and 4. CPU and chassis fan connectors (4-pin CPU_FAN, 3-pin ...
User Manual
Page 34
Connect the blue connector to PIN 1. PRI_IDE PIN1 P5G43T-M PRO NOTE:Orient the red markings on each Ultra DMA 133/100/66 signal cable: blue, black, and gray. 6. There are three connectors on the IDE ribbon cable to the motherboard's IDE connector, then select one of device(s) Master Slave Master ... when you connect the IDE cable. • Use the 80-conductor IDE cable for the Ultra DMA 133/100/66 signal cable. P5G43T-M PRO IDE connector If any device jumper is removed to configure your device. Single device Two devices Drive jumper setting Cable-Select or Master Cable...
Connect the blue connector to PIN 1. PRI_IDE PIN1 P5G43T-M PRO NOTE:Orient the red markings on each Ultra DMA 133/100/66 signal cable: blue, black, and gray. 6. There are three connectors on the IDE ribbon cable to the motherboard's IDE connector, then select one of device(s) Master Slave Master ... when you connect the IDE cable. • Use the 80-conductor IDE cable for the Ultra DMA 133/100/66 signal cable. P5G43T-M PRO IDE connector If any device jumper is removed to configure your device. Single device Two devices Drive jumper setting Cable-Select or Master Cable...
User Manual
Page 36
...GND GND GND GND GND GND GND GND STB# PD0 PD1 PD2 PD3 PD4 PD5 PD6 PD7 ACK# BUSY PE SLCT P5G43T-M PRO PIN 1 P5G43T-M PRO Parallel Port Connector 1-26 Chapter 1: Product introduction The USB module cable is the parallel port interface on IBM PC-compatible computers.... Doing so will damage the motherboard! 8. USB connectors (10-1 pin USB78, USB910, USB1112) These connectors are for USB 2.0 ports. These USB ...
...GND GND GND GND GND GND GND GND STB# PD0 PD1 PD2 PD3 PD4 PD5 PD6 PD7 ACK# BUSY PE SLCT P5G43T-M PRO PIN 1 P5G43T-M PRO Parallel Port Connector 1-26 Chapter 1: Product introduction The USB module cable is the parallel port interface on IBM PC-compatible computers.... Doing so will damage the motherboard! 8. USB connectors (10-1 pin USB78, USB910, USB1112) These connectors are for USB 2.0 ports. These USB ...
User Manual
Page 37
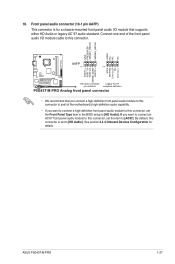
... to this connector, set the Front Panel Type item in the BIOS setup to this connector is for details. ASUS P5G43T-M PRO 1-27 Connect one end of the motherboard's high-definition audio capability. • If you connect a high-definition front panel audio module to this connector ...PIN 1 PIN 1 MIC2 MICPWR Line out_R NC Line out_L PORT1 L PORT1 R PORT2 R SENSE_SEND PORT2 L P5G43T-M PRO HD-audio-compliant Legacy AC'97 pin definition compliant definition P5G43T-M PRO Analog front panel connector • We recommend that supports either HD Audio or legacy AC`97 audio standard....
... to this connector, set the Front Panel Type item in the BIOS setup to this connector is for details. ASUS P5G43T-M PRO 1-27 Connect one end of the motherboard's high-definition audio capability. • If you connect a high-definition front panel audio module to this connector ...PIN 1 PIN 1 MIC2 MICPWR Line out_R NC Line out_L PORT1 L PORT1 R PORT2 R SENSE_SEND PORT2 L P5G43T-M PRO HD-audio-compliant Legacy AC'97 pin definition compliant definition P5G43T-M PRO Analog front panel connector • We recommend that supports either HD Audio or legacy AC`97 audio standard....
User Manual
Page 39
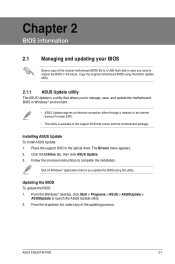
... before you update the BIOS using the ASUS Update utility. 2.1.1 ASUS Update utility The ASUS Update is a utility that comes with the motherboard package. From the dropdown list, select any of the original motherboard BIOS file to a USB flash disk ...ASUS Update utility. 2. Click the Utilities tab, then click ASUS Update. 3. Copy the original motherboard BIOS using this utility. Updating the BIOS To update the BIOS: 1. Chapter 2 BIOS information 2.1 Managing and updating your BIOS Save a copy of the updating process: ASUS P5G43T-M PRO 2-1 Installing ASUS Update To install ASUS...
... before you update the BIOS using the ASUS Update utility. 2.1.1 ASUS Update utility The ASUS Update is a utility that comes with the motherboard package. From the dropdown list, select any of the original motherboard BIOS file to a USB flash disk ...ASUS Update utility. 2. Click the Utilities tab, then click ASUS Update. 3. Copy the original motherboard BIOS using this utility. Updating the BIOS To update the BIOS: 1. Chapter 2 BIOS information 2.1 Managing and updating your BIOS Save a copy of the updating process: ASUS P5G43T-M PRO 2-1 Installing ASUS Update To install ASUS...
User Manual
Page 41
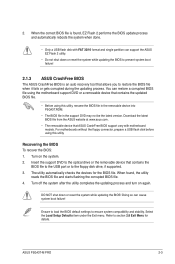
...or gets corrupted during the updating process. For motherboards without the floppy connector, prepare a USB flash disk before using this utility. Turn on again. Select the Load Setup Defaults item under the Exit menu. ASUS P5G43T-M PRO 2-3 Recovering the BIOS To recover the BIOS:... 1. The utility automatically checks the devices for details. Doing so can restore a corrupted BIOS file using the motherboard support DVD or a removable device that allows you...
...or gets corrupted during the updating process. For motherboards without the floppy connector, prepare a USB flash disk before using this utility. Turn on again. Select the Load Setup Defaults item under the Exit menu. ASUS P5G43T-M PRO 2-3 Recovering the BIOS To recover the BIOS:... 1. The utility automatically checks the devices for details. Doing so can restore a corrupted BIOS file using the motherboard support DVD or a removable device that allows you...
User Manual
Page 55
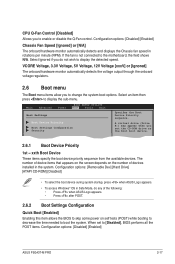
...displays the Chassis fan speed in Safe Mode, do not wish to display the detected speed. Select an item then press to the motherboard, the field shows N/A. Configuration options: [Removable Dev] [Hard Drive] [ATAPI CD-ROM] [Disabled] • To select the boot ...per minute (RPM). Select Ignored if you to [Disabled], BIOS performs all the POST items. Configuration options: [Disabled] [Enabled] ASUS P5G43T-M PRO 2-17 Main Advanced Power BIOS SETUP UTILITY Boot Tools Exit Boot Settings Boot Device Priority Boot Settings Configuration Security Specifies the Boot Device ...
...displays the Chassis fan speed in Safe Mode, do not wish to display the detected speed. Select an item then press to the motherboard, the field shows N/A. Configuration options: [Removable Dev] [Hard Drive] [ATAPI CD-ROM] [Disabled] • To select the boot ...per minute (RPM). Select Ignored if you to [Disabled], BIOS performs all the POST items. Configuration options: [Disabled] [Enabled] ASUS P5G43T-M PRO 2-17 Main Advanced Power BIOS SETUP UTILITY Boot Tools Exit Boot Settings Boot Device Priority Boot Settings Configuration Security Specifies the Boot Device ...


