P4BGV-MX User Manual
Page 11
Motherboard Info ASUS P4BGV-MX Motherboard 1-1 Chapter 1 This chapter gives information about the ASUS P4BGV-MX motherboard that came with the system.This chapter includes the motherboard layout, jumper settings, and connector locations.
Motherboard Info ASUS P4BGV-MX Motherboard 1-1 Chapter 1 This chapter gives information about the ASUS P4BGV-MX motherboard that came with the system.This chapter includes the motherboard layout, jumper settings, and connector locations.
P4BGV-MX User Manual
Page 12
... The ASUS P4BGV-MX motherboard is damaged or missing, contact your ASUS P4BGV-MX package for the following items. ASUS P4BGV-MX motherboard Micro-ATX form factor: 8.6 in x 9.6 in your package with the list below. 1.2 Package contents Check your retailer. 1-2 Before you for a 3.5-inch floppy drive Bag of extra jumper caps User Guide I/O Shield If any of ASUS quality motherboards...the long line of the above items is loaded with new features and the most advanced technologies making it , check the items in ASUS P4BGV-MX series support CD 40-conductor IDE cable Ribbon cable for buying the...
... The ASUS P4BGV-MX motherboard is damaged or missing, contact your ASUS P4BGV-MX package for the following items. ASUS P4BGV-MX motherboard Micro-ATX form factor: 8.6 in x 9.6 in your package with the list below. 1.2 Package contents Check your retailer. 1-2 Before you for a 3.5-inch floppy drive Bag of extra jumper caps User Guide I/O Shield If any of ASUS quality motherboards...the long line of the above items is loaded with new features and the most advanced technologies making it , check the items in ASUS P4BGV-MX series support CD 40-conductor IDE cable Ribbon cable for buying the...
P4BGV-MX User Manual
Page 13
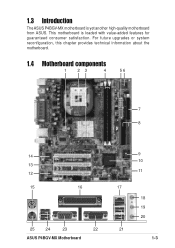
For future upgrades or system reconfiguration, this chapter provides technical information about the motherboard. 1.4 Motherboard components 1 23 4 56 7 8 14 13 12 15 16 25 24 23 22 ASUS P4BGV-MX Motherboard 9 10 11 17 18 19 20 21 1-3 This motherboard is yet another high-quality motherboard from ASUS. 1.3 Introduction The ASUS P4BGV-MX motherboard is loaded with value-added features for guaranteed consumer satisfaction.
For future upgrades or system reconfiguration, this chapter provides technical information about the motherboard. 1.4 Motherboard components 1 23 4 56 7 8 14 13 12 15 16 25 24 23 22 ASUS P4BGV-MX Motherboard 9 10 11 17 18 19 20 21 1-3 This motherboard is yet another high-quality motherboard from ASUS. 1.3 Introduction The ASUS P4BGV-MX motherboard is loaded with value-added features for guaranteed consumer satisfaction.
P4BGV-MX User Manual
Page 15
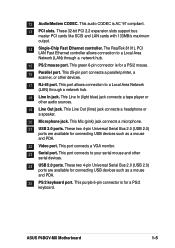
...) jack connects a microphone. 21 USB 2.0 ports. This green 6-pin connector is for a PS/2 mouse. 16 Parallel port. This port connects a VGA monitor. 23 Serial port. ASUS P4BGV-MX Motherboard 1-5 These two 4-pin Universal Serial Bus 2.0 (USB 2.0) ports are available for connecting USB devices such as a mouse and PDA. 22 Video port. This Line...
...) jack connects a microphone. 21 USB 2.0 ports. This green 6-pin connector is for a PS/2 mouse. 16 Parallel port. This port connects a VGA monitor. 23 Serial port. ASUS P4BGV-MX Motherboard 1-5 These two 4-pin Universal Serial Bus 2.0 (USB 2.0) ports are available for connecting USB devices such as a mouse and PDA. 22 Video port. This Line...
P4BGV-MX User Manual
Page 17
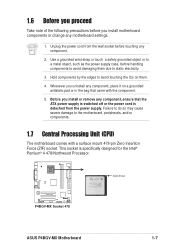
... do so may cause severe damage to the motherboard, peripherals, and/or components. 1.7 Central Processing Unit (CPU) The motherboard comes with the component. 5. P4BGV-MX P4BGV-MX Socket 478 Gold Arrow ASUS P4BGV-MX Motherboard 1-7 Use a grounded wrist strap or touch a safely grounded object or to a metal object, such as the power supply case, before handling components...
... do so may cause severe damage to the motherboard, peripherals, and/or components. 1.7 Central Processing Unit (CPU) The motherboard comes with the component. 5. P4BGV-MX P4BGV-MX Socket 478 Gold Arrow ASUS P4BGV-MX Motherboard 1-7 Use a grounded wrist strap or touch a safely grounded object or to a metal object, such as the power supply case, before handling components...
P4BGV-MX User Manual
Page 19
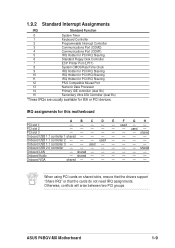
used - - shared - - - - - - used - - - - - Otherwise, conflicts will arise between two PCI groups. Onboard USB 1.1 controller 3 - - Onboard Audio - used - shared - - - - - - ASUS P4BGV-MX Motherboard 1-9 used - - - - 1.9.2 Standard Interrupt Assignments IRQ Standard Function 0 System Timer 1 Keyboard Controller 2 Programmable Interrupt Controller 3 Communications Port (COM2) 4 Communications Port (COM1) 5 IRQ Holder for PCI ...
used - - shared - - - - - - used - - - - - Otherwise, conflicts will arise between two PCI groups. Onboard USB 1.1 controller 3 - - Onboard Audio - used - shared - - - - - - ASUS P4BGV-MX Motherboard 1-9 used - - - - 1.9.2 Standard Interrupt Assignments IRQ Standard Function 0 System Timer 1 Keyboard Controller 2 Programmable Interrupt Controller 3 Communications Port (COM2) 4 Communications Port (COM1) 5 IRQ Holder for PCI ...
P4BGV-MX User Manual
Page 21
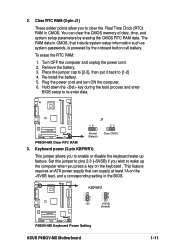
... system setup parameters by the onboard button cell battery. Remove the battery. 3. Plug the power cord and turn ON the computer. 6. J1 P4BGV-MX P4BGV-MX Clear RTC RAM 12 23 Normal (Default) Clear CMOS 3. Re-install the battery. 5. Hold down the key during the boot process and... and unplug the power cord. 2. Place the jumper cap to [2-3], then put it back to re-enter data. P4BGV-MX KBPWR1 2 1 +5V 3 2 +5VSB (Default) P4BGV-MX Keyboard Power Setting ASUS P4BGV-MX Motherboard 1-11 Set this jumper to pins 2-3 (+5VSB) if you wish to clear the Real Time Clock (RTC)...
... system setup parameters by the onboard button cell battery. Remove the battery. 3. Plug the power cord and turn ON the computer. 6. J1 P4BGV-MX P4BGV-MX Clear RTC RAM 12 23 Normal (Default) Clear CMOS 3. Re-install the battery. 5. Hold down the key during the boot process and... and unplug the power cord. 2. Place the jumper cap to [2-3], then put it back to re-enter data. P4BGV-MX KBPWR1 2 1 +5V 3 2 +5VSB (Default) P4BGV-MX Keyboard Power Setting ASUS P4BGV-MX Motherboard 1-11 Set this jumper to pins 2-3 (+5VSB) if you wish to clear the Real Time Clock (RTC)...

P4BGV-MX User Manual
Page 23
... lead to record a chassis intrusion event. This requires an external detection mechanism such as a chassis intrusion sensor or microswitch. CHASSIS1 +5VSB_MB Chassis Signal GND P4BGV-MX P4BGV-MX Chassis Alarm Lead ASUS P4BGV-MX Motherboard 1-13 FLOPPY1 NOTE: Orient the red markings on the floppy ribbon cable to the floppy drive. (Pin 5 is for a chassis designed with...
... lead to record a chassis intrusion event. This requires an external detection mechanism such as a chassis intrusion sensor or microswitch. CHASSIS1 +5VSB_MB Chassis Signal GND P4BGV-MX P4BGV-MX Chassis Alarm Lead ASUS P4BGV-MX Motherboard 1-13 FLOPPY1 NOTE: Orient the red markings on the floppy ribbon cable to the floppy drive. (Pin 5 is for a chassis designed with...
P4BGV-MX User Manual
Page 25
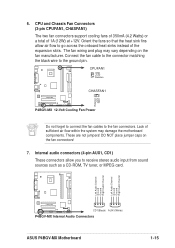
These are not jumpers! Left Audio Channel Ground Ground Right Audio Channel Left Audio Channel Ground Ground Right Audio Channel P4BGV-MX CD1(Black) AUX1(White) P4BGV-MX Internal Audio Connectors ASUS P4BGV-MX Motherboard 1-15 6. DO NOT place jumper caps on the fan manufacturer. Internal audio connectors (4-pin AUX1, CD1) These connectors allow air flow to receive...
These are not jumpers! Left Audio Channel Ground Ground Right Audio Channel Left Audio Channel Ground Ground Right Audio Channel P4BGV-MX CD1(Black) AUX1(White) P4BGV-MX Internal Audio Connectors ASUS P4BGV-MX Motherboard 1-15 6. DO NOT place jumper caps on the fan manufacturer. Internal audio connectors (4-pin AUX1, CD1) These connectors allow air flow to receive...
P4BGV-MX User Manual
Page 27
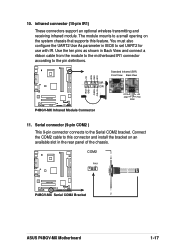
... the COM2 cable to this feature. You must also configure the UART2 Use As parameter in the rear panel of the chassis. COM2 PIN 1 P4BGV-MX P4BGV-MX Serial COM2 Bracket ASUS P4BGV-MX Motherboard 1-17 The module mounts to the pin definitions. 10. Serial connector (9-pin COM2 ) This 9-pin connector connects to set UART2 for use...
... the COM2 cable to this feature. You must also configure the UART2 Use As parameter in the rear panel of the chassis. COM2 PIN 1 P4BGV-MX P4BGV-MX Serial COM2 Bracket ASUS P4BGV-MX Motherboard 1-17 The module mounts to the pin definitions. 10. Serial connector (9-pin COM2 ) This 9-pin connector connects to set UART2 for use...
P4BGV-MX User Manual
Page 29
BIOS Information ASUS P4BGV-MX Motherboard 2-1 Chapter 2 This chapter gives information about the ASUS P4BGV-MX Binary Input/Output System (BIOS).This chapter includes updating the BIOS using the ASUS AFLASH BIOS that is bundled with the support CD.
BIOS Information ASUS P4BGV-MX Motherboard 2-1 Chapter 2 This chapter gives information about the ASUS P4BGV-MX Binary Input/Output System (BIOS).This chapter includes updating the BIOS using the ASUS AFLASH BIOS that is bundled with the support CD.
P4BGV-MX User Manual
Page 30
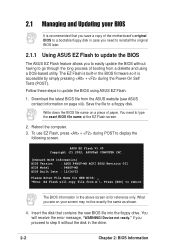
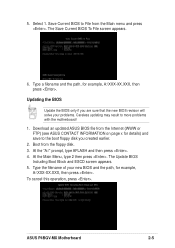
... into the floppy drive. To use EZ Flash, press + during the Power-On Self Tests (POST). You will copy file from the ASUS website (see on your BIOS It is accessible by simply pressing + during POST to reboot The BIOS information in case you proceed to a... the latest BIOS file from A:\, Press [ESC] to display the following screen. ASUS EZ Flash V1.00 Copyright (C) 2002, ASUSTeK COMPUTER INC. [Onboard BIOS Information] BIOS Version : ASUS P4BGV-MX ACPI BIOS Revision 001 BIOS Model : P4BGV-MX BIOS Built Date : 12/16/02 Please Enter File Name for reference only. if...
... into the floppy drive. To use EZ Flash, press + during the Power-On Self Tests (POST). You will copy file from the ASUS website (see on your BIOS It is accessible by simply pressing + during POST to reboot The BIOS information in case you proceed to a... the latest BIOS file from A:\, Press [ESC] to display the following screen. ASUS EZ Flash V1.00 Copyright (C) 2002, ASUSTeK COMPUTER INC. [Onboard BIOS Information] BIOS Version : ASUS P4BGV-MX ACPI BIOS Revision 001 BIOS Model : P4BGV-MX BIOS Built Date : 12/16/02 Please Enter File Name for reference only. if...

P4BGV-MX User Manual
Page 31
...typed in File] BIOS Version: P4BGV-MX Boot Block WARNING! Press any key to completely update the main BIOS area and the boot block area. Press . 6. Flash Memory: SST 49LF004 1. Doing so may cause system boot failure. 8. ASUS P4BGV-MX Motherboard 2-3 File not found ,... the following prompts appear if you downloaded from the ASUS website, then press . appears. Continue to reboot" appears. DO NOT shutdown or reset the ...
...typed in File] BIOS Version: P4BGV-MX Boot Block WARNING! Press any key to completely update the main BIOS area and the boot block area. Press . 6. Flash Memory: SST 49LF004 1. Doing so may cause system boot failure. 8. ASUS P4BGV-MX Motherboard 2-3 File not found ,... the following prompts appear if you downloaded from the ASUS website, then press . appears. Continue to reboot" appears. DO NOT shutdown or reset the ...
P4BGV-MX User Manual
Page 33
... and then press . 4. Download an updated ASUS BIOS file from the Internet (WWW or FTP) (see ASUS CONTACT INFORMATION on page x for example, A:\XXX-XX.XXX, then press . Type the filename of your problems. Careless updating may result to File from the floppy disk. 3. Boot from the Main menu and press . ASUS P4BGV-MX Motherboard 2-5
... and then press . 4. Download an updated ASUS BIOS file from the Internet (WWW or FTP) (see ASUS CONTACT INFORMATION on page x for example, A:\XXX-XX.XXX, then press . Type the filename of your problems. Careless updating may result to File from the floppy disk. 3. Boot from the Main menu and press . ASUS P4BGV-MX Motherboard 2-5
P4BGV-MX User Manual
Page 35
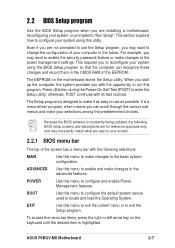
... opportunity to the advanced features. To access the menu bar items, press the right or left arrow key on the motherboard stores the Setup utility. ASUS P4BGV-MX Motherboard 2-7 This section explains how to the power management settings. The EEPROM on the keyboard until the desired item is constantly being updated, the following...
... opportunity to the advanced features. To access the menu bar items, press the right or left arrow key on the motherboard stores the Setup utility. ASUS P4BGV-MX Motherboard 2-7 This section explains how to the power management settings. The EEPROM on the keyboard until the desired item is constantly being updated, the following...

P4BGV-MX User Manual
Page 37
...-menu Note that explanations appear in the Item Specific Help window located to the right of each menu. Take some time to the main menu. ASUS P4BGV-MX Motherboard 2-9 Practice navigating through the Setup program, note that a right pointer symbol (as you specify (usually the current time). A sub-menu contains additional options for...
...-menu Note that explanations appear in the Item Specific Help window located to the right of each menu. Take some time to the main menu. ASUS P4BGV-MX Motherboard 2-9 Practice navigating through the Setup program, note that a right pointer symbol (as you specify (usually the current time). A sub-menu contains additional options for...
P4BGV-MX User Manual
Page 39
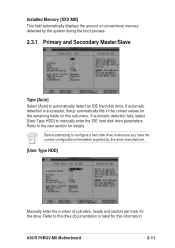
Refer to the drive documentation or label for details. Refer to the next section for this sub-menu. ASUS P4BGV-MX Motherboard 2-11 Before attempting to configure a hard disk drive, make sure you have the correct configuration information supplied by the system during the boot process. 2.3.1 ...
Refer to the drive documentation or label for details. Refer to the next section for this sub-menu. ASUS P4BGV-MX Motherboard 2-11 Before attempting to configure a hard disk drive, make sure you have the correct configuration information supplied by the system during the boot process. 2.3.1 ...
P4BGV-MX User Manual
Page 41
... automatically configured, the set value may also manually configure this field is normally disabled because the resources used in performance. Configuration options: [0] [1] [2] [3] [4] [5] [Disabled] 2.3.2 Keyboard Features ASUS P4BGV-MX Motherboard 2-13 To make changes to this field, set the Type field to [User Type HDD]. To make changes to this field, set the Type...
... automatically configured, the set value may also manually configure this field is normally disabled because the resources used in performance. Configuration options: [0] [1] [2] [3] [4] [5] [Disabled] 2.3.2 Keyboard Features ASUS P4BGV-MX Motherboard 2-13 To make changes to this field, set the Type field to [User Type HDD]. To make changes to this field, set the Type...
P4BGV-MX User Manual
Page 43
... detect a USB device at startup. If not detected, the USB controller legacy mode is detected, the BIOS assigns IRQ12 to [Enabled]. Configuration options: [Disabled] [Enabled] ASUS P4BGV-MX Motherboard 2-15 If a mouse is disabled. Configuration options: [Enabled] [Auto] USB Legacy Support [Auto] This motherboard supports Universal Serial Bus (USB) devices. Configuration options: [Disabled...
... detect a USB device at startup. If not detected, the USB controller legacy mode is detected, the BIOS assigns IRQ12 to [Enabled]. Configuration options: [Disabled] [Enabled] ASUS P4BGV-MX Motherboard 2-15 If a mouse is disabled. Configuration options: [Enabled] [Auto] USB Legacy Support [Auto] This motherboard supports Universal Serial Bus (USB) devices. Configuration options: [Disabled...
P4BGV-MX User Manual
Page 45
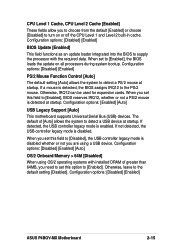
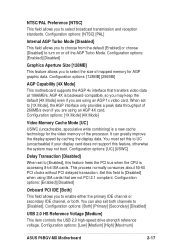
AGP 4X is backward-compatible, so you may not boot. Configuration options: [Low] [Medium] [High] [Maximum] ASUS P4BGV-MX Motherboard 2-17 Configuration options: [Enabled] [Disabled] Graphics Aperture Size [128MB] This feature allows you to [Disabled] when using ISA cards that transfers video data at ...
AGP 4X is backward-compatible, so you may not boot. Configuration options: [Low] [Medium] [High] [Maximum] ASUS P4BGV-MX Motherboard 2-17 Configuration options: [Enabled] [Disabled] Graphics Aperture Size [128MB] This feature allows you to [Disabled] when using ISA cards that transfers video data at ...


