User Manual
Page 44
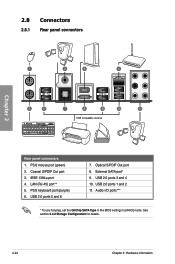
IEEE 1394a port 4. USB 2.0 ports 5 and 6 7. USB 2.0 ports 1 and 2 11. 2.8 Connectors 2.8.1 Rear panel connectors Chapter 2 Rear panel connectors 1. Coaxial S/PDIF Out port 3. PS/2 keyboard port (purple) 6. Optical S/PDIF Out port 8. USB 2.0 ports 3 and 4 10. See section 3.4.2 Storage Configuration for details. 2-24 Chapter 2: Hardware information Audio I/O ports*** * To use hot-plug, set the OnChip SATA Type in the BIOS settings to [AHCI] mode. LAN (RJ-45) port** 5. PS/2 mouse port (green) 2. External SATA port* 9.
IEEE 1394a port 4. USB 2.0 ports 5 and 6 7. USB 2.0 ports 1 and 2 11. 2.8 Connectors 2.8.1 Rear panel connectors Chapter 2 Rear panel connectors 1. Coaxial S/PDIF Out port 3. PS/2 keyboard port (purple) 6. Optical S/PDIF Out port 8. USB 2.0 ports 3 and 4 10. See section 3.4.2 Storage Configuration for details. 2-24 Chapter 2: Hardware information Audio I/O ports*** * To use hot-plug, set the OnChip SATA Type in the BIOS settings to [AHCI] mode. LAN (RJ-45) port** 5. PS/2 mouse port (green) 2. External SATA port* 9.
User Manual
Page 71
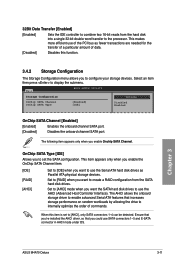
... to internally optimize the order of commands. OnChip SATA Type [IDE] Allows you to configure your storage devices. Set to [AHCI] mode when you could use the AHCI (Advanced Host Controller Interface). Chapter 3 ASUS M4A79 Deluxe 3-11 32Bit Data Transfer [Enabled] [Enabled] Sets the IDE controller to combine two 16-bit reads from the SATA...
... to internally optimize the order of commands. OnChip SATA Type [IDE] Allows you to configure your storage devices. Set to [AHCI] mode when you could use the AHCI (Advanced Host Controller Interface). Chapter 3 ASUS M4A79 Deluxe 3-11 32Bit Data Transfer [Enabled] [Enabled] Sets the IDE controller to combine two 16-bit reads from the SATA...
User Manual
Page 97
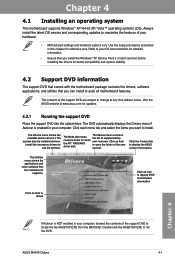
...are subject to locate the file ASSETUP.EXE from the BIN folder. Double-click the ASSETUP.EXE to create the ATI® RAID/AHCI driver disk. The contents of the user manual. Click each menu tab and select the items you install the Windows® XP... time without notice. Install the necessary drivers to display the ASUS contact information. The Manual menu contains the list of your computer. ASUS M4A79 Deluxe 4-1 Always install the latest OS version and corresponding updates to avail all motherboard features. Use the setup procedures presented in your OS documentation ...
...are subject to locate the file ASSETUP.EXE from the BIN folder. Double-click the ASSETUP.EXE to create the ATI® RAID/AHCI driver disk. The contents of the user manual. Click each menu tab and select the items you install the Windows® XP... time without notice. Install the necessary drivers to display the ASUS contact information. The Manual menu contains the list of your computer. ASUS M4A79 Deluxe 4-1 Always install the latest OS version and corresponding updates to avail all motherboard features. Use the setup procedures presented in your OS documentation ...
User Manual
Page 116
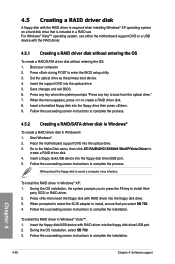
... drive. 3. When the menu appears, press to avoid a computer virus infection. Start Windows®. 2. Place the motherboard support DVD into the optical drive. 5. Write-protect the floppy disk to create a RAID driver disk. 8. Press then... the system prompts you select SB 750. 4. For Windows® Vista™ operating system, use either the motherboard support DVD or a USB device with the RAID driver is included in Windows®: 1. Insert the floppy disk...7. Go to the Make Disk menu, then click ATI RAID/AHCI 32/64bit WinXP/Vista Driver to create a RAID driver disk. 4.
... drive. 3. When the menu appears, press to avoid a computer virus infection. Start Windows®. 2. Place the motherboard support DVD into the optical drive. 5. Write-protect the floppy disk to create a RAID driver disk. 8. Press then... the system prompts you select SB 750. 4. For Windows® Vista™ operating system, use either the motherboard support DVD or a USB device with the RAID driver is included in Windows®: 1. Insert the floppy disk...7. Go to the Make Disk menu, then click ATI RAID/AHCI 32/64bit WinXP/Vista Driver to create a RAID driver disk. 4.


