User Manual
Page 6
Contents 4.3.2 Audio configurations 4-4 4.3.3 ASUS PC Probe II 4-5 4.3.4 ASUS Express Gate SSD / ASUS Express Gate 4-6 4.3.5 ASUS AI Suite 4-7 4.3.6 ASUS EPU 4-8 4.3.7 ASUS Q-Fan 2 4-9 4.3.8 ASUS AI Nap 4-10 4.3.9 ASUS TurboV 4-11 4.3.10 ASUS Turbo Key 4-12 4.4 RAID configurations 4-13 4.4.1 RAID definitions 4-13 4.4.2 Installing Serial ATA hard disks 4-14 4.4.3 AMD® RAID configurations 4-14 4.5 Creating a RAID driver disk 4-20 4.5.1 Creating a RAID driver disk without entering the OS 4-20 4.5.2 Creating a RAID/SATA driver disk in Windows 4-20 Chapter 5: ATI® ...
Contents 4.3.2 Audio configurations 4-4 4.3.3 ASUS PC Probe II 4-5 4.3.4 ASUS Express Gate SSD / ASUS Express Gate 4-6 4.3.5 ASUS AI Suite 4-7 4.3.6 ASUS EPU 4-8 4.3.7 ASUS Q-Fan 2 4-9 4.3.8 ASUS AI Nap 4-10 4.3.9 ASUS TurboV 4-11 4.3.10 ASUS Turbo Key 4-12 4.4 RAID configurations 4-13 4.4.1 RAID definitions 4-13 4.4.2 Installing Serial ATA hard disks 4-14 4.4.3 AMD® RAID configurations 4-14 4.5 Creating a RAID driver disk 4-20 4.5.1 Creating a RAID driver disk without entering the OS 4-20 4.5.2 Creating a RAID/SATA driver disk in Windows 4-20 Chapter 5: ATI® ...
User Manual
Page 19
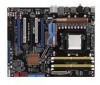
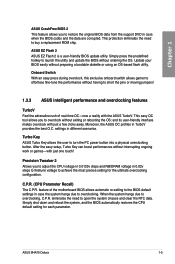
... different scenarios. ASUS M4A79 Deluxe 1-5 Update your BIOS easily without having to short the pins or moving jumpers! 1.3.3 ASUS intelligent performance and overclocking features TurboV Feel the adrenaline rush of the motherboard BIOS allows automatic re-setting to the BIOS default settings in case when the BIOS codes and the data are corrupted. This easy OC tool allows you to adjust the CPU voltage in 0.0125v steps and NB/DRAM voltage in 0.02v...
... different scenarios. ASUS M4A79 Deluxe 1-5 Update your BIOS easily without having to short the pins or moving jumpers! 1.3.3 ASUS intelligent performance and overclocking features TurboV Feel the adrenaline rush of the motherboard BIOS allows automatic re-setting to the BIOS default settings in case when the BIOS codes and the data are corrupted. This easy OC tool allows you to adjust the CPU voltage in 0.0125v steps and NB/DRAM voltage in 0.02v...

User Manual
Page 31
... (Mb) chips or less. • The default memory operation frequency is dependent on its Serial Presence Detect (SPD), which is recommended that you want to CPU limitation, DDR2 1066 MHz is then mapped for single-channel operation. • Due to install 4GB or more memory on 32-bit Windows OS, when you do any of accessing information from the higher-sized channel is supported by...
... (Mb) chips or less. • The default memory operation frequency is dependent on its Serial Presence Detect (SPD), which is recommended that you want to CPU limitation, DDR2 1066 MHz is then mapped for single-channel operation. • Due to install 4GB or more memory on 32-bit Windows OS, when you do any of accessing information from the higher-sized channel is supported by...
User Manual
Page 37
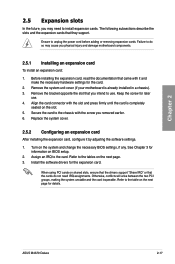
... shared slots, ensure that the drivers support "Share IRQ" or that they support. Refer to install expansion cards. ASUS M4A79 Deluxe 2-17 The following subsections describe the slots and the expansion cards that the cards do so may need IRQ assignments. Failure to do not need to the tables on BIOS setup. 2. Align the card connector with it by adjusting the software settings. 1. See Chapter 3 for the expansion card. Assign...
... shared slots, ensure that the drivers support "Share IRQ" or that they support. Refer to install expansion cards. ASUS M4A79 Deluxe 2-17 The following subsections describe the slots and the expansion cards that the cards do so may need IRQ assignments. Failure to do not need to the tables on BIOS setup. 2. Align the card connector with it by adjusting the software settings. 1. See Chapter 3 for the expansion card. Assign...
User Manual
Page 39
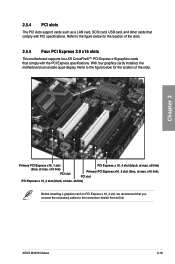
... the figure below for the location of the slots. 2.5.5 Four PCI Express 2.0 x16 slots This motherboard supports four ATI CrossFireX™ PCI Express x16 graphics cards that you connect the necessary cables to the figure below for the location of the slots. x8 link) Primary PCI Express x16_3 slot (blue, at max. Refer to the connectors beside the slot first ASUS M4A79 Deluxe 2-19 2.5.4 PCI slots The PCI slots support cards such as a LAN card, SCSI card, USB card, and other cards that comply with the PCI Express specifications.
... the figure below for the location of the slots. 2.5.5 Four PCI Express 2.0 x16 slots This motherboard supports four ATI CrossFireX™ PCI Express x16 graphics cards that you connect the necessary cables to the figure below for the location of the slots. x8 link) Primary PCI Express x16_3 slot (blue, at max. Refer to the connectors beside the slot first ASUS M4A79 Deluxe 2-19 2.5.4 PCI slots The PCI slots support cards such as a LAN card, SCSI card, USB card, and other cards that comply with the PCI Express specifications.

User Manual
Page 42
... the system to work stably under the highest BIOS voltage setting before you install a new CPU and have not booted for extra-high overvoltage ability, use the BIOS items introduced in BIOS. 2. Chapter 2 Pins 2-3 (Default) Pins 1-2 (OV Enabled) OV_CPU 0.80V - 1.70V up to pins 1-2 when you change the jumper setting for the first time. Ensure that your system functions well under high voltage settings. 2-22 Chapter 2: Hardware information For system failure due to...
... the system to work stably under the highest BIOS voltage setting before you install a new CPU and have not booted for extra-high overvoltage ability, use the BIOS items introduced in BIOS. 2. Chapter 2 Pins 2-3 (Default) Pins 1-2 (OV Enabled) OV_CPU 0.80V - 1.70V up to pins 1-2 when you change the jumper setting for the first time. Ensure that your system functions well under high voltage settings. 2-22 Chapter 2: Hardware information For system failure due to...
User Manual
Page 55
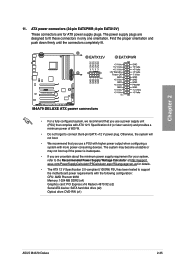
... devices. asus.com/PowerSupplyCalculator/PSCalculator.aspx?SLanguage=en-us for ATX power supply plugs. 11. The system may become unstable or may not boot up if the power is inadequate. • If you use a PSU with higher power output when configuring a system with the following configuration: CPU: AMD Phenom 9950 Memory: 1024 MB DDR2 (x4) Graphics card: PCI Express x16 Radeon 4870 X2 (x2) Serial ATA device: SATA hard disk drive (x2) Optical drive: DVD-RW (x1) ASUS M4A79 Deluxe...
... devices. asus.com/PowerSupplyCalculator/PSCalculator.aspx?SLanguage=en-us for ATX power supply plugs. 11. The system may become unstable or may not boot up if the power is inadequate. • If you use a PSU with higher power output when configuring a system with the following configuration: CPU: AMD Phenom 9950 Memory: 1024 MB DDR2 (x4) Graphics card: PCI Express x16 Radeon 4870 X2 (x2) Serial ATA device: SATA hard disk drive (x2) Optical drive: DVD-RW (x1) ASUS M4A79 Deluxe...
User Manual
Page 61
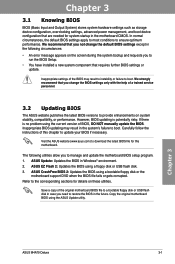
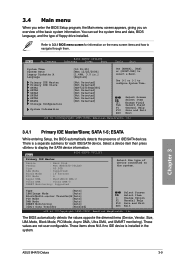
...motherboard support DVD when the BIOS file fails or gets corrupted. Chapter 3 ASUS M4A79 Deluxe 3-1 Chapter 3 Chapter 3: 3.1 Knowing BIOS BIOS setup BIOS (Basic Input and Output System) stores system hardware settings such as storage device configuration, overclocking settings, advanced power management, and boot device configuration that are needed for system startup in Windows® environment. 2. Inappropriate settings of the original motherboard BIOS file to a bootable floppy disk or USB flash disk in case you to boot. Carefully follow the instructions of BIOS, DO NOT manually...
...motherboard support DVD when the BIOS file fails or gets corrupted. Chapter 3 ASUS M4A79 Deluxe 3-1 Chapter 3 Chapter 3: 3.1 Knowing BIOS BIOS setup BIOS (Basic Input and Output System) stores system hardware settings such as storage device configuration, overclocking settings, advanced power management, and boot device configuration that are needed for system startup in Windows® environment. 2. Inappropriate settings of the original motherboard BIOS file to a bootable floppy disk or USB flash disk in case you to boot. Carefully follow the instructions of BIOS, DO NOT manually...
User Manual
Page 62
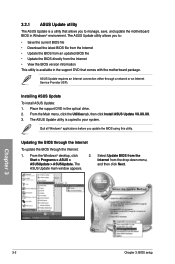
...; desktop, click 2. The ASUS Update main window appears. The ASUS Update utility is available in the optical drive. 2. Chapter 3 3-2 Chapter 3: BIOS setup Installing ASUS Update To install ASUS Update: 1. Quit all Windows® applications before you to: • Save the current BIOS file • Download the latest BIOS file from the Internet • Update the BIOS from an updated BIOS file • Update the BIOS directly from the drop‑down menu, and then click Next. Start > Programs > ASUS > ASUSUpdate > ASUSUpdate. Place the support DVD...
...; desktop, click 2. The ASUS Update main window appears. The ASUS Update utility is available in the optical drive. 2. Chapter 3 3-2 Chapter 3: BIOS setup Installing ASUS Update To install ASUS Update: 1. Quit all Windows® applications before you to: • Save the current BIOS file • Download the latest BIOS file from the Internet • Update the BIOS from an updated BIOS file • Update the BIOS directly from the drop‑down menu, and then click Next. Start > Programs > ASUS > ASUSUpdate > ASUSUpdate. Place the support DVD...
User Manual
Page 69
...-sector Transfer)M [Auto] PIO Mode [Auto] DMA Mode [Auto] SMART Monitoring [Auto] 32Bit Data Transfer [Enabled] Select Screen Select Item +- Refer to 3.3.1 BIOS menu screen for each IDE/SATA device. Change Option F1 General Help F10 Save and Exit ESC Exit v02.61 (C)Copyright 1985-2008, American Megatrends, Inc. Chapter 3 ASUS M4A79 Deluxe 3-9 Use [+] or [-] to the system. SATA 1-5; Main BIOS SETUP UTILITY Primary IDE Master Device : Hard Disk Vendor : WDC WD800JD-00LSA0 Size 80.0GB LBA Mode : Supported Block Mode : 16 Sectors...
...-sector Transfer)M [Auto] PIO Mode [Auto] DMA Mode [Auto] SMART Monitoring [Auto] 32Bit Data Transfer [Enabled] Select Screen Select Item +- Refer to 3.3.1 BIOS menu screen for each IDE/SATA device. Change Option F1 General Help F10 Save and Exit ESC Exit v02.61 (C)Copyright 1985-2008, American Megatrends, Inc. Chapter 3 ASUS M4A79 Deluxe 3-9 Use [+] or [-] to the system. SATA 1-5; Main BIOS SETUP UTILITY Primary IDE Master Device : Hard Disk Vendor : WDC WD800JD-00LSA0 Size 80.0GB LBA Mode : Supported Block Mode : 16 Sectors...
User Manual
Page 71
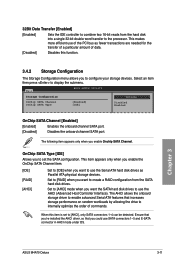
... the processor. Set to [RAID] when you to set to [AHCI] mode when you could use the Serial ATA hard disk drives as fewer transactions are needed for the transfer of a particular amount of commands. Main BIOS SETUP UTILITY Storage Configuration OnChip SATA Channel OnChip SATA Type [Enabled] [IDE] Options Disabled Enabled OnChip SATA Channel [Enabled] [Enabled] Enables the onboard channel SATA port. [Disabled] Disables the onboard channel SATA port. Chapter 3 ASUS M4A79 Deluxe 3-11 Select an item then press to configure your storage devices. Set to [AHCI], only SATA...
... the processor. Set to [RAID] when you to set to [AHCI] mode when you could use the Serial ATA hard disk drives as fewer transactions are needed for the transfer of a particular amount of commands. Main BIOS SETUP UTILITY Storage Configuration OnChip SATA Channel OnChip SATA Type [Enabled] [IDE] Options Disabled Enabled OnChip SATA Channel [Enabled] [Enabled] Enables the onboard channel SATA port. [Disabled] Disables the onboard channel SATA port. Chapter 3 ASUS M4A79 Deluxe 3-11 Select an item then press to configure your storage devices. Set to [AHCI], only SATA...
User Manual
Page 72
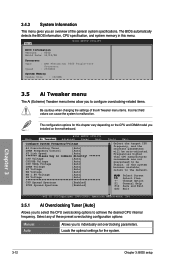
...CPU internal frequency. Loads the optimal settings for this menu. BIOS SETUP UTILITY Main Ai Tweaker Advanced Power Boot Tools Exit Configure System Frequency/Voltage AI Overclocking Tuner [Auto] DRAM Frequency Control [Auto] HT Link Speed [Auto] ******* Please key in this chapter vary depending on the CPU and DIMM model you an overview of these preset overclocking configuration options: Manual Auto Allows you to select the CPU overclocking options to individually set overclocking parameters. Chapter 3 3-12 Chapter 3: BIOS setup Frequencies...
...CPU internal frequency. Loads the optimal settings for this menu. BIOS SETUP UTILITY Main Ai Tweaker Advanced Power Boot Tools Exit Configure System Frequency/Voltage AI Overclocking Tuner [Auto] DRAM Frequency Control [Auto] HT Link Speed [Auto] ******* Please key in this chapter vary depending on the CPU and DIMM model you an overview of these preset overclocking configuration options: Manual Auto Allows you to select the CPU overclocking options to individually set overclocking parameters. Chapter 3 3-12 Chapter 3: BIOS setup Frequencies...
User Manual
Page 74
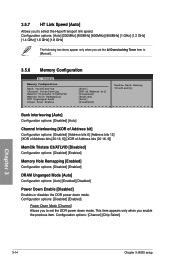
... bit] [Disabled] [Enabled] [Auto] [Disabled] Enable Bank Memory Interleavng. Configuration options: [Channel] [Chip Select] Chapter 3 3-14 Chapter 3: BIOS setup Configuration options: [Disabled] [Enabled] Power Down Mode [Channel] Allows you set the DDR power down mode. Configuration options: [Auto] [200MHz] [400MHz] [600MHz] [800MHz] [1 GHz] [1.2 GHz] [1.4 GHz] [1.6 GHz] [1.8 GHz] The following two items appear only when you to set the AI Overclocking Tuner item to select the HyperTransport link speed. This item appears only when you to [Manual]. 3.5.8 Memory...
... bit] [Disabled] [Enabled] [Auto] [Disabled] Enable Bank Memory Interleavng. Configuration options: [Channel] [Chip Select] Chapter 3 3-14 Chapter 3: BIOS setup Configuration options: [Disabled] [Enabled] Power Down Mode [Channel] Allows you set the DDR power down mode. Configuration options: [Auto] [200MHz] [400MHz] [600MHz] [800MHz] [1 GHz] [1.2 GHz] [1.4 GHz] [1.6 GHz] [1.8 GHz] The following two items appear only when you to set the AI Overclocking Tuner item to select the HyperTransport link speed. This item appears only when you to [Manual]. 3.5.8 Memory...

User Manual
Page 79
.... [Enabled] Enables the the Enhanced Halt State support. BIOS SETUP UTILITY Advanced CPU Configuration Module Version: 13.40 AGESA Version:3.3.1.0 AMD Phenom(tm) 8600 Triple-Core Processor Revision: B2 Cache L1: 384KB Cache L2: 1536KB Cache L3: 2MB Speed : 2300MHz, NB Clk: 1800MHz Able to Change Freq. : Yes uCode Patch Level : 0x100008D GART Error Reporting [Disabled] Microcode Updation [Enabled] Secure Virtual Machine Mode [Enabled] Cool 'n' Quiet [Disabled] ACPI SRAT Table [Enabled] CPU Prefetching [Enabled] C1E Support [Disabled] This option...
.... [Enabled] Enables the the Enhanced Halt State support. BIOS SETUP UTILITY Advanced CPU Configuration Module Version: 13.40 AGESA Version:3.3.1.0 AMD Phenom(tm) 8600 Triple-Core Processor Revision: B2 Cache L1: 384KB Cache L2: 1536KB Cache L3: 2MB Speed : 2300MHz, NB Clk: 1800MHz Able to Change Freq. : Yes uCode Patch Level : 0x100008D GART Error Reporting [Disabled] Microcode Updation [Enabled] Secure Virtual Machine Mode [Enabled] Cool 'n' Quiet [Disabled] ACPI SRAT Table [Enabled] CPU Prefetching [Enabled] C1E Support [Disabled] This option...
User Manual
Page 83
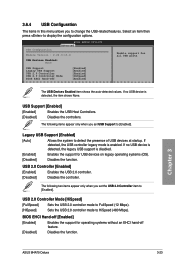
... Controller [Enabled] [Enabled] Enables the USB 2.0 controller. [Disabled] Disables the controller. BIOS EHCI Hand-off [Enabled] [Enabled] Enables the support for all USB ports The USB Devices Enabled item shows the auto-detected values. The following items appear only when you set the USB 2.0 Controller item to display the configuration options. Chapter 3 ASUS M4A79 Deluxe 3-23 BIOS SETUP UTILITY Advanced USB Configuration Module Version - 2.24.3-13.4 USB Devices Enabled None USB Support Legacy USB Support USB 2.0 Controller USB 2.0 Controller Mode BIOS...
... Controller [Enabled] [Enabled] Enables the USB 2.0 controller. [Disabled] Disables the controller. BIOS EHCI Hand-off [Enabled] [Enabled] Enables the support for all USB ports The USB Devices Enabled item shows the auto-detected values. The following items appear only when you set the USB 2.0 Controller item to display the configuration options. Chapter 3 ASUS M4A79 Deluxe 3-23 BIOS SETUP UTILITY Advanced USB Configuration Module Version - 2.24.3-13.4 USB Devices Enabled None USB Support Legacy USB Support USB 2.0 Controller USB 2.0 Controller Mode BIOS...
User Manual
Page 88
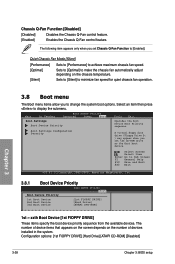
...options: [1st FlOPPY DRIVE] [Hard Drive] [ATAPI CD-ROM] [Disabled] 3-28 Chapter 3: BIOS setup Chapter 3 3.8 Boot menu The Boot menu items allow you set Chassis Q-Fan Function to change the system boot options. Boot Settings Configuration Security A virtual floppy disk drive (Floppy Drive B: ) may appear when you to [Enabled]. The following item appears only when you set the CD-ROM drive as the first boot device. Select Screen Select Item Enter Go to display the submenu. Chassis Q-Fan Function [Disabled] [Disabled] Disables the Chassis Q-Fan control feature. [Enabled...
...options: [1st FlOPPY DRIVE] [Hard Drive] [ATAPI CD-ROM] [Disabled] 3-28 Chapter 3: BIOS setup Chapter 3 3.8 Boot menu The Boot menu items allow you set Chassis Q-Fan Function to change the system boot options. Boot Settings Configuration Security A virtual floppy disk drive (Floppy Drive B: ) may appear when you to [Enabled]. The following item appears only when you set the CD-ROM drive as the first boot device. Select Screen Select Item Enter Go to display the submenu. Chassis Q-Fan Function [Disabled] [Disabled] Disables the Chassis Q-Fan control feature. [Enabled...
User Manual
Page 90
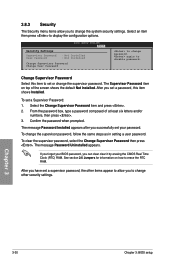
... settings. After you have set your BIOS password, you can clear clear it by erasing the CMOS Real Time Clock (RTC) RAM. The Supervisor Password item on how to erase the RTC RAM. The message Password Uninstalled appears. Select the Change Supervisor Password item and press . 2. From the password box, type a password composed of the screen shows the default Not Installed. To change the supervisor password, follow the same steps as in setting a user password...
... settings. After you have set your BIOS password, you can clear clear it by erasing the CMOS Real Time Clock (RTC) RAM. The Supervisor Password item on how to erase the RTC RAM. The message Password Uninstalled appears. Select the Change Supervisor Password item and press . 2. From the password box, type a password composed of the screen shows the default Not Installed. To change the supervisor password, follow the same steps as in setting a user password...
User Manual
Page 97
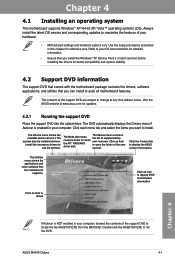
... better compatibility and system stability. 4.2 Support DVD information The support DVD that comes with the motherboard package contains the drivers, software applications, and utilities that the motherboard supports. The Make disk menu contains items to use the devices. The Manual menu contains the list of the user manual. The Utilities menu shows the applications and other software that you want to avail all motherboard features. Chapter 4 Chapter 4: Software support 4.1 Installing an operating system This motherboard supports Windows® XP/ 64-bit...
... better compatibility and system stability. 4.2 Support DVD information The support DVD that comes with the motherboard package contains the drivers, software applications, and utilities that the motherboard supports. The Make disk menu contains items to use the devices. The Manual menu contains the list of the user manual. The Utilities menu shows the applications and other software that you want to avail all motherboard features. Chapter 4 Chapter 4: Software support 4.1 Installing an operating system This motherboard supports Windows® XP/ 64-bit...
User Manual
Page 102
The First Screen Express Gate's first screen appears within a few seconds of powering on your pictures. in the Express Gate Chapter 4 4-6 Chapter 4: Software support When installed on USB HDDs and Flash drives, connect the drives to the motherboard USB port before you quick access to the motherboard chipset-controlled onboard SATA ports only. click to immediately enter existing OS Refer to the software manual in the support DVD or click environment for the BIOS setup details. • ASUS Express Gate SSD / ASUS Express Gate supports SATA devices connected to the...
The First Screen Express Gate's first screen appears within a few seconds of powering on your pictures. in the Express Gate Chapter 4 4-6 Chapter 4: Software support When installed on USB HDDs and Flash drives, connect the drives to the motherboard USB port before you quick access to the motherboard chipset-controlled onboard SATA ports only. click to immediately enter existing OS Refer to the software manual in the support DVD or click environment for the BIOS setup details. • ASUS Express Gate SSD / ASUS Express Gate supports SATA devices connected to the...
User Manual
Page 116
When the menu appears, press to enter the BIOS setup utility. 3. Place the motherboard support DVD into the floppy disk drive/USB port. 5. Insert a floppy disk/USB device into the optical drive. 3. To install the RAID driver in a RAID set. 4.5 Creating a RAID driver disk A floppy disk with the RAID driver is included in Windows® XP: 1. Press during POST to create a RAID driver disk. 8. When prompted to select the SCSI adapter to install, ensure that is required when installing Windows® XP operating system on a hard disk drive that you to press...
When the menu appears, press to enter the BIOS setup utility. 3. Place the motherboard support DVD into the floppy disk drive/USB port. 5. Insert a floppy disk/USB device into the optical drive. 3. To install the RAID driver in a RAID set. 4.5 Creating a RAID driver disk A floppy disk with the RAID driver is included in Windows® XP: 1. Press during POST to create a RAID driver disk. 8. When prompted to select the SCSI adapter to install, ensure that is required when installing Windows® XP operating system on a hard disk drive that you to press...


