
User Manual
Page 31
All rights reserved. Reading flash ..... done Write to file...... Version 1.19(ASUS V2.07(03.11.24BB)) Copyright (C) 2002 American Megatrends, Inc. ok A:\> 當 BIOS DOS 31 exe 2 DOS afudos /o[filename filename A:\>afudos /oOLDBIOS1.rom 3. 按下 afudos /oOLDBIOS1.rom AMI Firmware Update Utility - BIOS 2.1 使用 AFUDOS BIOS AFUDOS DOS BIOS BIOS 程式。AFUDOS BIOS BIOS BIOS 程式 BIOS 程式。 1.2MB BIOS 1 AFUDOS 程式(afudos.
All rights reserved. Reading flash ..... done Write to file...... Version 1.19(ASUS V2.07(03.11.24BB)) Copyright (C) 2002 American Megatrends, Inc. ok A:\> 當 BIOS DOS 31 exe 2 DOS afudos /o[filename filename A:\>afudos /oOLDBIOS1.rom 3. 按下 afudos /oOLDBIOS1.rom AMI Firmware Update Utility - BIOS 2.1 使用 AFUDOS BIOS AFUDOS DOS BIOS BIOS 程式。AFUDOS BIOS BIOS BIOS 程式 BIOS 程式。 1.2MB BIOS 1 AFUDOS 程式(afudos.

User Manual
Page 32
...!! done Advance Check ...... done Verifying flash .... Version 1.19(ASUS V2.07(03.11.24BB)) Copyright (C) 2002 American Megatrends, Inc. done Reading flash ...... 更新 BIOS 程式 AFUDOS BIOS 程式。 1 tw.asus.com BIOS 片中。 BIOS BIOS 2. 將 AFUDOS.EXE BIOS 3 DOS afudos /i[filename filename BIOS 程式。 A:\>afudos /iP5B-VM DO.ROM 4. Do...
...!! done Advance Check ...... done Verifying flash .... Version 1.19(ASUS V2.07(03.11.24BB)) Copyright (C) 2002 American Megatrends, Inc. done Reading flash ...... 更新 BIOS 程式 AFUDOS BIOS 程式。 1 tw.asus.com BIOS 片中。 BIOS BIOS 2. 將 AFUDOS.EXE BIOS 3 DOS afudos /i[filename filename BIOS 程式。 A:\>afudos /iP5B-VM DO.ROM 4. Do...

User Manual
Page 33
.../13/2006 Flash Type - 2.2 使用 AwardBIOS Flash BIOS AwardBIOS Flash AwardBIOS Flash 程式(AWDFLASH.EXE BIOS AwardBIOS Flash BIOS 程式。 1 http://tw.asus.com BIOS M2N-VM HDMI.bin FAT 32/16 格式的 USB BIOS 2 CD/DVD AwardBIOS Flash BIOS 3 DOS 4. 當 A BIOS 檔案與 AwardBIOS Flash 5 A awdflash 並按...
.../13/2006 Flash Type - 2.2 使用 AwardBIOS Flash BIOS AwardBIOS Flash AwardBIOS Flash 程式(AWDFLASH.EXE BIOS AwardBIOS Flash BIOS 程式。 1 http://tw.asus.com BIOS M2N-VM HDMI.bin FAT 32/16 格式的 USB BIOS 2 CD/DVD AwardBIOS Flash BIOS 3 DOS 4. 當 A BIOS 檔案與 AwardBIOS Flash 5 A awdflash 並按...

User Manual
Page 34
...OK Write OK No Update Write Fail Warning: Don't Turn Off Power Or Reset System! 在更新 BIOS 9 Flash Complete BIOS F1 AwardBIOS Flash Utility for ASUS V1.14 (C) Phoenix Technologies Ltd. PMC Pm49FL004T LPC/FWH File Name to Program: M2A-VM HDMI.bin Flashing ...Complete Press to Program: M2A-VM HDMI.bin Programming Flash Memory - 7 BIOS N BIOS 8 BIOS BIOS AwardBIOS Flash Utility for ASUS V1.14 (C) Phoenix Technologies Ltd. All Rights Reserved For C51PV-MCP51-M2A-VM HDMI-00 DATE:04/13/2006 Flash Type...
...OK Write OK No Update Write Fail Warning: Don't Turn Off Power Or Reset System! 在更新 BIOS 9 Flash Complete BIOS F1 AwardBIOS Flash Utility for ASUS V1.14 (C) Phoenix Technologies Ltd. PMC Pm49FL004T LPC/FWH File Name to Program: M2A-VM HDMI.bin Flashing ...Complete Press to Program: M2A-VM HDMI.bin Programming Flash Memory - 7 BIOS N BIOS 8 BIOS BIOS AwardBIOS Flash Utility for ASUS V1.14 (C) Phoenix Technologies Ltd. All Rights Reserved For C51PV-MCP51-M2A-VM HDMI-00 DATE:04/13/2006 Flash Type...
User Manual
Page 4
... 2.8.3 Internal connectors 2-28 2.9 Starting up for the first time 2-39 2.10 Turning off the computer 2-39 Chapter 3: BIOS setup 3.1 Knowing BIOS 3-1 3.2 Updating BIOS 3-1 3.2.1 ASUS Update utility 3-2 3.2.2 Creating a bootable floppy disk 3-4 3.2.3 ASUS EZ Flash 2 utility 3-5 3.2.4 ASUS CrashFree BIOS 2 utility 3-6 3.3 BIOS setup program 3-7 3.3.1 BIOS menu screen 3-7 3.3.2 Menu bar 3-7 3.3.3 Navigation keys 3-8 3.3.4 Menu items 3-8 3.3.5 Submenu items 3-8 3.3.6 Configuration fields 3-8 3.3.7 Pop-up window 3-8 3.3.8 Scroll bar...
... 2.8.3 Internal connectors 2-28 2.9 Starting up for the first time 2-39 2.10 Turning off the computer 2-39 Chapter 3: BIOS setup 3.1 Knowing BIOS 3-1 3.2 Updating BIOS 3-1 3.2.1 ASUS Update utility 3-2 3.2.2 Creating a bootable floppy disk 3-4 3.2.3 ASUS EZ Flash 2 utility 3-5 3.2.4 ASUS CrashFree BIOS 2 utility 3-6 3.3 BIOS setup program 3-7 3.3.1 BIOS menu screen 3-7 3.3.2 Menu bar 3-7 3.3.3 Navigation keys 3-8 3.3.4 Menu items 3-8 3.3.5 Submenu items 3-8 3.3.6 Configuration fields 3-8 3.3.7 Pop-up window 3-8 3.3.8 Scroll bar...
User Manual
Page 9
.... About this guide is organized This guide contains the following sources for additional information and for product and software updates. 1. ASUS websites The ASUS website provides updated information on the motherboard. • Chapter 3: BIOS setup This chapter tells how to change system settings through the BIOS Setup menus. It includes description of the standard package.
.... About this guide is organized This guide contains the following sources for additional information and for product and software updates. 1. ASUS websites The ASUS website provides updated information on the motherboard. • Chapter 3: BIOS setup This chapter tells how to change system settings through the BIOS Setup menus. It includes description of the standard package.
User Manual
Page 12
ASUS Q-Fan 2 ASUS EZ DIY - ASUS Q-Connector - ASUS CrashFree BIOS 2 - ASUS EZ Flash 2 - Onboard Switch 100% High-quality Japan-made conductive polymer capacitors (5000hrs VRM, over 57 years operation lifespan at 1 MHz increment Overclocking protection: - M4A79 Deluxe specifications summary ASUS unique features Special features ASUS exclusive overclocking features ASUS Power Solutions: - 8+2 Phase Power Design - ASUS Fanless Design: Heat pipe solution - ASUS C.P.R. (CPU Parameter Recall...
ASUS Q-Fan 2 ASUS EZ DIY - ASUS Q-Connector - ASUS CrashFree BIOS 2 - ASUS EZ Flash 2 - Onboard Switch 100% High-quality Japan-made conductive polymer capacitors (5000hrs VRM, over 57 years operation lifespan at 1 MHz increment Overclocking protection: - M4A79 Deluxe specifications summary ASUS unique features Special features ASUS exclusive overclocking features ASUS Power Solutions: - 8+2 Phase Power Design - ASUS Fanless Design: Heat pipe solution - ASUS C.P.R. (CPU Parameter Recall...
User Manual
Page 13
xiii M4A79 Deluxe specifications summary Back panel I/O ports Internal I/O connectors BIOS features Manageability Support DVD contents Form factor 1 x PS/2 keyboard port (purple) 1 x PS/2 mouse port (green) 1 x S/PDIF Out port (coaxial) 1 x S/PDIF Out port (optical)... x S/PDIF Out header Chassis Intrusion connector CD audio in 24-pin ATX Power connector System Panel (Q-Connector) 8-pin ATX 12V Power connector 1 x Power on switch 1 x Reset switch 8 Mb Flash ROM, AMI BIOS, PnP, DMI 2.0, SM BIOS 2.5, ACPI 2.0a, ASUS EZ Flash 2, ASUS CrashFree BIOS 2 WOL by PME, WOR by PME, WOR by Ring, PXE,...
xiii M4A79 Deluxe specifications summary Back panel I/O ports Internal I/O connectors BIOS features Manageability Support DVD contents Form factor 1 x PS/2 keyboard port (purple) 1 x PS/2 mouse port (green) 1 x S/PDIF Out port (coaxial) 1 x S/PDIF Out port (optical)... x S/PDIF Out header Chassis Intrusion connector CD audio in 24-pin ATX Power connector System Panel (Q-Connector) 8-pin ATX 12V Power connector 1 x Power on switch 1 x Reset switch 8 Mb Flash ROM, AMI BIOS, PnP, DMI 2.0, SM BIOS 2.5, ACPI 2.0a, ASUS EZ Flash 2, ASUS CrashFree BIOS 2 WOL by PME, WOR by PME, WOR by Ring, PXE,...

User Manual
Page 18
...the trouble of critical heat generating components. Profile The motherboard features the ASUS O.C. The motherboard uses a special design on the printed circuit board (PCB) to share and distribute their favorite settings. 1-4 Chapter 1: Product Introduction The BIOS settings can be stored in the CMOS or a... pipe design is a fanless and zero-noise cooling solution that allows users to the motherboard. ASUS Q-Connector ASUS Q-Connector allows you with easy ways to install computer components, update the BIOS, or back up to ensure quiet, cool and efficient operation.
...the trouble of critical heat generating components. Profile The motherboard features the ASUS O.C. The motherboard uses a special design on the printed circuit board (PCB) to share and distribute their favorite settings. 1-4 Chapter 1: Product Introduction The BIOS settings can be stored in the CMOS or a... pipe design is a fanless and zero-noise cooling solution that allows users to the motherboard. ASUS Q-Connector ASUS Q-Connector allows you with easy ways to install computer components, update the BIOS, or back up to ensure quiet, cool and efficient operation.
User Manual
Page 19
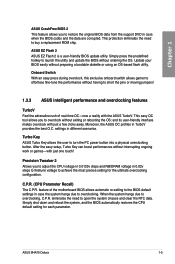
...real-time OC-now a reality with just a few clicks away. ASUS M4A79 Deluxe 1-5 This protection eliminates the need to overclocking, C.P.R. Simply press the predefined hotkey to launch the utility and update the BIOS without preparing a bootable diskette or using an OS-based flash utility.... to the BIOS default settings in different scenarios. After the easy setup, Turbo Key can boost performances without having to short the pins or moving jumpers! 1.3.3 ASUS intelligent performance and overclocking features TurboV Feel the adrenaline rush of the motherboard BIOS allows automatic ...
...real-time OC-now a reality with just a few clicks away. ASUS M4A79 Deluxe 1-5 This protection eliminates the need to overclocking, C.P.R. Simply press the predefined hotkey to launch the utility and update the BIOS without preparing a bootable diskette or using an OS-based flash utility.... to the BIOS default settings in different scenarios. After the easy setup, Turbo Key can boost performances without having to short the pins or moving jumpers! 1.3.3 ASUS intelligent performance and overclocking features TurboV Feel the adrenaline rush of the motherboard BIOS allows automatic ...

User Manual
Page 32
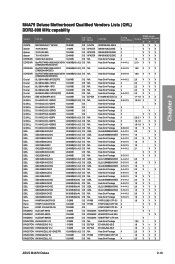
Timing Dimm (Bios) Voltage support (Optional) A* B* C* A-DATA ADQYE1A08 1024MB SS N/A Heat-Sink Package 5 V V A-DATA ADQYE1B16 2048MB DS N/A Apacer BoxP/N:CH.02GAF.C0KK2 (78.0AG9S.9KF) 2048MB (Kit of 2) ... Package Heat-Sink Package Heat-Sink Package 5-5-5-15 5-5-5-15 5-5-5-15 5-5-5-15 2.0-2.1 V V V 2.2-2.3 V V V 2.2-2.3 V V 2.2-2.3 V 2-12 Chapter 2: Hardware information DIMM socket Size SS/ Chip DS Brand Chip NO. Chapter 2 M4A79 Deluxe Motherboard Qualified Vendors Lists (QVL) DDR2-1066 MHz capability Vendor Part No.
Timing Dimm (Bios) Voltage support (Optional) A* B* C* A-DATA ADQYE1A08 1024MB SS N/A Heat-Sink Package 5 V V A-DATA ADQYE1B16 2048MB DS N/A Apacer BoxP/N:CH.02GAF.C0KK2 (78.0AG9S.9KF) 2048MB (Kit of 2) ... Package Heat-Sink Package Heat-Sink Package 5-5-5-15 5-5-5-15 5-5-5-15 5-5-5-15 2.0-2.1 V V V 2.2-2.3 V V V 2.2-2.3 V V 2.2-2.3 V 2-12 Chapter 2: Hardware information DIMM socket Size SS/ Chip DS Brand Chip NO. Chapter 2 M4A79 Deluxe Motherboard Qualified Vendors Lists (QVL) DDR2-1066 MHz capability Vendor Part No.
User Manual
Page 33
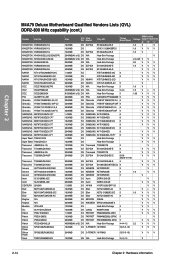
...-HJK-25A KKA8FEIBF-HJK-25A KKB8FFBXF-CFA-25A Heat-Sink Package E5108AJBG-8E-E E5108AJBG-8E-E Heat-Sink Package HY5PS1GB31CFP-S5 Heat-Sink Package Timing Dimm (Bios) 5 5 5 4 4-4-4-12 DIMM socket Voltage support (Optional) A* B* C* VV V VV V VV V VV V 1.9 VV V 2.10 V V ... V 2.0 V V 1.8 V 1.8 VV 2.0 VV 1.8 VV 2.0 VV V 1.8 VV V 2.0 VV V 1.8 VV V 1.8 VV V VV V V VV VV V 1.95 V V 1.8 Vv V 1.8 Vv V 2.0 VV V 1.8 VV V 2.0 VV V ASUS M4A79 Deluxe 2-13 Chapter 2 M4A79 Deluxe Motherboard Qualified Vendors Lists (QVL) DDR2-800 MHz capability Vendor Part No.
...-HJK-25A KKA8FEIBF-HJK-25A KKB8FFBXF-CFA-25A Heat-Sink Package E5108AJBG-8E-E E5108AJBG-8E-E Heat-Sink Package HY5PS1GB31CFP-S5 Heat-Sink Package Timing Dimm (Bios) 5 5 5 4 4-4-4-12 DIMM socket Voltage support (Optional) A* B* C* VV V VV V VV V VV V 1.9 VV V 2.10 V V ... V 2.0 V V 1.8 V 1.8 VV 2.0 VV 1.8 VV 2.0 VV V 1.8 VV V 2.0 VV V 1.8 VV V 1.8 VV V VV V V VV VV V 1.95 V V 1.8 Vv V 1.8 Vv V 2.0 VV V 1.8 VV V 2.0 VV V ASUS M4A79 Deluxe 2-13 Chapter 2 M4A79 Deluxe Motherboard Qualified Vendors Lists (QVL) DDR2-800 MHz capability Vendor Part No.
User Manual
Page 34
...-6400 04701G16CZ5D2A PSD2 51280081 PSD21G8002 PSD22GB002 PDC24G6400LLK SP001GBLRU800S02 SP002GBLRU800S02 TEDD1024M800HC5 Size SS/ Chip DS Brand Chip NO. Chapter 2 M4A79 Deluxe Motherboard Qualified Vendors Lists (QVL) DDR2-800 MHz capability (cont.) Vendor Part No. Timing Dimm (Bios) DIMM socket Voltage support (Optional) A* B* C* 1024MB DS ELPIDA E5108AJBG-8E-E 1.8 V V 1024MB DS V59C1 512804QBF25 1.8 VV V 1024MB DS ELPIDA...
...-6400 04701G16CZ5D2A PSD2 51280081 PSD21G8002 PSD22GB002 PDC24G6400LLK SP001GBLRU800S02 SP002GBLRU800S02 TEDD1024M800HC5 Size SS/ Chip DS Brand Chip NO. Chapter 2 M4A79 Deluxe Motherboard Qualified Vendors Lists (QVL) DDR2-800 MHz capability (cont.) Vendor Part No. Timing Dimm (Bios) DIMM socket Voltage support (Optional) A* B* C* 1024MB DS ELPIDA E5108AJBG-8E-E 1.8 V V 1024MB DS V59C1 512804QBF25 1.8 VV V 1024MB DS ELPIDA...

User Manual
Page 35
... KINGSTON KVR667D2N5/1G 1024MB DS ELPIDA E5108AJBG-8E-E 1.8 V SS - M4A79 Deluxe Motherboard Qualified Vendors Lists (QVL) DDR2-667 MHz capability Vendor Part No. Chapter 2 ASUS M4A79 Deluxe 2-15 Visit the ASUS website at www.asus.com for the latest QVL. Size SS/ DS Chip Brand Chip NO. Timing Dimm (Bios) Voltage DIMM socket support (Optional) A* B* C* Apacer 78.01G9O.9K5...
... KINGSTON KVR667D2N5/1G 1024MB DS ELPIDA E5108AJBG-8E-E 1.8 V SS - M4A79 Deluxe Motherboard Qualified Vendors Lists (QVL) DDR2-667 MHz capability Vendor Part No. Chapter 2 ASUS M4A79 Deluxe 2-15 Visit the ASUS website at www.asus.com for the latest QVL. Size SS/ DS Chip Brand Chip NO. Timing Dimm (Bios) Voltage DIMM socket support (Optional) A* B* C* Apacer 78.01G9O.9K5...
User Manual
Page 37
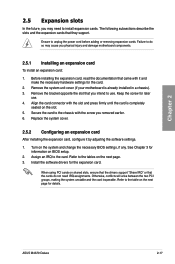
... 3. Install the software drivers for the card. 2. Chapter 2 2.5 Expansion slots In the future, you may cause you physical injury and damage motherboard components. 2.5.1 Installing an expansion card To install an expansion card: 1. Remove the bracket opposite the slot that the cards do so may need ...inoperable. ASUS M4A79 Deluxe 2-17 Failure to do not need to the tables on the next page for information on the system and change the necessary BIOS settings, if any. Keep the screw for later use . Turn on BIOS setup. 2. Remove the system unit cover (if your motherboard is ...
... 3. Install the software drivers for the card. 2. Chapter 2 2.5 Expansion slots In the future, you may cause you physical injury and damage motherboard components. 2.5.1 Installing an expansion card To install an expansion card: 1. Remove the bracket opposite the slot that the cards do so may need ...inoperable. ASUS M4A79 Deluxe 2-17 Failure to do not need to the tables on the next page for information on the system and change the necessary BIOS settings, if any. Keep the screw for later use . Turn on BIOS setup. 2. Remove the system unit cover (if your motherboard is ...
User Manual
Page 40
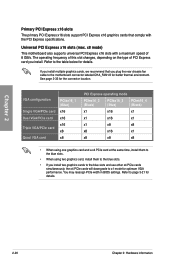
...blue slots and use other x4 PCIe cards simultaneously, the x4 PCIe cards will downgrade to x1 mode for details. x8 mode) This motherboard also supports universal PCI Express x16 slots with the PCI Express specifications. See page 2-33 for details. 2-20 Chapter 2: Hardware information Refer... to page 3-21 for the connector location. You may reassign PCIe width in BIOS settings. Universal PCI Express x16 slots (max. If you install multiple graphics cards, we recommend that comply with a maximum speed of PCI ...
...blue slots and use other x4 PCIe cards simultaneously, the x4 PCIe cards will downgrade to x1 mode for details. x8 mode) This motherboard also supports universal PCI Express x16 slots with the PCI Express specifications. See page 2-33 for details. 2-20 Chapter 2: Hardware information Refer... to page 3-21 for the connector location. You may reassign PCIe width in BIOS settings. Universal PCI Express x16 slots (max. If you install multiple graphics cards, we recommend that comply with a maximum speed of PCI ...
User Manual
Page 41
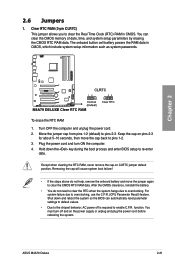
... help, remove the onboard battery and move the cap back to overclocking, use the C.P.R. (CPU Parameter Recall) feature. You must turn ON the computer. 4. ASUS M4A79 Deluxe 2-21 Turn OFF the computer and unplug the power cord. 2. Plug the power cord and turn off is required to clear the Real Time Clock...setup information such as system passwords. The onboard button cell battery powers the RAM data in CMOS. Hold down and reboot the system so the BIOS can clear the CMOS memory of date, time, and system setup parameters by erasing the CMOS RTC RAM data. Removing the cap will cause ...
... help, remove the onboard battery and move the cap back to overclocking, use the C.P.R. (CPU Parameter Recall) feature. You must turn ON the computer. 4. ASUS M4A79 Deluxe 2-21 Turn OFF the computer and unplug the power cord. 2. Plug the power cord and turn off is required to clear the Real Time Clock...setup information such as system passwords. The onboard button cell battery powers the RAM data in CMOS. Hold down and reboot the system so the BIOS can clear the CMOS memory of date, time, and system setup parameters by erasing the CMOS RTC RAM data. Removing the cap will cause ...

User Manual
Page 42
... high voltage settings. 2-22 Chapter 2: Hardware information Doing so may need a better cooling system (for example, a water-cooling system) to work stably under the highest BIOS voltage setting before you to enable or disable the advanced CPU overvoltage setting in 3.5 Ai Tweaker menu first to pins 1-2 when you change the jumper... the advanced CPU overvoltage feature. Read the following information before you install a new CPU and have not booted for extra-high overvoltage ability, use the BIOS items introduced in...
... high voltage settings. 2-22 Chapter 2: Hardware information Doing so may need a better cooling system (for example, a water-cooling system) to work stably under the highest BIOS voltage setting before you to enable or disable the advanced CPU overvoltage setting in 3.5 Ai Tweaker menu first to pins 1-2 when you change the jumper... the advanced CPU overvoltage feature. Read the following information before you install a new CPU and have not booted for extra-high overvoltage ability, use the BIOS items introduced in...
User Manual
Page 44
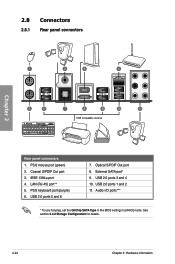
2.8 Connectors 2.8.1 Rear panel connectors Chapter 2 Rear panel connectors 1. LAN (RJ-45) port** 5. PS/2 keyboard port (purple) 6. Optical S/PDIF Out port 8. USB 2.0 ports 1 and 2 11. PS/2 mouse port (green) 2. USB 2.0 ports 5 and 6 7. Audio I/O ports*** * To use hot-plug, set the OnChip SATA Type in the BIOS settings to [AHCI] mode. IEEE 1394a port 4. External SATA port* 9. See section 3.4.2 Storage Configuration for details. 2-24 Chapter 2: Hardware information USB 2.0 ports 3 and 4 10. Coaxial S/PDIF Out port 3.
2.8 Connectors 2.8.1 Rear panel connectors Chapter 2 Rear panel connectors 1. LAN (RJ-45) port** 5. PS/2 keyboard port (purple) 6. Optical S/PDIF Out port 8. USB 2.0 ports 1 and 2 11. PS/2 mouse port (green) 2. USB 2.0 ports 5 and 6 7. Audio I/O ports*** * To use hot-plug, set the OnChip SATA Type in the BIOS settings to [AHCI] mode. IEEE 1394a port 4. External SATA port* 9. See section 3.4.2 Storage Configuration for details. 2-24 Chapter 2: Hardware information USB 2.0 ports 3 and 4 10. Coaxial S/PDIF Out port 3.
User Manual
Page 50
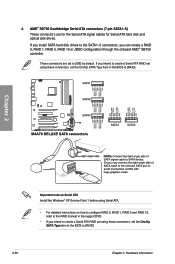
... disk and optical disk drives. If you intend to create a Serial ATA RAID set using these connectors, set the Onchip SATA Type item in the BIOS to [RAID]. AMD® SB750 Southbridge Serial ATA connectors (7-pin SATA1-5) These connectors are set the Onchip SATA Type item in the support DVD. ...1 before using Serial ATA. • For detailed instructions on how to configure RAID 0, RAID 1, RAID 5 and RAID 10, refer to the RAID manual in the BIOS to [IDE] by default. 4. If you install SATA hard disk drives to the SATA1-5 connectors, you intend to create a Serial ATA RAID set using these...
... disk and optical disk drives. If you intend to create a Serial ATA RAID set using these connectors, set the Onchip SATA Type item in the BIOS to [RAID]. AMD® SB750 Southbridge Serial ATA connectors (7-pin SATA1-5) These connectors are set the Onchip SATA Type item in the support DVD. ...1 before using Serial ATA. • For detailed instructions on how to configure RAID 0, RAID 1, RAID 5 and RAID 10, refer to the RAID manual in the BIOS to [IDE] by default. 4. If you install SATA hard disk drives to the SATA1-5 connectors, you intend to create a Serial ATA RAID set using these...


