
User Manual
Page 3
Contents Notices...v Safety information vi About this guide vi M4A78-VM IN/SI specifications summary viii Chapter 1: Product introduction 1.1 Before you proceed 1-1 1.2 Motherboard overview 1-2 1.2.1 Motherboard layout... 1-17 1.8.1 Installing an operating system 1-17 1.8.2 Support DVD information 1-17 Chapter 2: BIOS information 2.1 Managing and updating your BIOS 2-1 2.1.1 ASUS Update utility 2-1 2.1.2 ASUS EZ Flash 2 utility 2-2 2.1.3 ASUS CrashFree BIOS 3 utility 2-2 2.2 BIOS setup program 2-3 2.3 Main menu 2-4 2.3.1 System Time 2-4 2.3.2 System Date 2-4 iii
Contents Notices...v Safety information vi About this guide vi M4A78-VM IN/SI specifications summary viii Chapter 1: Product introduction 1.1 Before you proceed 1-1 1.2 Motherboard overview 1-2 1.2.1 Motherboard layout... 1-17 1.8.1 Installing an operating system 1-17 1.8.2 Support DVD information 1-17 Chapter 2: BIOS information 2.1 Managing and updating your BIOS 2-1 2.1.1 ASUS Update utility 2-1 2.1.2 ASUS EZ Flash 2 utility 2-2 2.1.3 ASUS CrashFree BIOS 3 utility 2-2 2.2 BIOS setup program 2-3 2.3 Main menu 2-4 2.3.1 System Time 2-4 2.3.2 System Date 2-4 iii

User Manual
Page 6
...power supply is organized This guide contains the following parts: • Chapter 1: Product introduction This chapter describes the features of the BIOS parameters are unplugged. • Seek professional assistance before you encounter technical problems with the package. • Before using the product,... it may become wet. • Place the product on it supports. • Chapter 2: BIOS information This chapter tells how to change system settings through the BIOS Setup menus. These devices could interrupt the grounding circuit. • Ensure that all power cables ...
...power supply is organized This guide contains the following parts: • Chapter 1: Product introduction This chapter describes the features of the BIOS parameters are unplugged. • Seek professional assistance before you encounter technical problems with the package. • Before using the product,... it may become wet. • Place the product on it supports. • Chapter 2: BIOS information This chapter tells how to change system settings through the BIOS Setup menus. These devices could interrupt the grounding circuit. • Ensure that all power cables ...
User Manual
Page 9
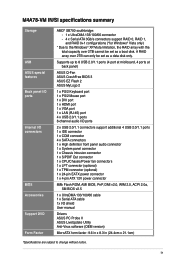
...BIOS Accessories Support DVD Form Factor AMD® SB700 southbridge: - 1 x UltraDMA 133/100/66 connector - 4 x Serial ATA 3Gb/s connectors support RAID 0, RAID 1, and RAID 0+1 configurations (*for Windows® Vista only) * Due to change without notice. M4A78-VM IN/SI specifications summary Storage USB ASUS... special features Back panel I/O ports Internal I /O shield User manual Drivers ASUS PC Probe II ASUS LiveUpdate Utility Anti-Virus software (OEM version) MicroATX form ...
...BIOS Accessories Support DVD Form Factor AMD® SB700 southbridge: - 1 x UltraDMA 133/100/66 connector - 4 x Serial ATA 3Gb/s connectors support RAID 0, RAID 1, and RAID 0+1 configurations (*for Windows® Vista only) * Due to change without notice. M4A78-VM IN/SI specifications summary Storage USB ASUS... special features Back panel I/O ports Internal I /O shield User manual Drivers ASUS PC Probe II ASUS LiveUpdate Utility Anti-Virus software (OEM version) MicroATX form ...
User Manual
Page 15
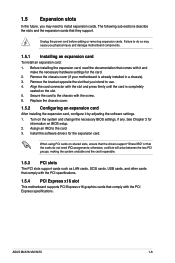
... adjusting the software settings. 1. When using PCI cards on the slot. 5. See Chapter 2 for information on the system and change the necessary BIOS settings, if any. ASUS M4A78-VM IN/SI 1-6 Turn on BIOS setup. 2. Install the software drivers for the card. 2. Remove the bracket opposite the slot that comply with the screw. 6. Unplug the power...
... adjusting the software settings. 1. When using PCI cards on the slot. 5. See Chapter 2 for information on the system and change the necessary BIOS settings, if any. ASUS M4A78-VM IN/SI 1-6 Turn on BIOS setup. 2. Install the software drivers for the card. 2. Remove the bracket opposite the slot that comply with the screw. 6. Unplug the power...
User Manual
Page 16
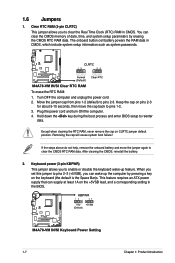
Hold down the key during the boot process and enter BIOS setup to pins 2-3. Except when clearing the RTC RAM, never remove the cap on pins 2-3 for about 5-10 seconds, then move the jumper again to ... RTC RAM (3-pin CLRTC) This jumper allows you to pins 2-3 (+5VSB), you set this jumper to clear the Real Time Clock (RTC) RAM in the BIOS. 1-7 Chapter 1: Product introduction You can supply at least 1A on the keyboard (the default is the Space Bar)s. 1.6 Jumpers 1. The onboard button cell battery powers...
Hold down the key during the boot process and enter BIOS setup to pins 2-3. Except when clearing the RTC RAM, never remove the cap on pins 2-3 for about 5-10 seconds, then move the jumper again to ... RTC RAM (3-pin CLRTC) This jumper allows you to pins 2-3 (+5VSB), you set this jumper to clear the Real Time Clock (RTC) RAM in the BIOS. 1-7 Chapter 1: Product introduction You can supply at least 1A on the keyboard (the default is the Space Bar)s. 1.6 Jumpers 1. The onboard button cell battery powers...
User Manual
Page 19
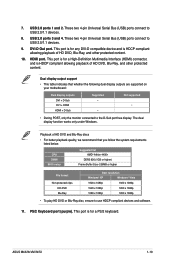
...8226; • During POST, only the monitor connected to USB 2.0/1.1 devices. 9. The dual display function works only under Windows. CPU DIMM BIOS setup Suggested list AMD® Athlon 4400+ DDR2 800 (1GB or higher) Frame Buffer Size--256MB or higher File format Non-protected clips HD-...Ray disc, ensure to USB 2.0/1.1 devices. 8. This port is HDCP compliant allowing playback of HD DVD, Blu-Ray, and other protected content. ASUS M4A78-VM IN/SI 1-10 These two 4-pin Universal Serial Bus (USB) ports connect to use HDCP compliant devices and software. 11. USB 2.0 ports 3 and ...
...8226; • During POST, only the monitor connected to USB 2.0/1.1 devices. 9. The dual display function works only under Windows. CPU DIMM BIOS setup Suggested list AMD® Athlon 4400+ DDR2 800 (1GB or higher) Frame Buffer Size--256MB or higher File format Non-protected clips HD-...Ray disc, ensure to USB 2.0/1.1 devices. 8. This port is HDCP compliant allowing playback of HD DVD, Blu-Ray, and other protected content. ASUS M4A78-VM IN/SI 1-10 These two 4-pin Universal Serial Bus (USB) ports connect to use HDCP compliant devices and software. 11. USB 2.0 ports 3 and ...

User Manual
Page 20
... to the RAID manual in the Support DVD. • If you intend to create a Serial ATA RAID set the OnChip SATA Type item in the BIOS to configure the setting. The numbers (1, 3, 2, 4) on the SATA ports only indicate the order that the audio device of the SATA devices. 2. The data transfer...
... to the RAID manual in the Support DVD. • If you intend to create a Serial ATA RAID set the OnChip SATA Type item in the BIOS to configure the setting. The numbers (1, 3, 2, 4) on the SATA ports only indicate the order that the audio device of the SATA devices. 2. The data transfer...
User Manual
Page 22
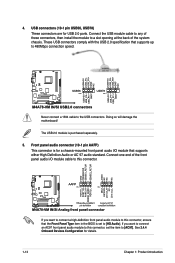
...-1 pin AAFP) This connector is for a chassis-mounted front panel audio I /O module cable to this connector, ensure that the Front Panel Type item in the BIOS is purchased separately. 5. The USB 2.0 module is set the item to this connector. 4. If you want to connect a high-definition front panel audio module to...
...-1 pin AAFP) This connector is for a chassis-mounted front panel audio I /O module cable to this connector, ensure that the Front Panel Type item in the BIOS is purchased separately. 5. The USB 2.0 module is set the item to this connector. 4. If you want to connect a high-definition front panel audio module to...
User Manual
Page 25
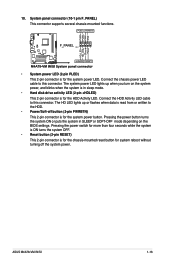
...turning off the system power. Connect the chassis power LED cable to this connector. Connect the HDD Activity LED cable to this connector. ASUS M4A78-VM IN/SI 1-16 System panel connector (10-1 pin F_PANEL) This connector supports several chassis-mounted functions. • System power LED (2-pin PLED) ...This 2-pin connector is for the chassis-mounted reset button for the system power button. The HD LED lights up when you turn on the BIOS...
...turning off the system power. Connect the chassis power LED cable to this connector. Connect the HDD Activity LED cable to this connector. ASUS M4A78-VM IN/SI 1-16 System panel connector (10-1 pin F_PANEL) This connector supports several chassis-mounted functions. • System power LED (2-pin PLED) ...This 2-pin connector is for the chassis-mounted reset button for the system power button. The HD LED lights up when you turn on the BIOS...
User Manual
Page 27
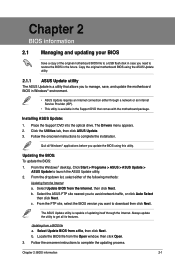
... Service Provider (ISP). • This utility is available in Windows® environment. • ASUS Update requires an Internet connection either of the original motherboard BIOS file to a USB flash disk in case you want to download then click Next. Place the... the Internet. Copy the original motherboard BIOS using this utility. b. Chapter 2 BIOS information 2.1 Managing and updating your BIOS Save a copy of the following methods: Updating from the Internet a. Installing ASUS Update: 1. Quit all its features. Select the ASUS FTP site nearest you to manage,...
... Service Provider (ISP). • This utility is available in Windows® environment. • ASUS Update requires an Internet connection either of the original motherboard BIOS file to a USB flash disk in case you want to download then click Next. Place the... the Internet. Copy the original motherboard BIOS using this utility. b. Chapter 2 BIOS information 2.1 Managing and updating your BIOS Save a copy of the following methods: Updating from the Internet a. Installing ASUS Update: 1. Quit all its features. Select the ASUS FTP site nearest you to manage,...
User Manual
Page 28
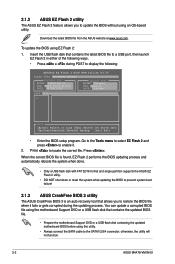
... a USB flash disk that contains the updated BIOS file. • Prepare the motherboard Support DVD or a USB flash disk containing the updated motherboard BIOS before using EZ Flash 2: 1. otherwise, the utility will not function. 2-2 ASUS M4A78-VM IN/SI Insert the USB flash disk that allows you... to locate the correct file. Download the latest BIOS file from the ASUS website at www.asus.com. Go to the ...
... a USB flash disk that contains the updated BIOS file. • Prepare the motherboard Support DVD or a USB flash disk containing the updated motherboard BIOS before using EZ Flash 2: 1. otherwise, the utility will not function. 2-2 ASUS M4A78-VM IN/SI Insert the USB flash disk that allows you... to locate the correct file. Download the latest BIOS file from the ASUS website at www.asus.com. Go to the ...

User Manual
Page 29
... This section explains how to your system using the OS standard shut-down the system properly from the ASUS website at www.asus.com. 2.2 BIOS setup program Use the BIOS Setup program when you are installing a motherboard, reconfiguring your system, or prompted to "Run Setup." Insert... completes the updating process. • Only a USB flash disk with FAT 32/16 format and single partition supports ASUS CrashFree BIOS 3. Bad BIOS checksum. Chapter 2: BIOS information 2-3 Restart the system after POST, reboot the system by doing any of the following message and automatically checks ...
... This section explains how to your system using the OS standard shut-down the system properly from the ASUS website at www.asus.com. 2.2 BIOS setup program Use the BIOS Setup program when you are installing a motherboard, reconfiguring your system, or prompted to "Run Setup." Insert... completes the updating process. • Only a USB flash disk with FAT 32/16 format and single partition supports ASUS CrashFree BIOS 3. Bad BIOS checksum. Chapter 2: BIOS information 2-3 Restart the system after POST, reboot the system by doing any of the following message and automatically checks ...
User Manual
Page 30
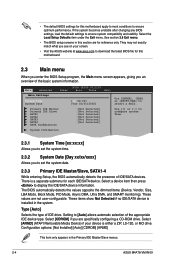
...is installed in the Primary IDE Master/Slave menus. 2-4 ASUS M4A78-VM IN/SI Type [Auto] Selects the type of IDE/SATA devices. Setting to download the latest BIOS file for this motherboard. 2.3 Main menu When you enter the BIOS Setup program, the Main menu screen appears, giving you...Removable Media Device) if your screen. • Visit the ASUS website at www.asus.com to [Auto] allows automatic selection of the basic system information. These values are for reference only. See section 2.8 Exit menu. • The BIOS setup screens in this section are not user-configurable. If...
...is installed in the Primary IDE Master/Slave menus. 2-4 ASUS M4A78-VM IN/SI Type [Auto] Selects the type of IDE/SATA devices. Setting to download the latest BIOS file for this motherboard. 2.3 Main menu When you enter the BIOS Setup program, the Main menu screen appears, giving you...Removable Media Device) if your screen. • Visit the ASUS website at www.asus.com to [Auto] allows automatic selection of the basic system information. These values are for reference only. See section 2.8 Exit menu. • The BIOS setup screens in this section are not user-configurable. If...
User Manual
Page 31
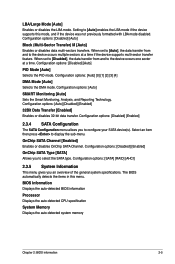
... Select an item then press to the device occurs one sector at a time if the device supports multi-sector transfer feature. The BIOS automatically detects the items in this mode, and if the device was not previously formatted with LBA mode disabled. Configuration options: [Disabled... options: [SATA] [RAID] [AHCI] 2.3.5 System Information This menu gives you an overview of the general system specifications. BIOS Information Displays the auto-detected BIOS information Processor Displays the auto-detected CPU specification System Memory Displays the auto-detected system memory Chapter...
... Select an item then press to the device occurs one sector at a time if the device supports multi-sector transfer feature. The BIOS automatically detects the items in this mode, and if the device was not previously formatted with LBA mode disabled. Configuration options: [Disabled... options: [SATA] [RAID] [AHCI] 2.3.5 System Information This menu gives you an overview of the general system specifications. BIOS Information Displays the auto-detected BIOS information Processor Displays the auto-detected CPU specification System Memory Displays the auto-detected system memory Chapter...
User Manual
Page 32
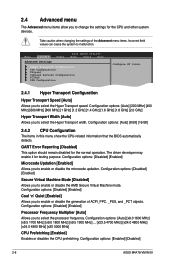
... to malfunction. Configuration options: [Enabled] [Disabled] 2-6 ASUS M4A78-VM IN/SI Configuration options: [Auto] [8 Bit] [16 Bit] 2.4.2 CPU Configuration The items in this menu show the CPU-related information that the BIOS automatically detects. Configuration options: [Auto] [x8.0 1600 ... 4900 MHz] [x25 5000 MHz] CPU Prefetching [Enabled] Enables or disables the CPU prefetching. Main Advanced Power BIOS SETUP UTILITY Boot Tools Exit Advanced Settings Hyper Transport Configuration CPU Configuration Chipset Onboard Devices Configuration PCIPnP USB Configuration Configure HT...
... to malfunction. Configuration options: [Enabled] [Disabled] 2-6 ASUS M4A78-VM IN/SI Configuration options: [Auto] [8 Bit] [16 Bit] 2.4.2 CPU Configuration The items in this menu show the CPU-related information that the BIOS automatically detects. Configuration options: [Auto] [x8.0 1600 ... 4900 MHz] [x25 5000 MHz] CPU Prefetching [Enabled] Enables or disables the CPU prefetching. Main Advanced Power BIOS SETUP UTILITY Boot Tools Exit Advanced Settings Hyper Transport Configuration CPU Configuration Chipset Onboard Devices Configuration PCIPnP USB Configuration Configure HT...

User Manual
Page 33
... related CPU power State. Configuration options: [Auto] [Always] Power Down Enable [Enabled] Enables or disables the DDR power down mode. Configuration options: [Auto] [Both] Chapter 2: BIOS information 2-7 Configuration options: [Disabled] [Address bits 6] [Address bits 12] [XOR of Address bits [20:16, 6]] [XOR of Address bits [20:16, 9]] Enable Clock to All...
... related CPU power State. Configuration options: [Auto] [Always] Power Down Enable [Enabled] Enables or disables the DDR power down mode. Configuration options: [Auto] [Both] Chapter 2: BIOS information 2-7 Configuration options: [Disabled] [Address bits 6] [Address bits 12] [XOR of Address bits [20:16, 6]] [XOR of Address bits [20:16, 9]] Enable Clock to All...

User Manual
Page 35
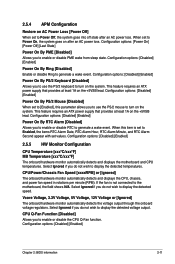
... 2-9 Select an item then press to [No], BIOS configures all the devices in this menu allows you to select the Serial Port1 base address. Configuration options: [Enabled] [Disabled] USB 2.0 Controller [Enabled] Enables or ...
... 2-9 Select an item then press to [No], BIOS configures all the devices in this menu allows you to select the Serial Port1 base address. Configuration options: [Enabled] [Disabled] USB 2.0 Controller [Enabled] Enables or ...
User Manual
Page 37
... not wish to display the detected voltage output. Select Ignored if you do not wish to display the detected speed. Configuration options: [Disabled] [Enabled] Chapter 2: BIOS information 2-11 Configuration options: [Disabled] [Enabled] Power On By RTC Alarm [Disabled] Allows you to use the PS/2 mouse to Enabled, the items RTC Alarm...
... not wish to display the detected voltage output. Select Ignored if you do not wish to display the detected speed. Configuration options: [Disabled] [Enabled] Chapter 2: BIOS information 2-11 Configuration options: [Disabled] [Enabled] Power On By RTC Alarm [Disabled] Allows you to use the PS/2 mouse to Enabled, the items RTC Alarm...
User Manual
Page 38
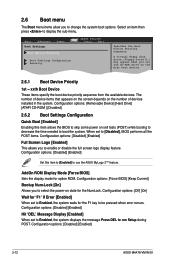
...items allow you to enable or disable the full screen logo display feature. Main Advanced Boot Settings Power Boot Device Priority BIOS SETUP UTILITY Boot Tools Exit Boot Settings Configuration Security Specifies the Boot Device Priority sequence. When set the CD-ROM ...you to boot the system. Select an item then press to use the ASUS MyLogo 2™ feature. Configuration options: [Disabled] [Enabled] 2-12 ASUS M4A78-VM IN/SI Configuration options: [Disabled] [Enabled] Set this item allows the BIOS to skip some power on self tests (POST) while booting to decrease...
...items allow you to enable or disable the full screen logo display feature. Main Advanced Boot Settings Power Boot Device Priority BIOS SETUP UTILITY Boot Tools Exit Boot Settings Configuration Security Specifies the Boot Device Priority sequence. When set the CD-ROM ...you to boot the system. Select an item then press to use the ASUS MyLogo 2™ feature. Configuration options: [Disabled] [Enabled] 2-12 ASUS M4A78-VM IN/SI Configuration options: [Disabled] [Enabled] Set this item allows the BIOS to skip some power on self tests (POST) while booting to decrease...
User Manual
Page 39
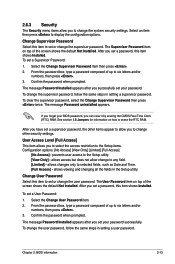
... same steps in setting a supervisor password. To set a password, this item shows Installed. Confirm the password when prompted. Chapter 2: BIOS information 2-13 After you set a User Password: 1. The message Password uninstalled appears. After you have set a Supervisor Password: 1. See...to display the configuration options. To clear the supervisor password, select the Change Supervisor Password then press twice. After you set your BIOS password, you to select the access restriction to the Setup items. Configuration options: [No Access] [View Only] [Limited] [Full...
... same steps in setting a supervisor password. To set a password, this item shows Installed. Confirm the password when prompted. Chapter 2: BIOS information 2-13 After you set a User Password: 1. The message Password uninstalled appears. After you have set a Supervisor Password: 1. See...to display the configuration options. To clear the supervisor password, select the Change Supervisor Password then press twice. After you set your BIOS password, you to select the access restriction to the Setup items. Configuration options: [No Access] [View Only] [Limited] [Full...


