
User Guide
Page 4
...Chapter 4: BIOS setup 4.1 Managing and updating your BIOS 4-1 4.1.1 Creating a bootable floppy disk 4-1 4.1.2 AFUDOS utility 4-2 4.1.3 ASUS CrashFree BIOS 2 utility 4-5 4.1.4 ASUS Update utility 4-7 4.2 BIOS setup program 4-10 4.2.1 BIOS menu screen 4-11 4.2.2 Menu bar 4-11 4.2.3 Navigation keys 4-...11 4.2.4 Menu items 4-12 4.2.5 Sub-menu items 4-12 4.2.6 Configuration fields 4-12 4.2.7 Pop-up window 4-12 4.2.8 Scroll bar 4-12 ...
...Chapter 4: BIOS setup 4.1 Managing and updating your BIOS 4-1 4.1.1 Creating a bootable floppy disk 4-1 4.1.2 AFUDOS utility 4-2 4.1.3 ASUS CrashFree BIOS 2 utility 4-5 4.1.4 ASUS Update utility 4-7 4.2 BIOS setup program 4-10 4.2.1 BIOS menu screen 4-11 4.2.2 Menu bar 4-11 4.2.3 Navigation keys 4-...11 4.2.4 Menu items 4-12 4.2.5 Sub-menu items 4-12 4.2.6 Configuration fields 4-12 4.2.7 Pop-up window 4-12 4.2.8 Scroll bar 4-12 ...

User Guide
Page 56
... Chapter 4 for less than four seconds lets the system enter the soft-off the computer 3.2.1 Using the OS shut down function If you are using Windows® 2000/2003 Server: 1. 3.2 Powering off mode regardless of the BIOS setting. Click the S t a r t button then click S h u t D o w n . . . 2. Make sure that the P l a n n e d check box is ON...
... Chapter 4 for less than four seconds lets the system enter the soft-off the computer 3.2.1 Using the OS shut down function If you are using Windows® 2000/2003 Server: 1. 3.2 Powering off mode regardless of the BIOS setting. Click the S t a r t button then click S h u t D o w n . . . 2. Make sure that the P l a n n e d check box is ON...
User Guide
Page 59
.... 1. Click F i l e from the format options field, then click S t a r t. A S U S C r a s h F r e e B I O S 2 (Updates the BIOS using the ASUS Update or AFUDOS utilities. 4.1.1 Creating a bootable floppy disk 1. b. b. A F o r m a t 3 1 / 2 F l o p p y D i s k window appears. D O S s t a r t u p d i s k from the menu, then select F o r m a t. Copy the original motherboard BIOS using a bootable floppy disk or the motherboard support CD when the BIOS file fails or gets corrupted.) 3. At the DOS...
.... 1. Click F i l e from the format options field, then click S t a r t. A S U S C r a s h F r e e B I O S 2 (Updates the BIOS using the ASUS Update or AFUDOS utilities. 4.1.1 Creating a bootable floppy disk 1. b. b. A F o r m a t 3 1 / 2 F l o p p y D i s k window appears. D O S s t a r t u p d i s k from the menu, then select F o r m a t. Copy the original motherboard BIOS using a bootable floppy disk or the motherboard support CD when the BIOS file fails or gets corrupted.) 3. At the DOS...
User Guide
Page 65
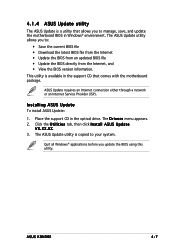
... BIOS version information. ASUS K8NDRE 4-7 Installing ASUS Update To install ASUS Update: 1. Place the support CD in Windows® environment. The D r i v e r s menu appears. 2. Quit all Windows® applications before you to manage, save, and update the motherboard BIOS in the optical drive. X X . The ASUS Update utility allows you to your system. 4.1.4 ASUS Update utility The ASUS Update is a utility...
... BIOS version information. ASUS K8NDRE 4-7 Installing ASUS Update To install ASUS Update: 1. Place the support CD in Windows® environment. The D r i v e r s menu appears. 2. Quit all Windows® applications before you to manage, save, and update the motherboard BIOS in the optical drive. X X . The ASUS Update utility allows you to your system. 4.1.4 ASUS Update utility The ASUS Update is a utility...

User Guide
Page 66
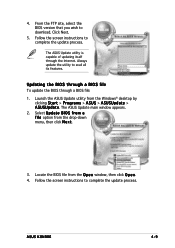
The ASUS Update main window appears. 2. Select the ASUS FTP site t h e I O S f r o m 3. N e x t. Click N e x t. 4-8 Chapter 4: BIOS setup Launch the ASUS Update utility from the nearest you to avoid network drop-down menu, then click traffic, or click A u t o S e l e c t. Select U p d a t e B I n t e r n e t option from the Windows® desktop by clicking S t a r t > P r o g r a m s > A S U S > A S U S U p d a t e > A S U S U p d a t e. Updating the BIOS through the Internet To update the BIOS through the Internet: 1.
The ASUS Update main window appears. 2. Select the ASUS FTP site t h e I O S f r o m 3. N e x t. Click N e x t. 4-8 Chapter 4: BIOS setup Launch the ASUS Update utility from the nearest you to avoid network drop-down menu, then click traffic, or click A u t o S e l e c t. Select U p d a t e B I n t e r n e t option from the Windows® desktop by clicking S t a r t > P r o g r a m s > A S U S > A S U S U p d a t e > A S U S U p d a t e. Updating the BIOS through the Internet To update the BIOS through the Internet: 1.
User Guide
Page 67
... is capable of updating itself through a BIOS file: 1. Launch the ASUS Update utility from the O p e n window, then click O p e n. 4. Locate the BIOS file from the Windows® desktop by clicking S t a r t > P r o g r a m s > A S U S > A S U S U p d a t e > A S U S U p d a t e. The ASUS Update main window appears. 2. Click Next. 5. Follow the screen instructions to avail all its features. ASUS K8NDRE 4-9 Select U p d a t e B I O S f r o m a f i l e option from the drop-down menu, then...
... is capable of updating itself through a BIOS file: 1. Launch the ASUS Update utility from the O p e n window, then click O p e n. 4. Locate the BIOS file from the Windows® desktop by clicking S t a r t > P r o g r a m s > A S U S > A S U S U p d a t e > A S U S U p d a t e. The ASUS Update main window appears. 2. Click Next. 5. Follow the screen instructions to avail all its features. ASUS K8NDRE 4-9 Select U p d a t e B I O S f r o m a f i l e option from the drop-down menu, then...

User Guide
Page 70
... 03/27/2003] [1.44M, 3.5 in the sections below may cause system to configure system time. Refer to "4.2.7 Pop-up window." 4.2.7 Pop-up window Select a menu item then press to display a list of the menu screen is highlighted when selected. Change Option F1 General Help... n shows the Main menu items. The other items on the screen. 4.2.9 General help Advanced Chipset settings WARNING: Setting wrong values in ] [English] :[ST320413A] :[ASUS CD-S340] :[Not Detected] :[Not Detected] :[Not Detected] :[Not Detected] Main menu items 4.2.5 Sub-menu items Use [ENTER], [TAB] or [SHIFT-TAB...
... 03/27/2003] [1.44M, 3.5 in the sections below may cause system to configure system time. Refer to "4.2.7 Pop-up window." 4.2.7 Pop-up window Select a menu item then press to display a list of the menu screen is highlighted when selected. Change Option F1 General Help... n shows the Main menu items. The other items on the screen. 4.2.9 General help Advanced Chipset settings WARNING: Setting wrong values in ] [English] :[ST320413A] :[ASUS CD-S340] :[Not Detected] :[Not Detected] :[Not Detected] :[Not Detected] Main menu items 4.2.5 Sub-menu items Use [ENTER], [TAB] or [SHIFT-TAB...

User Guide
Page 95
...not want to save your selections, choose this operation. →← Select Screen ↑↓ Select Item +- After selecting this menu. ASUS K8N-DRE 4-37 F10 key can be used for a confirmation before exiting. Change Field Tab Select Field F1 General Help F10 Save and Exit ESC Exit...failsafe default values for the BIOS items, and save the changes while exiting. Select one of the options from this option, a confirmation window appears. If you made to the Setup program. Discard Changes Allows you to discard the selections you select this menu or from the...
...not want to save your selections, choose this operation. →← Select Screen ↑↓ Select Item +- After selecting this menu. ASUS K8N-DRE 4-37 F10 key can be used for a confirmation before exiting. Change Field Tab Select Field F1 General Help F10 Save and Exit ESC Exit...failsafe default values for the BIOS items, and save the changes while exiting. Select one of the options from this option, a confirmation window appears. If you made to the Setup program. Discard Changes Allows you to discard the selections you select this menu or from the...

User Guide
Page 96
Load Setup Defaults Allows you press , a confirmation window appears. Select O k to the non-volatile RAM. 4-38 Chapter 4: BIOS setup When you select this option or if you to load the default values for each of the parameters on the Setup menus. Select S a v e C h a n g e s & E x i t or make other changes before saving the values to load default values.
Load Setup Defaults Allows you press , a confirmation window appears. Select O k to the non-volatile RAM. 4-38 Chapter 4: BIOS setup When you select this option or if you to load the default values for each of the parameters on the Setup menus. Select S a v e C h a n g e s & E x i t or make other changes before saving the values to load default values.

User Guide
Page 104
... 5-6 Chapter 5: RAID configuration Clear disk data? [Y] YES [N] Cancel 8. After selecting the hard disk drives, press to save your settings and exit the utility. A pop-up window appears.
... 5-6 Chapter 5: RAID configuration Clear disk data? [Y] YES [N] Cancel 8. After selecting the hard disk drives, press to save your settings and exit the utility. A pop-up window appears.

User Guide
Page 105
Use the up window appears. Highlight the hard disk drives that you clear the disk data! 9. Repeat the process until all data on the drives if you want to add in the A r r a y D i s k s section. Define a New Array - Press to backup exisitng data to save your settings and exit the utility.0 ASUS K8N-DRE 5-7 Press to a target...
Use the up window appears. Highlight the hard disk drives that you clear the disk data! 9. Repeat the process until all data on the drives if you want to add in the A r r a y D i s k s section. Define a New Array - Press to backup exisitng data to save your settings and exit the utility.0 ASUS K8N-DRE 5-7 Press to a target...

User Guide
Page 117
Device Identifier Displays the ASCII device identifier string extracted from the Adapter Properties window, then press . ASUS K8N-DRE 5-19 Set this item to [No] when: • You want the system to ignore a device and decrease boot time. • You do not want the ...
Device Identifier Displays the ASCII device identifier string extracted from the Adapter Properties window, then press . ASUS K8N-DRE 5-19 Set this item to [No] when: • You want the system to ignore a device and decrease boot time. • You do not want the ...

User Guide
Page 119
... the array. Size Shows the physical size of the array. Array Disk? ASUS K8N-DRE 5-21 Hot Spare Sets the drive as a hot spare. Select [Yes] to the adapter.To open the device properties screen, select the < D e v i c e P r o p e r t i e s > from the Adapter Properties window, then press . RAID Properties The R A I D P r o p e r t i e s page allows you select a hot spare. The...
... the array. Size Shows the physical size of the array. Array Disk? ASUS K8N-DRE 5-21 Hot Spare Sets the drive as a hot spare. Select [Yes] to the adapter.To open the device properties screen, select the < D e v i c e P r o p e r t i e s > from the Adapter Properties window, then press . RAID Properties The R A I D P r o p e r t i e s page allows you select a hot spare. The...

User Guide
Page 131
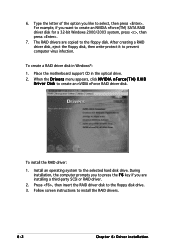
...system, you insert a floppy disk with the RAID driver is required when installing Windows® 2000/XP operating system on how to create the RAID driver disk from the system/motherboard support CD or from the support CD. ASUS K8N-DRE 6-1 Creating a RAID driver disk You may have to use another system to... d) Create NVIDIA nForce(TM) PATARAID Driver for Win2K3 64 bit driver e) Create NVIDIA nForce(TM) SATARAID Driver for Win2K3 64 bit driver For K8N-DRE/SCSI MB only: f) Create LSI Logic Fusion-MPT MiniPort for Win2K 32 bit driver g) Create LSI Logic Fusion-MPT MiniPort for Win2K3 32 bit...
...system, you insert a floppy disk with the RAID driver is required when installing Windows® 2000/XP operating system on how to create the RAID driver disk from the system/motherboard support CD or from the support CD. ASUS K8N-DRE 6-1 Creating a RAID driver disk You may have to use another system to... d) Create NVIDIA nForce(TM) PATARAID Driver for Win2K3 64 bit driver e) Create NVIDIA nForce(TM) SATARAID Driver for Win2K3 64 bit driver For K8N-DRE/SCSI MB only: f) Create LSI Logic Fusion-MPT MiniPort for Win2K 32 bit driver g) Create LSI Logic Fusion-MPT MiniPort for Win2K3 32 bit...
User Guide
Page 132
...s menu appears, click N V I D I A n F o r c e ( T M ) R A I D D r i v e r D i s k to the floppy disk drive. 3. For example, if you like to the floppy disk. Place the motherboard support CD in Windows®: 1. To install the RAID driver: 1. During installation, the computer prompts you to press the F 6 key if you are copied to select, then press...RAID driver disk. Follow screen instructions to create an NVIDIA nForce(TM) SATA RAID driver disk for a 32-bit Windows 2000/2003 system, press , then press . 7. 6. Type the letter of the option you want to install the RAID drivers...
...s menu appears, click N V I D I A n F o r c e ( T M ) R A I D D r i v e r D i s k to the floppy disk drive. 3. For example, if you like to the floppy disk. Place the motherboard support CD in Windows®: 1. To install the RAID driver: 1. During installation, the computer prompts you to press the F 6 key if you are copied to select, then press...RAID driver disk. Follow screen instructions to create an NVIDIA nForce(TM) SATA RAID driver disk for a 32-bit Windows 2000/2003 system, press , then press . 7. 6. Type the letter of the option you want to install the RAID drivers...

User Guide
Page 133
... the optical drive. Click N e x t when the InstallShield Wizard window appears. Restart the computer, then log on a Windows® 2000/XP OS. Double-click the A S S E T U P . 6.3 LAN driver installation This section provides instructions on how to install the Broadcom® Gigabit LAN controller drivers on with A d m i n i s t r a t o r privileges. 2. ASUS K8N-DRE 6-3 The CD automatically displays the D r i v e r s menu if...
... the optical drive. Click N e x t when the InstallShield Wizard window appears. Restart the computer, then log on a Windows® 2000/XP OS. Double-click the A S S E T U P . 6.3 LAN driver installation This section provides instructions on how to install the Broadcom® Gigabit LAN controller drivers on with A d m i n i s t r a t o r privileges. 2. ASUS K8N-DRE 6-3 The CD automatically displays the D r i v e r s menu if...

User Guide
Page 136
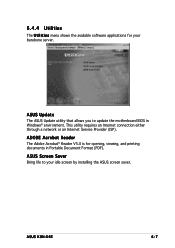
Install ASWM for details. 6-6 Chapter 6: Driver installation Refer to the application help file for Windows 2000 Installs the ASUS System Web-base Management utility. Refer to the application help file for details. Install ASUS Network Utility Installs the ASUS Network Utility. 6.4.3 Management Software The M a n a g e m e n t S o f t w a r e menu shows the available server management software applications.
Install ASWM for details. 6-6 Chapter 6: Driver installation Refer to the application help file for Windows 2000 Installs the ASUS System Web-base Management utility. Refer to the application help file for details. Install ASUS Network Utility Installs the ASUS Network Utility. 6.4.3 Management Software The M a n a g e m e n t S o f t w a r e menu shows the available server management software applications.
User Guide
Page 137
ASUS K8N-DRE 6-7 ASUS Update The ASUS Update utility that allows you to your barebone server. ADOBE Acrobat Reader The Adobe Acrobat® Reader V5.0 is for your idle screen by installing the ASUS screen saver. 6.4.4 Utilities The U t i l i t i e s menu shows the available software applications for opening, viewing, and printing documents in Windows® environment. ASUS Screen Saver Bring life to update the motherboard BIOS in Portable Document Format (PDF). This utility requires an Internet connection either through a network or an Internet Service Provider (ISP).
ASUS K8N-DRE 6-7 ASUS Update The ASUS Update utility that allows you to your barebone server. ADOBE Acrobat Reader The Adobe Acrobat® Reader V5.0 is for your idle screen by installing the ASUS screen saver. 6.4.4 Utilities The U t i l i t i e s menu shows the available software applications for opening, viewing, and printing documents in Windows® environment. ASUS Screen Saver Bring life to update the motherboard BIOS in Portable Document Format (PDF). This utility requires an Internet connection either through a network or an Internet Service Provider (ISP).


