User Guide
Page 6
... Express 3.0/2.0 x16 slot (at x16 mode) 2 x PCI Express 2.0 x1 slots Integrated graphics processor - H110M-K specifications summary CPU Chipset Memory Expansion slots Graphics Storage Audio LGA1151 socket for Intel® 6th Generation Core™ i7 / i5 / i3, Pentium®, and Celeron&#...Supports jack-detection and front panel jack-retasking. (continued on the CPU types. ** Refer to www.asus.com for the following items. Motherboard Cables Accessories Application DVD Documentation ASUS H110M-K motherboard 2 x Serial ATA 6.0 Gb/s cables 1 x I/O Shield Support DVD User Guide If any of ...
... Express 3.0/2.0 x16 slot (at x16 mode) 2 x PCI Express 2.0 x1 slots Integrated graphics processor - H110M-K specifications summary CPU Chipset Memory Expansion slots Graphics Storage Audio LGA1151 socket for Intel® 6th Generation Core™ i7 / i5 / i3, Pentium®, and Celeron&#...Supports jack-detection and front panel jack-retasking. (continued on the CPU types. ** Refer to www.asus.com for the following items. Motherboard Cables Accessories Application DVD Documentation ASUS H110M-K motherboard 2 x Serial ATA 6.0 Gb/s cables 1 x I/O Shield Support DVD User Guide If any of ...
User Guide
Page 9
...288-pin module) EATXPWR 22.6cm(8.9in) Place this side towards the rear of the chassis USB3_34 LGA1151 1 USB_56 LAN_USB78 CHA_FAN AUDIO RTL 8111H COM BATTERY PCIEX16_1 16 H110M-K Super I/O PCIEX1_1 6 15 Intel® SPEAKER H110 7 ALC 887 PCIEX1_2 128Mb BIOS CLRTC F_PANEL... the QR code to the motherboard, peripherals, or components. • Unplug the power cord before touching any component, ensure that the ATX power supply is switched off or the power cord is detached from the wall socket before installing or removing the motherboard. ASUS H110M-K 1-1
...288-pin module) EATXPWR 22.6cm(8.9in) Place this side towards the rear of the chassis USB3_34 LGA1151 1 USB_56 LAN_USB78 CHA_FAN AUDIO RTL 8111H COM BATTERY PCIEX16_1 16 H110M-K Super I/O PCIEX1_1 6 15 Intel® SPEAKER H110 7 ALC 887 PCIEX1_2 128Mb BIOS CLRTC F_PANEL... the QR code to the motherboard, peripherals, or components. • Unplug the power cord before touching any component, ensure that the ATX power supply is switched off or the power cord is detached from the wall socket before installing or removing the motherboard. ASUS H110M-K 1-1
User Guide
Page 10
asus.com/PowerSupplyCalculator/PSCalculator.aspx?SLanguage=en-us for the chassis-mounted system warning speaker. Insufficient air flow inside the system may damage the motherboard components. Serial port connector (10-1 pin COM) Connect the serial port module cable to this surface mount LGA1151 socket, ...at http://support. Do not place jumper caps on the motherboard, ensuring that complies with two Double Data Rate 4 (DDR4) Dual Inline Memory Module (DIMM) sockets. Intel® LGA1151 CPU socket Install Intel® LGA1151 CPU into these connectors and push down firmly until the...
asus.com/PowerSupplyCalculator/PSCalculator.aspx?SLanguage=en-us for the chassis-mounted system warning speaker. Insufficient air flow inside the system may damage the motherboard components. Serial port connector (10-1 pin COM) Connect the serial port module cable to this surface mount LGA1151 socket, ...at http://support. Do not place jumper caps on the motherboard, ensuring that complies with two Double Data Rate 4 (DDR4) Dual Inline Memory Module (DIMM) sockets. Intel® LGA1151 CPU socket Install Intel® LGA1151 CPU into these connectors and push down firmly until the...
User Guide
Page 15
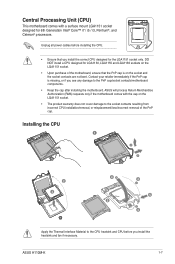
ASUS H110M-K 1-7 Installing the CPU 1 A B 2 3 4A D5 4 C 5 B 4 Apply the Thermal Interface Material to the PnP cap/socket contacts/motherboard components. • Keep the cap after installing the motherboard. DO NOT install a CPU designed for LGA1150, LGA1155 and LGA1156 sockets on the socket and the...™ i7 / i5 / i3, Pentium®, and Celeron® processors. Central Processing Unit (CPU) This motherboard comes with the cap on the LGA1151 socket. • The product warranty does not cover damage to the socket contacts resulting from incorrect CPU installation/removal,...
ASUS H110M-K 1-7 Installing the CPU 1 A B 2 3 4A D5 4 C 5 B 4 Apply the Thermal Interface Material to the PnP cap/socket contacts/motherboard components. • Keep the cap after installing the motherboard. DO NOT install a CPU designed for LGA1150, LGA1155 and LGA1156 sockets on the socket and the...™ i7 / i5 / i3, Pentium®, and Celeron® processors. Central Processing Unit (CPU) This motherboard comes with the cap on the LGA1151 socket. • The product warranty does not cover damage to the socket contacts resulting from incorrect CPU installation/removal,...


