User Guide
Page 2
...Copyrights No part of this manual may or may be registered trademarks or copyrights of alteration is defaced or missing. IN NO EVENT SHALL ASUS, ITS DIRECTORS, OFFICERS, EMPLOYEES OR AGENTS BE LIABLE FOR ANY INDIRECT, SPECIAL, INCIDENTAL, OR CONSEQUENTIAL DAMAGES (INCLUDING DAMAGES FOR LOSS ...SUCH DAMAGES ARISING FROM ANY DEFECT OR ERROR IN THIS MANUAL OR PRODUCT. Product Name: Manual Revision: Release Date: ASUS AP160R-S 1.01 E1068 July 2002 2 ASUS ASSUMES NO RESPONSIBILITY OR LIABILITY FOR ANY ERRORS OR INACCURACIES THAT MAY APPEAR IN THIS MANUAL, INCLUDING THE PRODUCTS AND ...
...Copyrights No part of this manual may or may be registered trademarks or copyrights of alteration is defaced or missing. IN NO EVENT SHALL ASUS, ITS DIRECTORS, OFFICERS, EMPLOYEES OR AGENTS BE LIABLE FOR ANY INDIRECT, SPECIAL, INCIDENTAL, OR CONSEQUENTIAL DAMAGES (INCLUDING DAMAGES FOR LOSS ...SUCH DAMAGES ARISING FROM ANY DEFECT OR ERROR IN THIS MANUAL OR PRODUCT. Product Name: Manual Revision: Release Date: ASUS AP160R-S 1.01 E1068 July 2002 2 ASUS ASSUMES NO RESPONSIBILITY OR LIABILITY FOR ANY ERRORS OR INACCURACIES THAT MAY APPEAR IN THIS MANUAL, INCLUDING THE PRODUCTS AND ...

User Guide
Page 9
This part includes the target audience, chapter description, and conventions used. It also lists other sources of this document. About this manual. Introduction "About This Guide" introduces the contents of information that are not contained in this guide ASUS AP160R-S 1U Rackmount Server 9
This part includes the target audience, chapter description, and conventions used. It also lists other sources of this document. About this manual. Introduction "About This Guide" introduces the contents of information that are not contained in this guide ASUS AP160R-S 1U Rackmount Server 9

User Guide
Page 11
...manual. NOTE: Tips and information to aid in the ASUS Contact Information on ASUS hardware and softare products. NOTE: These documents are listed in completing a task. ASUS AP160R-S 1U Rackmount Server 11 ASUS NR-LSR Motherboard User's Manual This manual contains detailed ...information about the NR-LSR motherboard. 2. The ASUS websites are not part of the following sources for additional information...
...manual. NOTE: Tips and information to aid in the ASUS Contact Information on ASUS hardware and softare products. NOTE: These documents are listed in completing a task. ASUS AP160R-S 1U Rackmount Server 11 ASUS NR-LSR Motherboard User's Manual This manual contains detailed ...information about the NR-LSR motherboard. 2. The ASUS websites are not part of the following sources for additional information...

User Guide
Page 13
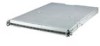
It includes sections on front panel, rear panel, and internal features of the AP160R-S server. System Overview ASUS AP160R-S 1U Rackmount Server 13 Chapter 1 This chapter describes the general features of the server.
It includes sections on front panel, rear panel, and internal features of the AP160R-S server. System Overview ASUS AP160R-S 1U Rackmount Server 13 Chapter 1 This chapter describes the general features of the server.

User Guide
Page 14
...; Storage: Four 1" height, 3.5-inch width HDD drive bays • Expansion: Two full-length 64-bit 133/100MHz PCI-X slots on the motherboard. 1.1 System Features The ASUS AP160R-S is an integrated Ethernet LAN component that provides a high performance data flow path between the IMB and the I/O subsystem. • LAN Chipsets: The Intel®...
...; Storage: Four 1" height, 3.5-inch width HDD drive bays • Expansion: Two full-length 64-bit 133/100MHz PCI-X slots on the motherboard. 1.1 System Features The ASUS AP160R-S is an integrated Ethernet LAN component that provides a high performance data flow path between the IMB and the I/O subsystem. • LAN Chipsets: The Intel®...

User Guide
Page 15
... (COM1) Gigabit LAN port 100/10Mbps LAN port PS/2 keyboard port PS/2 mouse port Rear fan Power supply fan AC Power socket Power supply fan ASUS AP160R-S 1U Rackmount Server 15 1.2 Front Panel Features The front panel of the server allows easy access to the hard disk drives.
... (COM1) Gigabit LAN port 100/10Mbps LAN port PS/2 keyboard port PS/2 mouse port Rear fan Power supply fan AC Power socket Power supply fan ASUS AP160R-S 1U Rackmount Server 15 1.2 Front Panel Features The front panel of the server allows easy access to the hard disk drives.
User Guide
Page 17
Chapter 2 This chapter describes the hardware setup procedures that you have to perform when installing system components. Hardware Setup ASUS AP160R-S 1U Rackmount Server 17
Chapter 2 This chapter describes the hardware setup procedures that you have to perform when installing system components. Hardware Setup ASUS AP160R-S 1U Rackmount Server 17
User Guide
Page 19
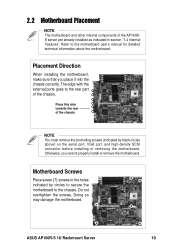
...that you cannot properly install or remove the motherboard. Do not overtighten the screws. Otherwise, you place it into the chassis correctly. ASUS AP160R-S 1U Rackmount Server 19 Doing so may damage the motherboard. Motherboard Screws Place seven (7) screws in section "1.4 Internal Features". 2.2 ...Motherboard Placement NOTE The motherboard and other internal components of the AP160RS server are already installed as indicated in the holes indicated by black circles above) on the serial port, VGA port, and ...
...that you cannot properly install or remove the motherboard. Do not overtighten the screws. Otherwise, you place it into the chassis correctly. ASUS AP160R-S 1U Rackmount Server 19 Doing so may damage the motherboard. Motherboard Screws Place seven (7) screws in section "1.4 Internal Features". 2.2 ...Motherboard Placement NOTE The motherboard and other internal components of the AP160RS server are already installed as indicated in the holes indicated by black circles above) on the serial port, VGA port, and ...

User Guide
Page 21
Socket Lever 90 - 100 Insert the CPU 1. Gold Mark ASUS AP160R-S 1U Rackmount Server 21 The lever clicks on the socket while you push down the socket lever to secure the CPU. Position the CPU above the socket such that it is in place. Carefully insert the CPU into the socket until it fits in place, press it firmly on the side tab to a 90°-100° angle. Unlock the CPU Socket Unlock the socket by pressing the lever sideways then lifting it up to indicate that its marked corner matches the base of the socket lever. 2. Secure the CPU When the CPU is locked.
Socket Lever 90 - 100 Insert the CPU 1. Gold Mark ASUS AP160R-S 1U Rackmount Server 21 The lever clicks on the socket while you push down the socket lever to secure the CPU. Position the CPU above the socket such that it is in place. Carefully insert the CPU into the socket until it fits in place, press it firmly on the side tab to a 90°-100° angle. Unlock the CPU Socket Unlock the socket by pressing the lever sideways then lifting it up to indicate that its marked corner matches the base of the socket lever. 2. Secure the CPU When the CPU is locked.
User Guide
Page 23
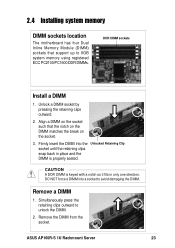
ASUS AP160R-S 1U Rackmount Server 23 Firmly insert the DIMM into a socket to avoid damaging the DIMM. DO NOT force a DIMM into the Unlocked Retaining Clip socket ...
ASUS AP160R-S 1U Rackmount Server 23 Firmly insert the DIMM into a socket to avoid damaging the DIMM. DO NOT force a DIMM into the Unlocked Retaining Clip socket ...

User Guide
Page 25
... main power supply unit. Bridge Board (BRIDGE/S-AR12) 2.5.3 Backplane board The backplane board includes the four hot-swappable connectors for the External Combo Drive Cage ASUS AP160R-S 1U Rackmount Server 25 The backplane board comes pre-installed in the figure below . When installed, the SCSI RAID bridge board appears as shown below...
... main power supply unit. Bridge Board (BRIDGE/S-AR12) 2.5.3 Backplane board The backplane board includes the four hot-swappable connectors for the External Combo Drive Cage ASUS AP160R-S 1U Rackmount Server 25 The backplane board comes pre-installed in the figure below . When installed, the SCSI RAID bridge board appears as shown below...

User Guide
Page 27
Push the tray all the way to avoid damaging the drive and the tray. Push the tray handle back in place before you push the handle back to the depth of the bay until it fits. 6. CAUTION Make sure that the HDD tray is completely in place. ASUS AP160R-S 1U Rackmount Server 27 5.
Push the tray all the way to avoid damaging the drive and the tray. Push the tray handle back in place before you push the handle back to the depth of the bay until it fits. 6. CAUTION Make sure that the HDD tray is completely in place. ASUS AP160R-S 1U Rackmount Server 27 5.
User Guide
Page 29
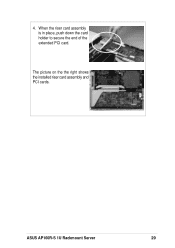
When the riser card assembly is in place, push down the card holder to secure the end of the extended PCI card. 4. ASUS AP160R-S 1U Rackmount Server 29 The picture on the the right shows the installed riser card assembly and PCI cards.
When the riser card assembly is in place, push down the card holder to secure the end of the extended PCI card. 4. ASUS AP160R-S 1U Rackmount Server 29 The picture on the the right shows the installed riser card assembly and PCI cards.
User Guide
Page 31
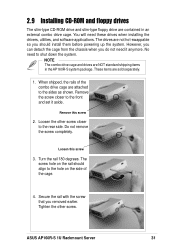
... CD-ROM and floppy drives The slim-type CD-ROM drive and slim-type floppy drive are sold separately. 1. These items are contained in the AP160R-S system package. The screw hole on the side of the combo drive cage are attached to the sides as shown. Remove the screw closer to... the rear side. Do not remove the screw completely. Loosen this screw 2. ASUS AP160R-S 1U Rackmount Server 31 The drives are NOT standard shipping items in an external combo drive cage. NOTE The combo drive cage and drives are...
... CD-ROM and floppy drives The slim-type CD-ROM drive and slim-type floppy drive are sold separately. 1. These items are contained in the AP160R-S system package. The screw hole on the side of the combo drive cage are attached to the sides as shown. Remove the screw closer to... the rear side. Do not remove the screw completely. Loosen this screw 2. ASUS AP160R-S 1U Rackmount Server 31 The drives are NOT standard shipping items in an external combo drive cage. NOTE The combo drive cage and drives are...
User Guide
Page 33
Chapter 3 This chapter describes the optional hardware procedures that you may have to do when configuring the system. Hardware Options ASUS AP160R-S 1U Rackmount Server 33
Chapter 3 This chapter describes the optional hardware procedures that you may have to do when configuring the system. Hardware Options ASUS AP160R-S 1U Rackmount Server 33
User Guide
Page 35
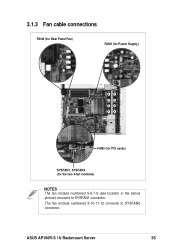
The fan module numbered 9-10-11-12 connects to SYSFAN1 connector. ASUS AP160R-S 1U Rackmount Server 35 3.1.3 Fan cable connections FAN4 (for Rear Panel Fan) FAN2 (for Power Supply) 8 12 7 11 6 10 59 FAN3 (for PCI cards) SYSFAN1, SYSFAN2 (for the two 4-fan modules) NOTES The fan module numbered 5-6-7-8 (see location in the above picture) connects to SYSFAN2 connector.
The fan module numbered 9-10-11-12 connects to SYSFAN1 connector. ASUS AP160R-S 1U Rackmount Server 35 3.1.3 Fan cable connections FAN4 (for Rear Panel Fan) FAN2 (for Power Supply) 8 12 7 11 6 10 59 FAN3 (for PCI cards) SYSFAN1, SYSFAN2 (for the two 4-fan modules) NOTES The fan module numbered 5-6-7-8 (see location in the above picture) connects to SYSFAN2 connector.
User Guide
Page 37
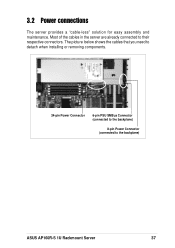
3.2 Power connections The server provides a "cable-less" solution for easy assembly and maintenance. The picture below shows the cables that you need to detach when installing or removing components. 24-pin Power Connector 6-pin PSU SMBus Connector (connected to the backplane) 8-pin Power Connector (connected to their respective connectors. Most of the cables in the server are already connected to the backplane) ASUS AP160R-S 1U Rackmount Server 37
3.2 Power connections The server provides a "cable-less" solution for easy assembly and maintenance. The picture below shows the cables that you need to detach when installing or removing components. 24-pin Power Connector 6-pin PSU SMBus Connector (connected to the backplane) 8-pin Power Connector (connected to their respective connectors. Most of the cables in the server are already connected to the backplane) ASUS AP160R-S 1U Rackmount Server 37
User Guide
Page 39
Appendix A This appendix gives information on the 284W switching power supply that comes with the AP160R-S server. Power Supply ASUS AP160R-S 1U Rackmount Server 39
Appendix A This appendix gives information on the 284W switching power supply that comes with the AP160R-S server. Power Supply ASUS AP160R-S 1U Rackmount Server 39

User Guide
Page 41
... start 18A warm start 65% min. By shorting +5VSB, the power supply can latch down and latch off for shorting +5V, +12V, -12V, or +3.3V. ASUS AP160R-S 1U Rackmount Server 41 at nominal input, maximum load Output Characteristics Output Voltage +5V +12V -12V +5VSB +3V3 Load Range Min Max 0.5A 9.5A 2.0A...
... start 18A warm start 65% min. By shorting +5VSB, the power supply can latch down and latch off for shorting +5V, +12V, -12V, or +3.3V. ASUS AP160R-S 1U Rackmount Server 41 at nominal input, maximum load Output Characteristics Output Voltage +5V +12V -12V +5VSB +3V3 Load Range Min Max 0.5A 9.5A 2.0A...
User Guide
Page 43
It lists the possible causes of the problems and offers solutions. Troubleshooting ASUS AP160R-S 1U Rackmount Server 43 You may encounter while using the AP160R-S server. Appendix B This appendix lists the common problems that you may refer to this part and try to solve simple problems before calling customer support.
It lists the possible causes of the problems and offers solutions. Troubleshooting ASUS AP160R-S 1U Rackmount Server 43 You may encounter while using the AP160R-S server. Appendix B This appendix lists the common problems that you may refer to this part and try to solve simple problems before calling customer support.


