Asus AP1710-S5 Support and Manuals
Get Help and Manuals for this Asus item
View All Support Options Below
Free Asus AP1710-S5 manuals!
Problems with Asus AP1710-S5?
Ask a Question
Free Asus AP1710-S5 manuals!
Problems with Asus AP1710-S5?
Ask a Question
Popular Asus AP1710-S5 Manual Pages
AP1710-S5 English Manual - Page 2

...:
ASUS AP1710-S5 First Edition V1 (E1346) July 2003
ii
All Rights Reserved. Product warranty or service will not be construed as is" without intent to change at any defect or error in this manual ae furnished for loss of profits, loss of business, loss of use only, and are used only for a particular purpose. No part...
AP1710-S5 English Manual - Page 11
ASUS AP1710-S5 user guide
1-1 It includes sections on front panel and rear panel specifications.
Product introduction
Chapter 1
This chapter describes the general features of the AP1710-S5 server.
AP1710-S5 English Manual - Page 12

... and fan assembly (2 sets)
2. ASUS PXL-S30 Ultra320 dual-channel SCSI RAID card
3. AC power cable 4. 1.1 System package contents
Check your ASUS AP1710-S5 package for the following items. Contact your dealer immediately if any of the items is damaged or missing.
1.1.1 Standard items
1. Documentation
• ASUS AP1710-S5 user guide • ASUS PRL-DL user guide • ASUS ASMS (ASMA+ASWM...
AP1710-S5 English Manual - Page 13
...inch drive bays 6 x hot-swap trays for up to 4GB system memory
Processor
Supports dual Intel® Xeon™ processors
Network Controller Intel® 82540 Gigabit Ethernet controller...Supply
500W redundant power supply
ASUS AP1710-S5 user guide
1-3
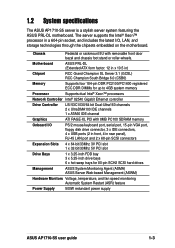
1.2 System specifications
The ASUS AP1710-S5 server is a stylish server system featuring the ASUS PRL-DL motherboard. Chassis
...
AP1710-S5 English Manual - Page 15

... port Gigabit LAN port
Gigabit LAN card (optional)
SCSI card (optional
AC IN connector AC Power status LED 12cm fan vent
Chassis lock
Expansion slots
ASUS AP1710-S5 user guide
1-5
1.4. Rear panel features
The rear panel includes a slot for the motherboard rear I/O ports, six full-length expansion slots, a chassis lock and intrusion switch, a vent...
AP1710-S5 English Manual - Page 19
Hardware setup
ASUS AP1710-S5 user guide
2-1 Chapter 2
This chapter lists the hardware setup procedures that you have to perform when installing or removing system components.
AP1710-S5 English Manual - Page 33
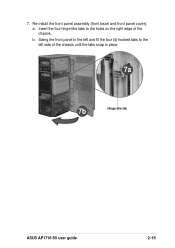
a. Insert the four hinge-like tabs to the left side of the chassis. Re-install the front panel assembly (front bezel and front panel cover). b. Swing the front panel to the left and fit the four (4) hooked tabs to the holes on the right edge of the chassis until the tabs snap in place.
7a
7b
Hinge-like tab
ASUS AP1710-S5 user guide
2-15 7.
AP1710-S5 English Manual - Page 35
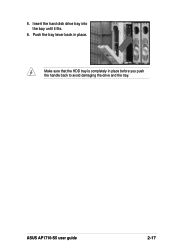
Push the tray lever back in place before you push the handle back to avoid damaging the drive and the tray. ASUS AP1710-S5 user guide
2-17 5.
Make sure that the HDD tray is completely in place. Insert the hard disk drive tray into the bay until it fits.
6.
AP1710-S5 English Manual - Page 37
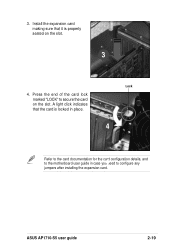
... card lock marked "LOCK" to the motherboard user guide in place. Lock
4
4 Refer to the card documentation for the card configuration details, and
to secure the card on the slot.
3
4.
A light click indicates that it is locked in case you need to configure any jumpers after installing the expansion card. ASUS AP1710-S5 user guide
2-19
AP1710-S5 English Manual - Page 38
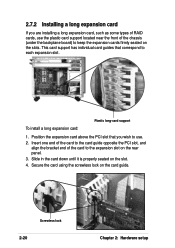
... card using the screwless lock on the slot. 4. This card support has individual card guides that you are installing a long expansion card, such as some types of RAID cards, use . 2. Plastic long-card support
To install a long expansion card:
1. Screwless lock
2-20
Chapter 2: Hardware setup
Slide in the card down until it is properly seated on...
AP1710-S5 English Manual - Page 39
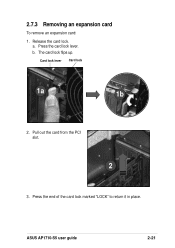
a. Press the card lock lever. b.
Pull out the card from the PCI slot.
2
3. The card lock flips up. Press the end of the card lock marked "LOCK" to return it in place. ASUS AP1710-S5 user guide
2-21 Release the card lock. 2.7.3 Removing an expansion card
To remove an expansion card:
1. Card lock lever Card lock
1a
1b
2.
AP1710-S5 English Manual - Page 41

...Disk drive 3 SCSI ID = 3 Disk drive 4 SCSI ID = 4 Disk drive 5 SCSI ID = 5 Disk drive 6
ASUS AP1710-S5 user guide
68-pin SCSI connector
(connect to the SCSI connector on the motherboard)
SMBus connector
(connect to the SMBus connector on the motherboard)...design incorporates a hot-swap feature to support SCA SCSI hard disks. The LED connectors on the motherboard)
HDD status LEDs
HDD activity LEDs...
AP1710-S5 English Manual - Page 43
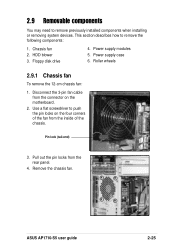
... 6. Remove the chassis fan. ASUS AP1710-S5 user guide
2-25 Disconnect the 3-pin fan cable from the inside of the fan from the connector on the four corners of the chassis.
Pull out the pin locks from the rear panel.
4. This section describes how to remove previously installed components when installing or removing system devices. Roller...
AP1710-S5 English Manual - Page 45

...Set aside the cover.
3
4. 2.9.3 Floppy disk drive
To remove the floppy disk drive:
1. Refer to remove the right side chassis cover screws.
2
3. Use a Phillips head screw driver
...to "2.5.1 Removing the front panel assembly" on page 2-11.
2. Pull out and detach the right side chassis cover. Locate the floppy disk drive cable and power connectors.
4
ASUS AP1710-S5 user guide...
AP1710-S5 English Manual - Page 53
....
2. Make sure that the DIMMs are properly installed on the rear panel.
2. ASUS AP1710-S5 user guide
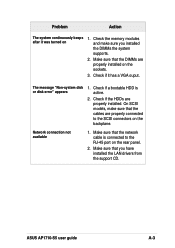
A-3 Check if it was turned on the backplane.
Check if a bootable HDD is connected to the SCSI connectors on
1. On SCSI models, make sure you have installed the LAN drivers from the support CD. Problem
Action
The system continuously beeps after it has...
Asus AP1710-S5 Reviews
We have not received any reviews for Asus yet.