User Guide
Page 3
... panel LEDs 1-7 Chapter 2: Hardware setup 2-1 2.1 Chassis cover 2-2 2.1.1 Removing the cover 2-2 2.1.2 Installing the cover 2-3 2.2 Central Processing Unit (CPU 2-4 2.2.1 Installling a CPU 2-4 2.2.2 Installing the CPU heatsink 2-6 2.4 System memory 2-7 2.4.1 Overview 2-7 2.4.2 Memory configurations 2-7 2.4.3 Installing a DIMM 2-8 2.4.4 Removing a DIMM 2-8 2.4 Hot-swap hard disk drives 2-9 2.5 Expansion slot 2-11 2.5.1 Installing a short expansion card 2-11 2.5.2 Installing a long expansion card 2-13 2.5.3 Configuring an...
... panel LEDs 1-7 Chapter 2: Hardware setup 2-1 2.1 Chassis cover 2-2 2.1.1 Removing the cover 2-2 2.1.2 Installing the cover 2-3 2.2 Central Processing Unit (CPU 2-4 2.2.1 Installling a CPU 2-4 2.2.2 Installing the CPU heatsink 2-6 2.4 System memory 2-7 2.4.1 Overview 2-7 2.4.2 Memory configurations 2-7 2.4.3 Installing a DIMM 2-8 2.4.4 Removing a DIMM 2-8 2.4 Hot-swap hard disk drives 2-9 2.5 Expansion slot 2-11 2.5.1 Installing a short expansion card 2-11 2.5.2 Installing a long expansion card 2-13 2.5.3 Configuring an...
User Guide
Page 13
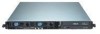
... System Restart (ASR) feature 500W power supply, 115V~230V, 50Hz~60Hz 670 mm (l) x 445 mm (w) x 43.6 mm (h) ASUS AP1600R-E2 (CS3) 1-3 1.2 System specifications The ASUS AP1600R-E2 (CS3) is a 1U barebone server system featuring the ASUS NCL-DS1R1 motherboard. Chassis Motherboard Chipset Processor Memory LAN VGA Expansion slot Storage Management Hardware monitors Power supply Dimensions Rackmount 1U (R11...
... System Restart (ASR) feature 500W power supply, 115V~230V, 50Hz~60Hz 670 mm (l) x 445 mm (w) x 43.6 mm (h) ASUS AP1600R-E2 (CS3) 1-3 1.2 System specifications The ASUS AP1600R-E2 (CS3) is a 1U barebone server system featuring the ASUS NCL-DS1R1 motherboard. Chassis Motherboard Chipset Processor Memory LAN VGA Expansion slot Storage Management Hardware monitors Power supply Dimensions Rackmount 1U (R11...
User Guide
Page 22
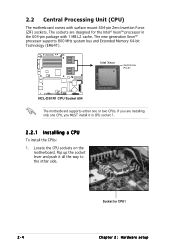
... 1 MB L2 cache. If you are designed for CPU1 2-4 Chapter 2: Hardware setup The new generation Xeon™ processor supports 800 MHz system bus and Extended Memory 64-bit Technology (EM64T). The sockets are installing only one or two CPUs. Intel Xeon Gold Arrow Pin A1 ® NCL-DS1R1 NCL-DS1R1 CPU...
... 1 MB L2 cache. If you are designed for CPU1 2-4 Chapter 2: Hardware setup The new generation Xeon™ processor supports 800 MHz system bus and Extended Memory 64-bit Technology (EM64T). The sockets are installing only one or two CPUs. Intel Xeon Gold Arrow Pin A1 ® NCL-DS1R1 NCL-DS1R1 CPU...
User Guide
Page 25
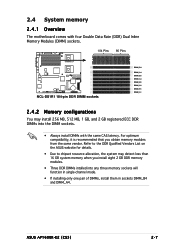
... system may install 256 MB, 512 MB, 1 GB, and 2 GB registered ECC DDR DIMMs into any three memory sockets will function in single-channel mode. • If installing only one pair of DIMMs, install them in sockets DIMM_B4 and DIMM_A4. ASUS AP1600R-E2 (CS3) 2-7 2.4 System memory 2.4.1 Overview The motherboard comes with the same CAS latency.
... system may install 256 MB, 512 MB, 1 GB, and 2 GB registered ECC DDR DIMMs into any three memory sockets will function in single-channel mode. • If installing only one pair of DIMMs, install them in sockets DIMM_B4 and DIMM_A4. ASUS AP1600R-E2 (CS3) 2-7 2.4 System memory 2.4.1 Overview The motherboard comes with the same CAS latency.
User Guide
Page 50
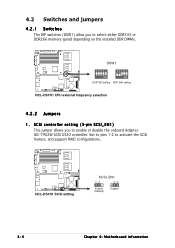
Set to pins 1-2 to select either DDR333 or DDR266 memory speed depending on the installed DDR DIMMs. DSW1 DDR 333 setting DDR 266 setting NCL-DS1R1 CPU external frequency selection 4.2.2 Jumpers 1 . ® NCL-DS1R1 ON ...
Set to pins 1-2 to select either DDR333 or DDR266 memory speed depending on the installed DDR DIMMs. DSW1 DDR 333 setting DDR 266 setting NCL-DS1R1 CPU external frequency selection 4.2.2 Jumpers 1 . ® NCL-DS1R1 ON ...
User Guide
Page 51
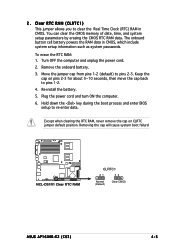
... the battery. 5. Removing the cap will cause system boot failure! ® NCL-DS1R1 NCL-DS1R1 Clear RTC RAM CLRTC1 21 32 Normal (Default) Clear CMOS ASUS AP1600R-E2 (CS3) 4-5 Plug the power cord and turn ON the computer. 6. 2. Clear RTC RAM (CLRTC1) This jumper allows you to re-enter data. You can clear... the CMOS memory of date, time, and system setup parameters by erasing the CMOS RTC RAM data. To erase the RTC RAM: 1. Keep the cap on CLRTC jumper...
... the battery. 5. Removing the cap will cause system boot failure! ® NCL-DS1R1 NCL-DS1R1 Clear RTC RAM CLRTC1 21 32 Normal (Default) Clear CMOS ASUS AP1600R-E2 (CS3) 4-5 Plug the power cord and turn ON the computer. 6. 2. Clear RTC RAM (CLRTC1) This jumper allows you to re-enter data. You can clear... the CMOS memory of date, time, and system setup parameters by erasing the CMOS RTC RAM data. To erase the RTC RAM: 1. Keep the cap on CLRTC jumper...

User Guide
Page 77
...: [Not Detected] : [Not Detected] Use [ENTER], [TAB] or [SHIFT-TAB] to display a list of the selected item. Configure DRAM Timing by SPD Memory Acceleration Mode DRAM Idle Timer DRAm Refresh Rate [Enabled] [Auto] [Auto] [Auto] Graphic Adapter Priority Graphics Aperture Size Spread Spectrum [AGP/PCI] [ 64 MB]...To change the value of a menu screen when there are items that menu. Use [+] or [-] to display a pop-up window Scroll bar ASUS AP1600R-E2 (CS3) 5-13 To display the sub-menu, select the item and press . 5.2.6 Configuration fields These fields show the values for the menu ...
...: [Not Detected] : [Not Detected] Use [ENTER], [TAB] or [SHIFT-TAB] to display a list of the selected item. Configure DRAM Timing by SPD Memory Acceleration Mode DRAM Idle Timer DRAm Refresh Rate [Enabled] [Auto] [Auto] [Auto] Graphic Adapter Priority Graphics Aperture Size Spread Spectrum [AGP/PCI] [ 64 MB]...To change the value of a menu screen when there are items that menu. Use [+] or [-] to display a pop-up window Scroll bar ASUS AP1600R-E2 (CS3) 5-13 To display the sub-menu, select the item and press . 5.2.6 Configuration fields These fields show the values for the menu ...
User Guide
Page 82
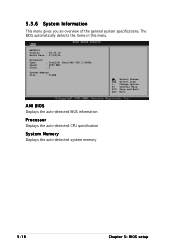
AMIBIOS Version : 08.00.10 Build Date : 07/23/04 Processor Type Speed Count : Intel(R) Xeon(TM) CPU 2.80GHz : 2800 MHz : 2 System Memory Size : 512MB AMI BIOS Displays the auto-detected BIOS information Processor Displays the auto-detected CPU specification System Memory Displays the auto-detected system memory Select Screen Select Item +- The BIOS automatically detects the items in this menu. 5.3.6 System Information This menu gives you an overview of the general system specifications. Change Option F1 General Help F10 Save and Exit ESC Exit 5-18 Chapter 5: BIOS setup
AMIBIOS Version : 08.00.10 Build Date : 07/23/04 Processor Type Speed Count : Intel(R) Xeon(TM) CPU 2.80GHz : 2800 MHz : 2 System Memory Size : 512MB AMI BIOS Displays the auto-detected BIOS information Processor Displays the auto-detected CPU specification System Memory Displays the auto-detected system memory Select Screen Select Item +- The BIOS automatically detects the items in this menu. 5.3.6 System Information This menu gives you an overview of the general system specifications. Change Option F1 General Help F10 Save and Exit ESC Exit 5-18 Chapter 5: BIOS setup
User Guide
Page 88
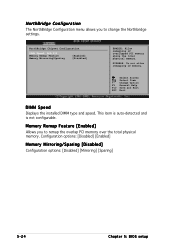
... Configuration menu allows you to change the Northbridge settings. DISABLE: Do not allow remapping of overlapped PCI memory above the total physical memory. This item is auto-detected and is not configurable. Configuration options: [Disabled] [Enabled] Memory Mirroring/Sparing [Disabled] Configuration options: [Disabled] [Mirroring] [Sparing] 5-24 Chapter 5: BIOS setup Select Screen Select Item...
... Configuration menu allows you to change the Northbridge settings. DISABLE: Do not allow remapping of overlapped PCI memory above the total physical memory. This item is auto-detected and is not configurable. Configuration options: [Disabled] [Enabled] Memory Mirroring/Sparing [Disabled] Configuration options: [Disabled] [Mirroring] [Sparing] 5-24 Chapter 5: BIOS setup Select Screen Select Item...
User Guide
Page 90
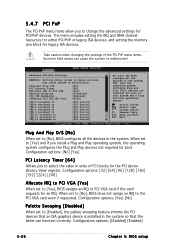
The menu includes setting the IRQ and DMA channel resources for either PCI/PnP or legacy ISA devices, and setting the memory size block for boot if your system has a Plug and Play operating system. YES: Lets the operating system configure Plug and Play (PnP) devices not ...
The menu includes setting the IRQ and DMA channel resources for either PCI/PnP or legacy ISA devices, and setting the memory size block for boot if your system has a Plug and Play operating system. YES: Lets the operating system configure Plug and Play (PnP) devices not ...
User Guide
Page 91
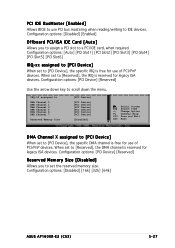
...PCI Device] [Reserved] Use the arrow down key to DMA Channel 0 DMA Channel 1 DMA Channel 3 DMA Channel 5 DMA Channel 6 DMA Channel 7 Reserved Memory Size [PCI Device] [PCI Device] [PCI Device] [PCI Device] [PCI Device] [PCI Device] [PCI Device] [Disabled] Select Screen Select Item +- ...PCI bus mastering when reading/writing to [Reserved], the DMA channel is reserved for legacy ISA devices. Configuration options: [Disabled] [16k] [32k] [64k] ASUS AP1600R-E2 (CS3) 5-27 Configuration options: [Auto] [PCI Slot1] [PCI Slot2] [PCI Slot3] [PCI Slot4] [PCI Slot5] [PCI Slot6] IRQ-xx ...
...PCI Device] [Reserved] Use the arrow down key to DMA Channel 0 DMA Channel 1 DMA Channel 3 DMA Channel 5 DMA Channel 6 DMA Channel 7 Reserved Memory Size [PCI Device] [PCI Device] [PCI Device] [PCI Device] [PCI Device] [PCI Device] [PCI Device] [Disabled] Select Screen Select Item +- ...PCI bus mastering when reading/writing to [Reserved], the DMA channel is reserved for legacy ISA devices. Configuration options: [Disabled] [16k] [32k] [64k] ASUS AP1600R-E2 (CS3) 5-27 Configuration options: [Auto] [PCI Slot1] [PCI Slot2] [PCI Slot3] [PCI Slot4] [PCI Slot5] [PCI Slot6] IRQ-xx ...

