Asus RS161-E2 - 0 MB RAM Support and Manuals
Get Help and Manuals for this Asus item
View All Support Options Below
Free Asus RS161-E2 manuals!
Problems with Asus RS161-E2?
Ask a Question
Free Asus RS161-E2 manuals!
Problems with Asus RS161-E2?
Ask a Question
Popular Asus RS161-E2 Manual Pages
User Manual - Page 13

1.2 System specifications
The ASUS RS161-E2 (PA2) is a 1U barebone server system featuring the ASUS K8N-DRE motherboard. RAID 0, RAID 1, and JBOD configurations
Management
ASUS Server Web-based Management (ASWM)
Monitoring
Voltage, temperature, and fan speed monitoring Automatic System Restart (ASR) feature
P o w e r r e q u i r e m e n t 500 W power supply, 100~240 VAC, 47~63 Hz
...
User Manual - Page 15
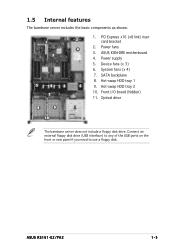
... includes the basic components as shown.
1. ASUS K8N-DRE motherboard
3
4. Hot-swap HDD tray 1
5
9. Front I/O board (hidden)
7
11. ASUS RS161-E2/PA2
1-5 Power supply
5. SATA backplane
5
6
5
8. Hot-swap HDD tray 2
10. Optical drive
8
9
11
10
The barebone server does not include a floppy disk drive. System fans (x 4)
7.
Power fans
4
3. Connect an external floppy...
User Manual - Page 25

... DIMM_C1
104 Pins
80 Pins
80 Pins
104 Pins
K8N-DRE 184-pin DDR DIMM sockets
For CPU 1 Channel A Channel B For CPU 2 Channel A Channel B
Sockets DIMM_A1 and DIMM_A2 DIMM_B1 and DIMM_B2
Sockets DIMM_C1 and DIMM_C2 DIMM_D1 and DIMM_D2
ASUS RS161-E2/PA2
2-9 2.4 System memory
2.4.1 Overview
The motherboard comes with eight 184-pin Double Data Rate (DDR) Dual Inline...
User Manual - Page 27
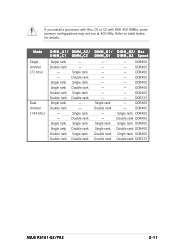
... rank Double rank Single rank Double rank - -
DDR400
-
If you install a processor with DDR 400 DIMMs, some memory configurations may not run at 400 MHz. CG or C0 with Rev. DDR400
- DDR400
-
DDR400
Single rank DDR400
Double rank DDR400
Single rank DDR400
Double rank DDR400
Single rank DDR400
Double rank DDR333
ASUS RS161-E2/PA2
2-11
User Manual - Page 29
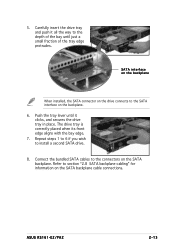
... SATA backplane cable connections. The drive tray is correctly placed when its front edge aligns with the bay edge.
7. SATA interface on the backplane
When installed, the SATA connector on the drive connects to install a second SATA drive.
8. ASUS RS161-E2/PA2
2-13
User Manual - Page 31

Take note of the holes on the motherboard.
3. Install the riser card bracket with the card into the PCI Express x16 slot on...on the
riser card should match these holes to the card, if applicable. Install a PCI Express x16 card to the bracket, then secure the card with the rear panel.
4. ASUS RS161-E2/PA2
2-15 5. Press the riser card bracket until the golden connectors completely fit...
User Manual - Page 33
... to optical drive) 5. Device fan connector (from motherboard to front I/O board)
ASUS RS161-E2/PA2
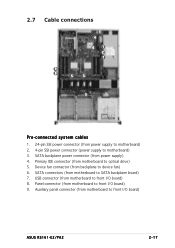
2-17 Primary IDE connector (from backplane to front I /O board) 8. USB connector (from motherboard to device fan) 6. Panel connector (from motherboard to motherboard) 3. 2.7 Cable connections
4
6
1
2
7
9
8
5
5
3
Pre-connected system cables
1. 24-pin SSI power connector...
User Manual - Page 35
... 2. Take note of the airflow directional arrows embossed on the backplane board.
2. Power supply module 4. Optical drive 5. Motherboard
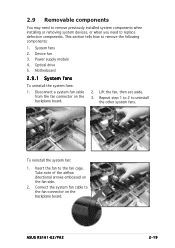
2.9.1 System fans
To uninstall the system fans:
1.
To reinstall the system fan: 1. ASUS RS161-E2/PA2
2-19 Lift the fan, then set aside.
3. Device fan 3. Insert the fan to uninstall the other system fans.
Disconnect a system fan cable...
User Manual - Page 43

Installation options
Chapter 3
This chapter describes how to install the optional components and devices into the barebone server. ASUS RS161-E2/PA2
2-1
User Manual - Page 45

... unit of a rack rail pair to attach the second rail pair. ASUS RS161-E2 (PA2)
3-3 Align the front end holes of space (1U) on the rack front.
3. Remove the screws from the 1U space on the rack where you attached the rail.
6. When properly installed, the rack rails appear as shown. Remove the screws from the rear...
User Manual - Page 47

Motherboard info
Chapter 4
This chapter gives information about the motherboard that comes with the server. This chapter includes the motherboard layout, jumper settings, and connector locations
ASUS RS161-E2/PA2
2-1
User Manual - Page 61

.... ASUS RS161-E2 (PA2)
4-15 Connect the Locator LED 1 cable to this connector. This requires an external detection mechanism such as a chassis intrusion sensor or microswitch. 12. Connect the LAN1 Activity LED cable to this connector. Devices communicate with an intrusion detection feature. System panel auxiliary connector (20-pin AUX_PANEL1) This connector supports several server...
User Manual - Page 95

...changes only to any field.
To set or change the user password.
ASUS RS161-E2/PA2
5-33 Main
Advanced
Server
BIOS SETUP UTILITY Security Boot Exit
Supervisor Password : Not Installed
User Password
: Not Installed
Change Supervisor Password User Access Level Change User Password Password Check
[Full Access] [Setup]
Install or Change the password.
→← Select Screen ↑...
User Manual - Page 97

... item then press to change the system boot options. Main
Advanced
Server
BIOS SETUP UTILITY Security Boot Exit
Boot Device Priority Boot Settings Configuration
Specifies the Boot Device Priority sequence.
→← Select Screen ↑↓ Select Item +- Configuration options: [xxxxx Drive] [Disabled]
ASUS RS161-E2/PA2
5-35
5.7 Boot menu
The Boot menu items allow you to...
User Manual - Page 121

Install ASUS Network Utility
Installs the ASUS Network Utility. ASUS RS161-E2/PA2
7-7 Install ASWM for details. Refer to the application help file for Windows 2000
Installs the ASUS System Web-base Management utility.
Refer to the application help file for details. 7.4.3 Management Software
The M a n a g e m e n t S o f t w a r e menu shows the available server management ...
Asus RS161-E2 Reviews
We have not received any reviews for Asus yet.