Asus TW510-E2 - 0 MB RAM Support and Manuals
Get Help and Manuals for this Asus item
View All Support Options Below
Free Asus TW510-E2 manuals!
Problems with Asus TW510-E2?
Ask a Question
Free Asus TW510-E2 manuals!
Problems with Asus TW510-E2?
Ask a Question
Popular Asus TW510-E2 Manual Pages
Service Guide - Page 11

Product introduction
Chapter 1
This chapter describes the general features of the barebone server, including sections on the front panel and rear panel specifications. ASUS TW510-E2
1-1
Service Guide - Page 12

....
Chassis Motherboard Components
Cables Accessories
Application CDs
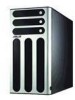
ASUS AK25 5U rackmount chassis
ASUS K8N-DL motherboard
600 W...sets) System screws and cables Dummy covers System keys (2 pcs.)
TW510-E2 support CD with ASWM* Computer Associates® eTrust™ anti-virus CD
Documentation Optional items
ASUS TW510-E2 user guide ASUS ASWM 2.0 user guide
ASUS AK25 rackmount rail kit
*ASUS...
Service Guide - Page 15
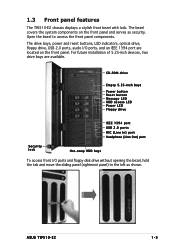
... tab and move the sliding panel (rightmost panel) to access the front panel components. ASUS TW510-E2
1-5 CD-ROM drive
Empty 5.25-inch bays
Power button Reset button Message LED HDD ...port are available. For future installation of 5.25-inch devices, two drive bays are located on the front panel and serves as shown.
1.3 Front panel features
The TW510-E2 chassis displays a stylish front...
Service Guide - Page 17

Expansion card locks 6. SATA backplane (hidden)
ASUS TW510-E2
1-7 Chassis intrusion switch 5. Optical drive 7. 2 x 5.25-inch drive bays 8. Front I/O board 10. 1.5 Internal features
The barebone server system includes the basic components as shown.
6 1
7
2 3
4 5
11 10
8
9
1. HDD fan (inside) 11. Hard disk drive cage 9. K8N-DL motherboard 4. Power supply cage 2. Chassis fan 3....
Service Guide - Page 27

2.4 System memory
2.4.1 Overview
The motherboard comes with six 184-pin Double Data Rate (DDR) Dual Inline Memory Modules (DIMM) sockets. The following figure illustrates the location of the sockets:
DIMM_A3
...
K8N-DL 184-pin DDR DIMM sockets
For CPU 1 Channel A Channel B For CPU 2 Channel A Channel B
Sockets DIMM_A1 and DIMM_A2 DIMM_B1 and DIMM_B2
Sockets DIMM_A3 DIMM_B3
ASUS TW510-E2
2-9
Service Guide - Page 29

... press the retaining clips outward to unlock the DIMM.
1
1
DDR DIMM notch
Support the DIMM lightly with extra force.
2. The DIMM might get damaged when it fits... snap back in only one direction.
ASUS TW510-E2
2-11 2.4.3 Installing a DIMM
Make sure to remove a DIMM.
2
1. Firmly insert the DIMM into a socket to both the motherboard and the components.
1.
Failure to ...
Service Guide - Page 31
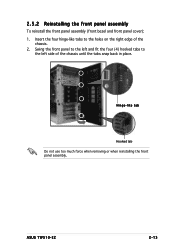
2.5.2 Reinstalling the front panel assembly
To reinstall the front panel assembly (front bezel and front panel cover): 1.
ASUS TW510-E2
2-13 Insert the four hinge-like tab
Hooked tab Do not use too much force when removing or when reinstalling the front panel assembly. Swing ...
Service Guide - Page 33

.... This mechanism secures the drive to the power connector on the drive bay. While holding up the drive bay lock bar.
IDE cable
Power plug
ASUS TW510-E2
2-15 Lock pegs
Due to easily connect the drive cables.
5. Underneath the lock bar are two pegs that match the holes on the back of...
Service Guide - Page 35

... and pull the drive tray out of the bay.
4. Metal bracket
ASUS TW510-E2
2-17 An empty drive tray requires a metal bracket for support.
Release a drive tray by pushing the spring lock to access the hot-swap drive trays.
2. Use a Phillips (cross) screwdriver to install a hot-swap SATA hard disk drive (HDD).
1. Open the front...
Service Guide - Page 37
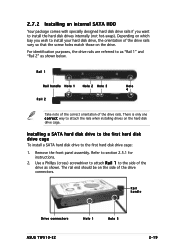
...should be on the hard disk drive cage. 2.7.2 Installing an internal SATA HDD
Your package comes with specially... 1
Hole 3
ASUS TW510-E2
2-19 Installing a SATA hard disk drive to the first hard disk drive cage
To install a SATA hard disk drive to install your hard disk drive... the rails when installing drives on the side of the drive rails. Depending on which bay you want to section 2.5.1 for...
Service Guide - Page 39

8.
Connect the other end to the SATA connector at the back of the SATA connectors. ASUS TW510-E2
2-21 Refer to Chapter 4 for the location of the drive.
9. Connect one end of the supplied 7-pin SATA cable to a SATA connector on the motherboard.
Service Guide - Page 41

...install the expansion card.
3.
ASUS TW510-E2
2-23 Remove the metal bracket opposite the slot where you wish to the slot, then make sure that it is designed with a screwless expansion slot frame on the slot. This design feature allows you wish to install... the plastic card lock opposite the slot where you to install the expansion card. Set the card lock aside for later use. Card lock tab...
Service Guide - Page 43
... 4 for detailed information on the motherboard connectors. Front audio cable 14.
Chassis intrusion 6. Secondary IDE (optical drive) 4. Front IEEE 1394 cable 12. Serial ATA connectors
Refer to the motherboard
14
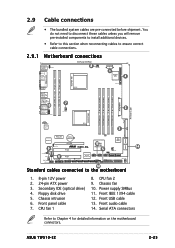
1. 8-pin 12V power 2. 24-pin ATX power 3. 2.9 Cable connections
• The bundled system cables are pre-connected before shipment. CPU fan 2 9. ASUS TW510-E2
2-25
Service Guide - Page 44
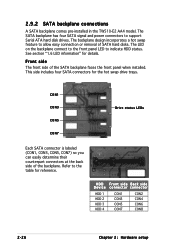
... connection or removal of SATA hard disks. See section "1.6 LED information" for reference.
Refer to support Serial ATA hard disk drives.
The backplane design incorporates a hot swap feature to indicate HDD status....
CON1 CON3 CON5 CON7
CON2 CON4 CON6 CON8
2-26
Chapter 2: Hardware setup 2.9.2 SATA backplane connections
A SATA backplane comes pre-installed in the TW510-E2 AA4 model.
Service Guide - Page 45

...of SATA backplane faces the rear panel when installed. ASUS TW510-E2
J1 setting (1-3 shorted, 2-4 shorted)
Device
Drive Bay ... 6-1 pins)
(connects the SMB cable from the motherboard)
P o w e r S M B u s c o n n e c t o r (lower 6-1 pins)
(connects the SMB cable from the power supply, when available)
CON2 CON4 CON6 CON8
SATA backplane jumper settings and HDD ID assignments
The 6-pin jumper J 1...
Asus TW510-E2 Reviews
We have not received any reviews for Asus yet.