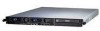
Asus RS161-E5 - 0 MB RAM Support and Manuals
Get Help and Manuals for this Asus item
View All Support Options Below
Free Asus RS161-E5 manuals!
Problems with Asus RS161-E5?
Ask a Question
Free Asus RS161-E5 manuals!
Problems with Asus RS161-E5?
Ask a Question
Popular Asus RS161-E5 Manual Pages
Service Guide - Page 11

Product introduction
Chapter 1
This chapter describes the general features of the barebone server, including sections on the front panel and rear panel specifications.
ASUS RS161-E5/PA2
1-
Service Guide - Page 13

.../2 mouse port
(continued on the next page)
The RJ-45 port for ASMB3 iKVM is a 1U barebone server system featuring the ASUS KFSN4-DRE motherboard. Model Name
RS161-E5/PA2
Processor / System Bus
2 * Socket F (1207)
AMD Opteron™ 2000 series processor
(Barcelona Support)
Quad Core/Dual Core
HyperTransport™ Technology 1.0, 1GHz
512KB L2 cache/Per core, 2MB L3
Core...
Service Guide - Page 15
...part includes the I/O shield with easily accessible features. LAN port for the rear panel connectors on the rear panel if motherboard is not present.
• Refer to 1.6.1 Front panel LEDs for ASMB3 iKVM functions only when you install...port 12. ASUS RS161-E5/PA2
1- Serial port 5.
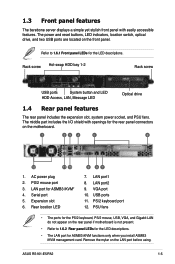
1.3 Front panel features
The barebone server displays a simple yet stylish front panel with openings for ...
Service Guide - Page 17

... present
No activity Read/write data into the HDD
The location switch and LED are for service purposes. ASUS RS161-E5/PA2
1-
When the system fails or is shut down, the server administrator can press either the front or the rear location switch to turn off) System is... switch is pressed (Press the location switch again to identify the location of the specific system in a rack cabinet.
Service Guide - Page 29

... holes. ASUS RS161-E5/PA2
2-11 Each side has three holes to the right, then pulling the tray lever outward. Use two screws on the tray, then secure it with four screws. To install a hot-swap SATA HDD: 1. The drive tray ejects slightly after you pull out the lever.
2.
2.4 Hard disk drives
The system supports two...
Service Guide - Page 31

... slot bay.
3.
Firmly hold the riser card bracket, then pull it up to install a PCI Express expansion cards. Install a PCI-E card to the riser card bracket
The barebone server comes with your vendor before the installation.
1. You need to remove the bracket if you want to detach it might cause the system malfunction.
ASUS RS161-E5/PA2
2-13
Service Guide - Page 33
... IDE Channel
15*
10
Secondary IDE Channel
*These IRQs are usually available for the expansion card. Refer to the card. Install the software drivers for ISA or PCI devices. ASUS RS161-E5/PA2
2-15 Assign an IRQ to the following tables.
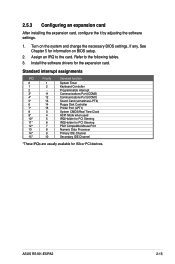
3. 2.5.3 Configuring an expansion card
After installing the expansion card, configure the it by adjusting the software settings.
1.
Service Guide - Page 35
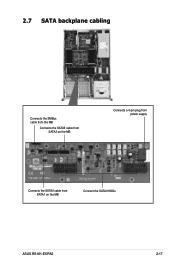
2.7 SATA backplane cabling
Connects the SMBus cable from the MB
Connects the SATAII cable from SATA2 on the MB
Connects a 4-pin plug from power supply
Connects the SATAII cable from SATA1 on the MB
Connect the SATAII HDDs
ASUS RS161-E5/PA2
2-17
Service Guide - Page 37
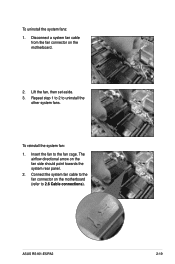
... fan cage. The
airflow directional arrow on the motherboard (refer to the fan connector on the fan side should point towards the system rear panel. 2. To uninstall the system fans: 1. Insert the fan to uninstall the
other system fans. ASUS RS161-E5/PA2
2-19 Lift the fan, then set aside. 3. Disconnect a system fan cable
from the...
Service Guide - Page 39
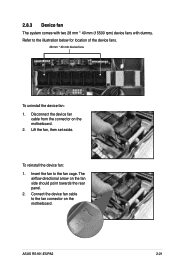
... with two 28 mm * 40 mm (15500 rpm) device fans with dummy. Disconnect the device fan
cable from the connector on the motherboard.
1 1
2
ASUS RS161-E5/PA2
2-21 Lift the fan, then set aside.
Insert the fan to the illustration below for location of the device fans.
28 mm * 40 mm device fans
To uninstall the...
Service Guide - Page 41
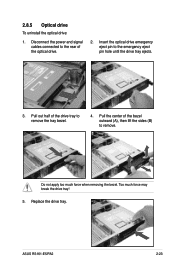
... hole until the drive tray ejects.
3.
2.8.5 Optical drive
To uninstall the optical drive:
1. Replace the drive tray. Disconnect the power and signal cables connected to remove. Insert the optical drive emergency eject pin to remove the tray bezel.
4. ASUS RS161-E5/PA2
2-23 Too much force when removing the bezel.
Do not apply too much...
Service Guide - Page 43

....
2. Uninstall all the pre-connected cables from the motherboard including the CPU and heatsink, riser card bracket, and DDR DIMMs. Refer to the chassis.
2.8.6 Motherboard
To uninstall the motherboard:
1. Carefully lift the motherboard out of the chassis as shown. ASUS RS161-E5/PA2
2-25 To reinstall the optical drive, follow the instructions in the previous chapter in a reverse order.
Service Guide - Page 45

Installation options
Chapter 3
This chapter describes how to install the optional components and devices into the barebone server.
ASUS RS161-E5/PA2
2-
Service Guide - Page 47

... front.
3. Align the front end holes of space (1U) on the outer holes to secure the front end.
1U space
5. Repeat steps 2 to 7 to the rack:
1. ASUS RS161-E5/PA2
3-
Find the rear 1U space that corresponds to the front 1U space where you wish to the 1U space.
4. Select one unit of a rack rail pair to install the barebone server.
2.
Service Guide - Page 49
Motherboard info
Chapter 4
This chapter includes the motherboard layout, and brief descriptions of the jumpers and internal connectors. ASUS RS161-E5/PA2
Asus RS161-E5 Reviews
We have not received any reviews for Asus yet.