Asus AP1600R-E2BA2 - AP - 1600R-E2 Support and Manuals
Get Help and Manuals for this Asus item
View All Support Options Below
Free Asus AP1600R-E2BA2 manuals!
Problems with Asus AP1600R-E2BA2?
Ask a Question
Free Asus AP1600R-E2BA2 manuals!
Problems with Asus AP1600R-E2BA2?
Ask a Question
Popular Asus AP1600R-E2BA2 Manual Pages
User Guide - Page 9

... user guide
This manual contains detailed information about the ASUS NCL-DS1R1 motherboard. 2 . W A R N I M P O R T A N T : Instructions that you MUST follow to complete a task. Conventions
To make sure that you perform certain tasks properly, take note of the following sources for additional information, and for all ASUS hardware and software products. ASUS websites The ASUS websites...
User Guide - Page 11
ASUS AP1600R-E2 (CS3)
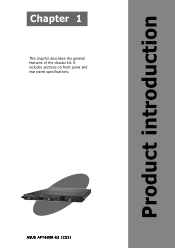
1-1 It includes sections on front panel and rear panel specifications.
Product introduction
Chapter 1
This chapter describes the general features of the chassis kit.
User Guide - Page 33
...
- PIRQB# -
-
-
-
-
PXH2_A_1 PXH2_A_1
PIRQB# -
-
- REQ1H
GNT1
PXH1_B_0 PXH1_B_1 PXH1_B_2 PXH1_B_3 PXH1_B_0 PXH1_B_0
ASUS AP1600R-E2 (CS3)
2-15 IRQ assignments for ISA or PCI devices. Install the software drivers for information on the system and change the necessary BIOS settings, if any. ICH5R USB UHCI contrl. #1 ICH5R USB UHCI contrl.#2 ICH5R USB 2.0 EHCI contrl...
User Guide - Page 41
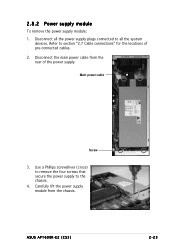
... rear of pre-connected cables.
2. Refer to section "2.7 Cable connections" for the locations of the power supply. Disconnect the main power cable from the chassis.
ASUS AP1600R-E2 (CS3)
2-23 Disconnect all the system
devices.
2.8.2 Power supply module
To remove the power supply module: 1.
User Guide - Page 43
Installation options
Chapter 3
This chapter describes how to install the optional components and devices into the barebone server.
ASUS AP1600R-E2 (CS3)
2-1
User Guide - Page 45
....
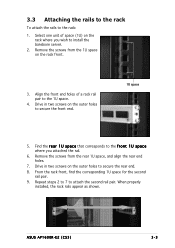
4. Align the front end holes of space (1U) on the outer holes to attach the second rail pair. ASUS AP1600R-E2 (CS3)
3-3 Repeat steps 2 to 7 to secure the front end.
1U space
5. Drive in two screws on the... rack
To attach the rails to secure the rear end.
8. When properly installed, the rack rails appear as shown.
Select one unit of a rack rail pair to the f r o n ...
User Guide - Page 57
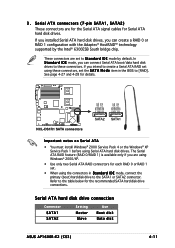
...ATA
• You must install Windows® 2000 Service Pack 4 or the Windows® XP Service Pack 1 before using these connectors. If you installed Serial ATA hard disk drives,...disk drives to these connectors, set using Serial ATA hard disk drives. Serial ATA hard disk drive connection
Connector
SATA1 SATA2
Setting
Master Slave
Use
Boot disk Data disk
ASUS AP1600R-E2 (CS3)
4-11
User Guide - Page 72
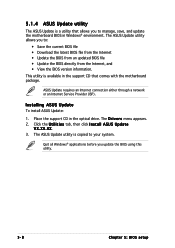
... version information. X X . Installing ASUS Update
To install ASUS Update:
1. 5.1.4 ASUS Update utility
The ASUS Update is a utility that comes with the motherboard package. The ASUS Update utility allows you to your system. Place the support CD in Windows® environment. X X. 3. ASUS Update requires an Internet connection either through a network or an Internet Service Provider (ISP...
User Guide - Page 75
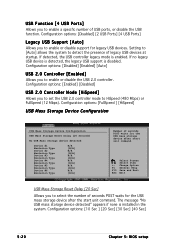
... so that you can enable the security password feature or change the configuration of the firmware hub. Even if you see on the system chassis. This requires you wish to enter Setup after changing any BIOS settings, load the default settings to configure your computer in section "5.1 Managing and updating your system, or prompted to run...
User Guide - Page 84
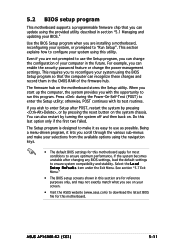
If no legacy USB device is detected, the legacy USB support is installed in the system. Configuration options: [FullSpeed ] [HiSpeed]
...Sec] [30 Sec] [40 Sec]
5-20
Chapter 5: BIOS setup Configuration options: [Enabled] [Disabled]
USB 2.0 Controller Mode [HiSpeed]
Allows you to set the USB 2.0 controller mode to enable a specific number of legacy USB devices at startup. The message "No USB...
User Guide - Page 86
... options: [Disabled] [Enabled]
5-22
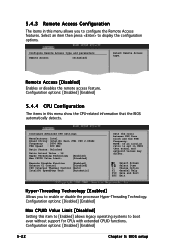
Chapter 5: BIOS setup Select an item then press to boot even without support for CPUs with extended CPUID functions. Configure Remote Access type... CPU Configuration
The items in CMOS then actual and setpoint values may differ. Configure Advanced CPU settings
Manufacturer: Intel Brand String: Intel(R) Xeon (TM) CPU 2.80GHz Frequency : 2800 MHz FSB...
User Guide - Page 92
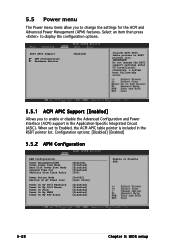
... in the Application-Specific Integrated Circuit (ASIC). 5.5 Power menu
The Power menu items allow you to enable or disable the Advanced Configuration and Power Interface (ACPI) support in the RSDT pointer list.
otherwise, a system boot failure may occur.
5.5.1 ACPI APIC Support [Enabled]
Allows you to change the APIC support settings after OS installation; Configuration options...
User Guide - Page 98
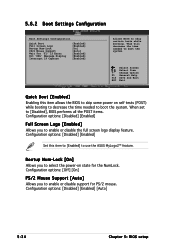
... use the ASUS MyLogo2™ feature. This will decrease the time needed to enable or disable support for the NumLock. When set to [Disabled], BIOS performs all the POST items. Configuration options: [Disabled] [Enabled]
Full Screen Logo [Enabled]
Allows you to boot the system. Configuration options: [Disabled] [Enabled] [Auto]
5-34
Chapter 5: BIOS setup
Bootup...
User Guide - Page 100
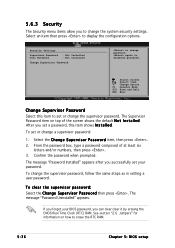
... l l e d. After you set a password, this item to change a supervisor password:
1.
To clear the supervisor password: Select the Change Supervisor Password then press .
Security Settings
Supervisor Password : Not Installed
User Password
: Not Installed
Change Supervisor Password
to erase the RTC RAM.
5-36
Chapter 5: BIOS setup Select the Change Supervisor Password item, then press...
User Guide - Page 101
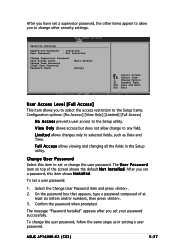
... viewing and changing all the fields in setting a user password. The U s e r P a s s w o r d item on top of at
least six letters and/or numbers, then press . 3. Select the Change User Password item and press . 2. ASUS AP1600R-E2 (CS3)
5-37
L i m i t e d allows changes only to selected fields, such as in the Setup utility.
After you have set a supervisor password, the other security...
Asus AP1600R-E2BA2 Reviews
We have not received any reviews for Asus yet.