A7V600 User Manual
Page 6
If you add a device. • Before connecting or removing signal cables from the motherboard, ensure that all power cables are using, contact your local power company. • If the power supply is set to or from the system, ensure ... of the electrical outlet you encounter technical problems with the package. • Before using an adpater or extension cord. Operation safety • Before installing the motherboard and adding devices on a stable surface. • If you are unplugged. • Seek professional assistance before using the product, make sure all the...
If you add a device. • Before connecting or removing signal cables from the motherboard, ensure that all power cables are using, contact your local power company. • If the power supply is set to or from the system, ensure ... of the electrical outlet you encounter technical problems with the package. • Before using an adpater or extension cord. Operation safety • Before installing the motherboard and adding devices on a stable surface. • If you are unplugged. • Seek professional assistance before using the product, make sure all the...
A7V600 User Manual
Page 36
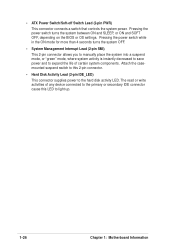
... mode for more than 4 seconds turns the system OFF. • System Management Interrupt Lead (2-pin SMI) This 2-pin connector allows you to manually place the system into a suspend mode, or "green" mode, where system activity is instantly decreased to save power and to expand the life ... connector cause this 2-pin connector. • Hard Disk Activity Lead (2-pin IDE_LED) This connector supplies power to light up. 1-26 Chapter 1: Motherboard Information Attach the casemounted suspend switch to this LED to the hard disk activity LED. • ATX Power Switch/Soft-off Switch Lead (2-pin ...
... mode for more than 4 seconds turns the system OFF. • System Management Interrupt Lead (2-pin SMI) This 2-pin connector allows you to manually place the system into a suspend mode, or "green" mode, where system activity is instantly decreased to save power and to expand the life ... connector cause this 2-pin connector. • Hard Disk Activity Lead (2-pin IDE_LED) This connector supplies power to light up. 1-26 Chapter 1: Motherboard Information Attach the casemounted suspend switch to this LED to the hard disk activity LED. • ATX Power Switch/Soft-off Switch Lead (2-pin ...
A7V600 User Manual
Page 49
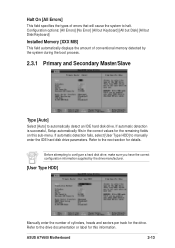
... drive. If automatic detection is successful, Setup automatically fills in the correct values for this sub-menu. Refer to the next section for the drive. ASUS A7V600 Motherboard 2-13 If automatic detection fails, select [User Type HDD] to halt. Refer to the drive documentation or label for the remaining fields on this information...] [All but Disk/Keyboard] Installed Memory [XXX MB] This field automatically displays the amount of conventional memory detected by the drive manufacturer. [User Type HDD] Manually enter the number of errors that will cause the system to...
... drive. If automatic detection is successful, Setup automatically fills in the correct values for this sub-menu. Refer to the next section for the drive. ASUS A7V600 Motherboard 2-13 If automatic detection fails, select [User Type HDD] to halt. Refer to the drive documentation or label for the remaining fields on this information...] [All but Disk/Keyboard] Installed Memory [XXX MB] This field automatically displays the amount of conventional memory detected by the drive manufacturer. [User Type HDD] Manually enter the number of errors that will cause the system to...
A7V600 User Manual
Page 51
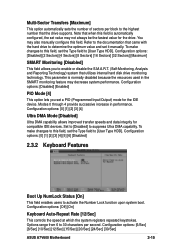
... 4 provide successive increase in the SMART monitoring feature may decrease system performance. This parameter is automatically configured, the set value may also manually configure this field, set a PIO (Programmed Input/Output) mode for the IDE device. Set to [Disabled] to activate the Number ... capability. Configuration options: [6/Sec] [8/Sec] [10/Sec] [12/Sec] [15/Sec] [20/Sec] [24/Sec] [30/Sec] ASUS A7V600 Motherboard 2-15 You may not always be the fastest value for compatible IDE devices. Multi-Sector Transfers [Maximum] This option automatically sets the number of sectors...
... 4 provide successive increase in the SMART monitoring feature may decrease system performance. This parameter is automatically configured, the set value may also manually configure this field, set a PIO (Programmed Input/Output) mode for the IDE device. Set to [Disabled] to activate the Number ... capability. Configuration options: [6/Sec] [8/Sec] [10/Sec] [12/Sec] [15/Sec] [20/Sec] [24/Sec] [30/Sec] ASUS A7V600 Motherboard 2-15 You may not always be the fastest value for compatible IDE devices. Multi-Sector Transfers [Maximum] This option automatically sets the number of sectors...
A7V600 User Manual
Page 55
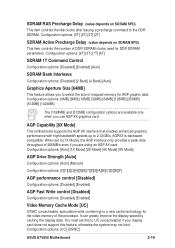
...(uncacheable) if your display card does not support this feature, otherwise the system may not boot. Configuration options: [UC] [USWC] ASUS A7V600 Motherboard 2-19 Configuration options: [4MB] [8MB] [16MB] [32MB] [64MB] [128MB] [256MB] [512MB] [1024MB] The [1024MB...options: [Auto] [1X Mode] [2X Mode] [4X Mode] [8X Mode] AGP Drive Strength [Auto] Configuration options: [Auto] [Manual] Configuration options: [0][1][2][3][4][5][6][7][8][9][A][B][C][D][E][F] AGP performance control [Disabled] Configuration options: [Disabled] [Enabled] AGP Fast Write control [Disabled] Configuration options: [...
...(uncacheable) if your display card does not support this feature, otherwise the system may not boot. Configuration options: [UC] [USWC] ASUS A7V600 Motherboard 2-19 Configuration options: [4MB] [8MB] [16MB] [32MB] [64MB] [128MB] [256MB] [512MB] [1024MB] The [1024MB...options: [Auto] [1X Mode] [2X Mode] [4X Mode] [8X Mode] AGP Drive Strength [Auto] Configuration options: [Auto] [Manual] Configuration options: [0][1][2][3][4][5][6][7][8][9][A][B][C][D][E][F] AGP performance control [Disabled] Configuration options: [Disabled] [Enabled] AGP Fast Write control [Disabled] Configuration options: [...
A7V600 User Manual
Page 77
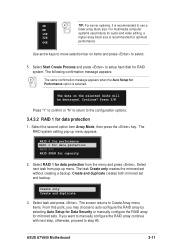
...the RAID array by selecting Auto Setup for Data Security or manually configure the RAID array for data protection 1. Select Start Create Process and press to the configuration options. 3.4.3.2 RAID 1 for mirrored sets. Create only Create and duplicate 3. ASUS A7V600 Motherboard 3-11 The data on items and press to select. ... array block size is recommended to step #5. The screen returns to Create Array menu items. From this point, you want to manually configure the RAID array continue with next step, otherwise, proceed to use a 8K lower array block size.
...the RAID array by selecting Auto Setup for Data Security or manually configure the RAID array for data protection 1. Select Start Create Process and press to the configuration options. 3.4.3.2 RAID 1 for mirrored sets. Create only Create and duplicate 3. ASUS A7V600 Motherboard 3-11 The data on items and press to select. ... array block size is recommended to step #5. The screen returns to Create Array menu items. From this point, you want to manually configure the RAID array continue with next step, otherwise, proceed to use a 8K lower array block size.


