User manual for A7S8X-MX
Page 4
... a bootable floppy disk 2-2 2.1.2 AwardBIOS Flash Utility 2-3 2.1.3 ASUS EZ Flash utility 2-5 2.1.4 ASUS CrashFree BIOS utility 2-6 2.1.5 ASUS Update utility 2-7 2.2 BIOS Setup program 2-10 2.2.1 BIOS menu bar 2-11 2.2.2 Legend bar 2-11 2.3 Main Menu 2-13 2.3.1 System Time 2-13 2.3.2 System Date 2-13 2.3.3 Legacy Diskette A 2-13 2.3.4 HDD SMART Monitoring 2-13 2.3.5 Installed Memory 2-13 2.3.6 ...
... a bootable floppy disk 2-2 2.1.2 AwardBIOS Flash Utility 2-3 2.1.3 ASUS EZ Flash utility 2-5 2.1.4 ASUS CrashFree BIOS utility 2-6 2.1.5 ASUS Update utility 2-7 2.2 BIOS Setup program 2-10 2.2.1 BIOS menu bar 2-11 2.2.2 Legend bar 2-11 2.3 Main Menu 2-13 2.3.1 System Time 2-13 2.3.2 System Date 2-13 2.3.3 Legacy Diskette A 2-13 2.3.4 HDD SMART Monitoring 2-13 2.3.5 Installed Memory 2-13 2.3.6 ...
User manual for A7S8X-MX
Page 8
... and configuring the motherboard. viii It includes description of the support CD that may have to change system settings through the BIOS Setup menus. Refer to the following parts: • Chapter 1: Product introduction This chapter describes the features of the standard...product and software updates. 1. Detailed descriptions of the BIOS parameters are not part of the motherboard and the new technology it supports. ASUS websites The ASUS website provides updated information on the motherboard. • Chapter 2: BIOS setup This chapter tells how to perform when installing...
... and configuring the motherboard. viii It includes description of the support CD that may have to change system settings through the BIOS Setup menus. Refer to the following parts: • Chapter 1: Product introduction This chapter describes the features of the standard...product and software updates. 1. Detailed descriptions of the BIOS parameters are not part of the motherboard and the new technology it supports. ASUS websites The ASUS website provides updated information on the motherboard. • Chapter 2: BIOS setup This chapter tells how to perform when installing...
User manual for A7S8X-MX
Page 10
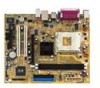
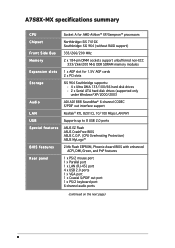
A7S8X-MX specifications summary CPU Chipset Front Side Bus Memory Expansion slots Storage Audio LAN USB Special features BIOS features Rear panel Socket A for AMD Athlon™ XP/Sempron™ processors Northbridge: SiS 741GX Southbridge: SiS 964 (without RAID ...CODEC S/PDIF out interface support Realtek® RTL 8201CL 10/100 Mbps LAN PHY Supports up to 8 USB 2.0 ports ASUS EZ Flash ASUS CrashFree BIOS ASUS C.O.P. (CPU Overheating Protection) ASUS MyLogo™ 2 Mb Flash EEPROM, Phoenix-Award BIOS with enhanced ACPI, DMI, Green, and PnP features 1 x PS/2 mouse port 1 x Parallel port 1 x ...
A7S8X-MX specifications summary CPU Chipset Front Side Bus Memory Expansion slots Storage Audio LAN USB Special features BIOS features Rear panel Socket A for AMD Athlon™ XP/Sempron™ processors Northbridge: SiS 741GX Southbridge: SiS 964 (without RAID ...CODEC S/PDIF out interface support Realtek® RTL 8201CL 10/100 Mbps LAN PHY Supports up to 8 USB 2.0 ports ASUS EZ Flash ASUS CrashFree BIOS ASUS C.O.P. (CPU Overheating Protection) ASUS MyLogo™ 2 Mb Flash EEPROM, Phoenix-Award BIOS with enhanced ACPI, DMI, Green, and PnP features 1 x PS/2 mouse port 1 x Parallel port 1 x ...
User manual for A7S8X-MX
Page 16
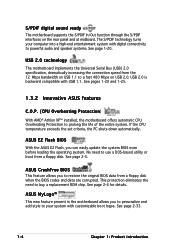
...you to personalize and add style to your computer into a high-end entertainment system with customizable boot logos. ASUS CrashFree BIOS This feature allows you can easily update the system BIOS even before loading the operating system. USB 2.0 technology The motherboard implements the Universal Serial Bus (USB) 2.0...20. See page 2-5. No need to use a DOS-based utility or boot from a floppy disk when the BIOS codes and data are corrupted. ASUS EZ Flash BIOS With the ASUS EZ Flash, you to a fast 480 Mbps on the rear panel and at midboard. This protection eliminates the need...
...you to personalize and add style to your computer into a high-end entertainment system with customizable boot logos. ASUS CrashFree BIOS This feature allows you can easily update the system BIOS even before loading the operating system. USB 2.0 technology The motherboard implements the Universal Serial Bus (USB) 2.0...20. See page 2-5. No need to use a DOS-based utility or boot from a floppy disk when the BIOS codes and data are corrupted. ASUS EZ Flash BIOS With the ASUS EZ Flash, you to a fast 480 Mbps on the rear panel and at midboard. This protection eliminates the need...
User manual for A7S8X-MX
Page 25
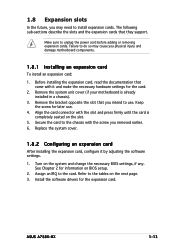
... the system unit cover (if your motherboard is completely seated on the system and change the necessary BIOS settings, if any. Keep the screw for the expansion card. ASUS A7S8X-MX 1-13 The following sub-sections describe the slots and the expansion cards that you intend to install expansion...IRQ to unplug the power cord before adding or removing expansion cards. Turn on the slot. 5. Secure the card to the tables on BIOS setup. 2. 1.8 Expansion slots In the future, you may cause you physical injury and damage motherboard components. 1.8.1 Installing an expansion card ...
... the system unit cover (if your motherboard is completely seated on the system and change the necessary BIOS settings, if any. Keep the screw for the expansion card. ASUS A7S8X-MX 1-13 The following sub-sections describe the slots and the expansion cards that you intend to install expansion...IRQ to unplug the power cord before adding or removing expansion cards. Turn on the slot. 5. Secure the card to the tables on BIOS setup. 2. 1.8 Expansion slots In the future, you may cause you physical injury and damage motherboard components. 1.8.1 Installing an expansion card ...
User manual for A7S8X-MX
Page 28
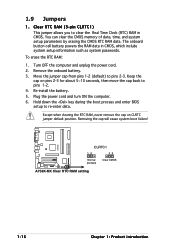
... failure! Hold down the key during the boot process and enter BIOS setup to clear the Real Time Clock (RTC) RAM in CMOS, which include system setup information such as system passwords. A7S8X-MX CLRTC1 12 23 ® Normal Clear CMOS (Default) A7S8X-MX Clear RTC RAM setting 1-16 Chapter 1: Product introduction Except when clearing...
... failure! Hold down the key during the boot process and enter BIOS setup to clear the Real Time Clock (RTC) RAM in CMOS, which include system setup information such as system passwords. A7S8X-MX CLRTC1 12 23 ® Normal Clear CMOS (Default) A7S8X-MX Clear RTC RAM setting 1-16 Chapter 1: Product introduction Except when clearing...

User manual for A7S8X-MX
Page 30
Refer to set the CPU Front Side Bus (FSB) frequency. 3 . External frequency selection (3-pin FSB_SEL1, FSB_SEL0) These jumpers allow you load the BIOS setup default after changing the external frequency selection. Refer to the jumper settings below. 1 FSB_SEL1 FSB_SEL0 100MHZ A7S8X-MX 1 FSB_SEL1 FSB_SEL0 133MHZ 1 ® FSB_SEL1 FSB_SEL0 A7S8X-MX External frequency selection 166MHZ (Default) Make sure you to page 2-36. 1-18 Chapter 1: Product introduction
Refer to set the CPU Front Side Bus (FSB) frequency. 3 . External frequency selection (3-pin FSB_SEL1, FSB_SEL0) These jumpers allow you load the BIOS setup default after changing the external frequency selection. Refer to the jumper settings below. 1 FSB_SEL1 FSB_SEL0 100MHZ A7S8X-MX 1 FSB_SEL1 FSB_SEL0 133MHZ 1 ® FSB_SEL1 FSB_SEL0 A7S8X-MX External frequency selection 166MHZ (Default) Make sure you to page 2-36. 1-18 Chapter 1: Product introduction

User manual for A7S8X-MX
Page 41
ASUS A7S8X-MX 1-29 Connect the chassis power LED cable to this connector. PLED PWRBTN PLED+ PLEDPWR GND A7S8X-MX PANEL HDLED+ HDLED- The system power LED lights up or flashes when data is read from or written to the connector description below for details. &#... is for the system power LED. Connect the HDD Activity LED cable to this connector. The IDE LED lights up when you turn on the BIOS settings. System panel connector (10-1 pin PANEL) This connector supports several chassis-mounted functions. Pressing the power button turns the system ON or puts the...
ASUS A7S8X-MX 1-29 Connect the chassis power LED cable to this connector. PLED PWRBTN PLED+ PLEDPWR GND A7S8X-MX PANEL HDLED+ HDLED- The system power LED lights up or flashes when data is read from or written to the connector description below for details. &#... is for the system power LED. Connect the HDD Activity LED cable to this connector. The IDE LED lights up when you turn on the BIOS settings. System panel connector (10-1 pin PANEL) This connector supports several chassis-mounted functions. Pressing the power button turns the system ON or puts the...
User manual for A7S8X-MX
Page 43
Detailed descriptions of the BIOS parameters are also provided. 2 BIOS setup ASUS A7S8X-MX 2-1 This chapter tells how to change the system settings through the BIOS Setup menus.
Detailed descriptions of the BIOS parameters are also provided. 2 BIOS setup ASUS A7S8X-MX 2-1 This chapter tells how to change the system settings through the BIOS Setup menus.

User manual for A7S8X-MX
Page 44
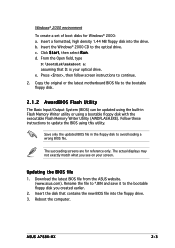
... S t a r t from the format options field, then click S t a r t. 2-2 Chapter 2: BIOS setup Windows® XP environment a. Select the 3 1/2 Floppy Drive icon. A w a r d B I O S U t i l i t y (Updates the BIOS using the ASUS Update or AFLASH utilities. • Visit the ASUS website and download the latest BIOS file for details on these utilities. A S U S C r a s h F r e e B I O S F l a s h U t i l i t y (Updates the BIOS using a floppy disk during POST.) 2. Click F i l e from the...
... S t a r t from the format options field, then click S t a r t. 2-2 Chapter 2: BIOS setup Windows® XP environment a. Select the 3 1/2 Floppy Drive icon. A w a r d B I O S U t i l i t y (Updates the BIOS using the ASUS Update or AFLASH utilities. • Visit the ASUS website and download the latest BIOS file for details on these utilities. A S U S C r a s h F r e e B I O S F l a s h U t i l i t y (Updates the BIOS using a floppy disk during POST.) 2. Click F i l e from the...
User manual for A7S8X-MX
Page 45
... Flash Memory Writer utility or using this utility. Reboot the computer. From the Open field, type D:\bootdisk\makeboot a: assuming that contains the new BIOS file into the drive. ASUS A7S8X-MX 2-3 c. The succeeding screens are for Windows® 2000: a. Windows® 2000 environment To create a set of boot disks for reference only. e. Insert the...
... Flash Memory Writer utility or using this utility. Reboot the computer. From the Open field, type D:\bootdisk\makeboot a: assuming that contains the new BIOS file into the drive. ASUS A7S8X-MX 2-3 c. The succeeding screens are for Windows® 2000: a. Windows® 2000 environment To create a set of boot disks for reference only. e. Insert the...
User manual for A7S8X-MX
Page 46
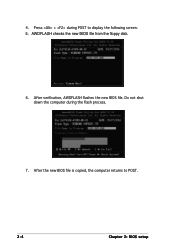
Press + during the flash process. 7. After the new BIOS file is copied, the computer returns to display the following screen. 5. AWDFLASH checks the new BIOS file from the floppy disk. 6. Do not shut down the computer during POST to POST. 2-4 Chapter 2: BIOS setup After verification, AWDFLASH flashes the new BIOS file. 4.
Press + during the flash process. 7. After the new BIOS file is copied, the computer returns to display the following screen. 5. AWDFLASH checks the new BIOS file from the floppy disk. 6. Do not shut down the computer during POST to POST. 2-4 Chapter 2: BIOS setup After verification, AWDFLASH flashes the new BIOS file. 4.
User manual for A7S8X-MX
Page 47
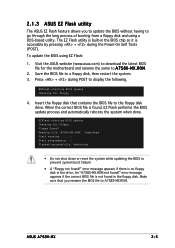
...disk that you to update the BIOS without having to go through the long process of booting from a floppy disk and using EZ Flash: 1. ASUS A7S8X-MX 2-5 error message appears if the correct BIOS file is found, EZ Flash performs the BIOS update process and automatically reboots the ...system when done. To update the BIOS using a DOS-based utility. EZFlash starting BIOS update Checking for the motherboard and...
...disk that you to update the BIOS without having to go through the long process of booting from a floppy disk and using EZ Flash: 1. ASUS A7S8X-MX 2-5 error message appears if the correct BIOS file is found, EZ Flash performs the BIOS update process and automatically reboots the ...system when done. To update the BIOS using a DOS-based utility. EZFlash starting BIOS update Checking for the motherboard and...
User manual for A7S8X-MX
Page 48
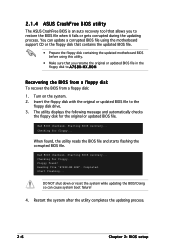
...BIOS file to A 7 S 8 X - Bad BIOS checksum. Completed. Starting BIOS recovery... Starting BIOS recovery... Reading file "A7S8X-MX.ROM". Checking for the original or updated BIOS file. Doing so can update a corrupted BIOS file using the motherboard support CD or the floppy disk that contains the updated BIOS ... you rename the original or updated BIOS file in the floppy disk to the floppy disk drive. 3. R O M. When found ! 2.1.4 ASUS CrashFree BIOS utility The ASUS CrashFree BIOS is an auto recovery tool that you to restore the BIOS file when it fails or gets...
...BIOS file to A 7 S 8 X - Bad BIOS checksum. Completed. Starting BIOS recovery... Starting BIOS recovery... Reading file "A7S8X-MX.ROM". Checking for the original or updated BIOS file. Doing so can update a corrupted BIOS file using the motherboard support CD or the floppy disk that contains the updated BIOS ... you rename the original or updated BIOS file in the floppy disk to the floppy disk drive. 3. R O M. When found ! 2.1.4 ASUS CrashFree BIOS utility The ASUS CrashFree BIOS is an auto recovery tool that you to restore the BIOS file when it fails or gets...
User manual for A7S8X-MX
Page 49
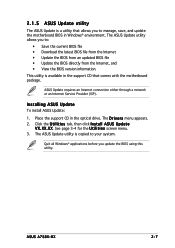
... support CD in Windows® environment. See page 3-4 for the U t i l i t i e s screen menu. 3. X X. Installing ASUS Update To install ASUS Update: 1. X X . Quit all Windows® applications before you to manage, save, and update the motherboard BIOS in the optical drive. 2.1.5 ASUS Update utility The ASUS Update is a utility that comes with the motherboard package. The D r i v e r s menu appears. 2. ASUS A7S8X-MX 2-7
... support CD in Windows® environment. See page 3-4 for the U t i l i t i e s screen menu. 3. X X. Installing ASUS Update To install ASUS Update: 1. X X . Quit all Windows® applications before you to manage, save, and update the motherboard BIOS in the optical drive. 2.1.5 ASUS Update utility The ASUS Update is a utility that comes with the motherboard package. The D r i v e r s menu appears. 2. ASUS A7S8X-MX 2-7
User manual for A7S8X-MX
Page 50
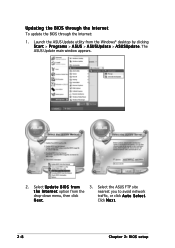
Updating the BIOS through the Internet To update the BIOS through the Internet: 1. Select the ASUS FTP site t h e I O S f r o m 3. Launch the ASUS Update utility from the nearest you to avoid network drop-down menu, then click traffic, or click A u t o S e l e c t. The ASUS Update main window appears. 2. Select U p d a t e B I n t e r n e t option from the Windows® desktop by clicking S t a r t > P r o g r a m s > A S U S > A S U S U p d a t e > A S U S U p d a t e. Click N e x t. 2-8 Chapter 2: BIOS setup N e x t.
Updating the BIOS through the Internet To update the BIOS through the Internet: 1. Select the ASUS FTP site t h e I O S f r o m 3. Launch the ASUS Update utility from the nearest you to avoid network drop-down menu, then click traffic, or click A u t o S e l e c t. The ASUS Update main window appears. 2. Select U p d a t e B I n t e r n e t option from the Windows® desktop by clicking S t a r t > P r o g r a m s > A S U S > A S U S U p d a t e > A S U S U p d a t e. Click N e x t. 2-8 Chapter 2: BIOS setup N e x t.
User manual for A7S8X-MX
Page 51
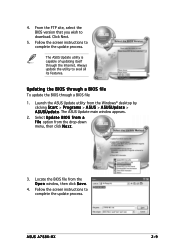
...-down menu, then click N e x t. 3. The ASUS Update utility is capable of updating itself through a BIOS file: 1. From the FTP site, select the BIOS version that you wish to avail all its features. Updating the BIOS through a BIOS file To update the BIOS through the Internet. The ASUS Update main window appears. 2. ASUS A7S8X-MX 2-9 Always update the utility to download...
...-down menu, then click N e x t. 3. The ASUS Update utility is capable of updating itself through a BIOS file: 1. From the FTP site, select the BIOS version that you wish to avail all its features. Updating the BIOS through a BIOS file To update the BIOS through the Internet. The ASUS Update main window appears. 2. ASUS A7S8X-MX 2-9 Always update the utility to download...
User manual for A7S8X-MX
Page 52
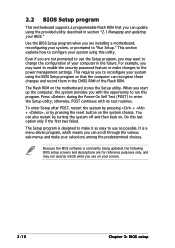
...easy to use the Setup program, you can update using the provided utility described in section "2.1 Managing and updating your system using the BIOS Setup program so that you may want to enable the security password feature or make your computer in the CMOS RAM of your selections among...This section explains how to run this last option only if the first two failed. otherwise, POST continues with the opportunity to configure your BIOS." This requires you to enter the Setup utility; You can also restart by pressing the reset button on the motherboard stores the Setup utility...
...easy to use the Setup program, you can update using the provided utility described in section "2.1 Managing and updating your system using the BIOS Setup program so that you may want to enable the security password feature or make your computer in the CMOS RAM of your selections among...This section explains how to run this last option only if the first two failed. otherwise, POST continues with the opportunity to configure your BIOS." This requires you to enter the Setup utility; You can also restart by pressing the reset button on the motherboard stores the Setup utility...
User manual for A7S8X-MX
Page 53
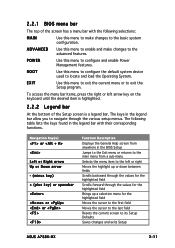
... cursor to the first field Moves the cursor to the last field Resets the current screen to its Setup Defaults Saves changes and exits Setup ASUS A7S8X-MX 2-11 POWER Use this menu to exit the current menu or to exit the Setup program. The following selections: MAIN Use this menu to make... Right arrow Up or Down arrow - (minus key) + (plus key) or spacebar or or Function Description Displays the General Help screen from anywhere in the BIOS Setup Jumps to the Exit menu or returns to the main menu from a sub-menu Selects the menu item to the left arrow key on...
... cursor to the first field Moves the cursor to the last field Resets the current screen to its Setup Defaults Saves changes and exits Setup ASUS A7S8X-MX 2-11 POWER Use this menu to exit the current menu or to exit the Setup program. The following selections: MAIN Use this menu to make... Right arrow Up or Down arrow - (minus key) + (plus key) or spacebar or or Function Description Displays the General Help screen from anywhere in the BIOS Setup Jumps to the Exit menu or returns to the main menu from a sub-menu Selects the menu item to the left arrow key on...
User manual for A7S8X-MX
Page 54
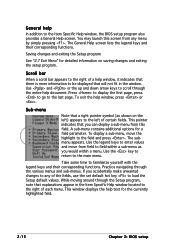
...appear in the window. General help In addition to the main menu. Use the key to return to the Item Specific Help window, the BIOS setup program also provides a General Help screen. If you accidentally make unwanted changes to any menu by simply pressing . Scroll bar When a... to the last page. Practice navigating through the entire help document. To exit the help text for the currently highlighted field. 2-12 Chapter 2: BIOS setup To display a sub-menu, move from any of certain fields. You may launch this field. This window displays the help window, press or...
...appear in the window. General help In addition to the main menu. Use the key to return to the Item Specific Help window, the BIOS setup program also provides a General Help screen. If you accidentally make unwanted changes to any menu by simply pressing . Scroll bar When a... to the last page. Practice navigating through the entire help document. To exit the help text for the currently highlighted field. 2-12 Chapter 2: BIOS setup To display a sub-menu, move from any of certain fields. You may launch this field. This window displays the help window, press or...


